RoadTest: BeagleBone AI
Author: fyaocn
Creation date:
Evaluation Type: Development Boards & Tools
Did you receive all parts the manufacturer stated would be included in the package?: True
What other parts do you consider comparable to this product?: None up to now.
What were the biggest problems encountered?: Heating Issue, explained in blog https://www.element14.com/community/people/fyaocn/blog/2019/10/11/first-of-all-tame-the-roaming-beast-bbb-ai
Detailed Review:
Brief
At least, in my viewpoint, BeagleBone AI is the first development board to be serious about deep learning. Reason is simple, IF the DL Engine return the CNN classification index in serveral seconds, that is good enough, most of others can not, the DevBoard can be classificated as toy. According to Examples — TIDL API User's Guide , you can get about 10 FPS (minimum process time of 814 ms per frame). It worth a try if you are serious about Embedded Deep Learning, after you understand First of All, Tame the roaming beast, BBB AI. . That is the only compromise shall know first before you start.
Nothing special if you happen to get one BeagleBone AI, especially you have other Beagle Board like BeagleBoen Green, BeagleBone Black before. But this time it is different.
You have got one complete DevEcosystem as a whole, hardware with GPIO drive capability, costumized communication protocl defination, self-sufficient online server, DeepLearning multi-Core Hardware plus TI Deeplearning Lib, That is One Out-Of-Box total sulution.
In my project AI_Lock - DIY with BeagleBone AI in four hours , I try to demostrate capability of BeagleBone AI as many as I have explored in one project as simple as possible. You can extend with your imagination, simple replace the model part as https://github.com/BVLC/caffe/wiki/Model-Zoo , if you want play with deepfake, that would be OK too. If you are not satisfied with the performance and want to include some data, eg. you want to include more people into your database for face recongnization, you can train the model with your customized data like https://github.com/tidsp/caffe-jacinto, but you can not play with BeagleBone AI this time, you need other platform with GPUs running hours and hours.
In another pilot demo project, I have tried to put the Classification example work and give simple output signal to start one animation demo with another ARM-M0 core development board in freeRTOS arduino-code, you can use that arduino sketch code for fun. But that is what I normally do with Raspberry Pi, for BeagleBone AI, PRU is available.
Tediously stat paragraph this is, but takes hours and hours for me to explore and investige.
2.1 BeagleBone® A Iis based on the Texas Instruments AM5729, developers have access to the powerful SoC with the ease of BeagleBone® Black header and mechanical compatibility. BeagleBone® AI makes it easy to explore how artificial intelligence (AI) can be used in everyday life via the TI C66x digital-signal-processor (DSP) cores and embedded-vision-engine (EVE) cores supported through an optimized TIDL machine learning OpenCL API with pre-installed tools. Refer to https://beagleboard.org/ai for more resources.

AM572x Sitara™ processoris provided by dual-core Arm® Cortex®-A15 RISC CPUs with Arm® Neon™ extension, and two TI C66x VLIW floating-point DSP core, and Vision AccelerationPac (with 4x EVEs). The AM572x Sitara Processor Technical Reference Manual (Rev. L) is the must-to-read if want to fully utiiize the power of BeagleBone AI. One diagram can make it clear.

Another part is the Abosulute Maximum Ratings , since you shall understand GPIOs and other resouces.

2.2 Follow the Quick start guide, you shall know plug-and-play is all you can do. You have the hardware, Cloud9 IDE, and reference manuals. It is better if you type the command in bash first.
sudo update
sudo upgrade
If not, it is fine too. Everything goes well. It would be good practise you type "git pull " under '/var/lib/cloud9/', up-to-date demo codes shows up. The TIDL subdirectory shall be updated.

Do not forget TPS659037 Power Management IC (PMIC) for ARM Cortex A15 Processors | TI.com , the Power Management IC (PMIC) for ARM Cortex A15 Processors. The TPS659037 device is an integrated power-management IC (PMIC). The device provides seven configurable step-down converters with up to 6 A of output current for memory, processor core, input-output (I/O), or preregulation of LDOs. One of these configurable step-down converters can be combined with another 3-A regulator to allow up to 9 A of output current. All of the step-down converters can synchronize to an external clock source between 1.7 MHz and 2.7 MHz, or an internal fallback clock at 2.2 MHz. I run into overload issue while playing around the GPIO output, TPS659037 trip off the power and blackout the board immdiately. Plug again, everything is fine. That is one mistake everyone may face, but do not want to try second time anymore.
2.3 Debain 9.9 in https://beagleboard.org/latest-images is flashed into 16GB on-board eMMC flash . Not need for SD image. I have tried Amstong , yocto and TI-properity Linux IMG, this Debian version is the best. Stable, compatible, nearly no conflict or crash, in all This software Bundle is very CLEAN. I prefer to OS like CentOS in development, ubuntu updates too frequently I have to mend unexpectable bugs after upgrade.
That is to say, Debian is balance choice with version-stable and software update, you can always install packages tested in Ubuntu, which holds large numbers of contributors without any problems.
For example, MQTT service/broker can be be installed simply run
apt-get install mosquitto
no need build for source code for mosquitto , and the MQTT service is available right away, no need to revise mosquitto.conf.
2.4 Cloud9 IDE
You can use any code-editor you feel like, but the free-software Cloud9 is good for everyone.
You can change theme, select comiler, write makefile, etc. And that is out-of-box configuration, simply plug the power by connect USB-C cable with the desktop computer and type 192.168.7.2 in any brower, like Chrome. USB-Net works and brings into the cloud9 UI.
2.5 Others
Here is some useful links with everything you want to know.
Let's go to project build, here is my suggested development flow as I do in AI_Lock - DIY with BeagleBone AI in four hours .
3.1Come out an idea and decide what you want and what Deep Learning Model you choice. In this project ,I use example model of Classification. You can use similar CV model but more interesting ones like face recognization or emotion detection, or age prediction.
3.2 Choose Driven Port and Actutator to control. First select pins and configuration on P8 and P9.

It would be best to choice PRU, read or write register R30 and R31 on Master Clock sequece, as
volatile register unsigned int __R30;
volatile register unsigned int __R31;


uint32_t gpio = P8_26;
__R30 |= gpio; // Set the GPIO pin to 1
__delay_cycles(1000000000/5);    // Wait 1/2 second
__R30 &= ~gpio; // Clear the GPIO pin
__delay_cycles(1000000000/5);

There are limits, only 21 GPIO pin is configurated and available memory size of 12k. I blow-off the memory for PRU by squeeze too much codes.
And forget another wonderful choice SHARED_MEMORY.
3.3 Use shared memory
Select address directly from PRU program and Linux Application. Both runs together like one application. Research on memory-map is needed, but as to use, too simple .
In PRU part,
#define SHARED_RAM_ADDRESS 0x10000
unsigned int volatile __far * const SHARED_RAM = (unsigned int *) (SHARED_RAM_ADDRESS);
unsigned int value = 0;
/* Set the SHARED_RAM value to 0 */
value = *SHARED_RAM;
In Linux Part,
#define PRUSS_SHARED_RAM_OFFSET     0x10000
mem_dev = open("/dev/uio0", O_RDWR | O_SYNC);
volatile int *shared_dataram =(int*) mmap(NULL,
        16+PRUSS_SHARED_RAM_OFFSET, /* grab 16 bytes of shared dataram, must allocate with offset of 0 */
        PROT_READ | PROT_WRITE,
        MAP_SHARED,
        mem_dev,
        0
    );
    shared_dataram += (PRUSS_SHARED_RAM_OFFSET/4);
3.4 USE TIDL in Linux APPLICATION
Here is the diagram
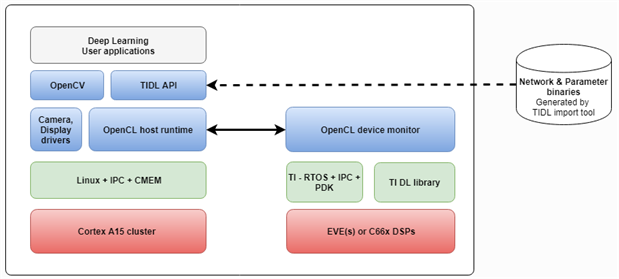
Even you are in blank and know little about TIDL or TICL, use of TIDL is simple,
First , create EOP and select DL engine with Vision Engine and DSP
uint32_t num_dsps = 2;
num_layers_groups))
return false;
Second, configurate the Deep Learning Parameters with two important files
configuration.paramsBinFile = "/usr/share/ti/examples/tidl/test/testvecs/config/tidl_models/tidl_param_jsegnet21v2.bin";
One is defination of CNN net imported from CAFFE net with TI tranfer tools. Another is paramter of net for Deep Learning on VE/DSP engine.
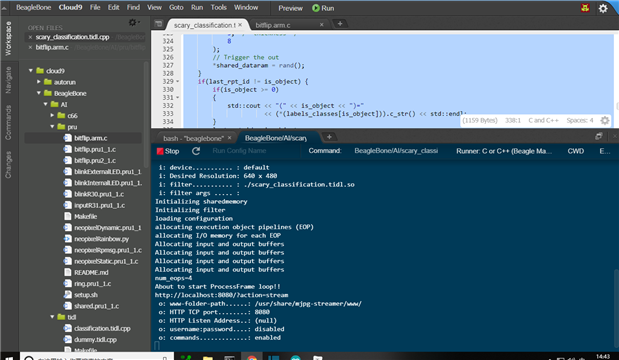
3.6 Code your program flow , then test and run with
sudo mjpg_streamer -i "input_opencv.so -r 640x480 --filter ./$(TARGET)$(EXE)" -o "output_http.so -p 8080 -w /usr/share/mjpg-streamer/www"
Your project runs as filter to opencv Streamer in there part, as bool filter_init(), filter_process(), filter_free() in the dummy file
return true;
}
void filter_process(void* filter_ctx, cv::Mat& src, cv::Mat& dst) {
dst = src;
return;
}
void filter_free(void* filter_ctx) {
return;
}
3.7 Put everything simple, you can use the Deep Learning Model as Black Box with two files as paramters. You just take care of input video stream and output driver.
Want some secret tricks, use PRU-ISS. Multicore operation is easy, use shared_memory.
3..8 Extended information on DL framework and network models
Here is the jdetnet export from TIDL viewer,

Jdetnet is lightweight with 18 layers. Now models with 64 layers or more are common, even 512 layers are not rare. So, BeagleBone AI knows the answer to framework selection, with recommondations.

Another lightweight DL framework is Tensorflow Lite. Tensorflow lite goes in different roadmap, it keep the complexity of network to be compatible with Tensorflow Complete Pack, and SQUEEZE the precision of NETWORK parameters. For tensorflow.js, it squeeze numbers from float into integer.
So, you shall have your balanced choice, performance or precision?
It is rash to jump to some comments with obvious preference. But I am just one normal user and want to share what I have thought with community members.
So, find what the BeagleBone AI is by yourself.
It is not a toy, it is a real AI things.
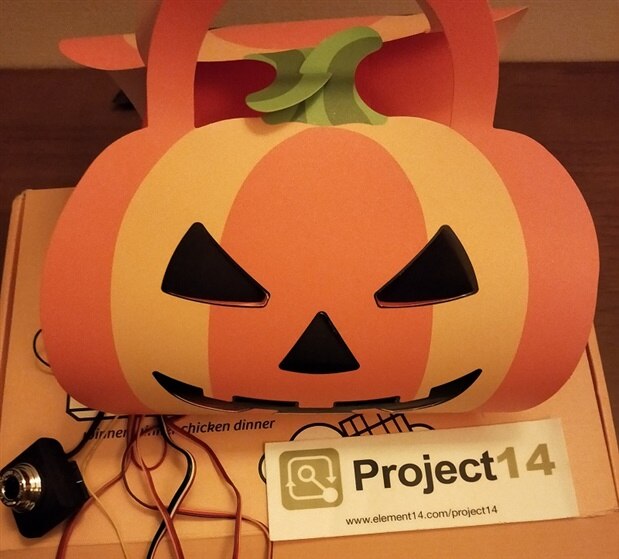
5.1 Using Computer Vision Deep Learning model, camera can detect your appearance and start rocking this scary pumpkin just before the SCARY DOOR.
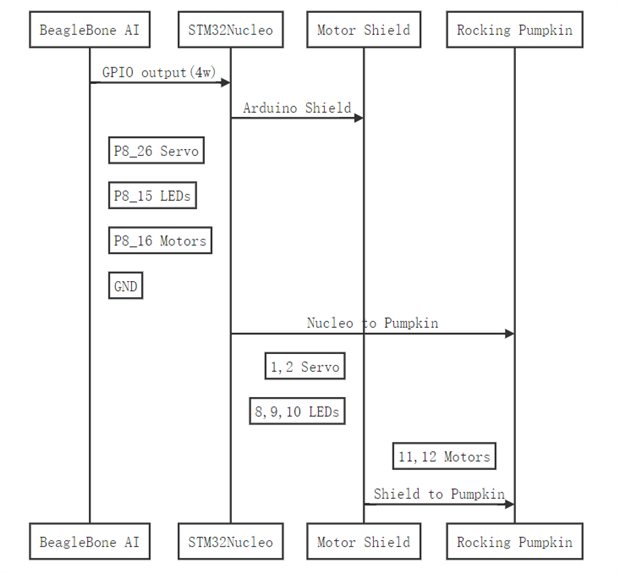
5.2 Code on PRU
#include <stdint.h>
#include <pru_cfg.h>
#include "resource_table_empty.h"
#include "prugpio.h"
#include<math.h>


#define SHARED_RAM_ADDRESS 0x10000
unsigned int volatile __far * const SHARED_RAM = (unsigned int *) (SHARED_RAM_ADDRESS);


volatile register unsigned int __R30;
volatile register unsigned int __R31;


void servo(uint32_t ouputpin, uint32_t servoangle );
void outputon(uint32_t ouputpin );


void main(void) {
uint32_t outputpin, servoangle;
unsigned int value = 0;
/* Set the SHARED_RAM value to 0 */
*SHARED_RAM = 0;
uint32_t gpio = P8_26 |  P8_16 | P8_15  ;
while(1) {
if(value != *SHARED_RAM) {
/* Flip every other bit and write the value back */
value = *SHARED_RAM;
//value ^= 0xAAAAAAAA;
//*SHARED_RAM = value;
// Turn servo pin
outputpin=P8_26;
servoangle=50;
servo(outputpin, servoangle);
// Put LEDs and Motor into On state;
outputpin=P8_16;
outputon(outputpin);
outputpin=P8_15;
outputon(outputpin);
}
__halt();
}
}


void outputon(uint32_t ouputpin ){
__R30 |= ouputpin; // Set the GPIO pin to 1
__delay_cycles(1000000000/5);    // Wait 1 second
__R30 &= ~ouputpin; // Clear the GPIO pin
//__delay_cycles(1000000000/5);
}


void servo(uint32_t ouputpin, uint32_t servoangle ){
servoangle=0;
int i,j,x,y;
// 1 second=10^9/5 & 1 degree angle=20000/5;
x=25+servoangle;
y=1000-x;
for(i=0; i<1000; i++) {
__R30 |= ouputpin; // Set the GPIO pin to 1
for(j=0; j<x; i++) {
__delay_cycles(20000/5);    // Wait 0.02ms second
};
__R30 &= ~ouputpin; // Clear the GPIO pin
for(j=0; j<y; i++) {
__delay_cycles(20000/5);
};
}
for(i=0; j<10; i++) {
__delay_cycles(2000000/5);    // Wait 2ms
};
return;
}
5.3 Main part of Code for CV_process, on ARM-A15 core
bool ProcessFrame(ExecutionObjectPipeline* eop, Mat &src)
{
    if(configuration.enableApiTrace)
        std::cout << "preprocess()" << std::endl;
    imgutil::PreprocessImage(src,
                             eop->GetInputBufferPtr(), configuration);
    eop->ProcessFrameStartAsync();

    return false;
}


void DisplayFrame(const ExecutionObjectPipeline* eop, Mat& dst)
{
    if(configuration.enableApiTrace)
        std::cout << "postprocess()" << std::endl;
    int is_object = tf_postprocess((uchar*) eop->GetOutputBufferPtr());
    if(is_object >= 0)
    {
        cv::putText(
            dst,
            (*(labels_classes[is_object])).c_str(),
            cv::Point(15, 60),
            cv::FONT_HERSHEY_SIMPLEX,
            1.5,
            cv::Scalar(0,255,0),
            3,  /* thickness */
            8
        );
        // Trigger the out
        *shared_dataram = "8";
    }
    if(last_rpt_id != is_object) {
        if(is_object >= 0)
        {
            std::cout << "(" << is_object << ")="
                      << (*(labels_classes[is_object])).c_str() << std::endl;
        }
        last_rpt_id = is_object;
    }
}
5.4 Sketch of Thread runs on STM32-nucleo
void setup() {
    // initialize serial communication at 9600 bits per second:
  Serial.begin(9600);
  while (!Serial) {  }
    // Pin Setting
  pinMode(buttonPin, INPUT);
  myservo.attach(9);  // attaches the servo on pin 9 to the servo object
  rockX.attach(11);
  rockY.attach(12);
  pinMode(LED1, OUTPUT);
  for(int i=3;i<9;i++)  pinMode(i,OUTPUT);
  //Tasks
  xTaskCreate(TaskSERVORUN,  (const portCHAR *)"SERVORUN" ,  128 ,  NULL ,  1 ,  NULL );
  xTaskCreate(TaskSERVORocking,  (const portCHAR *)"SERVORUN" ,  128 ,  NULL ,  1 ,  NULL );
  xTaskCreate(TaskBlinkLED1,  (const portCHAR *)"BlinkLED1" ,  128 ,  NULL ,  2 ,  NULL );
  xTaskCreate(TaskBlinkLED2,  (const portCHAR *)"BlinkLED2" ,  128 ,  NULL ,  2 ,  NULL );
  xTaskCreate(TaskBlinkLEDRGB,  (const portCHAR *)"BlinkLEDRGB" ,  128 ,  NULL ,  2 ,  NULL );
  vTaskStartScheduler();
  Serial.println("Insufficient RAM");
  //while(1);
}
5.5 Demo pics