element14 Community
element14 Community
    Register Log In
  • Site
  • Search
  • Log In Register
  • About Us
  • Community Hub
    Community Hub
    • What's New on element14
    • Feedback and Support
    • Benefits of Membership
    • Personal Blogs
    • Members Area
    • Achievement Levels
  • Learn
    Learn
    • Ask an Expert
    • eBooks
    • element14 presents
    • Learning Center
    • Tech Spotlight
    • STEM Academy
    • Webinars, Training and Events
    • Learning Groups
  • Technologies
    Technologies
    • 3D Printing
    • FPGA
    • Industrial Automation
    • Internet of Things
    • Power & Energy
    • Sensors
    • Technology Groups
  • Challenges & Projects
    Challenges & Projects
    • Design Challenges
    • element14 presents Projects
    • Project14
    • Arduino Projects
    • Raspberry Pi Projects
    • Project Groups
  • Products
    Products
    • Arduino
    • Avnet Boards Community
    • Dev Tools
    • Manufacturers
    • Multicomp Pro
    • Product Groups
    • Raspberry Pi
    • RoadTests & Reviews
  • Store
    Store
    • Visit Your Store
    • Choose another store...
      • Europe
      •  Austria (German)
      •  Belgium (Dutch, French)
      •  Bulgaria (Bulgarian)
      •  Czech Republic (Czech)
      •  Denmark (Danish)
      •  Estonia (Estonian)
      •  Finland (Finnish)
      •  France (French)
      •  Germany (German)
      •  Hungary (Hungarian)
      •  Ireland
      •  Israel
      •  Italy (Italian)
      •  Latvia (Latvian)
      •  
      •  Lithuania (Lithuanian)
      •  Netherlands (Dutch)
      •  Norway (Norwegian)
      •  Poland (Polish)
      •  Portugal (Portuguese)
      •  Romania (Romanian)
      •  Russia (Russian)
      •  Slovakia (Slovak)
      •  Slovenia (Slovenian)
      •  Spain (Spanish)
      •  Sweden (Swedish)
      •  Switzerland(German, French)
      •  Turkey (Turkish)
      •  United Kingdom
      • Asia Pacific
      •  Australia
      •  China
      •  Hong Kong
      •  India
      •  Korea (Korean)
      •  Malaysia
      •  New Zealand
      •  Philippines
      •  Singapore
      •  Taiwan
      •  Thailand (Thai)
      • Americas
      •  Brazil (Portuguese)
      •  Canada
      •  Mexico (Spanish)
      •  United States
      Can't find the country/region you're looking for? Visit our export site or find a local distributor.
  • Translate
  • Profile
  • Settings
3D Printing
  • Technologies
  • More
3D Printing
3D Printing Forum Getting into 3d Printing
  • Blog
  • Forum
  • Documents
  • Events
  • Polls
  • Files
  • Members
  • Mentions
  • Sub-Groups
  • Tags
  • More
  • Cancel
  • New
Join 3D Printing to participate - click to join for free!
Actions
  • Share
  • More
  • Cancel
Forum Thread Details
  • Replies 13 replies
  • Subscribers 332 subscribers
  • Views 1264 views
  • Users 0 members are here
  • 3d
  • pololu
  • printing
  • ramps
  • arduino
Related

Getting into 3d Printing

xarlyx
xarlyx over 11 years ago

Hi, I'm XarlyX from the Arduino forum.


i'm too jealous from all the people who have a 3d printer, because i can't stop imagining all the thing i could print. The reason i haven't got one: the price


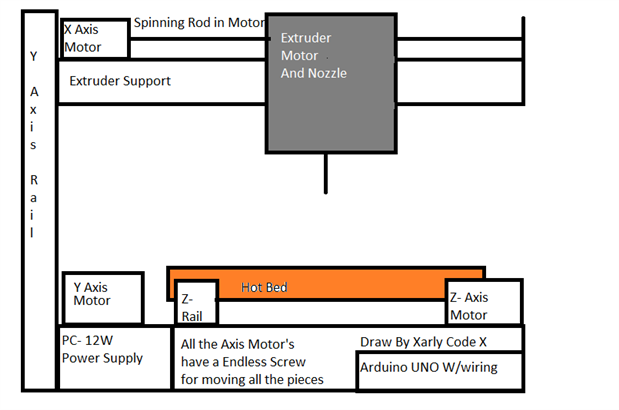
i have studied all the pieces that i need to build one.


I have an Arduino,

the RAMPS and POLOLU are cheap in my country

i can gather some stepper motors from my "old printers collection"

for the "chassis" i have great ideas,

The PSU, i think i could make one from a old PC power supply.


but... what about the "extruder" and hot end?


NO IDEA in how i could get access to one, here in Spain are too expensive like 60/70€ the "medium" quality extruder, that's in case i buy one from a spare part for any 3d printer.


My question is this:


How i could make a 3d printer from recycled printers and CD/DVD lectors units without spending more than 20/30€ or 50€ like so much.


Thanks, XarlyCodeX

  • Sign in to reply
  • Cancel
Parents
  • xarlyx
    xarlyx over 11 years ago

    Good morning mik_wind

    First of all, thanks for your response and for your great ideas.

    respecting to the reading your post i have to say just a thing, the DELTA printer is so expensive, only looking for all the joints and sliding points, i thought in a printer in where the X and Y axes are separated and only the Z axis is on the printer base, sliding the hot bed forward and backwards, while the Y axis just "pulls" the rails of the X axis using pulleys also using the simplest part of the recycled printer: the printer head's rack and pinion in where a motor is screwed on the base of the printer and on the top only a pulley for pull all the weight of the x axis,

    For the X axis i will use the SAME system rack and pinion, or using two motors spinning in the same direction all for reduce the wheight of the extruder.


    i have calculated all the costs and i only will have to pay between 25/50€ and that's just counting on the two printers used for pieces and materials.


    later i will upload an draw for what i want to do

    • Cancel
    • Vote Up 0 Vote Down
    • Sign in to reply
    • Cancel
  • xarlyx
    xarlyx over 11 years ago in reply to xarlyx

    Hi To Everyone,

    Here's an diagram for the design of my 3D printer, in this sketch we can see all the mechanical parts for moving the axes and extruder, like i said the Z- axis is mounted apart from the X and Y axes,

    I WILL NOT USE STEPPER MOTOR FOR MOVING THE EXTRUDER, i will use a system called, optoelectronic sensors, this system is formed by: A optoelectronic reader and an encoder strip, when the sensor moves it reads the strip and tells to the arduino and the software where the extruder is located in the axis, and i think using an H-Bridge will be like an stepper motor.


    image

    • Cancel
    • Vote Up 0 Vote Down
    • Sign in to reply
    • Cancel
  • Former Member
    Former Member over 11 years ago in reply to xarlyx

    @XarlyCodeX,


    Looks like you are making some excellent progress towards your 3D printer. I have seen several attempts to use rotary encoders and DC motors through an H-Bridge instead of steppers. If you can make it work, make sure to share your exploration, as that could be the key to bringing 3D printer costs under $200 USD!


    Keep up the great work!


    Kirk Hausman

    • Cancel
    • Vote Up 0 Vote Down
    • Sign in to reply
    • Cancel
  • xarlyx
    xarlyx over 11 years ago in reply to Former Member

    KKHausman,


    I have good news,

    Searching by Internet, i found that the "real name" of the optoelectronic sensor is Photo Interrupter, also i thought in the conveyor belt used in supermarkets; when a product reach the sensors, it cuts the communication between the emitter and the reciever, the conveyor stops, i think that i could use that idea for knowing HOW this photo interrupter WORKS, and when i get to the information i need, i will can start using the encoder strip for read the pits of it.


    Now i feel i'm closer to know the "secrets" of the hardcore electronics

    • Cancel
    • Vote Up 0 Vote Down
    • Sign in to reply
    • Cancel
Reply
  • xarlyx
    xarlyx over 11 years ago in reply to Former Member

    KKHausman,


    I have good news,

    Searching by Internet, i found that the "real name" of the optoelectronic sensor is Photo Interrupter, also i thought in the conveyor belt used in supermarkets; when a product reach the sensors, it cuts the communication between the emitter and the reciever, the conveyor stops, i think that i could use that idea for knowing HOW this photo interrupter WORKS, and when i get to the information i need, i will can start using the encoder strip for read the pits of it.


    Now i feel i'm closer to know the "secrets" of the hardcore electronics

    • Cancel
    • Vote Up 0 Vote Down
    • Sign in to reply
    • Cancel
Children
  • Former Member
    Former Member over 11 years ago in reply to xarlyx

    Very good new, Xarly Code X, the captive photo interrupter is a good design and very robust whenever you have a path that allows interruption along the axis of movement you want to test.

    image

    The emitter (E) transmits an optical signal to the sensor (S), which is latched as a digital 1 until interrupted, when it falls to a 0 state. We commonly use designs like this for pinewood derby car races and other actions that have an ad-hoc measure threshold within a defined region of completion. More detail is available for using with an Arduino microcontroller at: http://forum.arduino.cc/index.php/topic,20750.0.html

    You can also adapt the ATTiny85 microcontroller to run most Arduino code (also Atmel-based) on a much smaller form factor if you need to embed the controller in a space-constrained area.Details on that are here: http://makezine.com/2011/10/10/how-to-shrinkify-your-arduino-projects/


    Keep it up!


    Kirk

    • Cancel
    • Vote Up 0 Vote Down
    • Sign in to reply
    • Cancel
element14 Community

element14 is the first online community specifically for engineers. Connect with your peers and get expert answers to your questions.

  • Members
  • Learn
  • Technologies
  • Challenges & Projects
  • Products
  • Store
  • About Us
  • Feedback & Support
  • FAQs
  • Terms of Use
  • Privacy Policy
  • Legal and Copyright Notices
  • Sitemap
  • Cookies

An Avnet Company © 2025 Premier Farnell Limited. All Rights Reserved.

Premier Farnell Ltd, registered in England and Wales (no 00876412), registered office: Farnell House, Forge Lane, Leeds LS12 2NE.

ICP 备案号 10220084.

Follow element14

  • X
  • Facebook
  • linkedin
  • YouTube