


Introduction
Arm, the owners Mbed OS, has been in the news recently following the decision to withdraw from the Nvidia acquisition. Whilst this had nothing to do with Mbed OS itself, it did somehow renew my interest in this free open source Internet of Things (IoT) operating system.
It just so happened that I was in two minds deciding which Bluetooth engine to use for my dust monitoring road test, and so I decided to give the latest version (v6.15) of Mbed OS together with Mbed Studio (their dedicated desktop IDE) another try.
I liked it and as I had made considerable progress understanding how it all fits together I decided to develop this Bluetooth Low Energy (BLE) application and share the experience on Element14.
As many of you know, Arm Mbed OS has come a long way since Mbed OS was initially released in September 2009. It has not been a smooth journey mind you. I recall that Mbed OS 2 was very popular when it was released with it’s online compiler, open source libraries and shared examples. But when Mbed OS 5 was released it introduced so many breaking changes that this led to frustration and confusion as all the Mbed 2 code examples and libraries no longer worked. The website search engine also did not help as it kept referring you back to Mbed 2. Hence I gave up.
However, since the release of Mbed OS 6 (in June 2020), together with the launch of Mbed Studio and a redesign of the mbed website, things have improved noticeably, in my opinion. There is now much clearer and better structured documentation and there's a good core set of libraries, although it is nowhere as comprehensive as before.
So, in my opinion, it's a good time to jump back in as the website provides a pretty good explanation on how to get started with numerous tutorials and it also provides a good detailed reference on the various API’s available for use.
https://os.mbed.com/docs/mbed-os/v6.15/introduction/index.html
The MbedOS website also provides a useful explanation of the operating system's architecture to help you understand how it all fits together:
https://os.mbed.com/docs/mbed-os/v6.7/introduction/architecture.html
This includes a good explanation of the BLE API: https://os.mbed.com/docs/mbed-os/v6.15/apis/bluetooth-apis.html
Getting started with the BLE API
If you’re like me, then you will want to learn by example.
Thankfully there are a range of generic examples available, which are also referenced in the tutorials section (https://os.mbed.com/docs/mbed-os/v6.15/tutorials/index.html) and can be found on the Arm Mbed GitHub repo: https://github.com/ARMmbed/mbed-os-example-ble/
I initially found these examples quite difficult to follow, especially when unfamiliar with the BLE API. So to help, here is my take on how to make sense of these examples.
There are two architectural models or design approaches used.
The first is what I would refer to as the flat model, where you have one primary class for your app and then you link in other services and any API functions as required. The other is a more hierarchical model, which comprises three linked wrappers. The lowest layer handles BLE processes, the middle layer handles either server or client functions and the top layer, which you create yourself, defines the app class.
To understand these models and structures you need to refer to another Arm Mbed repository which contains these code wrappers, namely: https://github.com/ARMmbed/mbed-os-ble-utils
These wrappers are generic. The header file “ble_app.h” demonstrates the flat structure and the files “ble_process.h”, “gatt_client_process.h” and “gatt_server_process.h” create a hierarchical model.
Returning back to the ready made examples on GitHub, we can split these examples into the two camps. The hierarchical model is used in the two Gatt Client examples (“BLE_GattClient_Characteristicxxx”) and two Gatt Servers examples (start with the name “BLE_GattServer_Characteristicxxx”). All other examples use the flat structure.
So, with that out the way, let me jump straight into a simple example of my own.
Button-LED BLE App
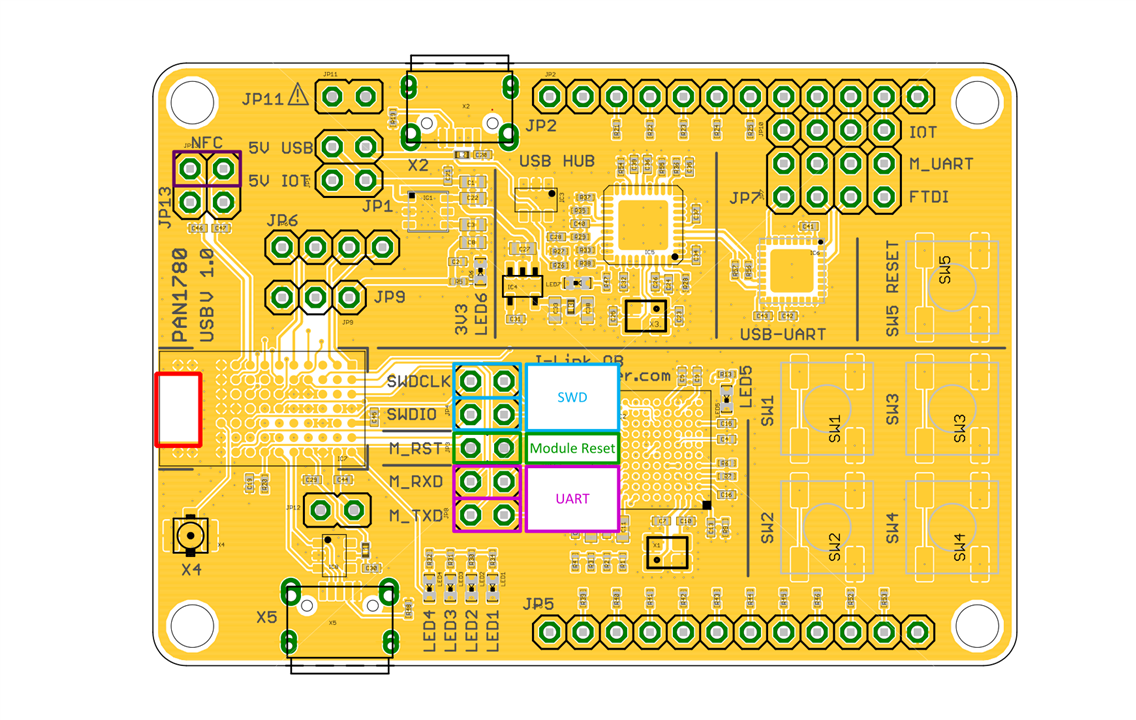
I used the Panasonic PAN1780 (nRF52840) development board as my microcontroller. I have also road tested this evaluation kit, so if you want to learn more you can click here to read the review.

As you may have noticed, from the above picture, I used a SWD compliant Particle.io DAPlink debugger to flash the PAN1780, as Mbed Studio cannot use Segger Jlink by default. The nice thing about the PAN1780 development board is that the SWDIO and SWDCLK pins are broken out for you so it is very straightforward, as shown here:
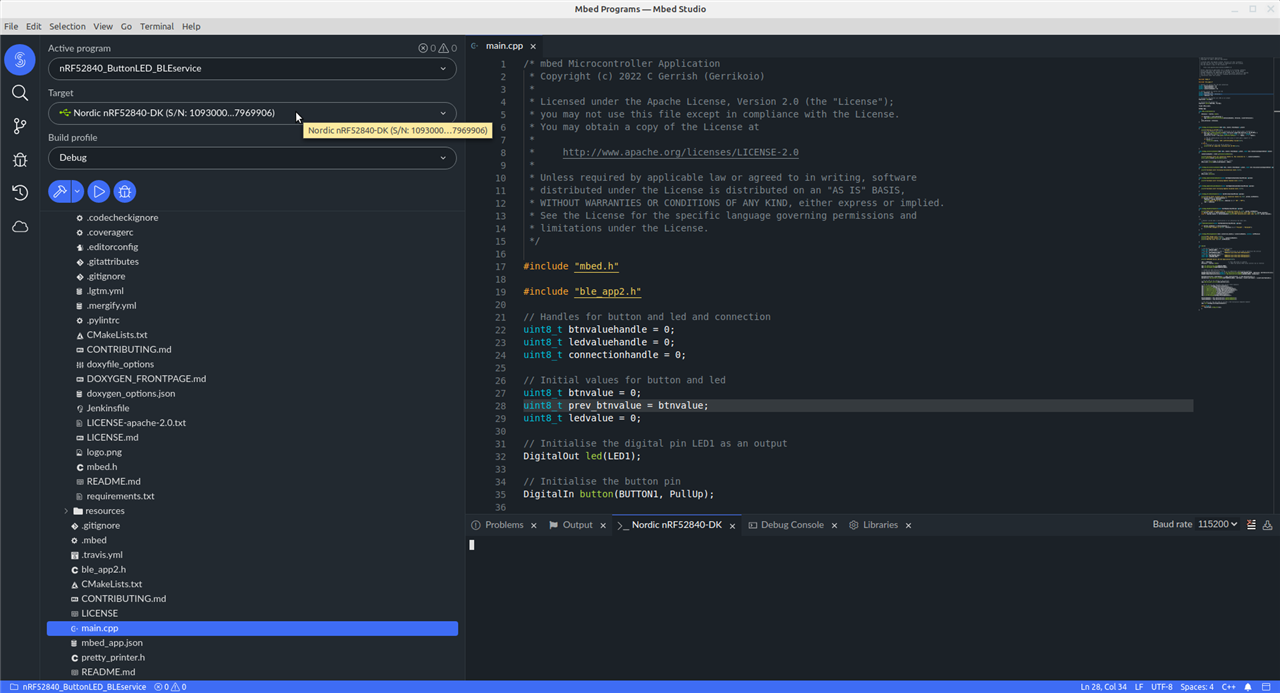
The code for my Mbed OS example was developed on Mbed Studio version 1.4.3 with the Target configured as Nordic nRF52840-DK, as shown here:
My code example is based on a flat-file architecture or design approach and makes use of a modified ble_app.h header file, which I’ve named ble_app2.h, can be found here: https://github.com/Gerriko/mbedOS_blebuttonleddemo).
This modified header file includes Gatt Server event handlers to inform you when a central client device connects or disconnects, when notifications are enabled or disabled, and when there is a read or write request or when data is updated/sent.
With this new header file, developing the rest of the application code is very straightforward.
But before I get to the detail of my application code, there is some housekeeping needed to get the BLE code project to work, i.e. a mbed_app.json file is required to provide the compiler with the appropriate settings.
My mbed_app.json file contains parameters for enabling serial output via printf statements, BLE trace logging (disabled by default), maximum desire att mtu size, and then finally adding the BLE feature to the target board.
{
    "target_overrides": {
        "*": {
            "platform.stdio-baud-rate": 115200,
            "platform.stdio-buffered-serial": 1,
            "mbed-trace.enable": false,
            "mbed-trace.max-level": "TRACE_LEVEL_DEBUG",
            "cordio.desired-att-mtu": 48,
            "cordio.rx-acl-buffer-size": 96,
            "cordio.trace-hci-packets": false,
            "cordio.trace-cordio-wsf-traces": false,
            "ble.trace-human-readable-enums": false
        },
        "NRF52840_DK": {
            "target.features_add": ["BLE"]
        },
        "NRF52_DK": {
            "target.features_add": ["BLE"]
        }
    }

}
And now, here’s the app code.
/* mbed Microcontroller Application
* Copyright (c) 2022 C Gerrish (Gerrikoio)
*
* Licensed under the Apache License, Version 2.0 (the "License");
* you may not use this file except in compliance with the License.
* You may obtain a copy of the License at
*
* http://www.apache.org/licenses/LICENSE-2.0
*
* Unless required by applicable law or agreed to in writing, software
* distributed under the License is distributed on an "AS IS" BASIS,
* WITHOUT WARRANTIES OR CONDITIONS OF ANY KIND, either express or implied.
* See the License for the specific language governing permissions and
* limitations under the License.
*/
#include "mbed.h"
#include "ble_app2.h"
// Handles for button and led and connection
uint8_t btnvaluehandle = 0;
uint8_t ledvaluehandle = 0;
uint8_t connectionhandle = 0;
// Initial values for button and led
uint8_t btnvalue = 0;
uint8_t prev_btnvalue = btnvalue;
uint8_t ledvalue = 0;
// Initialise the digital pin LED1 as an output
DigitalOut led(LED1);
// Initialise the button pin
DigitalIn button(BUTTON1, PullUp);
Ticker BTN_ticker;
BLEApp app;
void BTN_tickerhandler()
{
btnvalue = !button.read();
if (btnvalue != prev_btnvalue) {
app.updateCharacteristicValue(btnvaluehandle, btnvalue, sizeof(btnvalue));
}
prev_btnvalue = btnvalue;
}
void bleApp_InitCompletehandler(BLE &ble, events::EventQueue &_event)
{
printf("Setting up 2M PHY\r\n");
/* setup the default phy used in connection to 2M to reduce power consumption */
if (ble.gap().isFeatureSupported(ble::controller_supported_features_t::LE_2M_PHY)) {
ble::phy_set_t phys(/* 1M */ false, /* 2M */ true, /* coded */ false);
ble_error_t error = ble.gap().setPreferredPhys(/* tx */&phys, /* rx */&phys);
/* PHY 2M communication will only take place if both peers support it */
if (error) {
print_error(error, "GAP::setPreferedPhys failed\r\n");
}
} else {
/* otherwise it will use 1M by default */
printf("2M not supported. Sticking with 1M PHY\r\n");
}
}
void bleApp_Connectionhandler(BLE &ble, events::EventQueue &_event, const ble::ConnectionCompleteEvent &event)
{
connectionhandle = event.getConnectionHandle();
printf("Callback alert for Connection handle %u. Now connected to: ", connectionhandle);
print_address(event.getPeerAddress());
// Initialise a ticker to monitor button status
BTN_ticker.attach(&BTN_tickerhandler, 250ms);
}
void bleApp_Disconnectionhandler(BLE &ble, events::EventQueue &_event, const ble::DisconnectionCompleteEvent ¶ms)
{
printf("Callback alert following Disconnection event.\r\n");
// Detach ticker
BTN_ticker.detach();
}
void bleApp_UpdatesEnabledhandler(const GattUpdatesEnabledCallbackParams ¶ms)
{
printf("Callback alert following Updates Enabled event.\r\n");
}
void bleApp_UpdatesDisabledhandler(const GattUpdatesDisabledCallbackParams ¶ms)
{
printf("Callback alert following Updates Disabled event.\r\n");
}
void bleApp_WriteEventhandler(const GattWriteCallbackParams ¶ms)
{
printf("Write Event callback alert via connection handle %u.\r\n", params.connHandle);
if (params.handle == ledvaluehandle) {
ledvalue = params.data[0];
printf("Update LED to %s\r\n", ledvalue == 1 ? "ON" : "OFF");
led = !ledvalue;
}
}
void bleApp_ReadEventhandler(const GattReadCallbackParams ¶ms)
{
printf("Read Event callback alert via connection handle %u.\r\n", params.connHandle);
if (params.handle == ledvaluehandle) printf("LED characteristic data read: %u\r\n", params.data[0]);
else if (params.handle == btnvaluehandle) printf("BTN characteristic data read: %u\r\n", params.data[0]);
}
/**
* Handler called when a notification or an indication has been sent.
*/
void onDataSenthandler(const GattDataSentCallbackParams ¶ms)
{
if (params.attHandle == btnvaluehandle) {
printf("BTN changed to %s\r\n", btnvalue == 1 ? "Pressed" : "Released");
}
}
void bleApp_MTUchangehandler(ble::connection_handle_t connectionHandle, uint16_t attMtuSize)
{
printf("MTU change alert.\r\n");
printf("connection handle: %u\r\n", connectionHandle);
printf("New Mtu Size: %u\r\n", attMtuSize);
}
int main()
{
// We declare these after the class definition
const char *DEVICE_NAME = "BtnLED";
// We add the Gatt Service UUID to GattServerProcess as its used to advertise the service
const char *GATTSERVICE_UUID = "00001523-1212-efde-1523-785feabcd123";
// Button and LED Characteristics
const char *BUTTONCHAR_UUID = "00001524-1212-efde-1523-785feabcd123";
const char *LEDCHAR_UUID = "00001525-1212-efde-1523-785feabcd123";
printf("nRF52840 Button LED BLE Application\r\n");
led = !ledvalue; // This LED works in reverse
btnvalue = !button.read(); // Read the button GPIO value (active low so reverse)
app.set_advertising_name(DEVICE_NAME);
app.set_GattUUID_128(GATTSERVICE_UUID);
// Create our Gatt Service Profile
// For Button Characteristic, we add in an additional notification property
ReadOnlyGattCharacteristic<uint8_t> btn_characteristic(UUID(BUTTONCHAR_UUID), &btnvalue, GattCharacteristic::BLE_GATT_CHAR_PROPERTIES_NOTIFY);
ReadWriteGattCharacteristic<uint8_t> led_characteristic(UUID(LEDCHAR_UUID), &ledvalue);
GattCharacteristic *charTable[] = { &btn_characteristic, & led_characteristic };
GattService BLS_GattService(UUID(GATTSERVICE_UUID), charTable, sizeof(charTable) / sizeof(charTable[0]));
// We now add in our button & led service
app.add_new_gatt_service(BLS_GattService);
// We set up all our optional Gatt Server event handlers
app.on_connect(bleApp_Connectionhandler);
app.on_disconnect(bleApp_Disconnectionhandler);
app.on_updatesenabled(bleApp_UpdatesEnabledhandler);
app.on_updatesdisabled(bleApp_UpdatesDisabledhandler);
app.on_serverwriteevent(bleApp_WriteEventhandler);
app.on_serverreadevent(bleApp_ReadEventhandler);
app.on_serversentevent(onDataSenthandler);
app.on_AttMtuChange(bleApp_MTUchangehandler);
btnvaluehandle = btn_characteristic.getValueHandle();
ledvaluehandle = led_characteristic.getValueHandle();
// We start our app and need to include a BLE Initialise Complete handler
app.start(bleApp_InitCompletehandler);
while (true) {
ThisThread::sleep_for(1s);
}
}
It’s worth noting a couple of things inside the code.
First, instead of using debounce and interrupts for the GPIO connected to the push button, I used a timer interrupt to poll the button state every 250 milliseconds. The ticker API is used, which is enabled when a ble device connects and is detached when the client device disconnects.
Second, the BLEapp class (which is found in ble_app.h) is instantiated as a global object.
The led and button objects are also defined as global.
Then inside the main() function, the GATT services and characteristics are defined.
Note that the set_GattUUID_128 and add_new_gatt_services are new functions created within ble_app2.h.
The ble_app library also makes use of an OOP concept called a “Chain-of-responsibility pattern”. Basically this concept is beyond my level of expertise to explain here. Hopefully wikipedia provides a good reference for those who want to know more: https://en.wikipedia.org/wiki/Chain-of-responsibility_pattern
This is why ble_app.h includes the headers ChainableGapEventHandler.h for the GAP and a new one ChainableGattServerEventHandler.h for the Gatt Server. This then allows you to access the GAP and Gatt Serve events via these two internal event handler declarations:
In my example I have used specific callbacks to provide access to all the BLE application events:
This makes the whole application event driven, which is great.
Finally, it’s worth noting how the application actually starts. It is via this function:
Then within the bleApp_InitCompletehandler callback function, I decided to demonstrate the use of adding in some custom code to be triggered once initialisation is complete. Here I added in code to change the PHY settings (which is not really required for the app to function, it’s just here for show). This is all thanks to this OOP chainable wizardry.
So, if you are still confused by it all, here is a video demonstrating the app in action.
Demonstration
And that's basically it. I hope you found this useful.

