element14 Community
element14 Community
    Register Log In
  • Site
  • Search
  • Log In Register
  • Community Hub
    Community Hub
    • What's New on element14
    • Feedback and Support
    • Benefits of Membership
    • Personal Blogs
    • Members Area
    • Achievement Levels
  • Learn
    Learn
    • Ask an Expert
    • eBooks
    • element14 presents
    • Learning Center
    • Tech Spotlight
    • STEM Academy
    • Webinars, Training and Events
    • Learning Groups
  • Technologies
    Technologies
    • 3D Printing
    • FPGA
    • Industrial Automation
    • Internet of Things
    • Power & Energy
    • Sensors
    • Technology Groups
  • Challenges & Projects
    Challenges & Projects
    • Design Challenges
    • element14 presents Projects
    • Project14
    • Arduino Projects
    • Raspberry Pi Projects
    • Project Groups
  • Products
    Products
    • Arduino
    • Avnet Boards Community
    • Dev Tools
    • Manufacturers
    • Multicomp Pro
    • Product Groups
    • Raspberry Pi
    • RoadTests & Reviews
  • Store
    Store
    • Visit Your Store
    • Choose another store...
      • Europe
      •  Austria (German)
      •  Belgium (Dutch, French)
      •  Bulgaria (Bulgarian)
      •  Czech Republic (Czech)
      •  Denmark (Danish)
      •  Estonia (Estonian)
      •  Finland (Finnish)
      •  France (French)
      •  Germany (German)
      •  Hungary (Hungarian)
      •  Ireland
      •  Israel
      •  Italy (Italian)
      •  Latvia (Latvian)
      •  
      •  Lithuania (Lithuanian)
      •  Netherlands (Dutch)
      •  Norway (Norwegian)
      •  Poland (Polish)
      •  Portugal (Portuguese)
      •  Romania (Romanian)
      •  Russia (Russian)
      •  Slovakia (Slovak)
      •  Slovenia (Slovenian)
      •  Spain (Spanish)
      •  Sweden (Swedish)
      •  Switzerland(German, French)
      •  Turkey (Turkish)
      •  United Kingdom
      • Asia Pacific
      •  Australia
      •  China
      •  Hong Kong
      •  India
      •  Korea (Korean)
      •  Malaysia
      •  New Zealand
      •  Philippines
      •  Singapore
      •  Taiwan
      •  Thailand (Thai)
      • Americas
      •  Brazil (Portuguese)
      •  Canada
      •  Mexico (Spanish)
      •  United States
      Can't find the country/region you're looking for? Visit our export site or find a local distributor.
  • Translate
  • Profile
  • Settings
Embedded and Microcontrollers
  • Technologies
  • More
Embedded and Microcontrollers
Blog Renesas Solution Starter Kit for RX23E-A: enable GPIO FIT module (HAL)
  • Blog
  • Forum
  • Documents
  • Quiz
  • Polls
  • Files
  • Members
  • Mentions
  • Sub-Groups
  • Tags
  • More
  • Cancel
  • New
Join Embedded and Microcontrollers to participate - click to join for free!
  • Share
  • More
  • Cancel
Group Actions
  • Group RSS
  • More
  • Cancel
Engagement
  • Author Author: Jan Cumps
  • Date Created: 13 Jul 2023 11:11 PM Date Created
  • Views 729 views
  • Likes 9 likes
  • Comments 4 comments
  • RoadTest
  • RX23e-a
  • e2studio
  • d2a28d6e-11d8-11ee-be56-0242ac120002
Related
Recommended

Renesas Solution Starter Kit for RX23E-A: enable GPIO FIT module (HAL)

Jan Cumps
Jan Cumps
13 Jul 2023

In e² studio, when you install the support for Road test: Renesas Solution Starter Kit for RX23E-A, the FIT directory does not include the smart configurator module r_gpio_rx. For non-Renesas developers: this is the HAL API for GPIO. easter egg: I may get comments that HALs are not the way to go. 

image
It is possible to add it. Follow these steps:

In the smart configurator, components tab, click on the + sign to add a module, Select Download the latest FIT drivers and middleware:
image
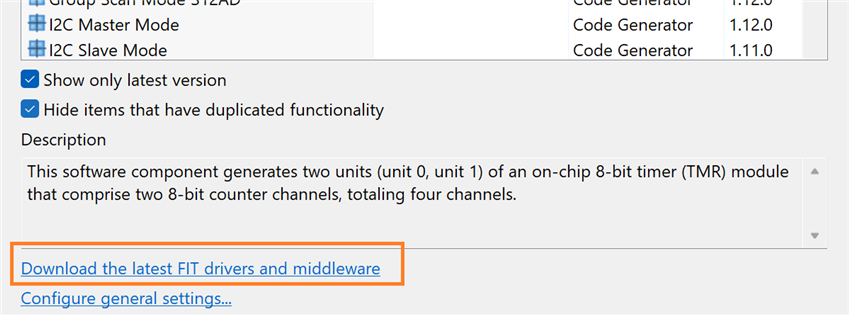
Deselect Show RX Driver Package only, then select the GPIO Module
image
Download

Deselect the Hide items that have duplicated functionality (there is overlap with the PORTS driver for initialisation, but we won't use the GPIO API for that).
image
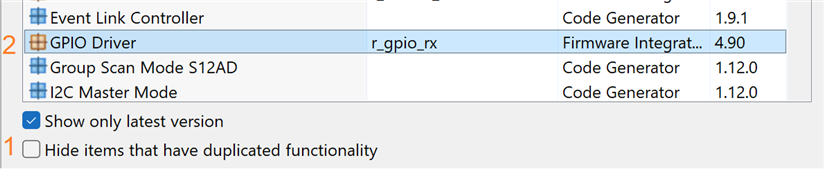
Select GPIO Driver, Finish

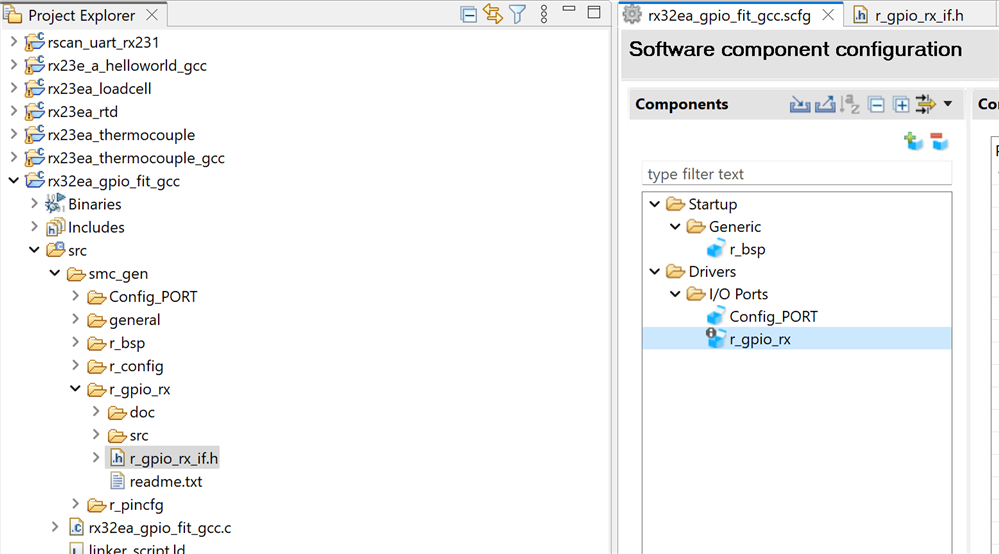
If you now generate code, the HAL API (header and source) are generated.
Example code (it's the blinky from my previous post, ported to the r_gpio_rx API):

// ...

#include "r_gpio_rx_if.h"

#define LED1 (GPIO_PORT_H_PIN_2)

// ...

void main(void)
{

	R_GPIO_PinWrite(LED1, GPIO_LEVEL_LOW);
	bool state = false;
    do {
    	state = !state;
   		R_GPIO_PinWrite(LED1, state ? GPIO_LEVEL_HIGH : GPIO_LEVEL_LOW);

    	// silly wait
    	for (int i = 0; i < 10000000; i++) {};

    } while (1);

}

link to all posts

  • Sign in to reply
  • Jan Cumps
    Jan Cumps over 2 years ago

    A nice e² studio extension is the eclipse IO Registers view

    image

    I can pause the program, then write to the register. I can switch the LED on or off by flipping its write bit

    image

    • Cancel
    • Vote Up 0 Vote Down
    • Sign in to reply
    • More
    • Cancel
  • Jan Cumps
    Jan Cumps over 2 years ago in reply to Jan Cumps

    For the lovers of brief code:

    SET_LED(state ^= true);
    • Cancel
    • Vote Up 0 Vote Down
    • Sign in to reply
    • More
    • Cancel
  • Jan Cumps
    Jan Cumps over 2 years ago in reply to Jan Cumps

    the 2nd code above is not for the RX23E-A, it's for a RX65N that I have here - I'm using it for the moment because it has a debugger.

    For the RX23E-A, one line of code has to change:

    #define SET_LED(LED_STATE) (PORTH.PODR.BIT.B2 = (LED_STATE))
    • Cancel
    • Vote Up 0 Vote Down
    • Sign in to reply
    • More
    • Cancel
  • Jan Cumps
    Jan Cumps over 2 years ago

    The r_gpio_rx API is function based. The Config_PORT FIT uses structures to wrap around registers.

    Example code using the r_gpio_rx API:

    R_GPIO_PinWrite(LED1, GPIO_LEVEL_LOW);
    bool state = false;
    do {
    state = !state;
    R_GPIO_PinWrite(LED1, state ? GPIO_LEVEL_HIGH : GPIO_LEVEL_LOW);

    // silly wait
    for (int i = 0; i < 10000000; i++) {};

    } while (1);

    Example using the Config_PORT structures:

    #define LED_ON (0)
    #define LED_OFF (1)
    #define SET_LED(LED_STATE) (PORT7.PODR.BIT.B0 = (LED_STATE))

    SET_LED(LED_OFF);
    bool state = false;
    do {
    state = !state;
    SET_LED(state ? LED_ON : LED_OFF);

    // silly wait
    for (int i = 0; i < 10000000; i++) {};

    } while (1);
    • Cancel
    • Vote Up 0 Vote Down
    • Sign in to reply
    • More
    • Cancel
element14 Community

element14 is the first online community specifically for engineers. Connect with your peers and get expert answers to your questions.

  • Members
  • Learn
  • Technologies
  • Challenges & Projects
  • Products
  • Store
  • About Us
  • Feedback & Support
  • FAQs
  • Terms of Use
  • Privacy Policy
  • Legal and Copyright Notices
  • Sitemap
  • Cookies

An Avnet Company © 2025 Premier Farnell Limited. All Rights Reserved.

Premier Farnell Ltd, registered in England and Wales (no 00876412), registered office: Farnell House, Forge Lane, Leeds LS12 2NE.

ICP 备案号 10220084.

Follow element14

  • X
  • Facebook
  • linkedin
  • YouTube