


It is common to have resource conflicts when designing with microcontrollers. It could be memory, I/O ports or any other constrained resources which often leads to having to choose a more expensive device with a larger package. I faced a similar situation using the EFM8 SB1 STK. The EFM8 STK is a starter kit platform with a Silicon Labs 8-bit MCU and is a nice platform for reference design because it has the EXP header for creating solutions. It also has some useful hardware like the Memory LCD to display data and a joystick for more user input.
My problem is that I needed the 3-wire SPI port for the expansion header or EXP, but it was being used on different ports for the memory LCD. If I were to design the board from scratch I could have used a chip select to share the SPI port with other peripherals. However, I don’t have that luxury because I am using off the shelf hardware so my ports are hardwired and there is no changing them. My added peripheral is a wireless transceiver that I will use to communicate with another MCU which also has a transceiver. I would also like to use the screen as a way of selecting what I want to send. Since the SPI port was already in use and the radio’s interface is through SPI I had to come up with a unique solution. After some head scratching and documentation reading, I learned that it’s quite easy and useful to reconfigure the pins of the SB1 MCU in real time making it possible to quickly switch which peripheral you wish to communicate with.
The Sleepy Bee 1 starter kit and the Si446x radio


Si446x specs:
- IEEE 802.15.4g
- Frequency range = 119–1050 MHz
- Receive sensitivity = –133 dBm
- Max output power up to +20 dBm
- PA support for +27 dBm or to +30 dBm
- Data rate = 0.1 kbps to 1Mbps
- Power supply = 1.8 to 3.8 V
The tool that comes free from Silicon Labs is Simplicity Studio. I will post a link to where you can download this if you wish. The tool is used on most of the Silicon Labs MCUs. Simplicity Studio is very similar to other IDEs and from it you can manage your projects, write code and debug. For each project you can make a configurator file like the one below.
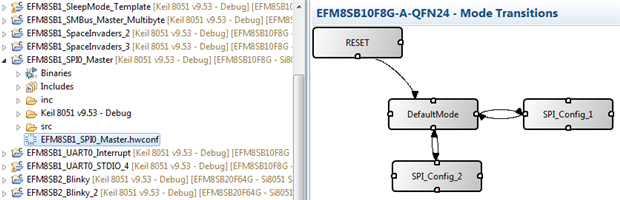
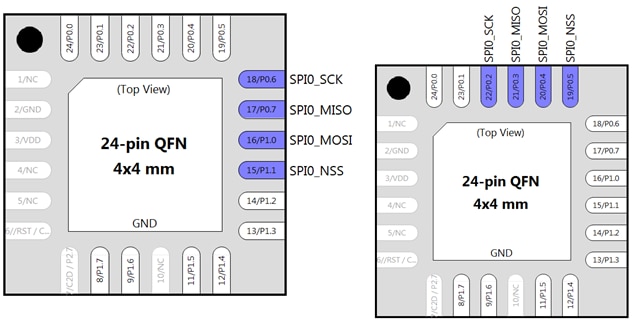
In the configurator you can set certain states almost like a Mealy/Moore state machine. Once the states are created you can alter the pin configuration for each state. The two states that I will use are the SPI_Config_1 and SPI_Config_2. The image below compares the pins for SPI_Config_1, on the left, and SPI_Config_2 on the right. As you can see for the LCD which is SPI_Config_1, I have it hooked up to port 0 pins 6 and 7 as well as port 1 pins 0 and 1. For the radio I have port 0 pins 2, 3, 4 and 5 routed.
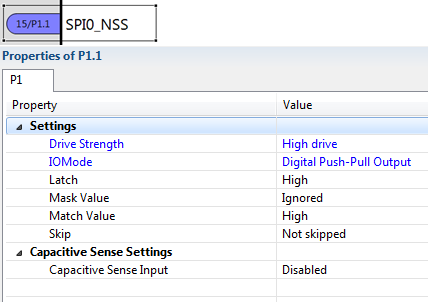
Each pin has many options for how it can be configured including its drive strength and type of input/output. All of these are altered and selected by a drop down menu in Simplicity Studio and are easy to configure. In the case of slave select on port 1 pin 1, I configured the drive strength as high and set it to be a digital push pull output, the rest are left as default.
Once you set up the pin configuration and save the project, Simplicity Studio will automatically generate code to enable those pins as you specified. The code is in a file called InitDevice.c in the form of functions that move from state to state.
In my project one of the functions is PORTS_0_enter_SPI_Config_2_from_DefaultMode(). This function configures the port 0 pins for SPI_Config_2 coming from DefaultMode by turning off and on pins as well as configuring them to the specifications in SPI_Config_2.
You can connect any states with one or two way transitions. For each transition and port, the configurator will automatically generate these functions. All you have to do from there is call these functions whenever you want to alter the configurations. The way my code flow works is to:
• Load something onto the LCD while in the SPI_Config_1 state
• Call the transition function to go back to DefaultMode
• Call the function to go to SPI_Config_2.
• Send a command to the radio
• Go back to SPI_Config_1 and repeat
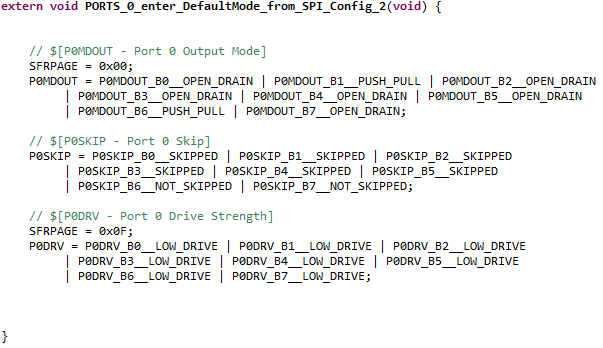
I could most likely do this without the use of the default state but for educational purposes this approach worked. Simplicity Studio will not generate any redundant code, so if you keep some pin functionality constant between states, it will not reconfigure them again to the same thing. Below is an example of the generated code which sets bits in the registers to configure the pins.
This application is a very simple example but you can imagine the usefulness and power of this real time reconfiguration. I could communicate with a number of peripherals: the only limit would be speed as the more devices hooked up the more switching there is and the longer a complete cycle of communication will be. While re-configuring might not be as efficient as each peripheral being on the same 3-wire SPI with individual selects it still allows a lot of freedom in designing the supporting hardware. This would be very useful for replacing old MCUs because a board redesign wouldn't be needed, in other words, switching to this part would only require a firmware change and not a surround hardware or board change.
Below are links for all the components and tools that I used.
EFM8 kits
- Newark Part No.: 41Y1984
Wireless Transceivers
- Newark Part No.: 49X9786
Simplicity Studio download
Simplicity Studio | Silicon Labs
-

michaelkellett
-
Cancel
-
Vote Up
0
Vote Down
-
-
Sign in to reply
-
More
-
Cancel
-

txbeech
in reply to michaelkellett
-
Cancel
-
Vote Up
0
Vote Down
-
-
Sign in to reply
-
More
-
Cancel
Comment-

txbeech
in reply to michaelkellett
-
Cancel
-
Vote Up
0
Vote Down
-
-
Sign in to reply
-
More
-
Cancel
Children