


You can measure the temperature without any external temperature sensor, for measuring the temperature all you need is only nrf52832.

When you want to measure the temperature of the surroundings while developing Bluetooth low-energy projects you require an external temperature sensor. implementing external sensors increases the BOM Cost and requires a bit more space. you can avoid these problems by using NRF52832 for your BLE Projects.
in this project, I am measuring the temperature using NRF52DK And displaying the temperature on the LCD Display. for developing the firmware I have used the Arm Mbed
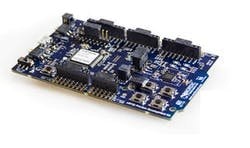
Introduction to Nordic nRF52-DK
The nRF52 Development Kit is a single-board development kit for Bluetooth Smart, ANT, and 2.4GHz proprietary applications using the nRF52 Series SoC. This kit supports both developments for nRF52832 SoCs.
The kit is compatible with the Arduino Uno Revision 3 standard, making it possible to use third-party shields that are compatible with this standard with the kit.
The kit supports the standard Nordic Software Development Toolchain using Keil, IAR, and GCC. The kit also supports ARM mbed tool-chain for rapid prototyping and development using mbed’s cloud-based IDE and tool-chain with an extensive range of open-source software libraries. Program/Debug options on the kit are Segger J-Link Lite for the standard toolchain and CMSIS-DAP for mbed. The kit gives access to all I/O and interfaces via connectors and has 4 LEDs and 4 buttons which are user-programmable. A range of software examples is available from the nRF5 SDK to support Bluetooth Smart, ANT, and 2.4GHz applications.

NRF52DK Features
- Nordic nRF52 System-on-Chip combining Bluetooth v4.2 compliant 2.4GHz multiprotocol radio, On-chip NFC tag, and ARM® Cortex®-M4F processor on a single chip optimized for ultra-low power operation
- Arduino Uno Rev. 3 compatible connector for use with 3rd party shields
- All I/O and interfaces available via connectors
- USB drag and drop programming and USB Virtual COM port for serial terminal
- Segger J-Link and CMSIS-DAP interface for programming and debugging from offline tools and pyOCD
- pluggable NFC antenna
- Connector for RF measurements
- Pins for power consumption measurements
Accepts power through:
- USB
- External source (1.8V-3.6V)
- Single 2032 coin-cell battery, onboard battery holder
- Accepts power through USBExternal source (1.8V-3.6V)Single 2032 coin-cell battery, onboard battery holder
nRF52 Series software architecture
The nRF52 Series software architecture offers a clean separation between application code and Nordic’s embedded protocol stacks (called SoftDevices). There are no compile, link, or run-time dependencies. Application code can be developed and compiled independently of the protocol stack. This simplifies overall development efforts and reduces the possibility and complexity of bugs during development.
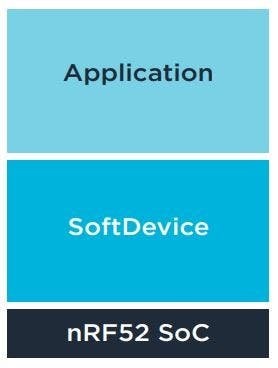
SoftDevices
The nRF52 DK is supported by a range of protocol stacks. These protocol stacks are known as SoftDevices and complement the nRF52 Series SoCs. SoftDevices can support Bluetooth Low Energy, ANT, or Bluetooth Low Energy/ANT combinations. This brings maximum flexibility to application development and allows the latest stack version and associated features to be programmed into the nRF52 Series SoC.
Interface MCU
The interface MCU on the nRF52 DK runs SEGGER J-Link OB or Mbed OB interface firmware and is used to program and debug the firmware of the nRF52832 System on Chip (SoC).
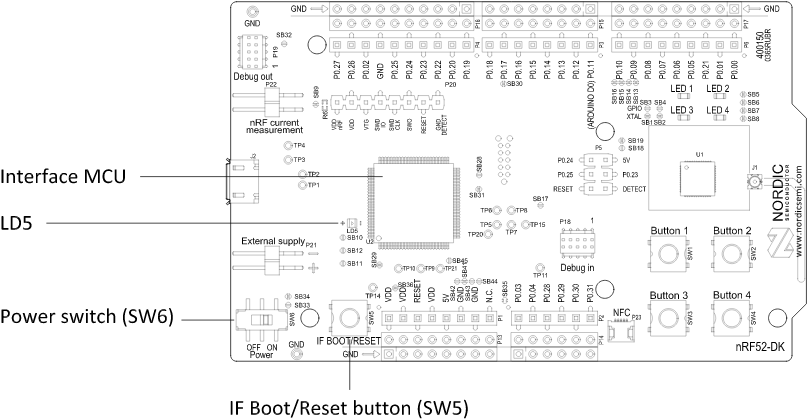
IF Boot/Reset button
The nRF52 DK has an IF Boot/Reset button (SW5).
This button is connected to the interface MCU on the Development Kit (DK) and has two functions:
- Resetting the nRF52832 SoC
- Entering the bootloader mode of the interface MCU
During normal operation the button functions as a reset button for the nRF52832 System on Chip (SoC). For this to work, a pin reset on P0.21 needs to be enabled in the embedded firmware.
The button is also used to enter the bootloader mode of the interface MCU. To enter the bootloader mode, keep the reset button pressed while powering up the DK until LD5 starts to blink. You can power up the DK either by disconnecting and reconnecting the USB cable or by toggling the power switch (SW6).
Interface MCU firmware
The onboard interface MCU is factory programmed with a Mbed-compliant bootloader. This feature makes it possible to swap interface firmware between the factory-preloaded SEGGER J-Link OB and the Mbed interface firmware.
See the IF Boot/Reset button for instructions on how to enter the bootloader mode.
To swap interface MCU firmware, drag the Interface image (.bin) into the mounted bootloader drive on the connected computer and power cycle the DK.
nRF52832 Block diagram
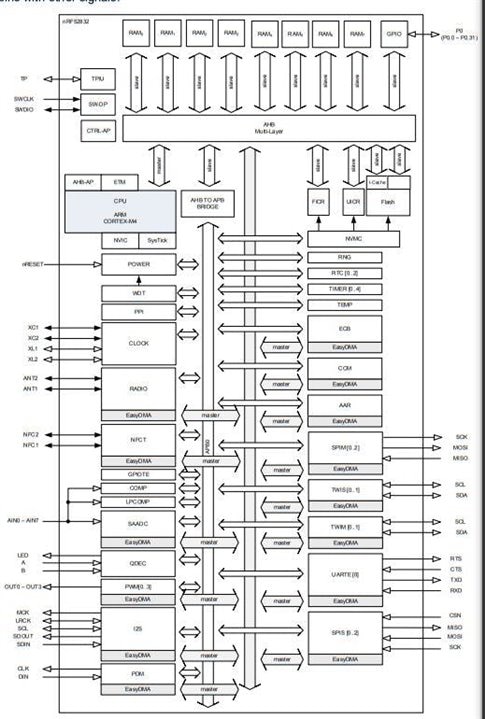
NRF52832 CPU
The ARM® Cortex®-M4 processor with a floating-point unit (FPU) has a 32-bit instruction set (Thumb®-2 technology) that implements a superset of 16 and 32-bit instructions to maximize code density and performance.
This processor implements several features that enable energy-efficient arithmetic and high-performance signal processing including:
- Digital signal processing (DSP) instructions
- Single-cycle multiply and accumulate (MAC) instructions
- Hardware divide
- 8 and 16-bit single instruction multiple data (SIMD) instructions
- Single-precision floating-point unit (FPU)
The ARM Cortex Microcontroller Software Interface Standard (CMSIS) hardware abstraction layer for the ARM Cortex processor series is implemented and available for the M4 CPU.
Real-time execution is highly deterministic in thread mode, to and from sleep modes, and when handling events at configurable priority levels via the Nested Vectored Interrupt Controller (NVIC).
Executing code from flash will have a wait state penalty on the nRF52 Series. An instruction cache can be enabled to minimize flash wait states when fetching instructions. For more information on cache, see Cache. The section Electrical specification shows CPU performance parameters including wait states in different modes, CPU current and efficiency, and processing power and efficiency based on the CoreMark® benchmark.
The code and other related files for this project can be taken from the GitHub repository of this project which can be accessed from here.
Floating point interrupt
The floating point unit (FPU) may generate exceptions when used due to e.g. overflow or underflow. These exceptions will trigger the FPU interrupt (see Instantiation). To clear the IRQ line when an exception has occurred, the relevant exception bit within the FPSCR register needs to be cleared. For more information about the FPSCR or other FPU registers, see Cortex-M4 Devices Generic User Guide.
TEMP — Temperature sensor
NRF52832 Contains an internal temperature sensor with 0.25 °Celcius Resolution. it can measure the die temperature over the temperature range of the device. Linearity compensation can be implemented if required by the application.
Main Features of the temperature sensor
- The temperature range is greater than or equal to the device's operating temperature.
- The resolution is 0.25 degrees
TEMP register stores measured temperature values, the following steps need to be used while developing firmware.
1. Enable the TASKS_START Register to Start temperature measurement.
2. Check EVENTS_DATARDY Register Temperature measurement complete, data ready
3. Collect the Temperature details from theTEMP register.
- The temperature is °C (0.25° steps).
- Result of temperature measurement. Die temperature in °C, 2's complement format, 0.25 °C steps.
- Decision point: DATARDY
4. Enable TASKS_STOP Register to Stop temperature measurement.
Follow the Link For NRF52832 Datasheet https://infocenter.nordicsemi.com/pdf/nRF52832_PS_v1.4.pdf
To compile the code you need to external libraries
LCD interfacing With NRF52832( NRFLCD.h)Serial Port Interfacing (pretty_printer.h)
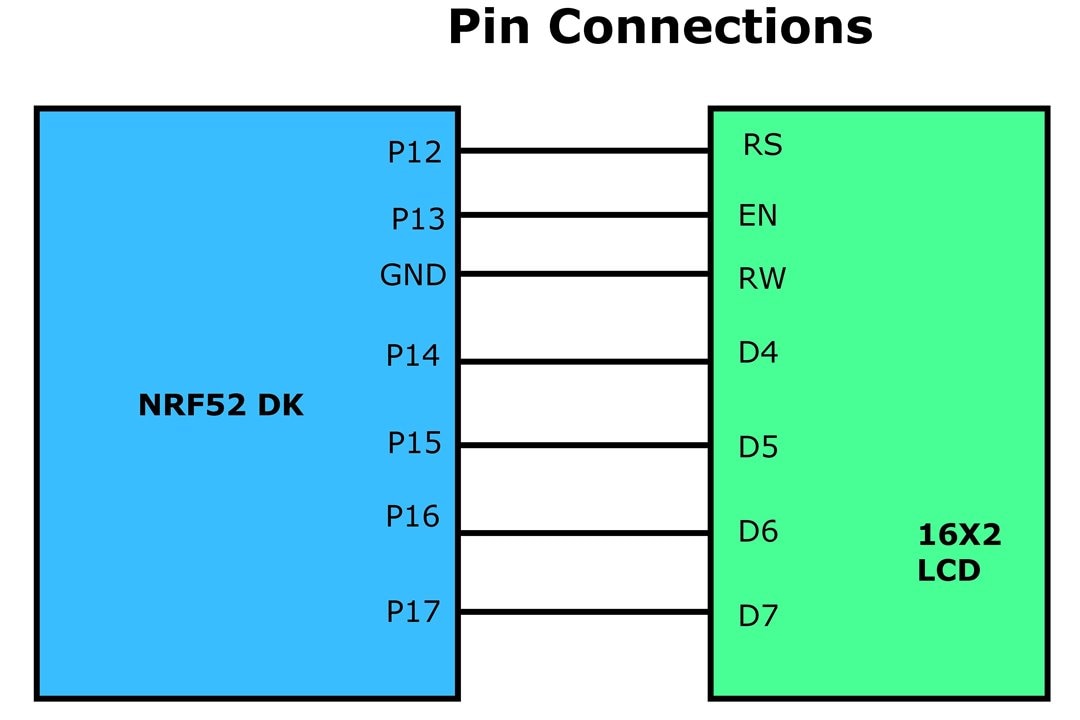
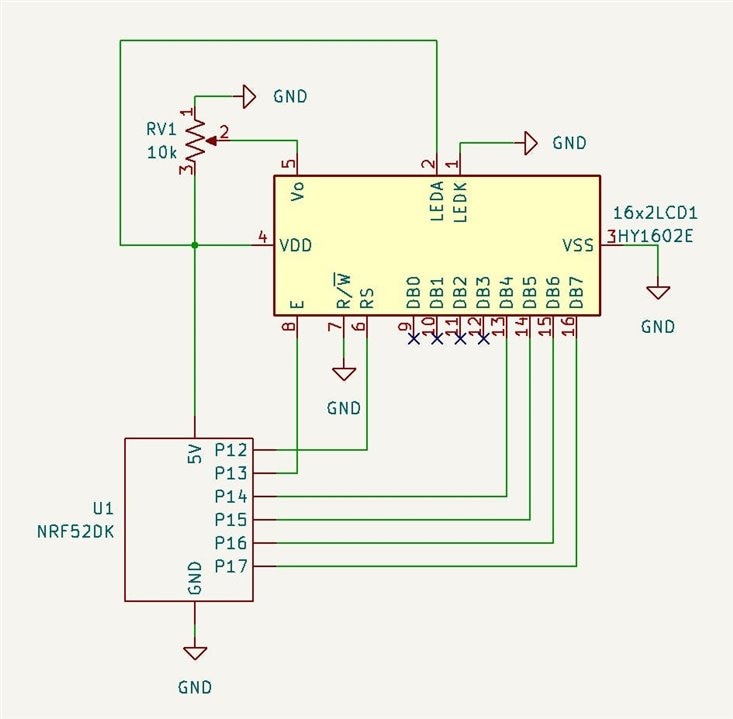
Schematic Diagram
Code
NRF52832 TEMPERATURE MEASUREMENT AND LCD INTERFACING main code
#include "mbed.h"
#include "pretty_printer.h"
#include <iostream>
#include "ble/BLE.h"
#include "ble/Gap.h"
#include <chrono>
#include <cstdint>
#include <cstdio>
#include <cstdlib>
#include <events/mbed_events.h>
#include <ratio>
#include <nrf_temp.h>
#include "NRFLCD.h"

//specify different pins to test printing on UART other than the console UART.
#define TARGET_TX_PIN USBTX
#define TARGET_RX_PIN USBRX


static BufferedSerial serial_port(TARGET_TX_PIN, TARGET_RX_PIN, 115200);//create a BufferedSerial object to be used by the system I/O retarget code.
FileHandle *mbed::mbed_override_console(int fd) { return &serial_port; }//printf and cout will be redirected to this port.
static uint32_t die_temp;

TextLCD lcd(p12, p13, p14, p15, p16, p17);//RS, EN, D4, D5, D6, D7


void nrf52_die_temperature_read(void)
{
    NRF_TEMP->TASKS_START = 1;//Start temperature measurement
    while (NRF_TEMP->EVENTS_DATARDY == 0) {}
    NRF_TEMP->EVENTS_DATARDY = 0;//Temperature measurement complete, data ready
    die_temp = NRF_TEMP->TEMP ;
    NRF_TEMP->TASKS_STOP = 1;  //Stop temperature measurement
}

int main()
{
    while (true) {
        nrf52_die_temperature_read();
        printf("temperatured = %d \r\n ",nrf_temp_read());
        die_temp = nrf_temp_read()*0.25;//Temperature in °C (0.25° steps)
        printf("die temperatured = %d \r\n ",die_temp);
        lcd.locate(0,0);
        lcd.printf("Temperature:%d C",die_temp);
        thread_sleep_for(1);
        }
        }
NRFLCD.cpp(Libraries for Compiling)
#include "NRFLCD.h"
#include "mbed.h"

TextLCD::TextLCD(PinName rs, PinName e, PinName d4, PinName d5,
                 PinName d6, PinName d7, LCDType type) : _rs(rs),
        _e(e), _d(d4, d5, d6, d7),
        _type(type) {

    _e  = 1;
    _rs = 0;            // command mode

thread_sleep_for(1);
    // send "Display Settings" 3 times (Only top nibble of 0x30 as we've got 4-bit bus)
    for (int i=0; i<3; i++) {
        writeByte(0x3);
        thread_sleep_for(1);
    }
    writeByte(0x2);     // 4-bit mode
    thread_sleep_for(1);
    writeCommand(0x28); // Function set 001 BW N F - -
    writeCommand(0x0C);
    writeCommand(0x6);  // Cursor Direction and Display Shift : 0000 01 CD S (CD 0-left, 1-right S(hift) 0-no, 1-yes
    cls();
}

void TextLCD::character(int column, int row, int c) {
    int a = address(column, row);
    writeCommand(a);
    writeData(c);
}

void TextLCD::cls() {
    writeCommand(0x01); // cls, and set cursor to 0
    thread_sleep_for(1);
    locate(0, 0);
}

void TextLCD::locate(int column, int row) {
    _column = column;
    _row = row;
}

int TextLCD::_putc(int value) {
    if (value == '\n') {
        _column = 0;
        _row++;
        if (_row >= rows()) {
            _row = 0;
        }
    } else {
        character(_column, _row, value);
        _column++;
        if (_column >= columns()) {
            _column = 0;
            _row++;
            if (_row >= rows()) {
                _row = 0;
            }
        }
    }
    return value;
}

int TextLCD::_getc() {
    return -1;
}

void TextLCD::writeByte(int value) {
    _d = value >> 4;
    thread_sleep_for(1);
    _e = 0;
    thread_sleep_for(1);
    _e = 1;
    _d = value >> 0;
    thread_sleep_for(1);
    _e = 0;
    thread_sleep_for(1);
    _e = 1;
}

void TextLCD::writeCommand(int command) {
    _rs = 0;
    writeByte(command);
}

void TextLCD::writeData(int data) {
    _rs = 1;
    writeByte(data);
}

int TextLCD::address(int column, int row) {
    switch (_type) {
        case LCD20x4:
            switch (row) {
                case 0:
                    return 0x80 + column;
                case 1:
                    return 0xc0 + column;
                case 2:
                    return 0x94 + column;
                case 3:
                    return 0xd4 + column;
            }
        case LCD16x2B:
            return 0x80 + (row * 40) + column;
        case LCD16x2:
        case LCD20x2:
        default:
            return 0x80 + (row * 0x40) + column;
    }
}

int TextLCD::columns() {
    switch (_type) {
        case LCD20x4:
        case LCD20x2:
            return 20;
        case LCD16x2:
        case LCD16x2B:
        default:
            return 16;
    }
}

int TextLCD::rows() {
    switch (_type) {
        case LCD20x4:
            return 4;
        case LCD16x2:
        case LCD16x2B:
        case LCD20x2:
        default:
            return 2;
    }
}
NRFLCD.h (Header File)
#ifndef MBED_NRFLCD_H
#define MBED_NRFLCD_H

#include "mbed.h"

/**  A TextLCD interface for driving 4-bit HD44780-based LCDs
 *
 * Currently supports 16x2, 20x2 and 20x4 panels
 *
 * @code
 * #include "mbed.h"
 * #include "TextLCD.h"
 *
 * TextLCD lcd(p10, p12, p15, p16, p29, p30); // rs, e, d4-d7
 *
 * int main() {
 *     lcd.printf("Hello World!\n");
 * }
 * @endcode
 */
class TextLCD : public Stream {
public:

    /** LCD panel format */
    enum LCDType {
        LCD16x2     /**< 16x2 LCD panel (default) */
        , LCD16x2B  /**< 16x2 LCD panel alternate addressing */
        , LCD20x2   /**< 20x2 LCD panel */
        , LCD20x4   /**< 20x4 LCD panel */
    };

    /** Create a TextLCD interface
     *
     * @param rs    Instruction/data control line
     * @param e     Enable line (clock)
     * @param d4-d7 Data lines for using as a 4-bit interface
     * @param type  Sets the panel size/addressing mode (default = LCD16x2)
     */
    TextLCD(PinName rs, PinName e, PinName d4, PinName d5, PinName d6, PinName d7, LCDType type = LCD16x2);

#if DOXYGEN_ONLY
    /** Write a character to the LCD
     *
     * @param c The character to write to the display
     */
    int putc(int c);

    /** Write a formated string to the LCD
     *
     * @param format A printf-style format string, followed by the
     *               variables to use in formating the string.
     */
    int printf(const char* format, ...);
#endif

    /** Locate to a screen column and row
     *
     * @param column  The horizontal position from the left, indexed from 0
     * @param row     The vertical position from the top, indexed from 0
     */
    void locate(int column, int row);

    /** Clear the screen and locate to 0,0 */
    void cls();

    int rows();
    int columns();

protected:

    // Stream implementation functions
    virtual int _putc(int value);
    virtual int _getc();

    int address(int column, int row);
    void character(int column, int row, int c);
    void writeByte(int value);
    void writeCommand(int command);
    void writeData(int data);

    DigitalOut _rs, _e;
    BusOut _d;
    LCDType _type;

    int _column;
    int _row;
};

#endif
Result Video
Top Comments