element14 Community
element14 Community
    Register Log In
  • Site
  • Search
  • Log In Register
  • Community Hub
    Community Hub
    • What's New on element14
    • Feedback and Support
    • Benefits of Membership
    • Personal Blogs
    • Members Area
    • Achievement Levels
  • Learn
    Learn
    • Ask an Expert
    • eBooks
    • element14 presents
    • Learning Center
    • Tech Spotlight
    • STEM Academy
    • Webinars, Training and Events
    • Learning Groups
  • Technologies
    Technologies
    • 3D Printing
    • FPGA
    • Industrial Automation
    • Internet of Things
    • Power & Energy
    • Sensors
    • Technology Groups
  • Challenges & Projects
    Challenges & Projects
    • Design Challenges
    • element14 presents Projects
    • Project14
    • Arduino Projects
    • Raspberry Pi Projects
    • Project Groups
  • Products
    Products
    • Arduino
    • Avnet & Tria Boards Community
    • Dev Tools
    • Manufacturers
    • Multicomp Pro
    • Product Groups
    • Raspberry Pi
    • RoadTests & Reviews
  • About Us
  • Store
    Store
    • Visit Your Store
    • Choose another store...
      • Europe
      •  Austria (German)
      •  Belgium (Dutch, French)
      •  Bulgaria (Bulgarian)
      •  Czech Republic (Czech)
      •  Denmark (Danish)
      •  Estonia (Estonian)
      •  Finland (Finnish)
      •  France (French)
      •  Germany (German)
      •  Hungary (Hungarian)
      •  Ireland
      •  Israel
      •  Italy (Italian)
      •  Latvia (Latvian)
      •  
      •  Lithuania (Lithuanian)
      •  Netherlands (Dutch)
      •  Norway (Norwegian)
      •  Poland (Polish)
      •  Portugal (Portuguese)
      •  Romania (Romanian)
      •  Russia (Russian)
      •  Slovakia (Slovak)
      •  Slovenia (Slovenian)
      •  Spain (Spanish)
      •  Sweden (Swedish)
      •  Switzerland(German, French)
      •  Turkey (Turkish)
      •  United Kingdom
      • Asia Pacific
      •  Australia
      •  China
      •  Hong Kong
      •  India
      • Japan
      •  Korea (Korean)
      •  Malaysia
      •  New Zealand
      •  Philippines
      •  Singapore
      •  Taiwan
      •  Thailand (Thai)
      • Vietnam
      • Americas
      •  Brazil (Portuguese)
      •  Canada
      •  Mexico (Spanish)
      •  United States
      Can't find the country/region you're looking for? Visit our export site or find a local distributor.
  • Translate
  • Profile
  • Settings
Internet of Things
  • Technologies
  • More
Internet of Things
Blog Tiva LaunchPad: Building an Event/Data Logger - Part 1 – SD Card capability
  • Blog
  • Forum
  • Documents
  • Quiz
  • Events
  • Polls
  • Members
  • Mentions
  • Sub-Groups
  • Tags
  • More
  • Cancel
  • New
Join Internet of Things to participate - click to join for free!
  • Share
  • More
  • Cancel
Group Actions
  • Group RSS
  • More
  • Cancel
Engagement
  • Author Author: shabaz
  • Date Created: 26 Jul 2014 12:38 PM Date Created
  • Views 6052 views
  • Likes 7 likes
  • Comments 36 comments
  • tiva
  • ioe
  • sensors
  • internet_of_things
  • measurement
  • texas_instruments
  • iot
  • test_and_measurement
  • data_acquisition
  • sensor
  • ti
Related
Recommended

Tiva LaunchPad: Building an Event/Data Logger - Part 1 – SD Card capability

shabaz
shabaz
26 Jul 2014

Part 1: You are here.

Part 2: Tiva LaunchPad: Building an Event/Data Logger - Part 2 – Real Time Clock capability


Note: This project uses a Tiva LaunchPad board, but it works with the MSP432 LaunchPad board too with some modifications by martinvalencia - click here for the MSP432 modifications to this project.

Introduction

This was a quick project to build a data logger, useful around the lab or elsewhere. So quick it can be built in a couple of hours, and with dozens of uses. The facility to log events or values over time is extremely important for many projects - it is a useful Swiss army knife to have around when needed. It uses a Tiva LaunchPadTiva LaunchPad which is a small board from Texas Instruments containing an ARM chip. It can be programmed just like an Arduino - download the Arduino-like software, write your Arduino code in a single window, and transfer it to the board using the supplied USB cable.

image


It is not hard to justify purchasing a data logger. Frequent, accurate data acquisition will greatly help in understanding the environment indoors or outdoors using measurements from sensors. A better understanding results in better products and solutions. Productivity will be improved immensely with the capability to record information automatically over a period of minutes, hours or days.


This logger is extremely easy to use, and so low cost that many could be created. Plug in an SD card, plug the board into a 5V supply (e.g. a phone charger) and it will automatically start storing analog voltage measurements to the SD card in a file. The analog input could be connected to a sensor. It will also record temperature. Everything is time-stamped (in part 2, (part 2 is now available, click here) - part 1 saves data with no time-stamp).


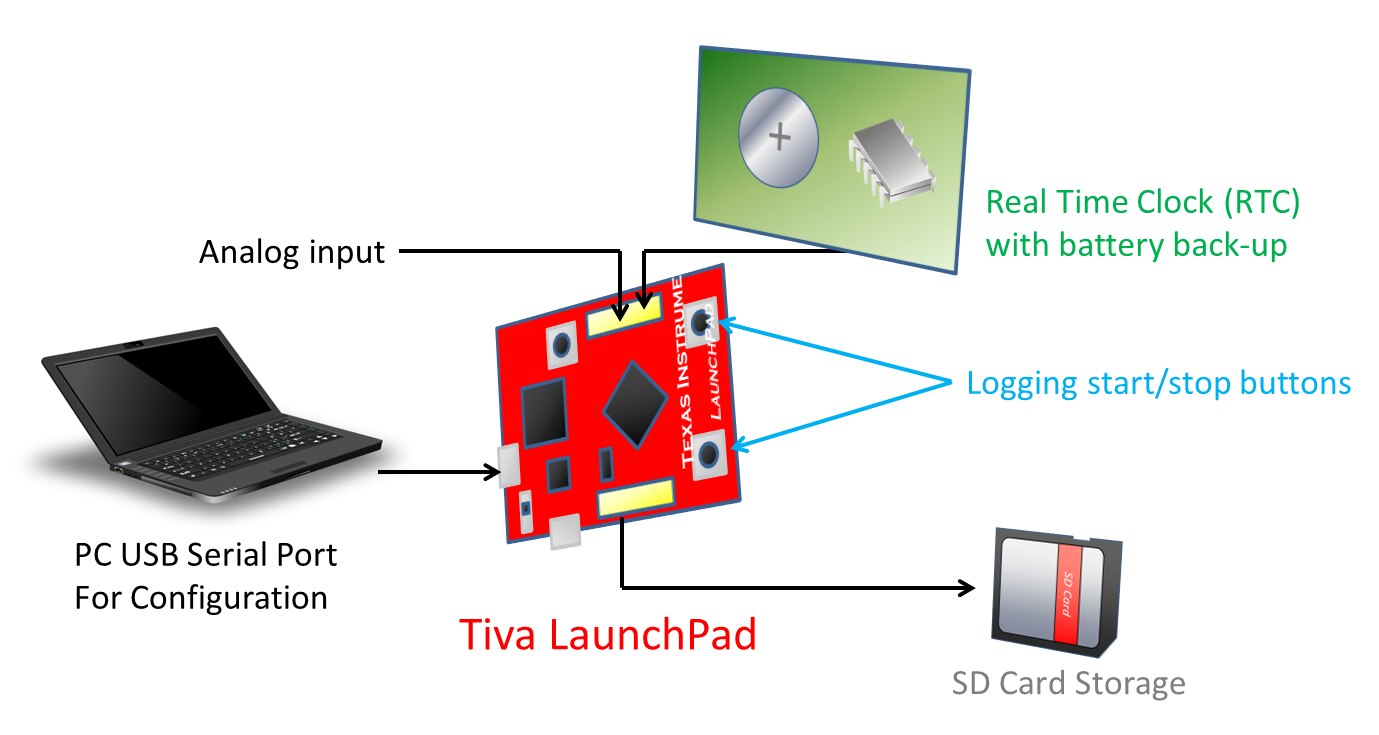
The diagram below shows the solution overview. A Tiva LaunchPad boardTiva LaunchPad board (less than £10) forms the heart of the data logger. SD card capability and (in part 2) a Real Time Clock (RTC) will be attached to it. Any initial configuration will be via serial port (USB serial) using a PC, and then the PC is no longer required – the logger will be controlled via on-board buttons to start/stop logging to the SD card.

image

The hardware design of the SD card portion of the data logger is covered below. The full source code is attached to this post too.

When run, this project logs analog data to the SD card without a timestamp. The RTC time-stamp functionality will be covered in part 2 in a day or so.


Hardware design

We wanted a solution that could run untethered from a PC and I considered a few platforms (including the RPI and BBB) but eventually settled on a Texas Instruments LaunchPad. It is low cost yet powerful enough to capture and store data.


For my particular use-case low power consumption was not a concern, but a quick solution was. I didn’t want to spend a lot of effort or money developing a data logger. I just wanted something that would work.


The Tiva range of microcontrollers from TI are ARM Cortex-M4 based. Within the Tiva family there are two categories. I chose the lower-end here, for which the Tiva LaunchPad costs about £10.


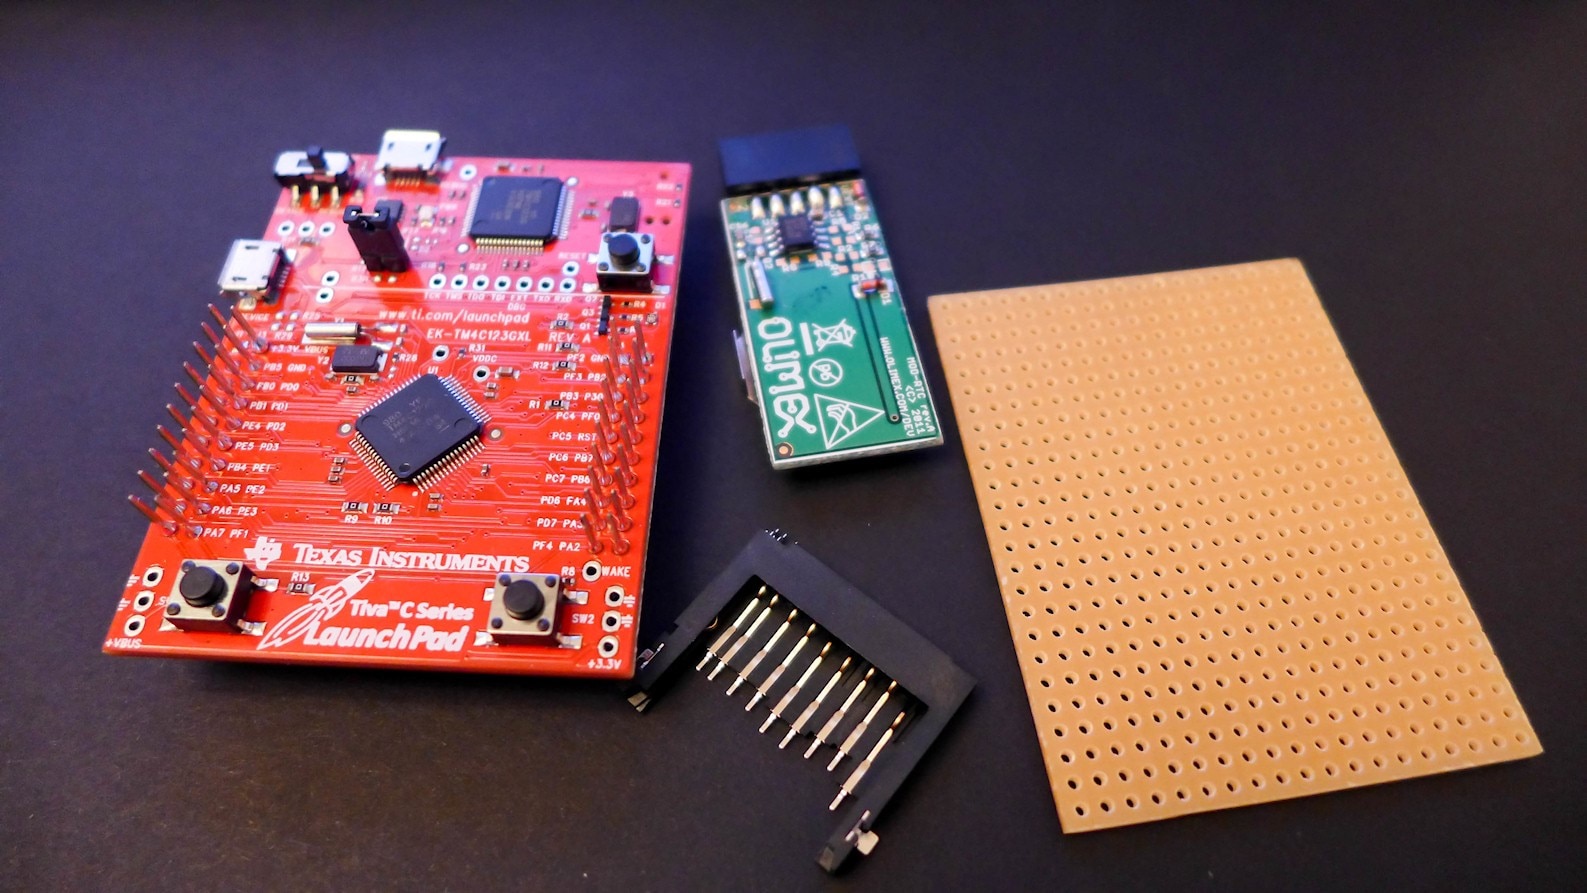
The LaunchPad does not contain an on-board SD card, but it was quick to add one onto a piece of stripboard. First, an SD card holderSD card holder and a piece of stripboard were acquired (ignore the green board in this photo, it was not needed):

image


The pinout from an existing board http://doc.43oh.com/The_Card_Reader_SDCard_BoosterPack  intended for a different LaunchPad was followed, to retain some standard. The pinout is listed below.

Launchpad pin   SD card pin   Description
-------------   -----------   -----------
J1-1            4             VDD (3.3V)
J1-7            5             SCLK
J1-8            1             CS
J2-1            6             GND (VSS1)
J2-6            2             MOSI
J2-7            7             MISO


This is the SD card pinout:

image


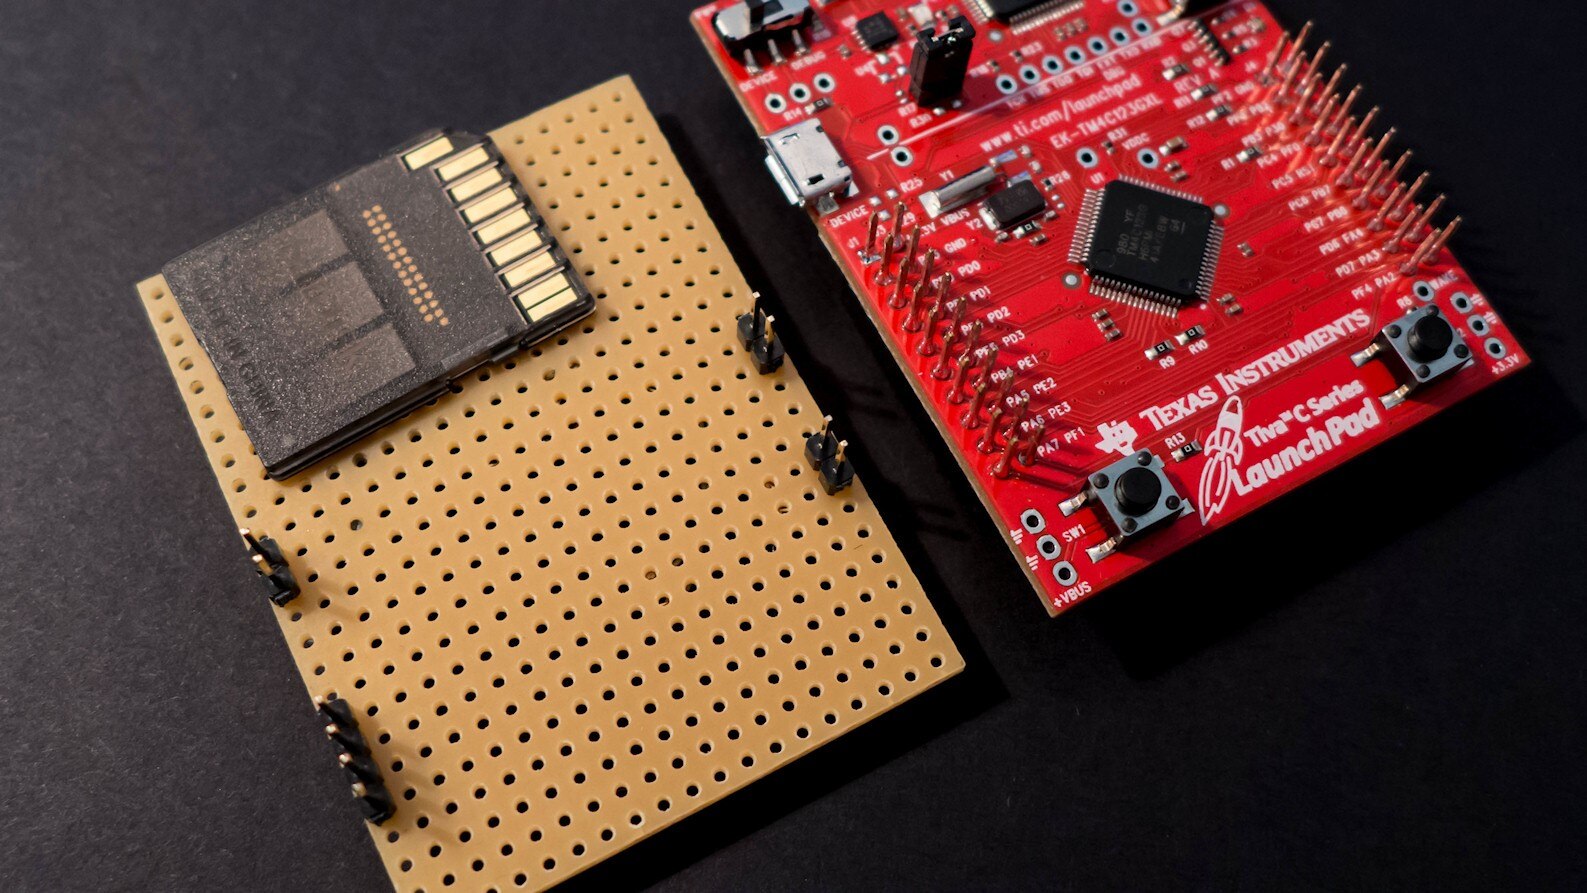
Header pins were soldered to interface with the required LaunchPad pins as shown in this photo:

image


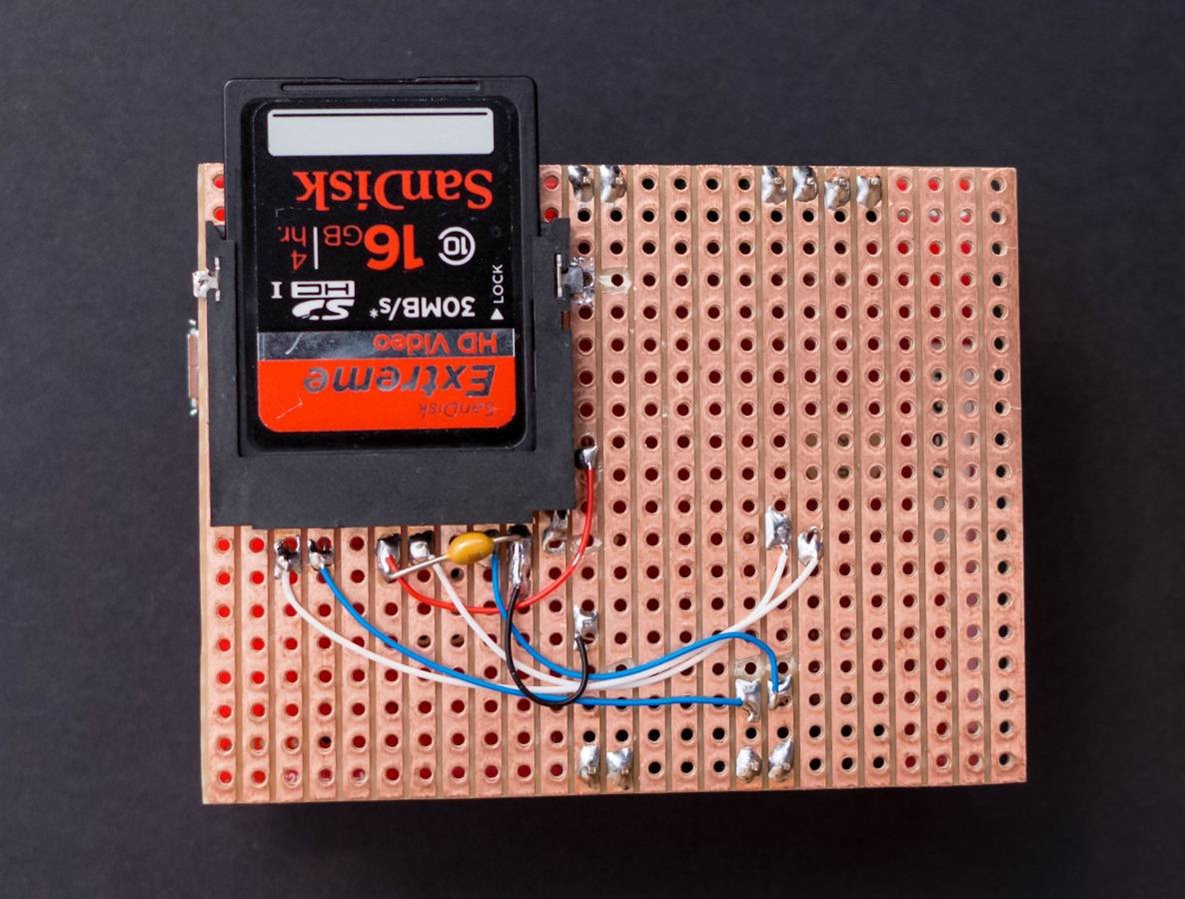
Then the SD card holder was soldered onto the underside and wired up. It really is simple. A 100nF capacitor was also soldered into place across the supply rails, close to the SD card holder. It is the only other component required to build the SD card functionality.

image


After this hardware was complete, it was time to move onto the software.


Software implementation

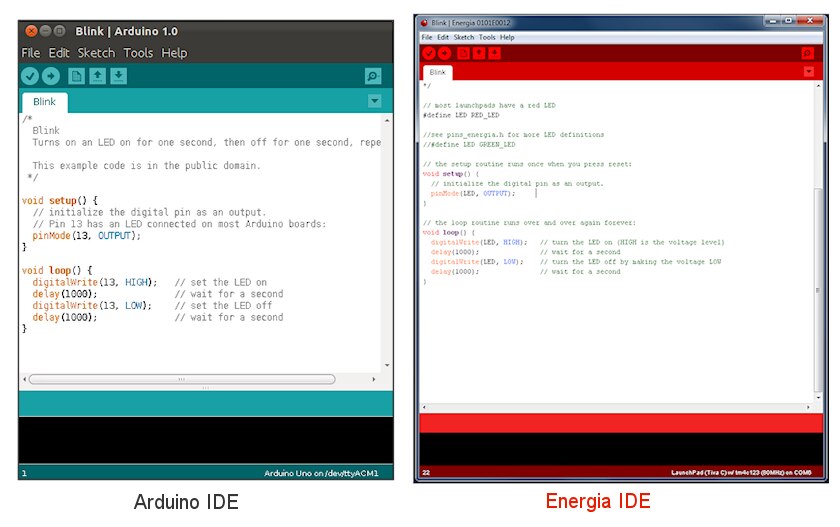
This was easy. An existing SD card implementation was taken and adapted slightly to suit the Tiva LaunchPad board. The source code is attached to this post. The development environment is called Energia. If you’re not familiar with it, it is near-identical to Arduino’s development environment. The functions are the same. If you can use an Arduino then you can use a LaunchPad. After having studied it, the conclusion is that the main difference is the color of the development environment:


image


The software attached to this post consists of two parts; an SD card support library, and the application code that implements the data logger. The SD card support library was saved into the folder energia/hardware/lm4f/libraries, so that (say) the file SD.h could be found at energia/hardware/lm4f/libraries/SD/SD.h


The application code is in a single file called sd_logger.ino and it can be saved elsewhere. Using the Energia development environment, the code can be compiled and uploaded to the board. For debug purposes, a serial port monitor can be used. This is part of the Energia development environment. The serial communication occurs over the USB connector that is part of the LaunchPad board.


Using the Logger

With the board programmed, power is applied. The logger will now wait until the on-board switch SW1 is pressed. Once pressed, the green light turns on to indicate logging, and it will record an analog value (analog input is pin J1-2 on the LaunchPad board) once per second to the SD card. Optionally, the data can be observed in real time as well, by plugging in the USB cable into a PC and using any console/terminal software (such as PuTTY).


Here is some example output on the console:

Initializing SD card...card initialized.
Creating filename DAT1.TXT
Starting logging...
2511, 327, 322, 327, 311, 2240, 2143, 322, 323, 321
323, 311, 323, 322, Logging stopped.


Pressing stop (SW2) and then start (SW1) will generate a new file:

Creating filename DAT2.TXT
Starting logging...
311, 326, 320, 311, Logging stopped.


The saved files contain one value per line with no additional text, ready for importing into Excel.


Summary

This was a trivial software logger, but the information here could be useful to save any data to an SD card. The development environment that was used for the Tiva Launchpad is near-identical to the Arduino development environment therefore it should be an easy and smooth transition for Arduino users.


Part 2 (click here) will provide useful time-stamping functionality and a serial port menu for configuration.


Source Code

The code is attached below.

Attachments:
sd-logger-source.zip
  • Sign in to reply

Top Comments

  • ravi_butani
    ravi_butani over 10 years ago in reply to Former Member +2
    I have tested this SD lib with TIVA Launchpad, CC3200 LaunchPad and old stellaris launchpad... it works just perfectly fine... as per following pic I have used SPI0 bus which is default SPI bus means.…
  • shabaz
    shabaz over 10 years ago in reply to mcb1 +2
    Hi Mark, Well spotted. There appears to be an inconsistency between the text and the photos : ( The text is correct as far as I can tell, but the photo doesn't reflect the correct pin grounded I think…
  • dougw
    dougw over 11 years ago in reply to shabaz +1
    I know it requires some conversion, but you could time and date stamp to the nearest second in 8 characters. One way is to allocate 3 digits for the day of the year (1-365) and 5 digits for the second…
Parents
  • Former Member
    Former Member over 10 years ago

    Hello  Shabaz,

    My name is Twofur and I’m new to the posting to forums and getting help from open sources. I’m learning computer architecture and I’m at a stage of building a project with a micro-controller that collects data and store it on a SD card.  I’m using a Tiva Launch pad just like yours and I’ve uploaded the code to the device and hooked up the device to the right pins. When I run the device and it initializing the SD card it says that it had a card failed, or not present even though it is been checked over many times to correctly wired(by your website instructions) and the pins are connected. Now when I used another person’s booster from 43oh and the code (yours), it works properly. What I wanted to ask, first was have you had this problem (I don’t think you did), and second is there a trick your using to get your card to work (like a unknown resistor I’m not seeing in the picture to the CD or is there something miss-wired). Any advice or suggestions to do something from your experience will be helpful to understanding why this is not working. Also before I leave I wanted to thank you for your post and time you put into this program. It looks much cleaner then a lot of code I’ve seen for writing to SD card for other open source code and look easy to implement.

    1. p.s. I forgot to put this in but I wanted to ask where the ports are being init(). I’m new to energia and It’s been hard to follow the path the program takes to assign the ports to the device (I’ve seen a lot of code this week and not having a debugger to watch makes it hard to locate parts of code at times.) Thanks for this as well if you have time.
    • Cancel
    • Vote Up 0 Vote Down
    • Sign in to reply
    • More
    • Cancel
Comment
  • Former Member
    Former Member over 10 years ago

    Hello  Shabaz,

    My name is Twofur and I’m new to the posting to forums and getting help from open sources. I’m learning computer architecture and I’m at a stage of building a project with a micro-controller that collects data and store it on a SD card.  I’m using a Tiva Launch pad just like yours and I’ve uploaded the code to the device and hooked up the device to the right pins. When I run the device and it initializing the SD card it says that it had a card failed, or not present even though it is been checked over many times to correctly wired(by your website instructions) and the pins are connected. Now when I used another person’s booster from 43oh and the code (yours), it works properly. What I wanted to ask, first was have you had this problem (I don’t think you did), and second is there a trick your using to get your card to work (like a unknown resistor I’m not seeing in the picture to the CD or is there something miss-wired). Any advice or suggestions to do something from your experience will be helpful to understanding why this is not working. Also before I leave I wanted to thank you for your post and time you put into this program. It looks much cleaner then a lot of code I’ve seen for writing to SD card for other open source code and look easy to implement.

    1. p.s. I forgot to put this in but I wanted to ask where the ports are being init(). I’m new to energia and It’s been hard to follow the path the program takes to assign the ports to the device (I’ve seen a lot of code this week and not having a debugger to watch makes it hard to locate parts of code at times.) Thanks for this as well if you have time.
    • Cancel
    • Vote Up 0 Vote Down
    • Sign in to reply
    • More
    • Cancel
Children
  • ravi_butani
    ravi_butani over 10 years ago in reply to Former Member

    I have tested this SD lib with TIVA Launchpad, CC3200 LaunchPad and old stellaris launchpad... it works just perfectly fine... as per following pic I have used SPI0 bus which is default SPI bus means...

    SD(SPI)  TivaC

    VSS1          GND

    VSS2          GND

    VDD            VCC    

    DO              MISO(0)

    DI                MOSI (0)

    CLK            SCLK(0)

    CS              CS(0)


    image


    image

    • Cancel
    • Vote Up +2 Vote Down
    • Sign in to reply
    • More
    • Cancel
  • shabaz
    shabaz over 10 years ago in reply to ravi_butani

    Hi Ravi,


    That's awesome, thanks for confirming operation with the CC3200! Also the microSD pinout is very useful, I had not tried it but will probably use that from now on, since normal SD cards feel too big these days.

    • Cancel
    • Vote Up 0 Vote Down
    • Sign in to reply
    • More
    • Cancel
  • shabaz
    shabaz over 10 years ago in reply to Former Member

    Hi Twofur,


    Thanks for the comments! The photo shows the final board, it didn't need any resistors or any additional components.

    Just to confirm, the 100nF capacitor should be fairly close to the microSD card, apart from that I can't see that anything is critical. I'm wondering if the SD card holder might be faulty, maybe not making good contact with some pins? This is a long shot, normally they make perfect contact unless they are cracked.

    Did you test using the same SD card as used with the 43oh board? (Just in case some SD cards behave differently).

    It may be worth using a continuity check on a multimeter just to make sure the connections on the SD card holder are going to the correct pins, and not shorted to each other, but probably you have done that or visually inspected it deeply already.

    If none of the above works, can you post a photo of it showing as much detail as you can, in case me or someone else can spot anything?

    • Cancel
    • Vote Up 0 Vote Down
    • Sign in to reply
    • More
    • Cancel
  • Former Member
    Former Member over 10 years ago in reply to shabaz

    Hey shabaz and ravi butani

    So a friend and I created a new holder for this picture and tested with every know combination of hooking it up to the pins before we sent it here (I wired it up as the same as your picture on a breadboard). It still is having the same issues as before. If you notice something, or anyone else, please let us know. As for the SD card, we are using the same card that was able to write to from the 43oh booster. Its kinda odd this is not working but we won't know any more info until my booster comes in, then we can take a closer look at everything and a fresh mindset to the problem. If we find something out in the mean time, we will let you know about it.

    Thanks for the respond to my question and if I have anything more I'll ask and again, thank you for your time,

    Twofur


    p.s. I may delete the picture/comments after a time or replace it with a cleaner one if we happen to get the chance(or you ask for one). Unless you want the comment kept for helping people diagnosis problems in the future.

    image

    • Cancel
    • Vote Up 0 Vote Down
    • Sign in to reply
    • More
    • Cancel
  • shabaz
    shabaz over 10 years ago in reply to Former Member

    Hi Twofur,


    Just a quick comment, (I will look in more detail at the photo later today), the jumper cables you're using do sometimes break inside the black part, so that no connection is made, sometimes only when flexed. It may be worth checking there is no break/intermittent fault with the wires.

    The other thing is that a 100nF capacitor across the supply close to the microSD card may be important, so it is best to add that too.

    • Cancel
    • Vote Up +1 Vote Down
    • Sign in to reply
    • More
    • Cancel
element14 Community

element14 is the first online community specifically for engineers. Connect with your peers and get expert answers to your questions.

  • Members
  • Learn
  • Technologies
  • Challenges & Projects
  • Products
  • Store
  • About Us
  • Feedback & Support
  • FAQs
  • Terms of Use
  • Privacy Policy
  • Legal and Copyright Notices
  • Sitemap
  • Cookies

An Avnet Company © 2025 Premier Farnell Limited. All Rights Reserved.

Premier Farnell Ltd, registered in England and Wales (no 00876412), registered office: Farnell House, Forge Lane, Leeds LS12 2NE.

ICP 备案号 10220084.

Follow element14

  • X
  • Facebook
  • linkedin
  • YouTube