


Note: The project is experimental. The project is low power and low voltage, and requires a low voltage source which can be derived from a mains transformer.
However there are significant risks with building mains powered projects. For that reason, it is advised to use an external enclosed AC to low voltage mains transformer unless you’re a qualified engineer.
Introduction
When working with analog circuits it can help to have a linear power supply. I use a Thandar supply at home, but unfortunately it just has a single supply rail.
Years ago I built a cheap dual-rail supply; it used a couple of linear supply kits from a local electronics store, and was put together with a mains transformer and a couple of voltmeter display panels. I still use it, but I wanted to create “building block” types of modules for op amp experiments, hi-fi audio projects such as headphone amplifiers, working with ultra-sensitive devices and signals from sensors, and sensitive radio receivers, and for integration into all sorts of other projects where noise would cause issues otherwise.
So, the aim of this project was to build a reasonably general-purpose, low noise, compact linear power supply that can be embedded into larger projects or could be used standalone. It is intended to supply up to around 250mA at voltages selectable at design time, and power output can be up to 3.75W for each of dual rails, so there is enough power to drive lots of interesting projects.
The final PCB actually contains two designs; a dual rail supply, and also a separate single rail supply. The two sections can be cut if desired, if all three rails are not needed in a project. Multiple boards could be used for additional rails.
The photo here shows the dual rail portion of the board completed (the single rail part of the board is essentially just a duplicate of half of the dual-rail portion, and is not fully soldered in the photo below). Having three rails could be useful for combined analog/digital projects where (say) a +5V supply is needed for a microcontroller, but also +/-15V is needed for the analog portion. The separate single rail supply is isolated, to help keep any microcontroller noise away from the analog circuitry.

The voltage regulators are adjustable at design time through modification of component values so the PCB can be useful for various projects by altering the capacitor and resistor values, and selecting an appropriate transformer.
As mentioned, a typical use-case could be to have +5V and +/-15V or +/-10V. I decided to construct the dual rail portion to be +/-14V (a somewhat arbitrary value, I just needed something higher than +/- 12V for some experiments.
To summarise, here are the design specs, but as mentioned these values can be changed by altering component values:
Input: 110V or 220V AC
Main Output: +14V 250mA, -14V 250mA
Additional Output: +5V 200mA
Design Overview
The output from the mains transformer is shown here:

The flattened top and bottom is normal; the mains supply is not always a perfect sine wave, and the transformer may be introducing some harmonics too.
The output from the mains transformer is rectified and then any diode switching noise is filtered and the rectified output is also filtered using the large electrolytic capacitors to leave a DC waveform. Any high frequency noise is reduced using ferrite beads, which present a high resistance to such noise content.

The positive unregulated output from the circuit above goes to the positive linear regulator. This circuit is based around an LT3065 integrated circuit. The datasheet was followed. The voltage is set using a couple of resistors, but if you wish to make changes then please consult the datasheet because some other part values (such as capacitor C10 in the diagram below) also need to be adjusted if the desired voltage is changed.
Note that the output voltage with the values shown is actually 14V, not 15V. The output current is set to 250mA maximum.

The negative unregulated output from the bridge rectifier is fed to a LT3090 based circuit. Again the datasheet was closely followed. The output is -14V (250mA max) with the values indicated.

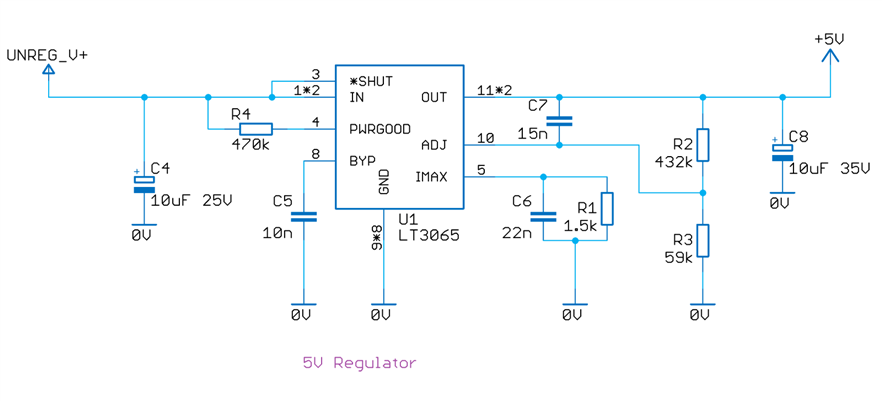
The portion of the PCB that contains the single rail power supply reuses the same design as for the positive rail. The values are changed though, because I desired to set this output to 5V. The current limit for the 5V output was set to 200mA with resistor R1.
Building It
The render here shows what the PCB looks like for the dual rail design. The transformer output is connected on the left side.
The circular arrangement was originally intended to allow screwing directly over the center of the toroidal transformer for a very small footprint supply block, but toward the end of the PCB design layout I decided to just fit it alongside the transformer with screw holes on the corners of the PCB instead. The top half of this design implements the negative supply rail, and the bottom half implements the positive supply rail.

The single rail output PCB design is near-identical to the bottom half of the dual-rail PCB design.
The CAD files are attached to the blog post, they can be sent to any PCB manufacturer. Once the boards arrive, the first task is to solder the linear regulator integrated circuits. They have an exposed pad on the underside; one procedure on how to solder underside pads using a normal soldering iron is shown here.
After they have been soldered, continue soldering the smallest parts and end with the largest, i.e. the electrolytic capacitors and the connectors.
Attaching the Transformer
Molex Ultra-Fit connectors were used for the transformer secondary wires. A low-cost PA-09 crimp tool was used.

When inserting the crimped ends into the plastic shell, orient the crimp such that the side of the crimp that was open is facing upwards, if the clip side of the plastic shell is also facing upwards. The photo below shows the correct orientation of the metal crimps in the center of the photo, open side facing upwards, to match the orientation of the plastic shell on the right side of the photo, which has its clip facing upwards.

Initial Tests
The bulk of the testing will be saved for part 2, but for now the transformer was powered up, and the output voltage from the dual rails was observed initially with no load. Noise was not measurable with the oscilloscope, other techniques will be used for this.
The voltage was also measured with a multimeter and the prototype output was measured to be +14.06V and -13.99V. Load and dynamic testing will be carried out in Part 2.
Getting a Third, Isolated Rail
In order to get the third rail to be fully isolated, one could use another transformer. However, it is more practical to use the same transformer and add another winding.
Note: The information in this section is explicitly for the specific 15VA 2x12V transformer15VA 2x12V transformer from Farnell, and is only appropriate if the dual rails set for +/-15V or lower, at up to 250mA on each rail, and if the third rail is set to be at +5V at up to 200mA.
The information will not apply to any other model transformer, even if the ratings appear identical. This also applies to all other materials (such as the wires and tape) mentioned in this section. Only the part numbers specified must be used, and they must come from a traceable source. There is a very high risk of damage or electrocution or fire if this is not followed.
Also, please use responsible mains wiring, not bad mains wiring as often seen.
The steps are extremely simple, there is not much that can go wrong, provided you use the correct, identical materials and follow the procedures. The actual mains wiring and final assembly will not be described in this blog post, it will come in part 2. This blog post will only describe how to obtain the extra supply rail using the transformer.
There are four main steps.
Step 1: Winding the Enamelled Wire
Take a 7 metre length of 180 degrees C rated 24 or 25 AWG enamelled copper wire, and wind 82 turns of it around the transformer. To do this, it is easier to start in the middle, at 3.5 metres into the wire, and wind 41 turns from each 3.5 metre length. One turn is basically one pass through the center of the transformer. Once you’re done, it should look like the photo below:

Step 2: Attaching the PVC Wire Leads
Use a small piece of Kapton tape (if you've not used it before, it is a very heat tolerant adhesive tape that can be used as an insulating layer) to hold the first and last windings in place, and then attach PVC insulated wires to the ends. This process will involve scraping off the enamel (use a small piece of sand paper or the edge of a blade). The photo here shows a blue PVC insulated wire soldered onto the enamelled copper wire. The insulated wire must be 22AWG, 105 degrees C rated.

Step 3: Securing the Wire Leads
Bend back the enamelled wire and place some tape across the blue wire, and then fold over the blue wire into a ‘U’ shape and secure it with more Kapton tape, such that there is some strain relief. The Kapton tape is placed across the wire, but also another piece is taped through the transformer, on both sides of the blue wire, so that it is held in place securely. The result of this should look like in the photo below:

Here is the birds eye view of it all so far; you can see the Kapton tape has been wrapped through the transformer, on both sides of the blue wire, for both ends of the winding:

Step 4: Insulating the Winding
Wind Kapton tape around the transformer, to cover all of the enamelled copper wire. This won’t be possible with a single long length of Kapton tape, so you’ll have to do it with shorter (say 30cm) lengths. Start at the other side of the blue wire, so that at least 10mm prior to the enamelled copper wire is covered, and overlap the Kapton tape by half of its width, so that by the time the tape has been wound around to the other end blue wire (and cover a further 10mm), there is effectively a double-layer thickness of Kapton tape everywhere over the 5V winding, due to the overlap. It will look like the photo below:

That’s it! Now you have a transformer with an additional winding suitable for providing the +5V rail.
In summary the modifications listed have made the transformer suitable for providing the +/-15V rails at up to 250mA, and +5V at 200mA. This capability should be sufficient for many of the projects mentioned in the introduction!
The specific parts that must be used are listed here:
15VA 2x12V Transformer15VA 2x12V Transformer
24 AWG enamelled wire24 AWG enamelled wire
22 AWG PVC insulated wire22 AWG PVC insulated wire
Kapton Polyimide tapeKapton Polyimide tape
Summary
A dual rail (or triple rail) power supply module design has been constructed for low noise projects. Although tests still need to be done, I thought it was worth writing up this part 1 now, in case others wish to construct this project too. The parts list is below and board files are attached to this blog post too, ready for sending to any PCB factory (e.g. Elecrow, iTead).
Parts List
Transformer, Enamelled Wire and Tape:
See above
Unregulated Supply Section:
C1,C2,C3,C4,C5,C6 3300uF 25V EEUFK1E332SEEUFK1E332S Farnell 1744955 18MMDIA 7.5MM PITCH Panasonic Capacitor FK Series
C15 1u 100V 1210 Capacitor Kemet C1210C105K1RACTU Farnell 1793831
R8 100R 0805 Resistor CR0805-FX-1000ELFCR0805-FX-1000ELF Farnell 2008370
D1,D2,D3,D4 PMEG10020AELRPMEG10020AELR Farnell 2498546 SOD123W 100 V 2 A low leakage current Schottky barrier rectifier
FB1,FB2 FBMH3225HM102NT Farnell 1651731 Ferrite Bead 1210
J1 Molex 172286-1204172286-1204 Farnell 2494350 ULTRA-FIT-4-VERT Connector
Dual Rail Section Plugs and Crimp terminals:
J1-PLUG J2-PLUG Molex 172256-1004172256-1004 Farnell 2494339 Ultra-Fit 4-way Connector Housing
CRIMP-SOCKETS (qty 8 needed) Molex 172253-3111 Farnell 2494336 Ultra-Fit 20AWG
Dual Rail Section Positive Output:
C7 10uF 25V Panasonic EEEHD1E100AREEEHD1E100AR Farnell 1714735 case'C SMD Aluminium Electrolytic capacitor
C8 10n 0603 Capacitor Kemet C0603C103K1RACTU Farnell 1865545
C9 22n 0603 Capacitor Kemet C0603C223K1RACTU Farnell 1865548
C10 56n 0603 Capacitor Kemet C0603C563K3RACTU Farnell 2522421
C11 10uF 35V AVX TPSD106K035R0300 Farnell 1432608 Tantalum D size (7.3mmx4.3mm) Band marks '+'
R1 1.2k 0603 Resistor(sets the current limit to 250mA CR0603-FX-1201ELFCR0603-FX-1201ELF Farnell 2333528
R2 270k 1% 0603 Resistor (sets the output voltage to 14V) ERJ3EKF2703V Farnell 2303262
R3 12k 1% 0603 Resistor (sets the output voltage to 14V) CR0603-FX-1202ELF Farnell 2333583
R4 470k 0603 Resistor CR0603-FX-4703ELFCR0603-FX-4703ELF Farnell 2333613
U1 LT3065EMSE or LT3065IMSE Farnell 2396654 LDO Positive Voltage Regulator
J2 Molex 172286-1204172286-1204 Farnell 2494350 ULTRA-FIT-4-VERT Connector
Dual Rail Section Negative Output:
C12 10uF 25V Panasonic EEEHD1E100AREEEHD1E100AR Farnell 1714735 case'C SMD Aluminium Electrolytic capacitor
C13 100p 0603 Capacitor Kemet C0603C101J1GACTU Farnell 1414602
C14 10uF 35V AVX TPSD106K035R0300 Farnell 1432608 Tantalum D size (7.3mmx4.3mm) Band marks '+'
R5 40.2k 1 0603 Resistor(sets the current limit to 250mA ERJ3EKF4022VERJ3EKF4022V Farnell 2059463
R6 280k 1 0603 Resistor(sets the output voltage to-14V ERJ3EKF2803VERJ3EKF2803V Farnell 2059515
R7 470k 0603 Resistor CR0603-FX-4703ELFCR0603-FX-4703ELF Farnell 2333613
U2 LT3090EMSE or LT3090IMSE or LT3090MPMSE Farnell 2365998 Negative Voltage Regulator
Third Rail Section Plugs and Crimp terminals:
J1-PLUG,J2-PLUG Molex 172256-1002172256-1002 Farnell 2494337 Ultra-Fit 2-way Connector Housing
CRIMP-SOCKETS (qty 4 needed) Molex 172253-3111 Farnell 2494336 Ultra-Fit 20AWG
Third Rail Section (Positive 5V Regulator):
D1,D2,D3,D4 PMEG10020AELRPMEG10020AELR Farnell 2498546 SOD123W 100 V 2 A low leakage current Schottky barrier rectifier
FB1 FBMH3225HM102NT Farnell 1651731 Ferrite Bead 1210
C1 1u 100V 1210 Capacitor Kemet C1210C105K1RACTU Farnell 1793831
C2,C3 5600uF 16V EEUFK1C562EEUFK1C562 Farnell 1744932 16MMDIA 7.5MM PITCH Panasonic Capacitor FK Series
C4 10uF 25V Panasonic EEEHD1E100AREEEHD1E100AR Farnell 1714735 case'C SMD Aluminium Electrolytic capacitor
C5 10n 0603 Capacitor
C6 22n 0603 Capacitor
C7 15n 0603 Capacitor
C8 10uF 35V AVX TPSD106K035R0300 Farnell 1432608 Tantalum D size (7.3mmx4.3mm) Band marks '+'
R1 1.5k 0603 Resistor(sets the current limit to 200mA CR0603-FX-1501ELFCR0603-FX-1501ELF Farnell 2333563
R2 432k 1% 0603 Resistor (sets the output voltage to 5V) ERJ3EKF4323V Farnell 2303286
R3 59k 1% 0603 Resistor (sets the output voltage to 5V) CRCW060359K0FKEA Farnell 1652892
R4 470k 0603 Resistor CR0603-FX-4703ELFCR0603-FX-4703ELF Farnell 2333613
R8 100R 0805 Resistor CR0805-FX-1000ELFCR0805-FX-1000ELF Farnell 2008370
U1 LT3065EMSE or LT3065IMSE Farnell 2396654 LDO Positive Voltage Regulator
J1,J2 Molex 172286-1202172286-1202 Farnell 2494346 ULTRA-FIT-2-VERT Connector

