element14 Community
element14 Community
    Register Log In
  • Site
  • Search
  • Log In Register
  • Members
    Members
    • Benefits of Membership
    • Achievement Levels
    • Members Area
    • Personal Blogs
    • Feedback and Support
    • What's New on element14
  • Learn
    Learn
    • Learning Center
    • eBooks
    • STEM Academy
    • Webinars, Training and Events
    • More
  • Technologies
    Technologies
    • 3D Printing
    • FPGA
    • Industrial Automation
    • Internet of Things
    • Power & Energy
    • Sensors
    • More
  • Challenges & Projects
    Challenges & Projects
    • Design Challenges
    • element14 presents
    • Project14
    • Arduino Projects
    • Raspberry Pi Projects
    • More
  • Products
    Products
    • Arduino
    • Dev Tools
    • Manufacturers
    • Raspberry Pi
    • RoadTests & Reviews
    • Avnet Boards Community
    • More
  • Store
    Store
    • Visit Your Store
    • Choose Another Store
      • Europe
      •  Austria (German)
      •  Belgium (Dutch, French)
      •  Bulgaria (Bulgarian)
      •  Czech Republic (Czech)
      •  Denmark (Danish)
      •  Estonia (Estonian)
      •  Finland (Finnish)
      •  France (French)
      •  Germany (German)
      •  Hungary (Hungarian)
      •  Ireland
      •  Israel
      •  Italy (Italian)
      •  Latvia (Latvian)
      •  
      •  Lithuania (Lithuanian)
      •  Netherlands (Dutch)
      •  Norway (Norwegian)
      •  Poland (Polish)
      •  Portugal (Portuguese)
      •  Romania (Romanian)
      •  Russia (Russian)
      •  Slovakia (Slovak)
      •  Slovenia (Slovenian)
      •  Spain (Spanish)
      •  Sweden (Swedish)
      •  Switzerland(German, French)
      •  Turkey (Turkish)
      •  United Kingdom
      • Asia Pacific
      •  Australia
      •  China
      •  Hong Kong
      •  India
      •  Korea (Korean)
      •  Malaysia
      •  New Zealand
      •  Philippines
      •  Singapore
      •  Taiwan
      •  Thailand (Thai)
      • Americas
      •  Brazil (Portuguese)
      •  Canada
      •  Mexico (Spanish)
      •  United States
      Can't find the country/region you're looking for? Visit our export site or find a local distributor.
  • Translate
  • Profile
Test & Tools
  • Technologies
  • More
Test & Tools
Blog Building Custom Helping Hands
  • Blog
  • Forum
  • Documents
  • Events
  • Members
  • Mentions
  • Sub-Groups
  • Tags
  • More
  • Cancel
  • New
Test & Tools requires membership for participation - click to join
Blog Post Actions
  • Subscribe by email
  • More
  • Cancel
  • Share
  • Subscribe by email
  • More
  • Cancel
Group Actions
  • Group RSS
  • More
  • Cancel
Engagement
  • Author Author: shabaz
  • Date Created: 12 Mar 2019 10:20 PM Date Created
  • Views 512 views
  • Likes 20 likes
  • Comments 16 comments
  • bench vise
  • vise
  • helping hands
  • pcb_holder
  • helping_hands
  • vice
  • pcb holder
  • vises
Related
Recommended

Building Custom Helping Hands

shabaz
shabaz
12 Mar 2019

Introduction

For years I’ve been “helping hand”-less. Since I was a kid, the design of the classic helping hands has not really changed - it has stood the test of time, but just for lightweight tasks. For anything large/heavy, it all goes wrong.


Here’s one attempt at solving the problem.. it relies on cheap camera ball-heads and clamps, and a steel base. It can all be built in an hour or two, depending on how fancy a base is desired. Otherwise, it is all plug-and-play to assemble, like Lego.


This eight-minute video explains the project, and has some demo examples of it in action.

You don't have permission to edit metadata of this video.
Edit media
x
Upload Preview


This is the type of Helping Hands I was familiar with:

Image source: Google Images


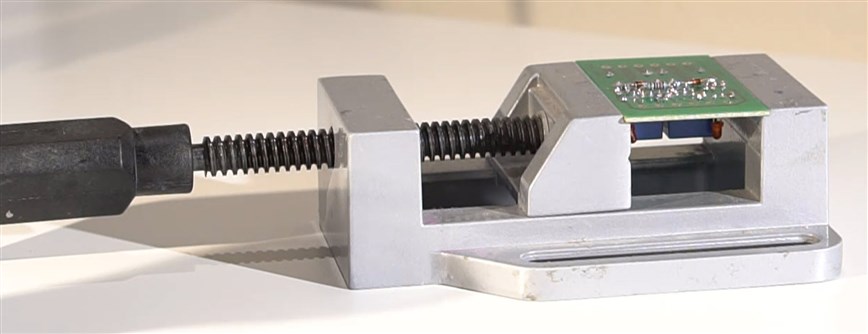
Instead, I’ve been using a low-cost aluminium vice such as the one in the photo below to meet most of my needs, but occasionally I’d still like a helping-hands style tool, but a lot stronger, and customisable.


The bill-of-materials for this project is probably $40-50 in total, but there is the opportunity to reduce costs. It hinges on the fact that camera users often have very fancy equipment at their disposal! Searching on Amazon/Aliexpress revealed systems such as 'SmallRig’ which have components like 15mm diameter rods, and clamps. I purchased some to see if they could be useful. Any camera user will eventually have a ball head spare, so costs can be saved there too. There are very basic ones from Aliexpress for less than $5 but they are not very good : ( I used an old CB2.7 ball head, and a £12 SIOTI ball head from Amazon. Both are great.


For the base, I purchased an oval 15mm thick steel offcut for £3.99. Somewhere in the UK a large steel plate needed a shape cut out, and the factory sold the cut-outs on ebay.


It is low cost, has a reasonable footprint (168x99mm), and is very heavy (perhaps a kilogram) – perfect! I imagine factories in other countries will also sell offcuts for next to nothing. One person's scrap is another person's treasure..


There is a notch in the offcut where the cutting tool started, but that can be filled (Polyfilla, or even epoxy glueepoxy glue) if desired, or left as-is. Next, a ¼ inch UNC hole was tapped – this is the typical standard thread for consumer cameras. It is not essential, if the hole is untapped then epoxy glue could be used too.


I filed off the sharp edges and lightly hand-sanded it to get rid of the rust. It looked nice and industrial! Still, to go with the rest of the décor, I did paint it afterwards but that was unnecessary. Some rubber feet should be attached on the underside too.


Assembling It

There’s not much to say, it is trivial to connect it all together.

Materials

These were the main parts that I used, but there is plenty of scope for variation.

Item
1Steel base from ebay seller bitsandbobs332014
2Rubber feetRubber feet
31/4" to 1/4" Adaptor
4Ball Head
515mm Rod 150mm length
6Rod Clamp
7M12 to 1/4" Adaptor
8SmallRig Super Clamp


Customizing It

The possibilities are endless.. Another clamp arm could be attached if required. An LED light could be added. Custom grips could be 3D-printed to clip onto the current clamp jaws.


Using It

Check out the earlier video to see it in action – it’s surprising how many uses it has.

It can act as a PCB holder, although I still prefer using the aluminium flat vice for that.


It is extremely rigid, so things can be held at a distance, wherever it is easier to work.


It can hold heavy-ish antennas too!


I found that very large PCBs can be propped up.


Since the clamp has rubber grips, it is also very handy for holding oscilloscope probes in place. Also, it can help with holding large heavy cables close to connectors. I found it useful for soldering audio jacks!


Summary

I’m really happy how this simple project turned out. The entire unit is strong, and doesn’t easily tip while using it. In future I may try adding an LED light.


If you build any type of helping hands/clamp system, or have ideas for adaptations or attachments for it, it would be great to hear about them.


Thanks for reading!

Anonymous

Top Comments

  • 14rhb
    14rhb over 3 years ago +9

    Hi Shabaz,


    This is a great build and looks so much better than the standard croc-clip helping hands, well done.


    I bought myself some 1/4" UNC tap/die set years ago (so that I could make customised tripod…

  • ntewinkel
    ntewinkel over 3 years ago +9

    That's a REALLY nice design, Shabaz!

    I might have to try that for myself. I can likely get a chunk of heavy metal from my father-in-law. Nice how yours is perfectly shaped like that.


    I was about to order…

  • genebren
    genebren over 3 years ago +8

    shabaz,


    What a great idea (or series of ideas). The video was very good, I feel that you are quite good at capturing your ideas/explaining your process in your videos (far more comfortable than I feel anywhere…

Parents
  • three-phase
    three-phase over 3 years ago

    Awesome idea and great write up. I do particularly like the assembly diagram, you do seem very good at producing those types of drawings.


    The clamps you are using are for mounting extras onto camera tripods. You could also consider using a friction arm, sometimes called a magic arm. Loosening the one nut at the elbow joint allows all the pivots and joint to move and rotate and then just the one nut tightens it all back up again.


    https://www.amazon.co.uk/s?k=friction+arms&i=electronics&ref=nb_sb_noss


    Below is my camera tripod, camera not present as it was taking the picture!


    The only thing that I have found if that they tend to unscrew at the clamp sometimes due to the weight of accessory. A little loctite is called for I think.


    Anything from the big players such as Manfrotto is going to cost a lot, but there are plenty of options at a lower cost that are still good quality. The accessories in the pictures come from Moman and Camvate.


    I agree with Jan, the more you record and play with the editing software, the more comfortable and better you get at the videos, but in all honesty, I do not find anything wrong with the content you produce, same goes for a lot of the others on here.


    One tip I was given is, if you are on a tripod, you can turn the camera focus to manual and lens stability off, depending on type of camera used. Manually adjust the focus to your object and then when you move your hands around doing things, the camera won't focus in on them instead of what you want people to see. Although I still forget to do this now, and forget to switch it back to autofocus when needed.


    Kind regards

    • Cancel
    • Up +8 Down
    • Reply
    • More
    • Cancel
Comment
  • three-phase
    three-phase over 3 years ago

    Awesome idea and great write up. I do particularly like the assembly diagram, you do seem very good at producing those types of drawings.


    The clamps you are using are for mounting extras onto camera tripods. You could also consider using a friction arm, sometimes called a magic arm. Loosening the one nut at the elbow joint allows all the pivots and joint to move and rotate and then just the one nut tightens it all back up again.


    https://www.amazon.co.uk/s?k=friction+arms&i=electronics&ref=nb_sb_noss


    Below is my camera tripod, camera not present as it was taking the picture!


    The only thing that I have found if that they tend to unscrew at the clamp sometimes due to the weight of accessory. A little loctite is called for I think.


    Anything from the big players such as Manfrotto is going to cost a lot, but there are plenty of options at a lower cost that are still good quality. The accessories in the pictures come from Moman and Camvate.


    I agree with Jan, the more you record and play with the editing software, the more comfortable and better you get at the videos, but in all honesty, I do not find anything wrong with the content you produce, same goes for a lot of the others on here.


    One tip I was given is, if you are on a tripod, you can turn the camera focus to manual and lens stability off, depending on type of camera used. Manually adjust the focus to your object and then when you move your hands around doing things, the camera won't focus in on them instead of what you want people to see. Although I still forget to do this now, and forget to switch it back to autofocus when needed.


    Kind regards

    • Cancel
    • Up +8 Down
    • Reply
    • More
    • Cancel
Children
  • shabaz
    shabaz over 3 years ago in reply to three-phase

    Hi Donald,


    That's really interesting! I'd never heard of these magic arms - I'm going to get one for my light, and also to experiment with.. it could make a really convenient probe holder, if there was just one knob to tighten it all.

    I hoped that by setting the autofocus on the specific item, the video would be fine, but I accidentally did not notice I brought my arm over that location, and it messed things up there a bit.. Going into manual there is a much better idea.

    Regarding the diagrams, I (mis)use PowerPoint for those : ) Conveniently the shapes menu has a cube and cylinder and that and the gradient shading options gets me out of trouble a lot. The ball head was an AND gate symbol, shaded radially, with an ellipse at the back

    Thanks for all the tips!

    • Cancel
    • Up +6 Down
    • Reply
    • More
    • Cancel
Element14

element14 is the first online community specifically for engineers. Connect with your peers and get expert answers to your questions.

  • Members
  • Learn
  • Technologies
  • Challenges & Projects
  • Products
  • Store
  • About Us
  • Feedback & Support
  • FAQs
  • Terms of Use
  • Privacy Policy
  • Legal and Copyright Notices
  • Sitemap
  • Cookies

An Avnet Company © 2022 Premier Farnell Limited. All Rights Reserved.

Premier Farnell Ltd, registered in England and Wales (no 00876412), registered office: Farnell House, Forge Lane, Leeds LS12 2NE.

ICP 备案号 10220084.

Follow element14

  • Facebook
  • Twitter
  • linkedin
  • YouTube