


Hello everyone,
One of the uses the Agilent 33622A can have, is that of a signal source in an automated test system. Automated test systems are used on the production lines to test for defects, in the research stage for design validation (running a bunch of tests and checking if the result is within the expected limits), for characterization of a DUT and so on.
While you can connect to the instruments directly, using one of the communication interfaces, the preferred way of doing it is via the VISA API, which is an abstraction layer between your program and the device, that allows you to interact with each device in the same way, regardless of how it is connected to the PC (LAN, USB, GPIB, etc).
For this blog post, I was planning to use VISA to measure the sensitivity my HP 53131A frequency counter has at various frequencies and generate a sensitivity curve. It could have been done by generating a signal at those frequencies and lowering the amplitude until the frequency reading was off by some percentage, all done programmatically. I couldn't source a GPIB to USB adapter in time (I needed that for the frequency counter), so I can't run this experiment, but instead I'll do the next best thing: take a look at how we can control this waveform generator from custom software.
As I mentioned above, you can connect to the device directly via one of the provided interfaces. I'm not sure what and how is exposed over USB, however over LAN you can enable the "Sockets" service and connect to the device on port 5025.

Although this is perfectly fine and extremely straight forward, using the VISA API is still the preferred way to go, because it will allow you to use almost the same code, even if you change the connection interface (ex: you used USB up until now, but because the test system grew bigger you switched to LAN).
How do you use the VISA API? Luckily there's plenty of documentation out there - for quick reference I like the Visa.chm file that gets installed with the Agilent IO Libraries. To get to call those functions tho, you need to include the visa.h header and link against visa32.lib. On my PC the header can be found in C:\Program Files (x86)\IVI Foundation\VISA\WinNT\include and the library in C:\Program Files (x86)\IVI Foundation\VISA\WinNT\lib\msc, so the best way of using them is by adding these include paths in your project settings.
An important thing to understand about VISA is that it's session based. A session is nothing more than a handle that identifies a specific resource (ex: a connection to an instrument), so when we connect to a device, we receive a session handle and then we can use that handle to send and receive data to and from the device. When we are done with that resource, we need to close the session and VISA will close connections and free the resources its using internally.
The code flow looks like this:
- Open the Resource Manager.
- Query the resource manager for the connected instruments.
- Pick an instrument and connect to it.
- Communicate with the instrument, using the received session handle.
- Close the session for the instrument.
- Close the Resource Manager's session
What's immediately apparent, is that after we're done with a session, we need to close it and since I'm using C++, the natural approach to keep complexity down is to create a simple class that holds and closes the session in the destructor and we can derive from that when we need another class that is making use of sessions. Eventually, we can have an Instrument class that is a wrapper for the common VISA calls and a ResourceManager class that takes care of querying. I won't get into that tho, because complete code is never a good first example, but keep in mind the whole thing can be very OOP friendly. Instead, I'll give you a few very short and basic examples that should get you going.
In order to connect to a device we have to discover it first, that means we have to query the resource manager. The following program does just that: it queries for all the resources available and outputs the instrument location (the same string we can use to actually get a connection to the device).
ViStatus    res;
ViSession    rm;

// Initialize and get a handle on the Resource Manager
res = viOpenDefaultRM(&rm);

if (res == VI_SUCCESS)
{
    // See what instruments we have connected
    ViFindList    findList;
    ViUInt32    retcnt;
    char        instrDescr[VI_FIND_BUFLEN];

    // Find the first resource
    res = viFindRsrc(rm, (ViString)"?*", &findList, &retcnt, instrDescr);

    if (res == VI_SUCCESS)
    {
        cout << instrDescr << endl;

        while (--retcnt)
        {
            // Get the next resource
            res = viFindNext(findList, instrDescr);

            if (res != VI_SUCCESS)
                break;

            cout << instrDescr << endl;
        }d
    }

    viClose(rm);
}
One thing that's worth noting in here, is the "?*" string which is an expression that has to match the instrument descriptor in order for it to be returned. In this case it means any character (?), any number of times (*), but it allows you to get very specific and search for serial numbers or instruments connected in a particular way. For example, if you wanted to search for USB connected instruments you would use this filter: "USB?*:INSTR" which means USB<any character, any number of times>:INSTR. Running that on my PC returns the instrument descriptor for my scope and for the Agilent waveform generator:
USB0::6833::1230::ds1za000000000::0::INSTR
USB0::2391::22279::MY00000000::0::INSTR
To get more information on each device or on one in particular, you can connect to it and ask for the identification string via the "*IDN?" command or, in the case of USB devices, you can query the USB controller to get additional information - this has the added benefit that it doesn't get the device in remote mode.
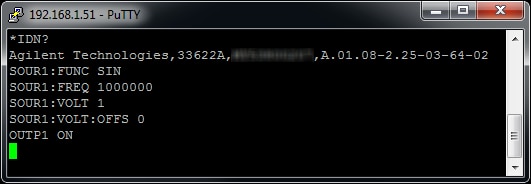
With the following code, we're searching for the ":2391::22279:", which is the VID and PID for the Agilent 33622A. Once found, we're going to connect to it, get and display the IDN string and make it output a 1 MHz sine wave just like we did earlier, using PuTTY.
ViStatus    res;
ViSession    rm;

// Initialize and get a handle on the Resource Manager
res = viOpenDefaultRM(&rm);

if (res == VI_SUCCESS)
{
    // See what instruments we have connected
    ViFindList    findList;
    ViUInt32    retcnt;
    char        instrDescr[VI_FIND_BUFLEN];

    res = viFindRsrc(rm, (ViString)"?*:2391::22279:?*", &findList, &retcnt, instrDescr);

    if (res == VI_SUCCESS)
    {
        cout << instrDescr << endl;

        // Connect to the device
        ViSession sess;

        res = viOpen(rm, (ViString)instrDescr, VI_NULL, VI_NULL, &sess);

        if (res == VI_SUCCESS)
        {
            // Get the IDN string
            char idn[1000];

            viPrintf(sess, "*IDN?\n");
            viScanf(sess, "%[^\n]\n", idn);

            cout << idn << endl;


            // Output a 1 MHz sinewave with 1 Vpp amplitude and 0 V offset
            viPrintf(sess, "SOUR1:FUNC SIN\n");
            viPrintf(sess, "SOUR1:FREQ 1000000\n");
            viPrintf(sess, "SOUR1:VOLT 1\n");
            viPrintf(sess, "SOUR1:VOLT:OFFS 0\n");
            viPrintf(sess, "OUTP1 ON\n");

            cout << "done" << endl;

            // Close device connection
            viClose(sess);
        }
    }

    // Free resource manager
    viClose(rm);
}
As I was saying, sometimes you might want to get more information about the device from the USB descriptor, since it's useful when deciding which device to use and it's a non-intrusive method, offering you a bunch of information with out the need to open a remote connection. I attached a piece of code that is based on an example from the NI-VISA samples and it does just that.
The Agilent 33622A Operating and Serivce Guide is listing all the supported SCPI commands and by the looks of it, it can do any of the operations you can do manually, so from here on, the sky is the limit. If I manage to get a GPIB adapter, I will do the test I was planning to do (with the frequency counter) and update this thread with the results. If that never happens, I hope that the information in this blog post is enough to get you started with VISA.
Edit:
I was not able to get my hands on a GPIB to USB adapter - they just cost more than I'm willing to pay (hundreds of dollars), so the only option I was left with was to build an adapter myself. That's exactly what I did this weekend and surprisingly it works fine, even tho I cut corners. It doesn't have a box yet, since I haven't decided if I'm going to improve on it or not.
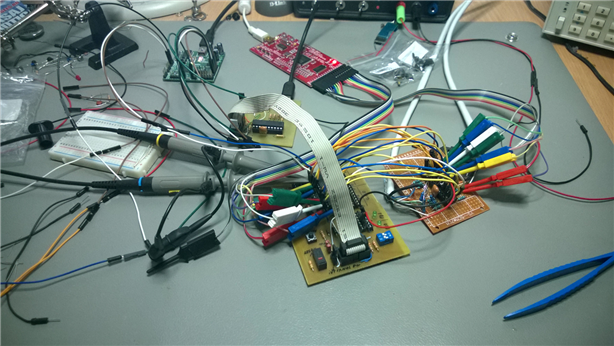
Home made GPIB to Serial adapter

and it works.
Now that we have a working connection to the counter, all that's left to do is figure out if the commands we're planning to send will actually work. The simplest way of testing this is to bring up the Interactive IO dialog for both instruments and send SCPI commands.
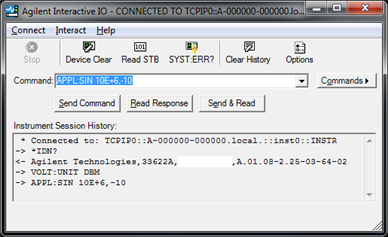 |  |
You may notice that in this case I used APPLy instead of issuing a separate command for each particular subsystem. For our little experiment, addressing each subsystem individually would make more sense, but I figured I'd show off this SCPI command, because I find it more useful/convenient than the other ones. After this test, we know that we are going to use the following commands:
VOLT:UNIT DBM          // Set the Waveform Generator to use dBm instead of V for amplitude
APPL:SIN 10E+6, -10    // Set the shape of the signal, the frequency and the amplitude in dBm

READ:FREQ?             // Get a frequency reading from the frequency counter
In order to keep the code as simple as possible, I didn't bother with enabling the output of the waveform generator, setting the input load via SCPI or even finding the devices like we did with the previous programs. Enabling the output and setting the input load can be done manually before running the test, while the instrument descriptors can be found in the Agilent IO Control and then hardcoded into the program.
The algorithm I used, to quickly find the lowest power that my counter can detect, is divide et impera. It should need the least number of tests before figuring out the result. A valid result is when the read frequency is within ±5% from the set frequency.
#include <iostream>
#include <string>
#include <boost/lexical_cast.hpp>

#include <visa.h>
#pragma comment (lib, "visa32")


#define WAVEGEN_DESCR    "TCPIP0::A-000000-000000.local.::inst0::INSTR"
#define COUNTER_DESCR    "ASRL14::INSTR"

#define AMPL_MAX    0
#define AMPL_MIN    -50

using namespace std;

bool test_ampl(ViSession &wg, ViSession &cnt, unsigned int freq, int ampl)
{
    // Set the frequency and amplitude
    viPrintf(wg, (ViString)("APPL:SIN " + boost::lexical_cast<string>(freq) + ", " + boost::lexical_cast<string>(ampl) + "\n").c_str());

    // Read it back from the counter
    long double freqIn;

    viPrintf(cnt, "READ:FREQ?\n");

    if (viScanf(cnt, "%lf\n", &freqIn) != VI_SUCCESS)
    {
        // Since scanf failed, we have to consume the buffer so the next scanf works
        viFlush(cnt, VI_READ_BUF);

        return false;
    }


    long double ffreq = freq;

    return (ffreq * 1.05) > freqIn && (ffreq * 0.95) < freqIn;
}

int test_freq(ViSession &wg, ViSession &cnt, unsigned int freq)
{
    int ampl_max = AMPL_MAX;
    int ampl_min = AMPL_MIN;

    int ampl = ampl_min + (ampl_max - ampl_min) / 2;


    while (true)
    {
        if (test_ampl(wg, cnt, freq, ampl))
        {
            if (ampl == ampl_min)
                return ampl;

            ampl_max = ampl;

            ampl = (ampl_max - ampl_min) / 2;

            ampl = ampl_min + ampl;
        }
        else
        {
            ampl_min = ampl + 1;

            // If this was the last testable one, return the last valid one
            if (ampl_min == ampl_max)
                return ampl_max;

            ampl = (ampl_max - ampl_min) / 2;

            if (ampl == 0)
                ampl = 1;

            ampl = ampl_min + ampl;
        }
    }
}


int main(int argc, char *argv[])
{
    ViStatus    res;
    ViSession    rm;

    // Initialize and get a handle on the Resource Manager
    res = viOpenDefaultRM(&rm);

    if (res == VI_SUCCESS)
    {
        // Connect to the devices
        ViSession wg;
        ViSession cnt;

        ViStatus resWG    = viOpen(rm, (ViString)WAVEGEN_DESCR, VI_NULL, VI_NULL, &wg);
        ViStatus resCNT    = viOpen(rm, (ViString)COUNTER_DESCR, VI_NULL, VI_NULL, &cnt);

        viSetAttribute(cnt, VI_ATTR_TMO_VALUE, VI_TMO_INFINITE);

        // Let's do what we're here to do
        if (resWG == VI_SUCCESS && resCNT == VI_SUCCESS)
        {
            // Make sure the WG is taking dBm
            viPrintf(wg, "VOLT:UNIT DBM\n");


            unsigned int freq = 10;
            bool five = true;

            while (freq <= 120000000)
            {
                cout << freq << "," << test_freq(wg, cnt, freq) << endl;

                if (freq < 10000000)
                {
                    freq *= five ? 5 : 2;
                    five = !five;
                }
                else
                    freq += 10000000;
            }
        }

        // Close device connections
        if (resWG == VI_SUCCESS)
            viClose(wg);

        if (resCNT == VI_SUCCESS)
            viClose(cnt);

        // Free resource manager
        viClose(rm);
    }

    return 0;
}
If you feel like it, you can watch the (rather boring) video showing the waveform generator and the counter during this process. If not, feel free to skip to the results.
Results:
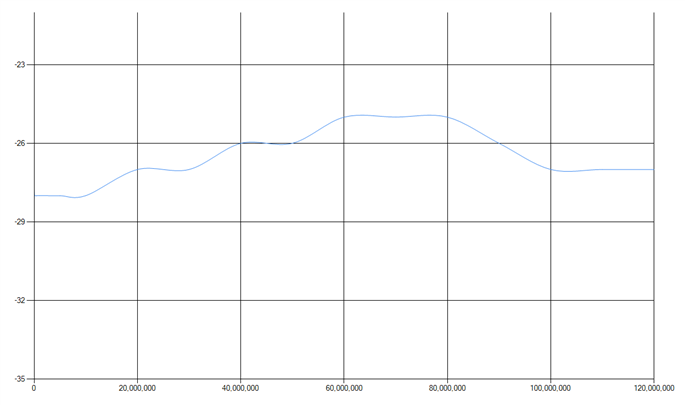
| Frequency | dBm |
|---|---|
| 10 | -25 |
| 50 | -32 |
| 100 | -32 |
| 500 | -31 |
| 1,000 | -31 |
| 5,000 | -31 |
| 10,000 | -31 |
| 50,000 | -28 |
| 100,000 | -28 |
| 500,000 | -28 |
| 1,000,000 | -28 |
| 5,000,000 | -28 |
| 10,000,000 | -28 |
| 20,000,000 | -27 |
| 30,000,000 | -27 |
| 40,000,000 | -26 |
| 50,000,000 | -26 |
| 60,000,000 | -25 |
| 70,000,000 | -25 |
| 80,000,000 | -25 |
| 90,000,000 | -26 |
| 100,000,000 | -27 |
| 110,000,000 | -27 |
| 120,000,000 | -27 |
Pretty much < 10 mVrms across the board, which is way better than the 20 mVrms value, specified in the datasheet for frequencies up to 100 MHz.
Thanks for reading,
Razvan

