element14 Community
element14 Community
    Register Log In
  • Site
  • Search
  • Log In Register
  • Community Hub
    Community Hub
    • What's New on element14
    • Feedback and Support
    • Benefits of Membership
    • Personal Blogs
    • Members Area
    • Achievement Levels
  • Learn
    Learn
    • Ask an Expert
    • eBooks
    • element14 presents
    • Learning Center
    • Tech Spotlight
    • STEM Academy
    • Webinars, Training and Events
    • Learning Groups
  • Technologies
    Technologies
    • 3D Printing
    • FPGA
    • Industrial Automation
    • Internet of Things
    • Power & Energy
    • Sensors
    • Technology Groups
  • Challenges & Projects
    Challenges & Projects
    • Design Challenges
    • element14 presents Projects
    • Project14
    • Arduino Projects
    • Raspberry Pi Projects
    • Project Groups
  • Products
    Products
    • Arduino
    • Avnet Boards Community
    • Dev Tools
    • Manufacturers
    • Multicomp Pro
    • Product Groups
    • Raspberry Pi
    • RoadTests & Reviews
  • Store
    Store
    • Visit Your Store
    • Choose another store...
      • Europe
      •  Austria (German)
      •  Belgium (Dutch, French)
      •  Bulgaria (Bulgarian)
      •  Czech Republic (Czech)
      •  Denmark (Danish)
      •  Estonia (Estonian)
      •  Finland (Finnish)
      •  France (French)
      •  Germany (German)
      •  Hungary (Hungarian)
      •  Ireland
      •  Israel
      •  Italy (Italian)
      •  Latvia (Latvian)
      •  
      •  Lithuania (Lithuanian)
      •  Netherlands (Dutch)
      •  Norway (Norwegian)
      •  Poland (Polish)
      •  Portugal (Portuguese)
      •  Romania (Romanian)
      •  Russia (Russian)
      •  Slovakia (Slovak)
      •  Slovenia (Slovenian)
      •  Spain (Spanish)
      •  Sweden (Swedish)
      •  Switzerland(German, French)
      •  Turkey (Turkish)
      •  United Kingdom
      • Asia Pacific
      •  Australia
      •  China
      •  Hong Kong
      •  India
      •  Korea (Korean)
      •  Malaysia
      •  New Zealand
      •  Philippines
      •  Singapore
      •  Taiwan
      •  Thailand (Thai)
      • Americas
      •  Brazil (Portuguese)
      •  Canada
      •  Mexico (Spanish)
      •  United States
      Can't find the country/region you're looking for? Visit our export site or find a local distributor.
  • Translate
  • Profile
  • Settings
Test & Tools
  • Technologies
  • More
Test & Tools
Blog LabVIEW: Module to Generate Step Increments
  • Blog
  • Forum
  • Documents
  • Files
  • Members
  • Mentions
  • Sub-Groups
  • Tags
  • More
  • Cancel
  • New
Join Test & Tools to participate - click to join for free!
  • Share
  • More
  • Cancel
Group Actions
  • Group RSS
  • More
  • Cancel
Engagement
  • Author Author: Jan Cumps
  • Date Created: 20 Apr 2018 10:03 AM Date Created
  • Views 2888 views
  • Likes 5 likes
  • Comments 7 comments
  • labview
Related
Recommended

LabVIEW: Module to Generate Step Increments

Jan Cumps
Jan Cumps
20 Apr 2018

In my automated test processes, I have several places where I need to increase an instrument's voltage with a little step, do a measurement, then increase it again. Because it's used multiple times I've turned into a little module.

image

This blog is born out of need. My "write to Excel" blocks were taking way too much real estate of my Labview main flow.


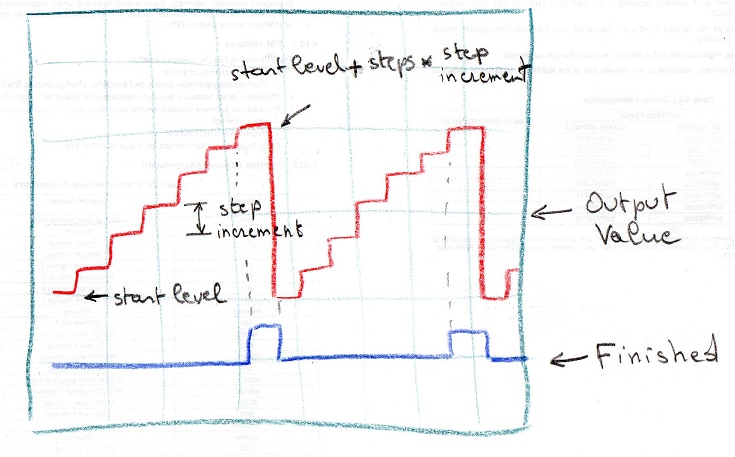
What is this Step Increment Generator?


It's a small calculation block that allows you to increment a setting of an instrument a given number of times, with a given step size.

It starts from a given start value.

When it reaches that maximum, it starts counting all over from the start value.

It's Counter input is typically a loop counter.

When it reaches the upper limit, it sets a Finished flag. You can use that value in your downstream flow to stop looping.

image


Example


In the example below, I use this block two times.

One time in the lower section (outer loop) to make a power supply loop between 8 V and 14V. Without exit. This one keeps looping forever.

The other timer in the top section (inner loop) makes a DC load loop between 0 A and 7.8 A. With exit. Once the upper limit is reached the loop breaks and returns to the outer loop.

image


Here's the block diagram of the outer and inner loop of that process. The two Increment Generators are highlighted.


image

You can see that in the outer block the Finished flag isn't used. This loop keeps running until an operator presses the Stop button.

In the inner loop, the Finished flag is used to end the loop's execution and exit back to the surrounding block.


Why?


Step increments within a given range are often used to measure the behaviour of a component or circuit.

You step to the next measurement point and collect the data.

This is a way to fully automate measurements on a device and log the measurements to a file.

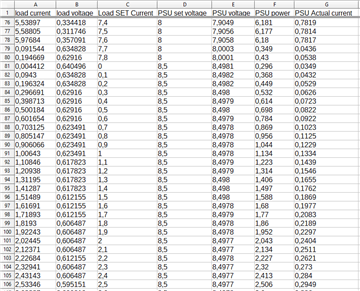
The example above is part of an efficiency logger for a dc to dc converter.

Here's output data, and a graph based on such measurements.


imageimage

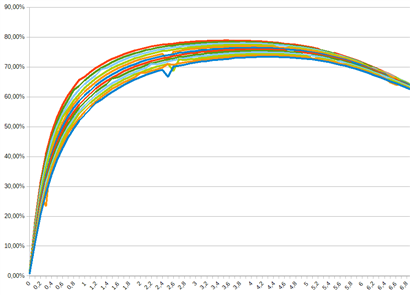
Each line in the diagram above represents 1028 test setups. From 0 V - 0 A to 14 V -7.8 A.
On each step you need to measure the power at input and the power delivered by the device under test, to measure efficiency.
This type of characterisation, where you need a lot of manual effort to set up and write down measure points - repetitive - is where I think that automatisation becomes more efficient.

I don't know where the magic border between doing everything manual, and learning + building automation, becomes obvious. It depends on who pays you and what type of activities you want to do on your job.
Anyhow, once you spend the time learning automation, that border drops. You spend less time automating your setup.

From my own experience, learning to control an instrument and learning the basics of LabVIEW took a few months.

Then, automating a process took a few weeks.
Now I'm able to automate a test setup - including detailed logging to excel,  in a day, given that I know the instruments and the test process.My progress from purchasing LabVIEW up to achieving that skill is documented here on element14. You can trace back from my very first baby steps.


But what's the point? Why make a module for such a small piece of logic as a step increment generator?

In my case, two reasons:

  • it's reusable and used multiple times in a single diagram. As an extra, the block's icon uses less space on the main diagram than the separate blocks - leaving more real estate for the flow.
  • I always get this wrong at the border conditions (yes: every time). Having it correct and debugged and tested saves me peace of mind.


The Increment Generator for LabVIEW is attached to this blog post.

Attachments:
increment_generator.zip
  • Sign in to reply

Top Comments

  • DAB
    DAB over 7 years ago +2
    Great post Jan. DAB
  • Jan Cumps
    Jan Cumps over 7 years ago +1
    You could say it's not a real step incrementor because it doesn't increment based upon a trigger. It calculates the output based upon an external counter. A pure implementation would maybe keep an external…
  • Jan Cumps
    Jan Cumps over 7 years ago in reply to DAB +1
    Thank you!
  • Jan Cumps
    Jan Cumps over 2 years ago in reply to DAB

    refinement of the reply:

    this block is a guard unit. It tells what to do next, and flags the special case of overflow. Tested so you don't have to test it.
    it is not a trigger block that guards time, waits, reacts on external events. It is guaranteed passive without side effects.

    • Cancel
    • Vote Up 0 Vote Down
    • Sign in to reply
    • More
    • Cancel
  • Andrew J
    Andrew J over 5 years ago

    I Think these are really useful posts Jan.  I can certainly sympathise with the tediousness of manual measurement.

    • Cancel
    • Vote Up +1 Vote Down
    • Sign in to reply
    • More
    • Cancel
  • Jan Cumps
    Jan Cumps over 5 years ago in reply to DAB

    This block does not deal with time. It just increments every time the loop is repeated, triggered by an increment of the loop counter.

    I deal with timing of the loop by adding a timeout to the flow at those points where it's needed for stable / correct measurements.:

    image

    • Cancel
    • Vote Up 0 Vote Down
    • Sign in to reply
    • More
    • Cancel
  • DAB
    DAB over 5 years ago in reply to Jan Cumps

    I was looking this over and where do you set the time interval for each step?


    DAB

    • Cancel
    • Vote Up +1 Vote Down
    • Sign in to reply
    • More
    • Cancel
  • Jan Cumps
    Jan Cumps over 7 years ago in reply to DAB

    Thank you!

    • Cancel
    • Vote Up +1 Vote Down
    • Sign in to reply
    • More
    • Cancel
>
element14 Community

element14 is the first online community specifically for engineers. Connect with your peers and get expert answers to your questions.

  • Members
  • Learn
  • Technologies
  • Challenges & Projects
  • Products
  • Store
  • About Us
  • Feedback & Support
  • FAQs
  • Terms of Use
  • Privacy Policy
  • Legal and Copyright Notices
  • Sitemap
  • Cookies

An Avnet Company © 2025 Premier Farnell Limited. All Rights Reserved.

Premier Farnell Ltd, registered in England and Wales (no 00876412), registered office: Farnell House, Forge Lane, Leeds LS12 2NE.

ICP 备案号 10220084.

Follow element14

  • X
  • Facebook
  • linkedin
  • YouTube