element14 Community
element14 Community
    Register Log In
  • Site
  • Search
  • Log In Register
  • Community Hub
    Community Hub
    • What's New on element14
    • Feedback and Support
    • Benefits of Membership
    • Personal Blogs
    • Members Area
    • Achievement Levels
  • Learn
    Learn
    • Ask an Expert
    • eBooks
    • element14 presents
    • Learning Center
    • Tech Spotlight
    • STEM Academy
    • Webinars, Training and Events
    • Learning Groups
  • Technologies
    Technologies
    • 3D Printing
    • FPGA
    • Industrial Automation
    • Internet of Things
    • Power & Energy
    • Sensors
    • Technology Groups
  • Challenges & Projects
    Challenges & Projects
    • Design Challenges
    • element14 presents Projects
    • Project14
    • Arduino Projects
    • Raspberry Pi Projects
    • Project Groups
  • Products
    Products
    • Arduino
    • Avnet Boards Community
    • Dev Tools
    • Manufacturers
    • Multicomp Pro
    • Product Groups
    • Raspberry Pi
    • RoadTests & Reviews
  • Store
    Store
    • Visit Your Store
    • Choose another store...
      • Europe
      •  Austria (German)
      •  Belgium (Dutch, French)
      •  Bulgaria (Bulgarian)
      •  Czech Republic (Czech)
      •  Denmark (Danish)
      •  Estonia (Estonian)
      •  Finland (Finnish)
      •  France (French)
      •  Germany (German)
      •  Hungary (Hungarian)
      •  Ireland
      •  Israel
      •  Italy (Italian)
      •  Latvia (Latvian)
      •  
      •  Lithuania (Lithuanian)
      •  Netherlands (Dutch)
      •  Norway (Norwegian)
      •  Poland (Polish)
      •  Portugal (Portuguese)
      •  Romania (Romanian)
      •  Russia (Russian)
      •  Slovakia (Slovak)
      •  Slovenia (Slovenian)
      •  Spain (Spanish)
      •  Sweden (Swedish)
      •  Switzerland(German, French)
      •  Turkey (Turkish)
      •  United Kingdom
      • Asia Pacific
      •  Australia
      •  China
      •  Hong Kong
      •  India
      •  Korea (Korean)
      •  Malaysia
      •  New Zealand
      •  Philippines
      •  Singapore
      •  Taiwan
      •  Thailand (Thai)
      • Americas
      •  Brazil (Portuguese)
      •  Canada
      •  Mexico (Spanish)
      •  United States
      Can't find the country/region you're looking for? Visit our export site or find a local distributor.
  • Translate
  • Profile
  • Settings
Test & Tools
  • Technologies
  • More
Test & Tools
Blog Make your own Test Leads; Assembling 4mm Banana Plugs
  • Blog
  • Forum
  • Documents
  • Files
  • Members
  • Mentions
  • Sub-Groups
  • Tags
  • More
  • Cancel
  • New
Join Test & Tools to participate - click to join for free!
  • Share
  • More
  • Cancel
Group Actions
  • Group RSS
  • More
  • Cancel
Engagement
  • Author Author: shabaz
  • Date Created: 13 Jan 2017 2:49 AM Date Created
  • Views 9886 views
  • Likes 8 likes
  • Comments 7 comments
  • test_leads
  • test_lead
  • multi-contact
  • bootlace_ferrule
  • banana
  • banana_plug
  • knipex
  • test_and_measurement
  • ferrule
Related
Recommended

Make your own Test Leads; Assembling 4mm Banana Plugs

shabaz
shabaz
13 Jan 2017

Introduction

I needed some custom test leads recently and after experimenting with a few types of banana plugs and cables I found a nice combination and set about assembling them. This short blog post contains a possible recipe, i.e. what worked for me. It was also an opportunity for me to use a ferrule crimp tool. The end result was good – it appears to be a reliable set of test leads. (For innovative ideas on test probes, see here: Shop Tips -  Intrusive Meter Probe  ).

image

In the end I went for stackable banana plugs for my particular need, and they also have a retractable sheath to prevent accidental shorts. Internally there is ample room to fit the 4mm overall diameter cable that I wanted to use. The entire parts list is further below.


Check out the video for more detail:

You don't have permission to edit metadata of this video.
Edit media
x
image
Upload Preview
image


Stripping the cable

The chosen cable is really nice. The insulation is thermoplastic elastomer and 525 strands of copper wire making it very flexible. It is designed for hand-held test leads according to the manufacturer Multi-Contact (PDF datasheet). It is usable at temperatures down to -30 degrees C, and can withstand up to 105 degrees C.


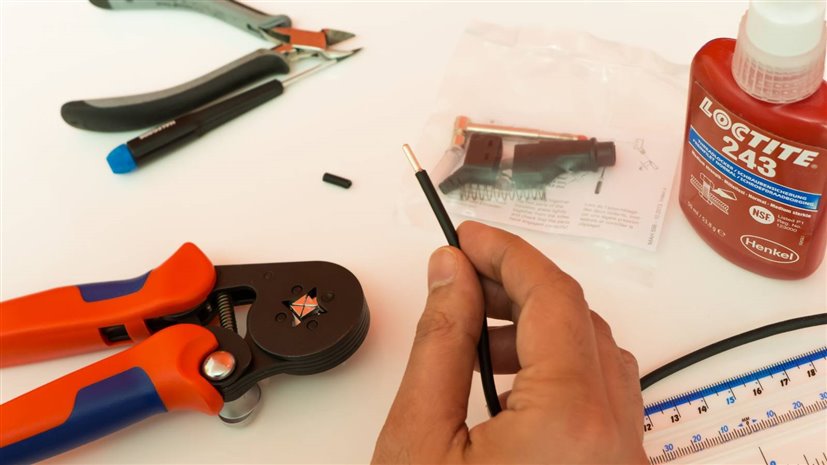
Ordinarily I’d use a wire stripper for cable stripping but this 4mm cable wasn’t something I normally use; it has hundreds of very thin copper strands and a very thick and soft plastic insulation for extra flexibility and therefore I was worried about the risk of nicking copper strands with the strippers I had (electrician’s wire strippers which are designed for solid core wire of certain sizes).


Since I wasn’t making many lots of leads it was very easy to gently slice at the insulation with a scalpel, bend the wire slightly to confirm that it hadn’t reached the copper core, and then dig a fingernail into the insulation and tear apart the insulation. After that the wire was twisted back into its original lay. These Knipex wire strippersKnipex wire strippers would possibly make the job a lot easier; this style of wire stripper does not rely on the strength of the insulation.

image


Note that although other cables could be used (such as a speaker cable if the banana plugs are for an audio system), it is fairly important that the overall diameter is around 4mm because the strain relief on the chosen banana plug shell is designed for 4mm diameter cables.


Applying the Ferrule

The wire has more than 500 strands; I wanted all strands to be captured and attached to the banana plug. I therefore made use of the Knipex Crimping Pliers reviewed here and a sleeve-less ferrule. The result was perfect, every strand captured. For this type of extreme multi-stranded cable the ferrule is essential otherwise the strands will just bunch on either side when the screw is tightened.

image


Attaching the Banana Plug

The user instructions for the banana plug specify that 6mm of wire needs to be bared; the ferrule exposes more than that so it was measured with a ruler and the excess was cut off with wire-cutters.

The banana plug shell is in two pieces and the cable was threaded through the rear piece.


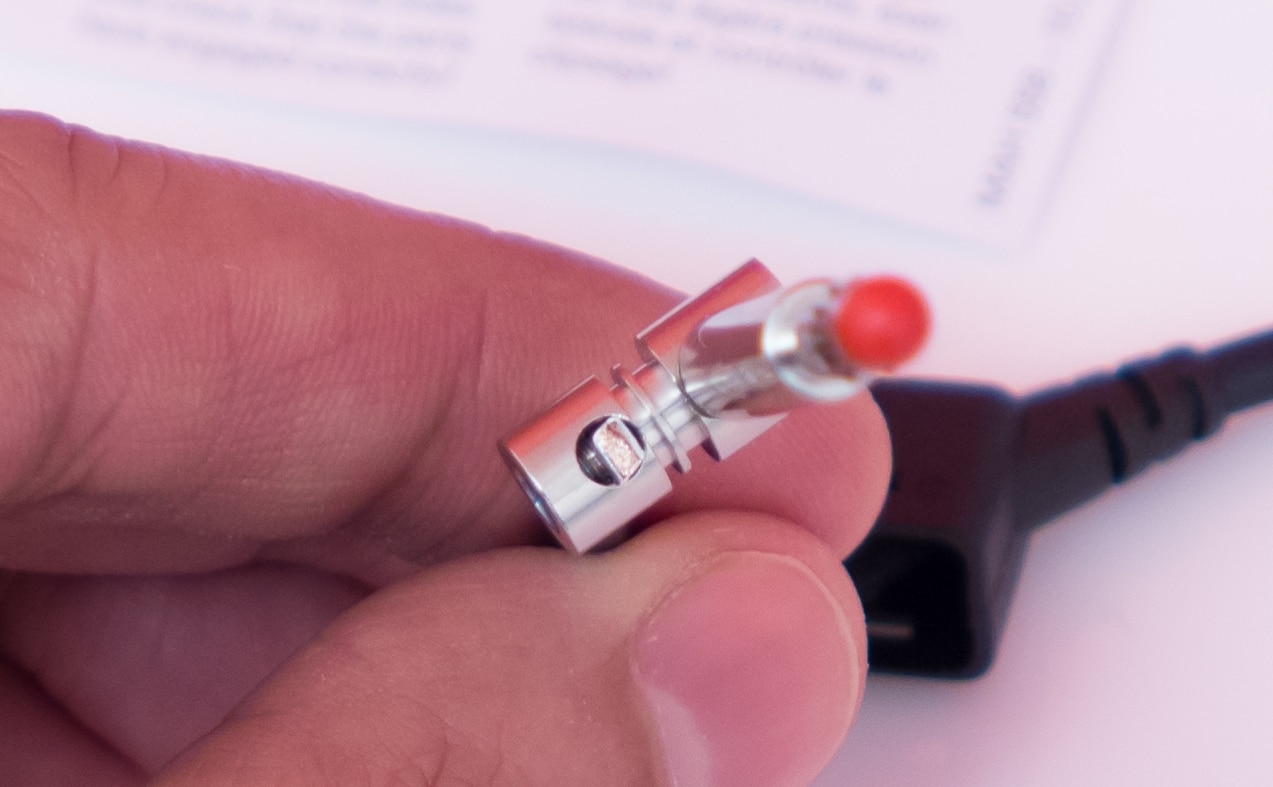
Next the cable was inserted into the screw terminal and held in a centred position until the screw was tightly fastened. To keep it from working loose over time, thread-locking adhesive can be applied before the screw is tightened. I tightened very firmly since there was no chance of the strands breaking up under the crush of the screw, due to the use of the ferrule.

image


Fully Assembling the Banana Plug

The banana plug has a retractable clear plastic shield with a spring action. The shield and spring are inserted first. The rear plastic piece of the shell clicks into place.

image


Testing the Assembled Lead

Apart from a simple tug test during assembly, no other mechanical tests were done tot he test lead. Although the cable will be difficult to detach by pulling, and the banana plug has strain relief to prevent some flexing at the end of the cable, there is nothing preventing the cable being rotated. I doubt this will be a problem, and most banana probes would have the same behaviour. However if I was assembling it again I probably would use a short length of adhesive-lined heat-shrink tubing to secure the cable to the strain relief on the banana plug.


As an electrical check the resistance was measured. Of course, for many measurements the precise resistance (or having very low resistance) does not matter, but for want of measuring something, the resistance was measured. The two banana plugs at either end, plus 140cm of cable (which alone has a resistance of around 7mOhm) totalled 17mOhm (checked with a 2-wire and a 4-wire measurement; the 2-wire measurement had the banana plugs inserted into the multimeter, i.e. how the test lead would ordinarily be used. For the 4-wire measurement a dedicated resistance meter model M210resistance meter model M210 was used).  It was concluded that the resistance was as good as many typical test leads, some in fact have a much higher resistance.

image


Summary

It is possible to assemble custom test leads that should perform at least as well as off-the-shelf ones with hopefully similar or better levels of reliability, with little effort and no soldering involved. The particular cable and plugs used are designed for 30A.


I hope the information here was useful; I wanted to examine if ferrules would be useful for terminating wires into connectors such as these, and from the result (reasonable strength from experience trying to force apart the ferrule, and the reasonably low resistance) I'm impressed that it solves the problem of how to connect heavily stranded cables to screw terminals.


Parts List

These were the parts that were used:

Parts (Click for more information)
Cable, Red, 2mm2, 5m lengthCable, Red, 2mm2, 5m length
Cable, Black, 2mm2, 5m lengthCable, Black, 2mm2, 5m length
Banana Plug, RedBanana Plug, Red
Banana Plug, BlackBanana Plug, Black
Bootlace Ferrules, 2.5mm2 (14AWG)Bootlace Ferrules, 2.5mm2 (14AWG)
Loctite 243 Adhesive 10mlLoctite 243 Adhesive 10ml
Bootlace Ferrule Crimping PlierBootlace Ferrule Crimping Plier
Resistance MeterResistance Meter
  • Sign in to reply

Top Comments

  • shabaz
    shabaz over 8 years ago in reply to balearicdynamics +5
    Hi Enrico, Thanks! I make quite a few test leads now, although it can take time initially, I find that I learn more about materials and cable joining methods. Here is a photo of some different ones: The…
  • jw0752
    jw0752 over 8 years ago +2
    Hi Shabaz, Thanks for the great tutorial and also for the "plug" . John
  • clem57
    clem57 over 8 years ago +2
    Bananana!
  • shabaz
    shabaz over 8 years ago in reply to balearicdynamics

    Hi Enrico,


    Thanks!

    I make quite a few test leads now, although it can take time initially, I find that I learn more about materials and cable joining methods. Here is a photo of some different ones:

    image

    The banana plugs in the photo have a hole for soldering the wire and were intended for 1.5mm2 wire, so I needed to drill (to 2.0 or 2.1mm diameter I can't recall) the holes to make them bigger to fit 2mm2 wire, but it results in a thin wall so I drilled deeper (into the square part) which worked great. It does need a fat soldering iron though, lots of heat! The resistance of these leads is extremely low (5mohm total for two banana plugs and 60cm of cable), but a lot of effort to drill very centred. To solder the wire I first tinned it, then applied solder paste into the hole, pushed the wire in, then when heating I also supplemented it with some additional solder wire into the hole.

    • Cancel
    • Vote Up +5 Vote Down
    • Sign in to reply
    • More
    • Cancel
  • balearicdynamics
    balearicdynamics over 8 years ago

    Great tutorial Shabaz! Very interesting image


    Maybe I should find these pieces and replace the (almost crap) terminals of the BitScope micro. For most of the usages these can be a great repalcement.


    Enrico

    • Cancel
    • Vote Up +1 Vote Down
    • Sign in to reply
    • More
    • Cancel
  • DAB
    DAB over 8 years ago

    Great article, I have not made a test lead since tech school.


    We had to make all of our meter and scope leads as part of our soldering class.


    Good refresher.


    DAB

    • Cancel
    • Vote Up +2 Vote Down
    • Sign in to reply
    • More
    • Cancel
  • shabaz
    shabaz over 8 years ago in reply to jlangbridge

    Hi James!

    Ohh, interesting, I'm not sure of the reason, however hopefully this direct Farnell France link should work:

    97 53 04 KNIPEX, 180mm Length Self Adjusting Crimping Plier for 28AWG to 5AWG Ferrules | Farnell element14 France

    (Knipex model 97 53 04, Farnell part code 834701 newark part code 58K9764 )

    • Cancel
    • Vote Up 0 Vote Down
    • Sign in to reply
    • More
    • Cancel
  • jlangbridge
    jlangbridge over 8 years ago

    Thanks for this! I need to redo my setup soon, I'll keep the link handy for the day I get time to redo my cables.


    Technical detail, the crimping pliers link doesn't seem to work form my county (France).

    • Cancel
    • Vote Up +1 Vote Down
    • Sign in to reply
    • More
    • Cancel
>
element14 Community

element14 is the first online community specifically for engineers. Connect with your peers and get expert answers to your questions.

  • Members
  • Learn
  • Technologies
  • Challenges & Projects
  • Products
  • Store
  • About Us
  • Feedback & Support
  • FAQs
  • Terms of Use
  • Privacy Policy
  • Legal and Copyright Notices
  • Sitemap
  • Cookies

An Avnet Company © 2025 Premier Farnell Limited. All Rights Reserved.

Premier Farnell Ltd, registered in England and Wales (no 00876412), registered office: Farnell House, Forge Lane, Leeds LS12 2NE.

ICP 备案号 10220084.

Follow element14

  • X
  • Facebook
  • linkedin
  • YouTube