


|
In this series, I design a programmable lab switch based on RP2040, that can turn a set of signals or supplies on or off. Over USB. SCPI compatible.
|
Integrate SCPI Parser library
This 'll be the key post in this mini project: make the Pico SCPI-savvy. If you follow along and get the software of this post running, you'll have a base programmable instrument. The complexity of what you and I have to do is low. We have to integrate an existing SCPI parser. But the yield is high: you get the (operational!) skeleton of a programmable lab device. Standard (ieee488) compliant. With integrated error handling that's identical to what commercial instruments offer.
Get Jan Breuer's SCPI lib
When you design an instrument that has to be SCPI capable, there are several libraries that you can use to implement the SCPI layer. I investigated and used several. Jan Breuer's SCPI lib, I think, is great. A small footprint SCPI parser that's easy to work with, and implements the standards out of the box.
Download the sources and adapt the build files
In this project, I try to point at libraries, instead of copying their sources into my project. For the SCPI lib, I'm doing the same. I'll get the latest version of the sources, but will not copy or modify them. I'll learn y project's make files to include them at compile and link time.
First step is to download the source. This can be done from any location on your file system that makes sense.
git clone https://github.com/j123b567/scpi-parser.git

Then, in our make file (and automatically also in VSCode), We'll mark ,that location, and tell our project where to look for header and source files.
First step is to tell VSCode where the files for the SCPI library are (not using VSCode? You can set these as OS environment variables too).
Open the user settings
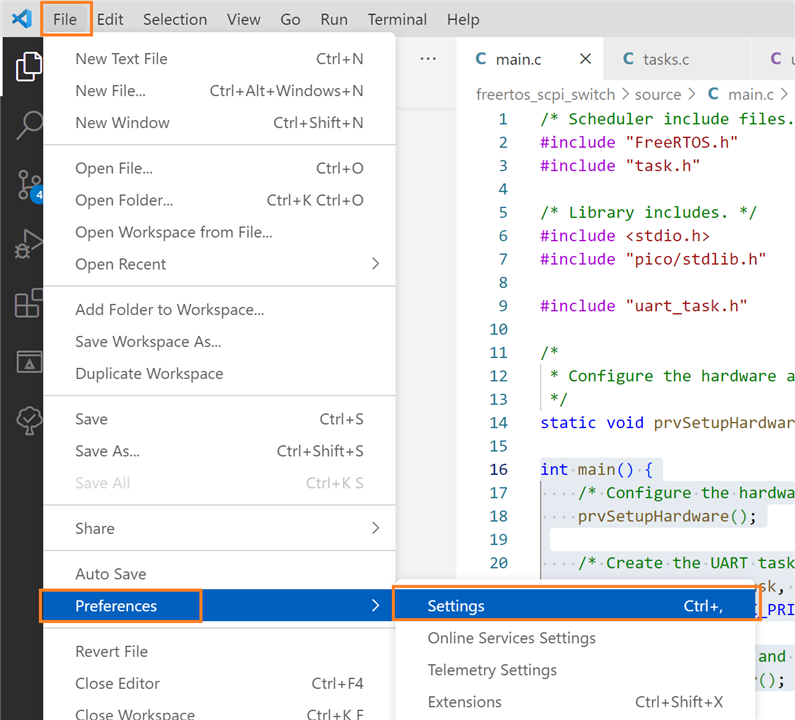
Navigate to environment variables, and add the location of the SCPI sources as SCPI_LIB_PATH.
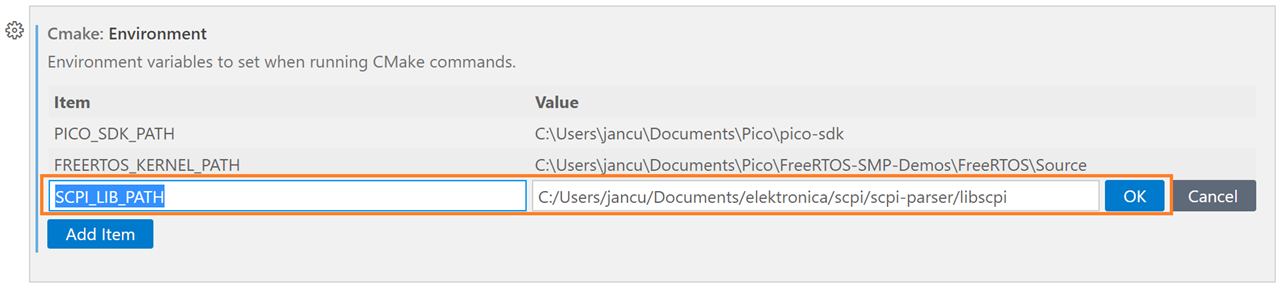
SCPI_LIB_PATH = C:/Users/jancu/Documents/elektronica/scpi/scpi-parser/libscpi
Update the Build File
The SCPI lib source code organisation documents what folders need to be included, and what sources compiled. Let's adapt our make scripts.
add_executable(scpi_switch
        source/main.c
        source/telemetry/telemetry_queue.c
        source/uart/uart_task.c
        source/scpi/scpi-def.c
        $ENV{SCPI_LIB_PATH}/src/parser.c
        $ENV{SCPI_LIB_PATH}/src/lexer.c
        $ENV{SCPI_LIB_PATH}/src/error.c
        $ENV{SCPI_LIB_PATH}/src/ieee488.c
        $ENV{SCPI_LIB_PATH}/src/minimal.c
        $ENV{SCPI_LIB_PATH}/src/utils.c
        $ENV{SCPI_LIB_PATH}/src/units.c
        $ENV{SCPI_LIB_PATH}/src/fifo.c
        )

target_include_directories(scpi_switch PRIVATE
        ${CMAKE_CURRENT_LIST_DIR}/source
        ${CMAKE_CURRENT_LIST_DIR}/source/telemetry
        ${CMAKE_CURRENT_LIST_DIR}/source/uart
        ${CMAKE_CURRENT_LIST_DIR}/source/scpi
        $ENV{SCPI_LIB_PATH}/inc
)
Now, let's adapt our UART handling code.
Create a function to send back replies
The SCPI lib expects that there's a function that knows how to send replies to the communication channel. Very easy in our case:
void UART_write(const char * data, uint32_t len) {
    uart_puts(UART_ID, data);
}

// ...

size_t SCPI_Write(scpi_t * context, const char * data, size_t len) {
    (void) context;
    UART_write(data, (uint32_t)len);
    return len;
}
In my project, the first function resides in the UART part of the code (it needs to know what UART is used, and needs to know the RP2040 APIs). The second function - required by the SCPI lib to know how to respond, sits with the other SCPI code.
The concept is simple. If the SCPI lib needs to send replies or results, It 'll call the second function. That second function will then invoke the RP2040 C SDK to send results to the USB serial port.
Learn our existing UART task to call the SCPI parser
This one is very simple. We just have to pass each character we receive on the UART port to the lib:
        if (ulNotificationValue == 1) {
            /* Handle received data */
            while (uart_is_readable(UART_ID)) {
                rxChar = uart_getc(UART_ID);
                if (rxChar == 255) break; // ignore dirty read values
                scpi_instrument_input((const char *)&rxChar, 1);
            }
That's most of the work. The lib has to initialised, but that's a single line we can call from the UART task:
void uart_task(void *pvParameters) {

// ... existing code
  scpi_instrument_init();
// ...
The SCPI integration will work, from that point on. If we receive a character, we 'll send it to the SCPI lib. The lib will parse and decide what logic to call.
Replies, if they are needed, will use our UART_write() function to send any results back to the USB COM port.
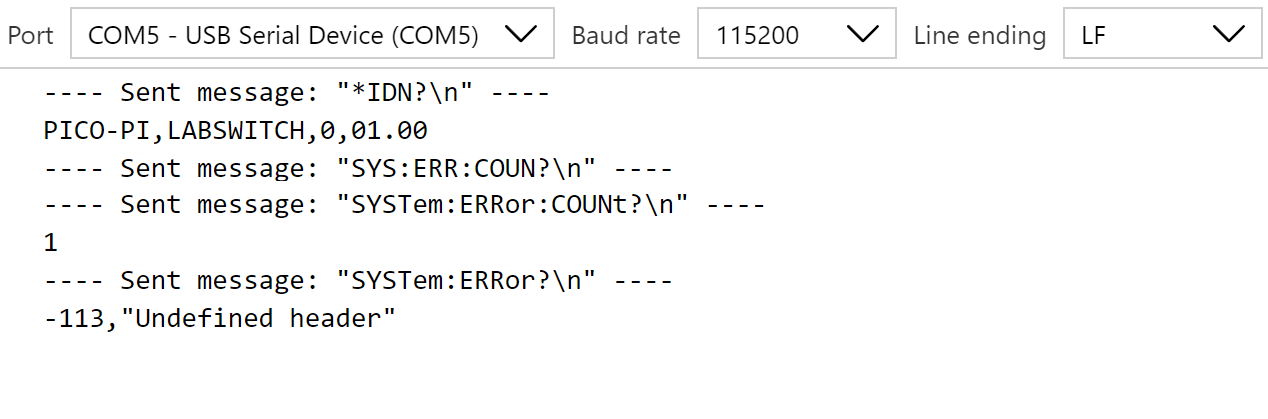
Showcase: standard *IDN? SCPI command
The lib can reply toieee488 commands out of the box. The most famous SCPI command is IDN? (who am I).
The lib will use some constant you defined, to send the instrument identification:
// manufacturer
#define SCPI_IDN1 "PICO-PI"
// model
#define SCPI_IDN2 "LABSWITCH"
// serial number
#define SCPI_IDN3 NULL
// version
#define SCPI_IDN4 "01.00"
When you send the command *IDN? to the USB COM port, these constants are used by the instrument to reply.

In the next post, I'm adding intelligence to the SCPI parser: how to interpret the SCPI command: :DIGITAL:OUTPUTB ON/OFF.
The Pico will then turn the GPIO associated to X either ON or OFF.
Current project is attached as an archive.
