


Introduction
I recently bought a new laptop to replace an ancient one, and this time decided to put more thought into how I organized things.
A problem for me is that I tend to install a lot of software tools and integrated development environments (IDEs), and they consume a lot of space on the PC; many Gigabytes in some instances.
As the solid-state drive (SSD) inside the PC fills up, its performance eventually starts to decline. In addition, there is always the risk that some tools/IDEs may accidentally load in libraries or other content that is unrelated and cause a clash. It was time to try to solve this problem!
Some Initial Ideas
I ruled out full-blown virtual machines for each application very quickly; it would consume a lot of storage, plus it would be awful to maintain/configure, or update each VM individually.
Ideally, I would have loved to consider a container technology such as Docker, which allows one to create a sort of virtual environment for each application, and start and shut them down as desired. Each tool/IDE could reside in a separate container. However, Docker is not geared towards desktop-based Windows graphical applications, so it wasn’t a good fit.
I also considered simply installing applications directly on an external Flash drive or SSD to offload things. The problem there was that it would be very reliant on maintaining a single drive letter, since some applications may write full paths in configuration files. Of special concern to me was that there may be poor performance and low reliability if all the thousands of files that make up large applications were on an external drive. That’s a lot of files, and some of them could become corrupted.
I thought about replacing the SSD in my new laptop with a much larger one, but storage costs have shot up in the past few months; in some cases, an 80% hike, from what I can see.
A Virtual Hard Disk Approach
I decided that rather than a complete virtual machine, I’d rather just stick each application's main files (those that would ordinarily be in “C:\Program Files”, for instance) in a virtual hard disk (VHD) file (known as a .vhdx file). As far as the file system is concerned, that’s a single file, whereas when mounted, all the hundreds/thousands of individual files become accessible.
I decided not to concern myself too much that tools/applications might also install some files elsewhere, or applications might modify the registry, and so on, and just accept that I won’t solve everything.
By using VHDs, every tool/IDE install could be reduced to as little as a single .vhdx file (as mentioned above, I’m ignoring some extra files). I could then happily store the .vhdx files anywhere, even archive them off if I decided I didn’t need some applications for a while, stick them in the cloud or anywhere, until I wished to use them.
The devil is in the details; this blog post describes what I did to achieve such a setup.
Creating Useful Folders
On the local C: drive, I created the following three folders:
| # | Path | Description |
| 1 | C:\LOCAL_VHD | Folder for storing all the virtual hard disk images, such as arduino.vhdx |
| 2 | C:\DEV\vhd_mounts | Folder where sub-folders will be created, which will become mount points for VHDs. Example folder: C:\DEV\vhd_mounts\arduino folder |
| 3 | C:\DEV\projects | Folder for storing project source code files, for example, C:\DEV\projects\myblinky\myblinky.ino |
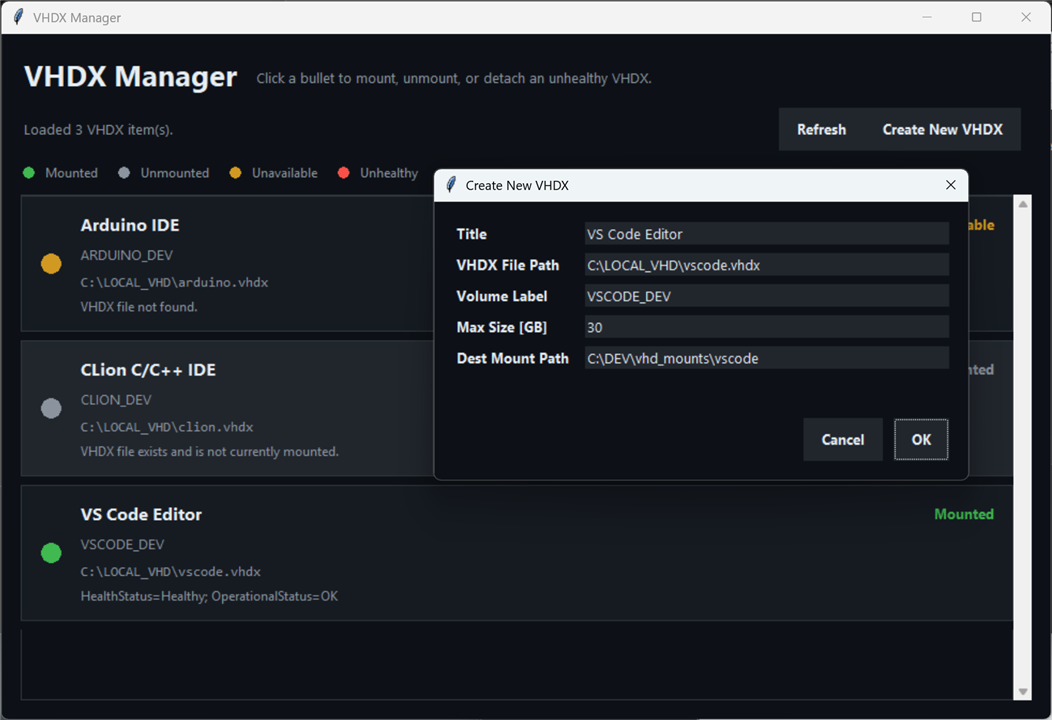
VHDX Manager
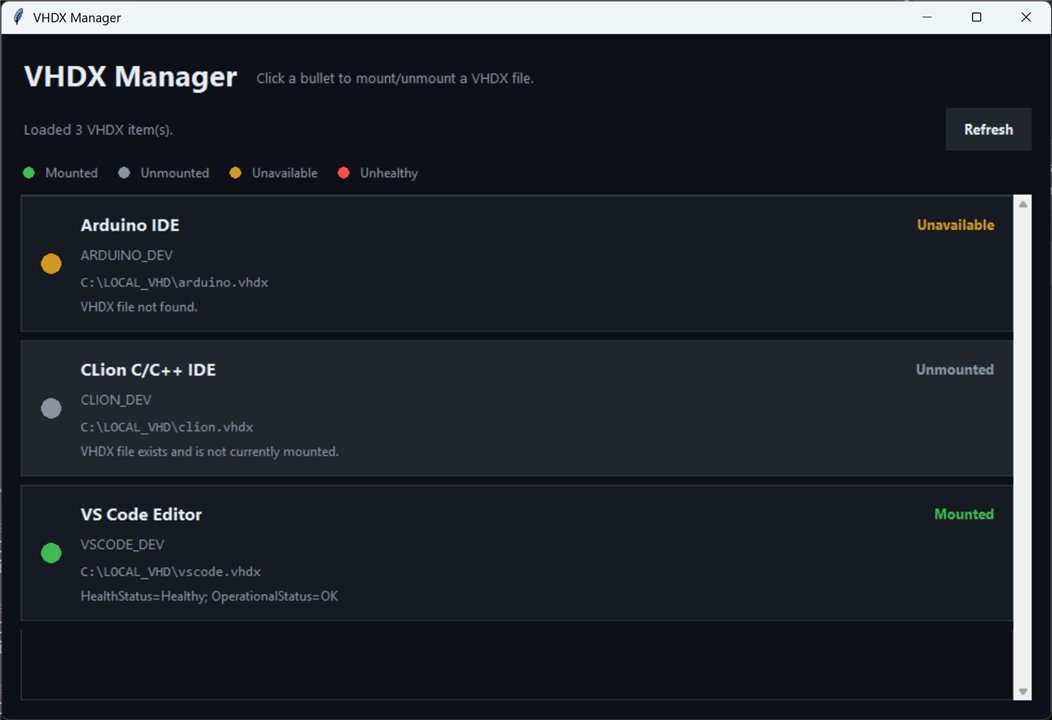
Further below, I describe how to perform all the steps using the Windows Disk Management tool. However, I subsequently wrote a simple VHDX Manager app that doesn't require Disk Management to be used, It's optional. Follow the instructions in the README file to see how to install and run the app (the app is quick and straightforward to install).
However, for the first time, it is suggested to use Disk Management instead, just so you're aware what the VHDL Manager app is really doing in the background.
Creating a Virtual Hard Disk (VHD)
An easy way is to use the Windows graphical Disk Management program. Hold down the Windows key, press X, and select Disk Management.
The disk drives will appear (usually that’s just the C: drive unless you’ve attached more). The aim is to create another one, a virtual disk.
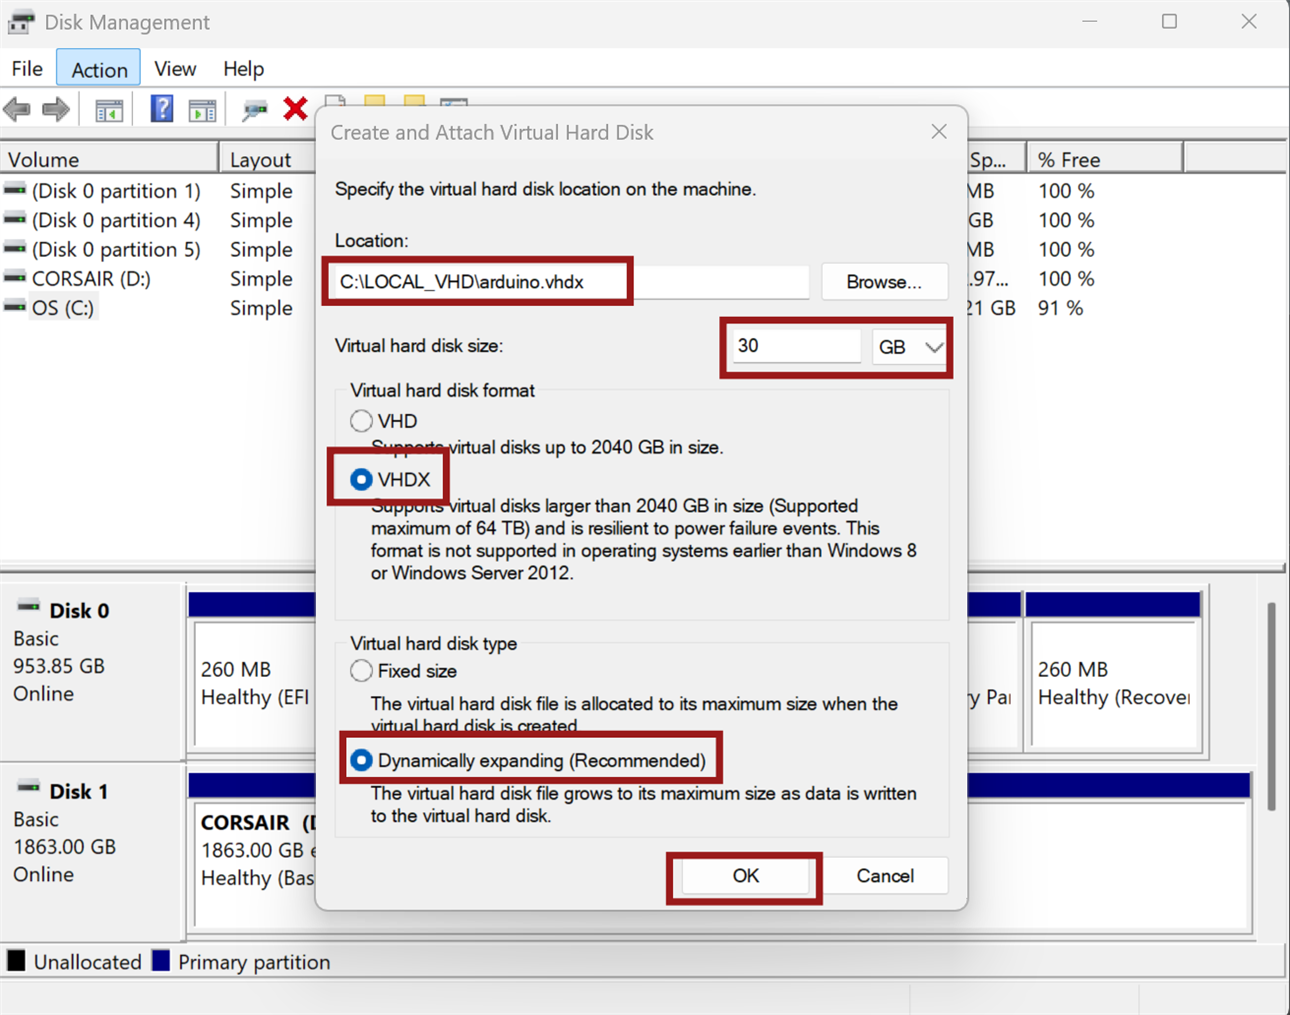
Select one of the drives (I selected the C: drive) and then from the top menu bar go to Action->Create VHD. Fill in the details as shown in the screenshot. Note that the 30 GB selected is not a real value; it’s a worst-case figure that should never be reached, because the virtual disk will dynamically expand when needed, toward that maximum worst-case value. For the example below, it’s best to set a large value, like 100 GB, if you’re not sure how many Arduino frameworks/libraries will be installed.
You’ll note that now the new disk appears in the window. To the left of it, the text shows that it’s not online, the VHD is not initialised yet. Right-click on that text and select Initialise Disk.
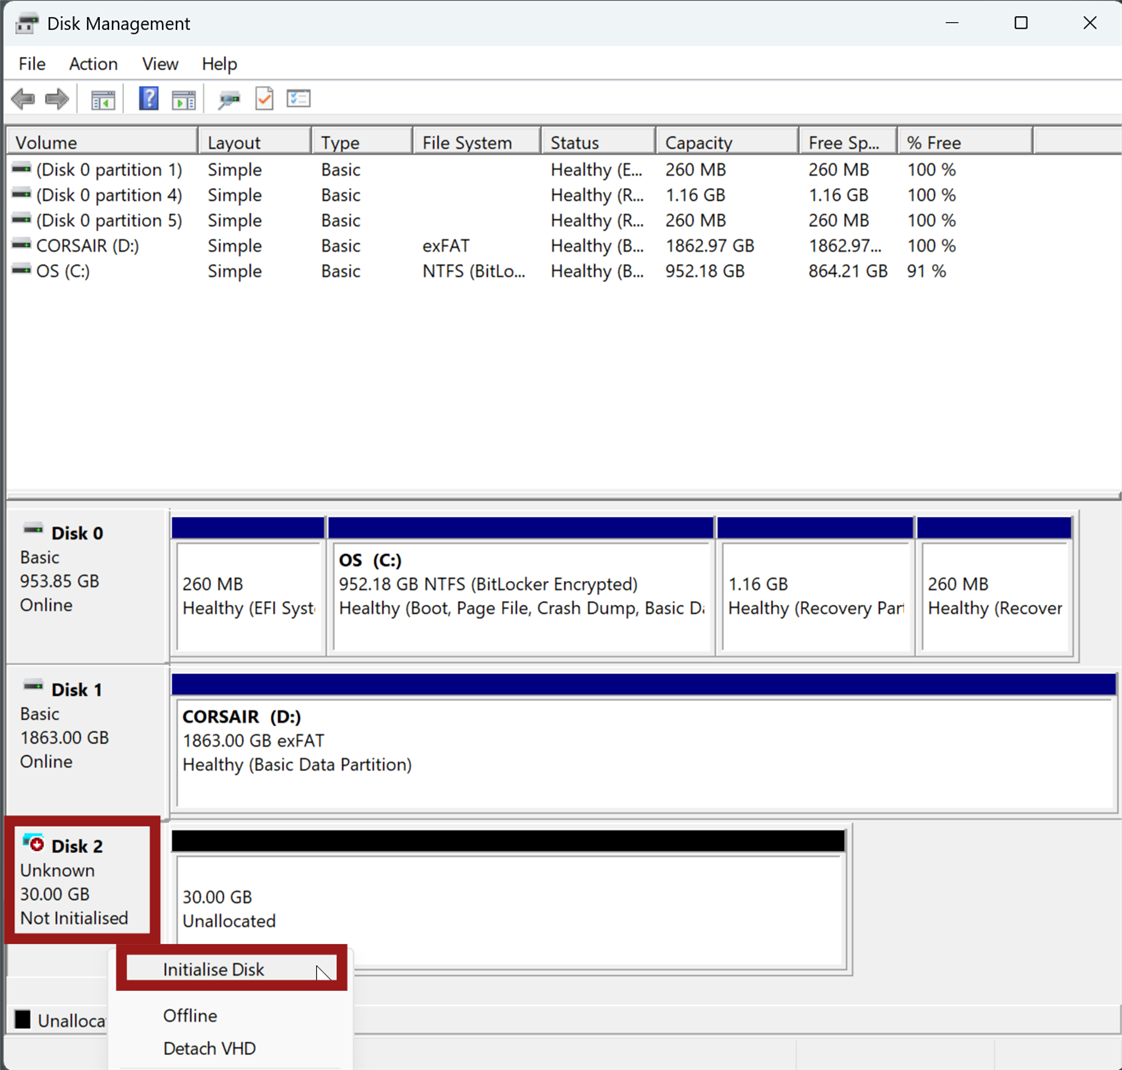
The new disk will now be online!

The disk needs to be formatted and then mounted either as a new drive letter (such as X: drive) or mounted into a folder; we will be mounting it into a folder, which is important.
In your C:\DEV\vhd_mounts folder, create a new folder. I created a folder called arduino.
Back in Disk Management, right-click in the unallocated space, and select New Simple Volume.
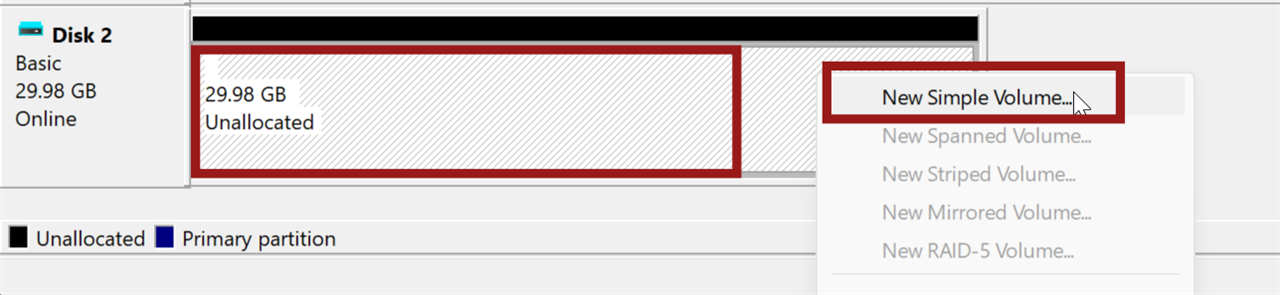
Then, browse to the newly created folder, because that’s the folder that you want to become the mount point for the virtual disk:
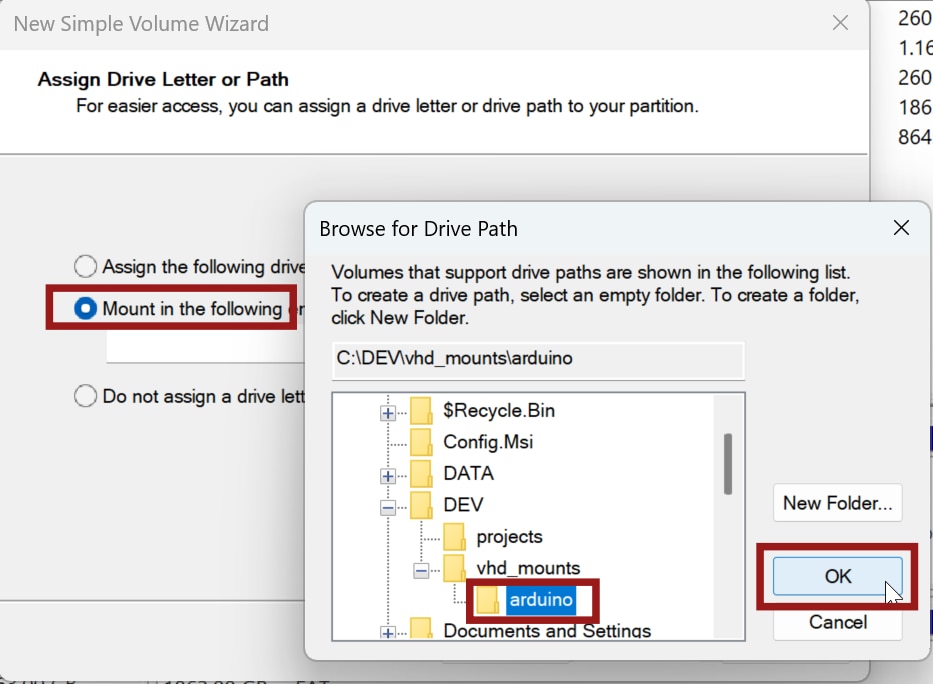
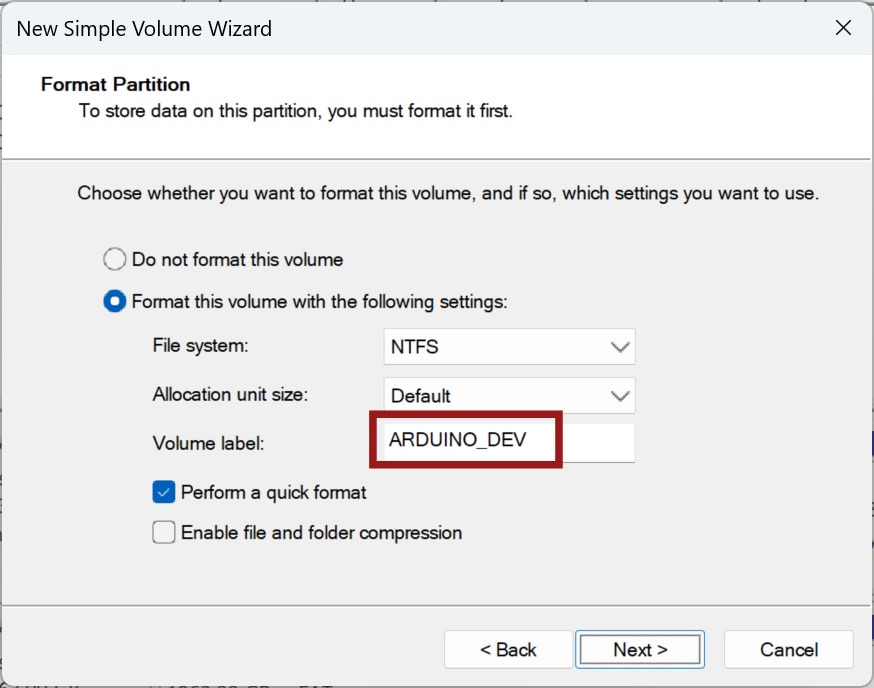
Create a suitable volume label, just for cosmetic purposes:
The new VHD is now created and mounted!
If you open a Windows Explorer and go to the C:\DEV\vhd_mounts folder, you’ll see that the arduino folder now has a 30 GB file size in the screenshot below. That’s not real disk space currently occupied. In the LOCAL_VHD folder, you can see that the arduino.vhdx file is actually just 135 kbytes in size.
As files are added to the C:\DEV\vhd_mounts folder, the arduino.vhdx file will gradually increase in size.
Also, notice that the arduino folder that was created no longer has a typical yellow folder icon; it looks different.

Mounting and Unmounting the VHD
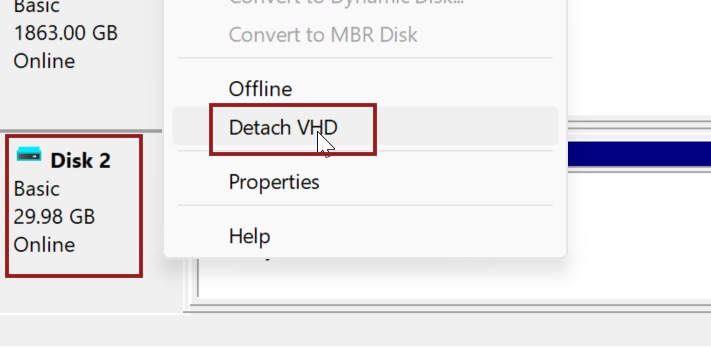
To unmount the VHD, in Disk Management, right-click on the virtual disk, and select Detach VHD.
(Note that if you wish to permanently delete the VHD, then don't first detach, but rather first right-click inside the volume, and select Delete Volume, and then do the Detach VHD. Then you can delete the .vhdx file from Windows Explorer).
To re-mount the detached VHD, in the Disk Management top menu bar, select Action->Attach VHD, select the .vhdx file, and it will be re-mounted back to where it previously was.
To make life a bit simpler, use the optional VHDX Manager app which was mentioned earlier.
Installing an Application or IDE
Now that a virtual hard disk has been created and mounted, an application can be installed on it. For this example, it will be the Arduino IDE. All that needs to be done is that during the installation process, the install folder needs to be changed to C:\DEV\vhd_mounts\arduino, rather than C:\Program Files.

The application will now install and run as usual. Whenever the IDE is no longer required for a period of time, it doesn’t need to be uninstalled; the VHD can merely be detached, and the .vhdx file archived off somewhere.
You can even move the file onto external storage and run it directly from there, provided the storage access is fast enough. In my case, I tested this with a USB 4 external SSD, and it ran fine (many new PCs can support 40 Gbit/sec or more throughput). I couldn’t notice any significant speed difference versus running from the local disk.
Summary
Many integrated development environments (IDEs) and other applications consume a lot of disk space and occupy tens of thousands of files. When installing many of these, it quickly fills up disk space, and that’s a concern, especially with laptops, which may only have a single disk; a full disk impacts performance. Storage costs have shot up recently, compounding the issue.
Installing and uninstalling IDEs frequently was considered unviable; however, an alternative approach was attempted that relies on mounting and unmounting virtual hard disks (VHDs) instead.
Each VHD is a single file, which is easy to archive or move to other storage as desired, and when mounted to a specific folder on the local PC, it means that the IDE or application can continue to run regardless of where the VHD file physically resides.
In the future, I’ll consider how to speed things up using PowerShell, but for now, the process is fairly simple to perform using the graphical Windows Disk Management program.
I don’t know yet if the chosen approach is good, but I’ll find out over time! It would be interesting to hear if others do a similar thing, or have considered it, or have an alternative approach.
Thanks for reading!


