


UNI-T multimeters have spread widely in recent years, due to their low cost and characteristics that come closer to the higher-end DMMs. Many models have an interesting feature: the ability to connect to a computer via USB, for data logging.
For several years I have owned a UT-71A, with which I feel pretty good. In the original packaging, in addition to various adapters and test leads, I also found a USB interface cable. The same type of cable, cataloged on the official website as UT-D04, is compatible with the DMMs of the UT71, UT61B/C/D and UT230 series.

This cable interfaces to the DMM through an IR photodiode, illuminated by an IR LED on the back of the multimeter. In this way it is possible to transmit the measurement information encoded in an infrared signal, thus electrically isolating the multimeter from the computer, similar to the operation of a photocoupler.
Unfortunately, this USB interface appears to be compatible only with Windows, including software to read and acquire data. The most serious thing is that the available drivers are compatible only up to Windows 7 and I have not been able to find a way to make the device recognized by Windows 10. I therefore decided to open the plastic enclosure to investigate and solve the problem.

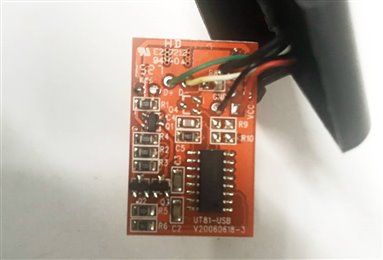
Inside this device we note the presence of an integrated marked CH9325, which should be a USB-TTL converter produced by the Chinese company WCH, like the more well-known CH340, widely used instead of the classic FTDI chips in the cheaper boards.
Oddly, several models with similar names are listed on the chip list on the manufacturer's website, but not this CH9325:
USB series chip - Jiangsu Qinheng Co., Ltd.
However, it is easy to recognize that pin 8 of the IC is connected to GND, while pin 3 should be the RX signal, as there is the only track connected to the output of the conditioned signal coming from the photodiode.
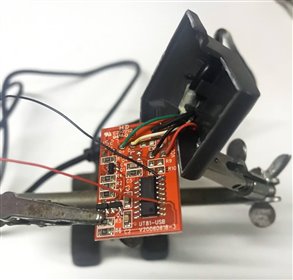
So I connected 2 test wires on pins 3 and 8, connected the original USB cable as the only power source, connected the oscilloscope probe, set the DMM on the SEND function and...bingo!

Here you can see the serial signal corresponding to a single acquisition, which has a peak voltage of just under 5V, so we know first of all that it is a UART TTL 5V (and not 3.3V). Using the RS232 decoder function of my oscilloscope, I tried to set all the most common baud rates, but the only one that seems to interpret a readable data is the 2400 baud.
Fortunately, the manufacturer's software (UT71A/B Interface Program Ver 3.0) allows you to select both a USB interface and a COM (RS232) interface. By connecting the two wires (GND and RX) to a USB-TTL converter module (with FTDI chip, which has more compatible drivers) it was possible to get around the problem and make the software work on Windows 10 as well.

On the software interface you can click on the COM1 button (top left) to change the COM number to the desired one (depending on the label assigned to your USB-TTL converter, read as virtual COM). Warning: this software limits the choice to COM1-4, therefore if your converter is assigned a higher ID, it will be necessary to change it from the Windows Device Management panel. At this point, by clicking on COM Connect, the interface will start receiving data.

From this interface, in addition to reading the data in real time, it is possible to acquire the measurements at regular (adjustable) intervals and save the list of data in txt or xls format (unfortunately not csv), so that it can be processed later or draw a graph.
I hope this guide is useful to those who found myself in my same situation. It would also be nice to make this interface compatible with systems other than Windows, but this would also require replacing the manufacturer's software, interpreting the protocol used on the serial port.
Top Comments