element14 Community
element14 Community
    Register Log In
  • Site
  • Search
  • Log In Register
  • About Us
  • Community Hub
    Community Hub
    • What's New on element14
    • Feedback and Support
    • Benefits of Membership
    • Personal Blogs
    • Members Area
    • Achievement Levels
  • Learn
    Learn
    • Ask an Expert
    • eBooks
    • element14 presents
    • Learning Center
    • Tech Spotlight
    • STEM Academy
    • Webinars, Training and Events
    • Learning Groups
  • Technologies
    Technologies
    • 3D Printing
    • FPGA
    • Industrial Automation
    • Internet of Things
    • Power & Energy
    • Sensors
    • Technology Groups
  • Challenges & Projects
    Challenges & Projects
    • Design Challenges
    • element14 presents Projects
    • Project14
    • Arduino Projects
    • Raspberry Pi Projects
    • Project Groups
  • Products
    Products
    • Arduino
    • Avnet Boards Community
    • Dev Tools
    • Manufacturers
    • Multicomp Pro
    • Product Groups
    • Raspberry Pi
    • RoadTests & Reviews
  • Store
    Store
    • Visit Your Store
    • Choose another store...
      • Europe
      •  Austria (German)
      •  Belgium (Dutch, French)
      •  Bulgaria (Bulgarian)
      •  Czech Republic (Czech)
      •  Denmark (Danish)
      •  Estonia (Estonian)
      •  Finland (Finnish)
      •  France (French)
      •  Germany (German)
      •  Hungary (Hungarian)
      •  Ireland
      •  Israel
      •  Italy (Italian)
      •  Latvia (Latvian)
      •  
      •  Lithuania (Lithuanian)
      •  Netherlands (Dutch)
      •  Norway (Norwegian)
      •  Poland (Polish)
      •  Portugal (Portuguese)
      •  Romania (Romanian)
      •  Russia (Russian)
      •  Slovakia (Slovak)
      •  Slovenia (Slovenian)
      •  Spain (Spanish)
      •  Sweden (Swedish)
      •  Switzerland(German, French)
      •  Turkey (Turkish)
      •  United Kingdom
      • Asia Pacific
      •  Australia
      •  China
      •  Hong Kong
      •  India
      •  Korea (Korean)
      •  Malaysia
      •  New Zealand
      •  Philippines
      •  Singapore
      •  Taiwan
      •  Thailand (Thai)
      • Americas
      •  Brazil (Portuguese)
      •  Canada
      •  Mexico (Spanish)
      •  United States
      Can't find the country/region you're looking for? Visit our export site or find a local distributor.
  • Translate
  • Profile
  • Settings
Test & Tools
  • Technologies
  • More
Test & Tools
Forum How to take Good Pictures of Electronics
  • Blog
  • Forum
  • Documents
  • Files
  • Members
  • Mentions
  • Sub-Groups
  • Tags
  • More
  • Cancel
  • New
Join Test & Tools to participate - click to join for free!
Actions
  • Share
  • More
  • Cancel
Forum Thread Details
  • Replies 26 replies
  • Subscribers 359 subscribers
  • Views 4628 views
  • Users 0 members are here
  • photo_techniques
  • photos
  • picture
Related

How to take Good Pictures of Electronics

jw0752
jw0752 over 9 years ago

Recently I posted a couple of pictures that fell short of being the quality that I was looking for. mcb1 was kind enough to send me some excellent tips on camera settings. I thought it might be helpful to everyone if we all share some of the tips and techniques that we use to get good quality pictures of our projects and builds. This will hopefully get the conversation going and we can add to it as ideas and techniques begin to flow back and forth.


Here is my first Tip:


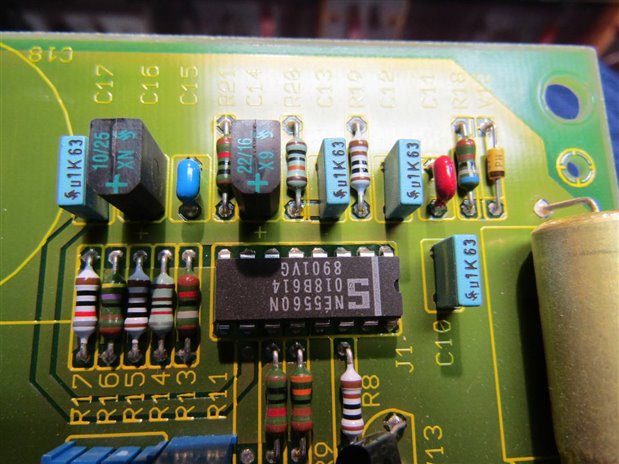
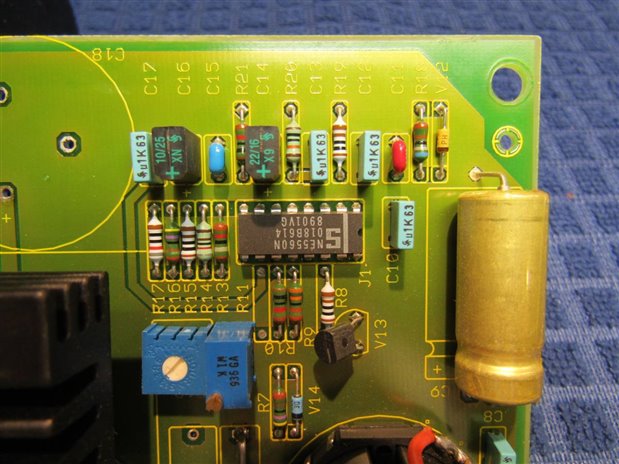
When I try to take a picture of a circuit board that is layed out flat on my bench I have difficulty with shadows frm my body and camera. I also experience difficulty eliminating flare on the circuit board from the over head lights. By propping the circuit board at an angle to the lighting it is much easier to avoid the shadows and the flare. In these pictures I am using a hockey puck to prop the board up.


image


image

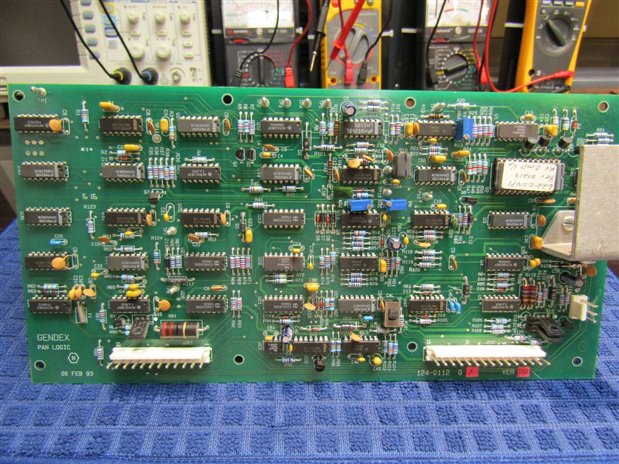
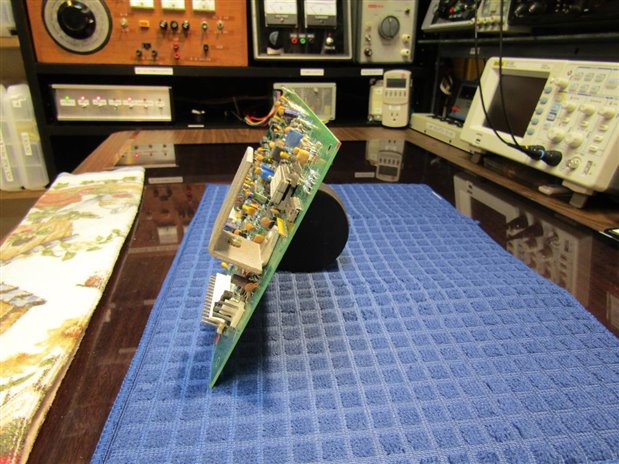
These pictures were shot at f3.5  1/30th of a second exposure.


John

  • Sign in to reply
  • Cancel

Top Replies

  • balearicdynamics
    balearicdynamics over 9 years ago +3
    Hi John! Good idea to open this discussion. Really. To avoid shades and get the best field depth also a lens ring light (neon or cold LED ring) is a good choice to reach a good illumination, reduce the…
  • D_Hersey
    D_Hersey over 9 years ago +2
    Sometimes there is a lot of high-albedo stuff on a circuit board You might experiment with a polarizing filter, linear or circular
  • D_Hersey
    D_Hersey over 9 years ago +2
    I use a copy-stand. I illuminate with white LEDs and UV LEDs, but I could use tungsten.
Parents
  • jw0752
    jw0752 over 9 years ago

    Here is an Idea that I use when I need to take an extreme closeup. Extreme closeups are very problematic even with a camera that is capable of focusing down to the surface of the lens. For one thing, it is very difficult to get the camera lens in as physically close as may be necessary. Secondly at some point the camera and lens begin to shade the subject. Here is a picture from the same section of board that I used above. The target subject of my picture is the "N" in NE5560N on the DIP chip.This is the closest practical distance that I can get to the board without shading the subject. If all that is important is the "N" then I have to include a lot of extraneous clutter.


    image


    The above picture was shot at a 3 mega pixel resolution but actually contains only 1 MB after compression. This is a good general purpose resolution as it is sharp enough at normal sizing. The memory size of the picture also allows for e-mail limits and other data size restrictions. In this next picture I have increased resolution to the max of the camera 20 MP and I have backed off from my target a little bit. The picture after compression contains 5.8 MB of data. Remember for the purpose of this demonstration my actual target is the "N" in NE5560N on the DIP Chip. The E-14 site will allow pictures up to 10 MB in size so this picture should upload without problems.


    image


    Since the target of my picture is the "N" I haven't accomplished much with this higher resolution picture, except now I have a lot more pixels to work with. But taking the high resolution image and trimming it down to the area of interest I am able to come up with this closeup of the "N" :


    image


    Now I have a closeup of my target that is nearly as big as the entire chip in my first picture. Since it is only part of the high resolution picture (5.8 Mp) it only has data content of 16KB and can be easily e-mailed or used in applications that are data size sensitive. I can also use it as needed without a lot of extraneous items in the picture.


    John

    • Cancel
    • Vote Up +1 Vote Down
    • Sign in to reply
    • Cancel
Reply
  • jw0752
    jw0752 over 9 years ago

    Here is an Idea that I use when I need to take an extreme closeup. Extreme closeups are very problematic even with a camera that is capable of focusing down to the surface of the lens. For one thing, it is very difficult to get the camera lens in as physically close as may be necessary. Secondly at some point the camera and lens begin to shade the subject. Here is a picture from the same section of board that I used above. The target subject of my picture is the "N" in NE5560N on the DIP chip.This is the closest practical distance that I can get to the board without shading the subject. If all that is important is the "N" then I have to include a lot of extraneous clutter.


    image


    The above picture was shot at a 3 mega pixel resolution but actually contains only 1 MB after compression. This is a good general purpose resolution as it is sharp enough at normal sizing. The memory size of the picture also allows for e-mail limits and other data size restrictions. In this next picture I have increased resolution to the max of the camera 20 MP and I have backed off from my target a little bit. The picture after compression contains 5.8 MB of data. Remember for the purpose of this demonstration my actual target is the "N" in NE5560N on the DIP Chip. The E-14 site will allow pictures up to 10 MB in size so this picture should upload without problems.


    image


    Since the target of my picture is the "N" I haven't accomplished much with this higher resolution picture, except now I have a lot more pixels to work with. But taking the high resolution image and trimming it down to the area of interest I am able to come up with this closeup of the "N" :


    image


    Now I have a closeup of my target that is nearly as big as the entire chip in my first picture. Since it is only part of the high resolution picture (5.8 Mp) it only has data content of 16KB and can be easily e-mailed or used in applications that are data size sensitive. I can also use it as needed without a lot of extraneous items in the picture.


    John

    • Cancel
    • Vote Up +1 Vote Down
    • Sign in to reply
    • Cancel
Children
  • D_Hersey
    D_Hersey over 9 years ago in reply to jw0752

    Alternatively, close-up rings:

    image

    • Cancel
    • Vote Up +1 Vote Down
    • Sign in to reply
    • Cancel
element14 Community

element14 is the first online community specifically for engineers. Connect with your peers and get expert answers to your questions.

  • Members
  • Learn
  • Technologies
  • Challenges & Projects
  • Products
  • Store
  • About Us
  • Feedback & Support
  • FAQs
  • Terms of Use
  • Privacy Policy
  • Legal and Copyright Notices
  • Sitemap
  • Cookies

An Avnet Company © 2025 Premier Farnell Limited. All Rights Reserved.

Premier Farnell Ltd, registered in England and Wales (no 00876412), registered office: Farnell House, Forge Lane, Leeds LS12 2NE.

ICP 备案号 10220084.

Follow element14

  • X
  • Facebook
  • linkedin
  • YouTube