element14 Community
element14 Community
    Register Log In
  • Site
  • Search
  • Log In Register
  • About Us
  • Community Hub
    Community Hub
    • What's New on element14
    • Feedback and Support
    • Benefits of Membership
    • Personal Blogs
    • Members Area
    • Achievement Levels
  • Learn
    Learn
    • Ask an Expert
    • eBooks
    • element14 presents
    • Learning Center
    • Tech Spotlight
    • STEM Academy
    • Webinars, Training and Events
    • Learning Groups
  • Technologies
    Technologies
    • 3D Printing
    • FPGA
    • Industrial Automation
    • Internet of Things
    • Power & Energy
    • Sensors
    • Technology Groups
  • Challenges & Projects
    Challenges & Projects
    • Design Challenges
    • element14 presents Projects
    • Project14
    • Arduino Projects
    • Raspberry Pi Projects
    • Project Groups
  • Products
    Products
    • Arduino
    • Avnet Boards Community
    • Dev Tools
    • Manufacturers
    • Multicomp Pro
    • Product Groups
    • Raspberry Pi
    • RoadTests & Reviews
  • Store
    Store
    • Visit Your Store
    • Choose another store...
      • Europe
      •  Austria (German)
      •  Belgium (Dutch, French)
      •  Bulgaria (Bulgarian)
      •  Czech Republic (Czech)
      •  Denmark (Danish)
      •  Estonia (Estonian)
      •  Finland (Finnish)
      •  France (French)
      •  Germany (German)
      •  Hungary (Hungarian)
      •  Ireland
      •  Israel
      •  Italy (Italian)
      •  Latvia (Latvian)
      •  
      •  Lithuania (Lithuanian)
      •  Netherlands (Dutch)
      •  Norway (Norwegian)
      •  Poland (Polish)
      •  Portugal (Portuguese)
      •  Romania (Romanian)
      •  Russia (Russian)
      •  Slovakia (Slovak)
      •  Slovenia (Slovenian)
      •  Spain (Spanish)
      •  Sweden (Swedish)
      •  Switzerland(German, French)
      •  Turkey (Turkish)
      •  United Kingdom
      • Asia Pacific
      •  Australia
      •  China
      •  Hong Kong
      •  India
      •  Korea (Korean)
      •  Malaysia
      •  New Zealand
      •  Philippines
      •  Singapore
      •  Taiwan
      •  Thailand (Thai)
      • Americas
      •  Brazil (Portuguese)
      •  Canada
      •  Mexico (Spanish)
      •  United States
      Can't find the country/region you're looking for? Visit our export site or find a local distributor.
  • Translate
  • Profile
  • Settings
1 Meter of Pi
  • Challenges & Projects
  • Design Challenges
  • 1 Meter of Pi
  • More
  • Cancel
1 Meter of Pi
Blog Blog# 5 EAS - Research Temperature Sensor - DS18B20
  • Blog
  • Forum
  • Documents
  • Polls
  • Files
  • Events
  • Mentions
  • Sub-Groups
  • Tags
  • More
  • Cancel
  • New
  • Share
  • More
  • Cancel
Group Actions
  • Group RSS
  • More
  • Cancel
Engagement
  • Author Author: skruglewicz
  • Date Created: 21 Nov 2020 3:10 AM Date Created
  • Views 3209 views
  • Likes 5 likes
  • Comments 16 comments
  • 1meterofpi
  • ds18b20
  • w1thermsensor
  • 1meter of pi
Related
Recommended

Blog# 5 EAS - Research Temperature Sensor - DS18B20

skruglewicz
skruglewicz
21 Nov 2020

imageimage

BLOG# 5 -Edible Algae System - (Growing Spirulina in space)

Temperature Sensor - DS18B20

This is my 5th blog post in a series of blog post for the Design Challenge 1 Meter of Pi

version 1.3

<<< PREVIOUS BLOGNEXT BLOG  >>>

Blog# 4 EAS - Research and Unboxing of the challenge kit

Blog# 6 EAS - System Designs -- Block diagram

  • INTRODUCTION
  • How to Setup the DS18B20 - Experiment 2
    • Setup
    • Attaching to the PI
    • Installation
    • Testing
    • The CODE
    • here it is running
  • How to Setup the DS18B20 - Research experiment 1
    • Materials
    • Steps
    • 1.Enable the w1-gpio in config.txt
    • 2. Connect the Sensor
    • 3. Load, Configure and Test the drivers
    • 4. Python Code Example
  • Conclusion and summary
  • REFERENCES

image


INTRODUCTION

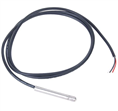
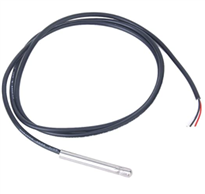
In order to maintain a consistent temperature of the water in the growing tank, a waterproof temperature Sensor will be used.

The Sensor that I found on the internet, is the 1-Wire DS18B20

I bought a set of five DS18B20  from Amazon here

image

How to Setup the DS18B20 - Experiment 2

OK, since the 1st setup experiment did not work, I've decided to try another option that element14 member ajcc recommended.

I've decided to give the package on GitHub a try W1ThermSensor

You can reference the GitHub, but I'll document what I did to get this sensor connected to the Raspberry PI.


Setup

These are the Materials needed:

  • Raspberry Pi 4model B 2GB
  • DB18B20 (waterproof temperature sensor)
  • 10kΩ resistor
  • Breadboard
  • Jumper Wires


Edit the /boot/config.txt and I added dtoverlay=w1-gpio,pullup="y" to the end.

edit with sudo nano /boot/config.txt


NOTE: the article suggest that you can use dtoverlay=w1-gpio , but it did not work for me.

Attaching to the PI

connected the jumpers, resistor, and sensor to the breadboard an RaspPI as described in the article.
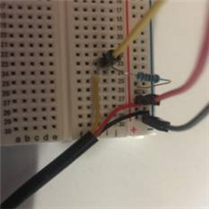
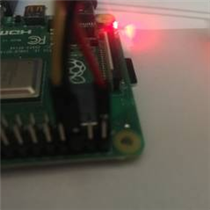
imageimage


Installation

install it from the official repository

sudo apt-get install python3-w1thermsensor

Testing

you can check the connection from the command line

List all available sensors:
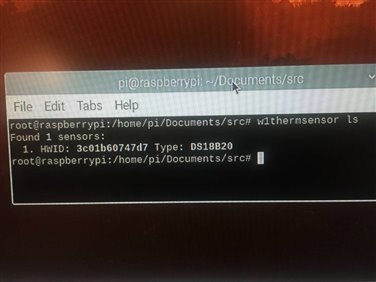
$ w1thermsensor ls
image

The CODE

here's the code that worked for me


import Unit from w1thermsensor but this did not work for me

from w1thermsensor import W1ThermSensor


sensor = W1ThermSensor()

temperature_in_celsius = sensor.get_temperature()

temperature_in_fahrenheit = sensor.get_temperature(.DEGREES_F)

here it is running


The water in the glass is almost the sane as the room here. a cowincidence.
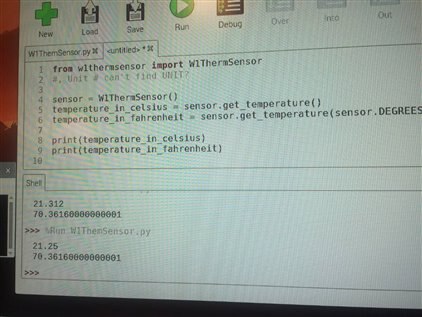
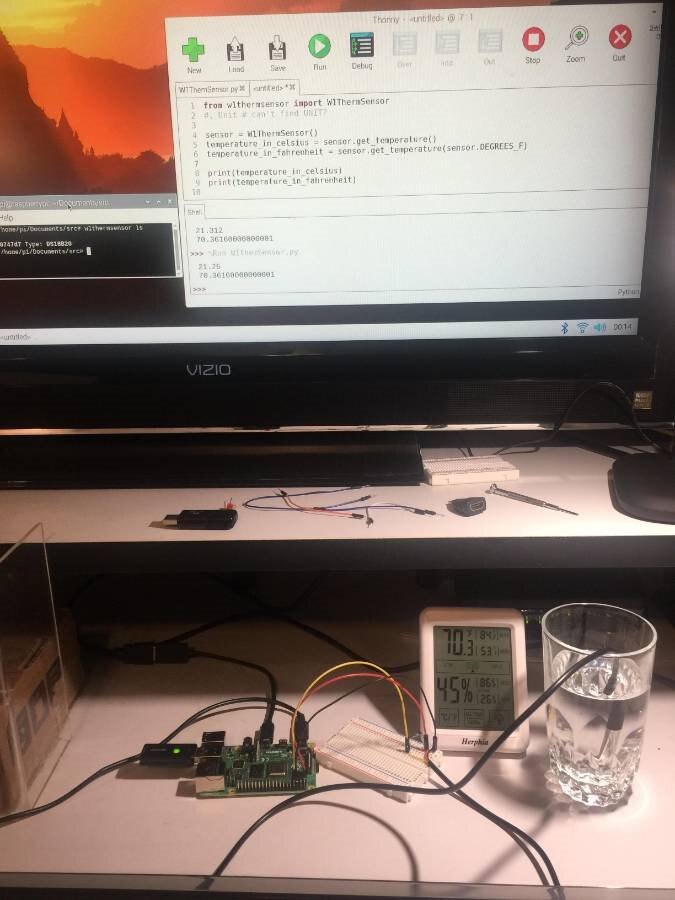
imageimage
SUCCESSThis sensor works great.


How to Setup the DS18B20 - Research experiment 1

NOTE 10/21/2020 --- Problem on  step 3.2

PROBLEM:

  • Folder not created after a reboot
  • Will try alternative suggestion from ajcc

I was able to find an article on the  DS18B20 on  the internet at Set Up a Raspberry Pi DS18B20 Temperature Sensor, which I will attempt to experiment with.

Using this article as a guide, The following steps are taken:

  1. Show how to enable the w1-gpio in config.txt.
  2. Describe how to connect the DS18B20 to the Raspberry Pi 4
  3. Describe how to load, configure, test the drivers.
  4. Python code example to read the sensor

Materials

These are the Materials that were recommended:

  • Raspberry Pi 4model B 2GB
  • DB18B20 (waterproof temperature sensor)
  • 4.7kΩ (or 10kΩ) resistor
  • Breadboard
  • Jumper Wires

Steps

1.Enable the w1-gpio in config.txt

Enable the w1-gpio by editing the /boot/config.txt file.

  1. Enter the following command:  sudo nano /boot/config.txt
  2. Then add this line to the bottom of the file if not already present dtoverlay=w1-gpio

2. Connect the Sensor

  1. Connect GPIO GND on the Pi to the negative rail on the breadboard and connect GPIO 3.3V on the Pi to the positive rail on the breadboard.
  2. Connect the black (-)wire of your DS18B20 to the breadboard negative rail.
  3. Connect the red (+)wire of your DS18B20 to the breadboard positive rail.
  4. Connect one end of your 4.7kΩ resistor to the positive rail and the other end to an empty row on your breadboard.
  5. Connect the yellow (Data) wire of your DS18B20 to the same row on your breadboard as the 4.7kΩ resistor.
  6. Finally, connect GPIO4 on the RPi to the same row on your breadboard as the 4.7kΩ resistor and yellow (Data) wire.

     If all has gone well then your setup should look like the diagram below.

<DIAGRAM of the Breadboard HERE>

3. Load, Configure and Test the drivers

     Now , we will need to identify the registered serial number of our sensor. To do this follow the next steps:

     1. Add the 1-Wire and Thermometer drivers to your RasPI.

        To load the drivers, use the modprobe command.

        From the command prompt enter the following:


     2. We then need to check that the DB18B20 has connected correctly to our Pi, change directory to your 1-Wire device folder and list the devices.

     cd /sys/bus/w1/devices/

     ls

          In the device drivers folder, your sensor should have created a folder using its mac address.

          If you can’t see any folder then perform a reboot of the Pi and check again.

     sudo reboot


PROBLEM:

  • Folder not created even after a reboot


3. You can read what has been saved to the file by entering

cd /sys/bus/w1/devices/

ls

cd 28-xxxxxxxxxxxx (enter your registered device mac address)

cat w1_slave

4. This will print 2 lines with error checking.

  • In the first line we see that it finishes with the word YES, this indicated that there has been a successful reading.
  • In the second line, there is a t= indicating the temperature in °C.

<SCREEN SHOT HERE >

The temperature sensor is now successfully connected to our Pi so we can start our Python programming.


4. Python Code Example

CodeComments

import os

from time import sleep

First, we need to import the required python modules.

os.system('modprobe w1-gpio')

os.system('modprobe w1-therm')

We then need to load our drivers:
temp_sensor_1 = '/sys/bus/w1/devices/Your_Sensor_Name/w1_slave'We now need to define where our sensors output file is located

def read_temp_raw():

   f = open(temp_sensor, 'r')

   lines = f.readlines()

   f.close()

   return lines

We next need to read into a variable our raw sensor output file,


This function opens, reads and then saves the 2 lines of raw data to the variable “lines” , we use the return function so that the result can be used later in our code.

def read_temp():


lines = read_temp_raw()

while lines[0].strip()[-3:] != 'YES':

  sleep(0.2)

  lines = read_temp_raw()

temp_result = lines[1].find('t=')


if temp_result != -1:

  temp_string = lines[1].strip()[temp_result + 2:]

  # Temperature in Celcius

  temp = float(temp_string) / 1000.0

  # Temperature in Fahrenheit

  #temp = ((float(temp_string) / 1000.0) * (9.0 / 5.0)) + 32.0

  return temp

Now we need to analyze our raw data, first we will check for errors


This error check reads the first line from the variable lines (lines[0]) and then strips all but the last 3 digits, it is then compared to the value ‘YES’ (In python “!=” is defined as “not equal to”).  If the value does not equal ‘YES’ then the program pauses for 0.2s then reads the new data and does the comparison again.


Once we have a successful ‘YES’ result we move on to read the second line of data from the variable lines (lines[1]).  We search the string and count how many digits until we find the string ‘t=’ and store it in temp_result.  Provided the result of this is not -1 we proceed to strip all the digits prior to that number plus 2 (to remove the ‘t=’) leaving us with just the temperature stored in temp_string. Finally, we calculate the temperature in Celsius or Fahrenheit ready for printing.

while True:

  print(read_temp())

  time.sleep(2)

We now loop or final code to print out the data every 2 seconds


Conclusion and summary


  • Problem

I Tried to hook up the sensor using an article from 2016 but I could not get it to work

  • I had a problem when with the loading of the drivers as described in my reference article.
  • The directory was not created as specified in section 3.1 and 3.2 above.
  • I need to figure out why? i might have to use a different approach.
  • I received a suggestion from ajcc  in a comment below.
  • I will try and follow this members advice to get the sensor working.

Suggestion from a member

ajcc Nov 22, 2020 5:33 AM

AC: "The temperature T is in milliCelsius, this is the default unit used by temperature sensors in Linux, that might be obvious from reading the python code but perhaps not from the sysfs output?"

SK: Good to know


AC: "Instead of running modprobe from the Python script (requiring you to it run as root), you automatically load them at boot by add the following to /etc/modules

  1. w1-gpio 
  2. w1-therm 

"

SK: Good to know


AC: "If you don't want to write your own code to parse the output in the sysfs-file you could pip install W1ThermSensor instead, which also implements a command for setting the resolution from 9 to 12-bits (you can also do this by writing to the sysfs-file, notice that you can save the settings in the device)."

SK: I've decided to give the package on git Hub a try W1ThermSensor

I will document my finding in this blog


I used the package on GitHub W1ThermSensor

I started on a new Raspberry pi and put the same circuit I had for experiment 1.

THis worked out great for me and I will use the circut and software for my design.


REFERENCES

GitHub  W1ThermSensor Package

https://pypi.org/project/w1thermsensor/1.3.0/
https://www.kernel.org/doc/Documentation/w1/slaves/w1_therm
Set Up a Raspberry Pi DS18B20 Temperature Sensor


<<< PREVIOUS BLOGNEXT BLOG  >>>

Blog# 4 EAS - Research and Unboxing of the challenge kit

Blog# 6 EAS - System Designs -- Block diagram


  • Sign in to reply

Top Comments

  • colporteur
    colporteur over 4 years ago +2
    I have a tutorial that provides the details for setting up a temperature monitor that logs both air and water temperature on a Raspberry Pi, if it is something you require. It has been cleared for space…
  • DAB
    DAB over 4 years ago +1
    How stable was the temperature sensor over a longer time? Did it stay within specifications? DAB
  • skruglewicz
    skruglewicz over 4 years ago in reply to DAB +1
    HI DAB I'm still in the process of experimenting with this sensor. I needed a waterproof sensor to check water temp. I'll have to test for these 2 points in my unit testing. Thanks for your feedback S…
Parents
  • ajcc
    ajcc over 4 years ago

    First off, I don't think you should copy the text, code and images from the reference into your blog. I understand that you're just making notes at this point in time.


    The temperature T is in milliCelsius, this is the default unit used by temperature sensors in Linux, that might be obvious from reading the python code but perhaps not from the sysfs output?


    Instead of running modprobe from the Python script (requiring you to it run as root), you automatically load them at boot by add the following to /etc/modules

    w1-gpio
    w1-therm


    If you don't want to write your own code to parse the output in the sysfs-file you could pip install W1ThermSensor instead, which also implements a command for setting the resolution from 9 to 12-bits (you can also do this by writing to the sysfs-file, notice that you can save the settings in the device).


    Good luck with your project!

    • Cancel
    • Vote Up +1 Vote Down
    • Sign in to reply
    • More
    • Cancel
  • skruglewicz
    skruglewicz over 4 years ago in reply to ajcc

    Hi ajcc

    Yes your absolutely right about the plagiarism, I just wanted to keep notes, I'll clean it up soon.

    I appreciate your help and will give your suggestions a try.


    Kind Regards

    Steve K

    • Cancel
    • Vote Up +1 Vote Down
    • Sign in to reply
    • More
    • Cancel
  • skruglewicz
    skruglewicz over 4 years ago in reply to ajcc

    Hello ajcc


    This is great information to help me diagnose my problem with "folder not created after reboot".in answer to your question

    " was it created when you ran the two modprobe commands?" , Iit was not created after the modprobe commands and it was not created after a reboot as the article stated to do.

    I will try diagnostic  suggestions later.


    In the mean time, I have abandoned that experiment and have moved on to researching your recommended solution using the W1ThermSensor  package on Github.


    I followed the:

    • Setup,
    • Installation (sudo apt-get install python3-w1thermsensor)
    • and ran the CLI command from root

                    w1thermsensor ls


    I received 0 sensors found!!

    The results is as follows:

                   root@raspberrypi:/home/pi# w1thermsensor ls

                        Found 0 sensors:

    imageimageimage


    I'm now wondering if I'll ever get this sensor working for my design.

    I'm now questioning a few things in my diagnostics:

    • Is the sensor defective? I tried two.
    • I'm using a 10K resistor. is this the problem?
    • Are  my connections correct?
    • Did i do the setup correctly


    I'll continue to test but I need to move on with my design documentation for design challenge.

    thank you for all your wonderful help

    Steve K

    • Cancel
    • Vote Up +1 Vote Down
    • Sign in to reply
    • More
    • Cancel
  • ajcc
    ajcc over 4 years ago in reply to skruglewicz

    You could try a 4.7 kOhm resistor, but I doubt it would change much. Not sure how to easily check if the device tree overlay was applied. modprobe will not fail if it doesn't find any devices, but it should print out a kernel message if it finds a device. Here are all the devices that are created when I run sudo dtoverlay w1-gpio on the RPi. If you don't see any of these directories then the overlay was not applied and you can't use 1-wire devices (the GPIO pins have many functions and you have to select the alternative ones to use them).

    image

    I don't have any 1-wire devices connected, so there's no devices added (this is a thing with Linux, drivers don't fail to load if there's no device). Not sure why it keeps adding those 00-... devices.

    image

    If I run modprobe w1-gpio w1-therm without the overlay I see this instead:

    image

    Notice that the (platform) line is missing, so while the devices were created, they have no bus to talk too.

    image

    Found out that the more Rasperry Pi way of setting the device tree overlay is to use the raspi-config tool (instead of changing config.txt by hand):

    sudo raspi-config

    Interfacing Options -> 1-Wire -> <Yes>


    In summary, if the directory /sys/devices/platform/onewire@0/ exists then the overlay was applied. If that's the case then I'm not sure I can be off much more help.

    • Cancel
    • Vote Up +1 Vote Down
    • Sign in to reply
    • More
    • Cancel
  • skruglewicz
    skruglewicz over 4 years ago in reply to ajcc

    Success ajcc  !!

    I was able to get a sensor back from the command !!

         i@raspberrypi:~ $ w1thermsensor ls

              Found 1 sensors:

                     1. HWID: 3c01b60747d7 Type: DS18B20


    My solution:

    • I didn't realize I was on another Pi and I did not complete the setup as specified by the README on the  W1ThermSensor  repo.
    • It specified to:
      • "On the Raspberry Pi, you will need to add dtoverlay=w1-gpio" (for regular connection) or dtoverlay=w1-gpio,pullup="y" (for parasitic connection) to your /boot/config.txt. "
    • I added the line dtoverlay=w1-gpio,pullup="y" to the end of /boot/config.txt with nano and rebooted
    • Volla the command is now working and I now know that the connections, and setup is working.
    • NOTE I didn't try it with the other setting because that didn't seem to work on my other PI.


    Thank you so much for your help and time.

    Steve K


    • Cancel
    • Vote Up +1 Vote Down
    • Sign in to reply
    • More
    • Cancel
  • skruglewicz
    skruglewicz over 4 years ago in reply to ajcc

    Thanks so much for the information. This all is very helpful in diagnosing device.

    • Cancel
    • Vote Up +1 Vote Down
    • Sign in to reply
    • More
    • Cancel
  • ajcc
    ajcc over 4 years ago in reply to skruglewicz

    That's so cool!

    I'm happy you managed to figure it out and get it working, a waterproof temperature sensor seem like the perfect fit for growing algae image

    • Cancel
    • Vote Up +1 Vote Down
    • Sign in to reply
    • More
    • Cancel
Comment
  • ajcc
    ajcc over 4 years ago in reply to skruglewicz

    That's so cool!

    I'm happy you managed to figure it out and get it working, a waterproof temperature sensor seem like the perfect fit for growing algae image

    • Cancel
    • Vote Up +1 Vote Down
    • Sign in to reply
    • More
    • Cancel
Children
  • skruglewicz
    skruglewicz over 4 years ago in reply to ajcc

    Thank you so much..  I needed a second set of eyes.  Your suggestion for that package is awesome. It’s more of the date  then the first article I had

    regards

    Steve K

    • Cancel
    • Vote Up +1 Vote Down
    • Sign in to reply
    • More
    • Cancel
  • ajcc
    ajcc over 4 years ago in reply to skruglewicz

    No thank you! I learned a lot trying to help, it's so easy to just tell someone to run a couple of commands. But it's not so easy to find a way to help out.

    • Cancel
    • Vote Up +1 Vote Down
    • Sign in to reply
    • More
    • Cancel
element14 Community

element14 is the first online community specifically for engineers. Connect with your peers and get expert answers to your questions.

  • Members
  • Learn
  • Technologies
  • Challenges & Projects
  • Products
  • Store
  • About Us
  • Feedback & Support
  • FAQs
  • Terms of Use
  • Privacy Policy
  • Legal and Copyright Notices
  • Sitemap
  • Cookies

An Avnet Company © 2025 Premier Farnell Limited. All Rights Reserved.

Premier Farnell Ltd, registered in England and Wales (no 00876412), registered office: Farnell House, Forge Lane, Leeds LS12 2NE.

ICP 备案号 10220084.

Follow element14

  • X
  • Facebook
  • linkedin
  • YouTube