element14 Community
element14 Community
    Register Log In
  • Site
  • Search
  • Log In Register
  • Community Hub
    Community Hub
    • What's New on element14
    • Feedback and Support
    • Benefits of Membership
    • Personal Blogs
    • Members Area
    • Achievement Levels
  • Learn
    Learn
    • Ask an Expert
    • eBooks
    • element14 presents
    • Learning Center
    • Tech Spotlight
    • STEM Academy
    • Webinars, Training and Events
    • Learning Groups
  • Technologies
    Technologies
    • 3D Printing
    • FPGA
    • Industrial Automation
    • Internet of Things
    • Power & Energy
    • Sensors
    • Technology Groups
  • Challenges & Projects
    Challenges & Projects
    • Design Challenges
    • element14 presents Projects
    • Project14
    • Arduino Projects
    • Raspberry Pi Projects
    • Project Groups
  • Products
    Products
    • Arduino
    • Avnet Boards Community
    • Dev Tools
    • Manufacturers
    • Multicomp Pro
    • Product Groups
    • Raspberry Pi
    • RoadTests & Reviews
  • About Us
  • Store
    Store
    • Visit Your Store
    • Choose another store...
      • Europe
      •  Austria (German)
      •  Belgium (Dutch, French)
      •  Bulgaria (Bulgarian)
      •  Czech Republic (Czech)
      •  Denmark (Danish)
      •  Estonia (Estonian)
      •  Finland (Finnish)
      •  France (French)
      •  Germany (German)
      •  Hungary (Hungarian)
      •  Ireland
      •  Israel
      •  Italy (Italian)
      •  Latvia (Latvian)
      •  
      •  Lithuania (Lithuanian)
      •  Netherlands (Dutch)
      •  Norway (Norwegian)
      •  Poland (Polish)
      •  Portugal (Portuguese)
      •  Romania (Romanian)
      •  Russia (Russian)
      •  Slovakia (Slovak)
      •  Slovenia (Slovenian)
      •  Spain (Spanish)
      •  Sweden (Swedish)
      •  Switzerland(German, French)
      •  Turkey (Turkish)
      •  United Kingdom
      • Asia Pacific
      •  Australia
      •  China
      •  Hong Kong
      •  India
      •  Korea (Korean)
      •  Malaysia
      •  New Zealand
      •  Philippines
      •  Singapore
      •  Taiwan
      •  Thailand (Thai)
      • Americas
      •  Brazil (Portuguese)
      •  Canada
      •  Mexico (Spanish)
      •  United States
      Can't find the country/region you're looking for? Visit our export site or find a local distributor.
  • Translate
  • Profile
  • Settings
Design For A Cause 2021
  • Challenges & Projects
  • Design Challenges
  • Design For A Cause 2021
  • More
  • Cancel
Design For A Cause 2021
Blog Upgrade your current Monitor with Adaptive Brightness Smart feature to Save Eyes #03 :arduino 33 iot interfaced with light sensor BH1750 that gives room light level in lux
  • Blog
  • Forum
  • Documents
  • Polls
  • Files
  • Mentions
  • Sub-Groups
  • Tags
  • More
  • Cancel
  • New
  • Share
  • More
  • Cancel
Group Actions
  • Group RSS
  • More
  • Cancel
Engagement
  • Author Author: sandeepdwivedi17
  • Date Created: 17 May 2021 3:02 PM Date Created
  • Views 1371 views
  • Likes 4 likes
  • Comments 0 comments
  • program
  • bh1750
  • arduino nano 33 iot
Related
Recommended

Upgrade your current Monitor with Adaptive Brightness Smart feature to Save Eyes #03 :arduino 33 iot interfaced with light sensor BH1750 that gives room light level in lux

sandeepdwivedi17
sandeepdwivedi17
17 May 2021

In this part we will see how to connect and program arduino with BH1750 light sensor to get room light levels.


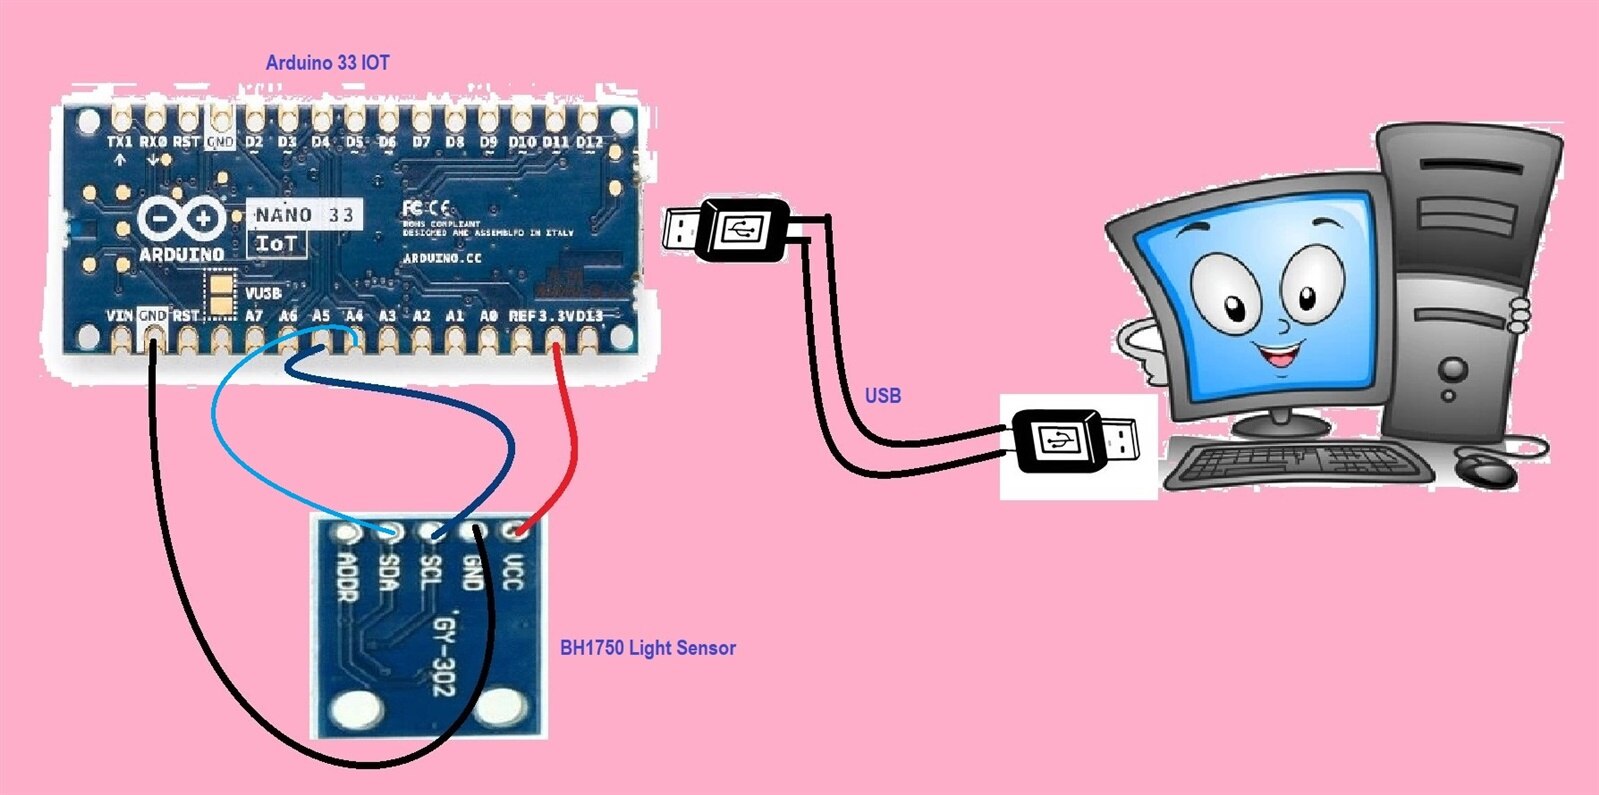
Circuit Diagram(Arduino + BH1750)

To mount the circuit, you would want to start off by disconnecting any source of power going into your Arduino as it may be a hazard when connecting wires to the BH1750 sensor. Now, we can start wiring the sensor to the Arduino. Before starting, make sure you have soldered the 5-pin header to the sensor for your connections. This sensor uses the standard i2c protocol wiring, so it may all be very familiar to you. Firstly, use one of your five jumper wires to connect the VCC image pin of the sensor to the 5v image pin on your Arduino board. Now, use another jumper wire to connect the GND image pin of your BH1750 sensor to any of your GND image pins on your Arduino. Next, connect the SCL (Serial Clock) pin of the sensor to A5 (analog pin 5) of your Arduino and the SDA (Serial Data) pin of your sensor to A4 (analog pin 4) of your Arduino. These four connections are all part of the standard i2c hardware connections for any i2c sensor. The hardware part of this project is now done!

image

Program To be Uploaded into Arduino

#include <BH1750FVI.h>

// Create the Lightsensor instance
BH1750FVI LightSensor(BH1750FVI::k_DevModeContLowRes);

void setup() 
{
  Serial.begin(115200);
  LightSensor.begin();  
}

void loop()
{
  uint16_t lux = LightSensor.GetLightIntensity();
  Serial.print("Light: ");
  Serial.println(lux);
  delay(700);
}


Blog #01 :Concept


Blog #02 :Solution Overview


Blog #03 :arduino 33 iot interfaced with light sensor BH1750 that gives room light level in lux


Blog #04 :PC Program to Control Screen Brightness


Blog #05 :Final Touch

  • Sign in to reply
element14 Community

element14 is the first online community specifically for engineers. Connect with your peers and get expert answers to your questions.

  • Members
  • Learn
  • Technologies
  • Challenges & Projects
  • Products
  • Store
  • About Us
  • Feedback & Support
  • FAQs
  • Terms of Use
  • Privacy Policy
  • Legal and Copyright Notices
  • Sitemap
  • Cookies

An Avnet Company © 2025 Premier Farnell Limited. All Rights Reserved.

Premier Farnell Ltd, registered in England and Wales (no 00876412), registered office: Farnell House, Forge Lane, Leeds LS12 2NE.

ICP 备案号 10220084.

Follow element14

  • X
  • Facebook
  • linkedin
  • YouTube