


The next challenge for Matilda was a temperature gauge, she'd planned to use an LED bargraph for this but was concerned it would "light up the house like a Christmas tree". Her next thought was a servo driven slider pointing at a scale. There was not much room for this so she wondered if she needed to bother with a Fahrenheit scale. She'd ask the oldest person she knew which was Farmer Hogg. It was lunch time so she knew where to find him, in the Adam and Eve.
Farmer Hogg
Matilda arrived at the inn and soon spotted Farmer Hogg with a shepherd's pie and a tankard of ale. She showed him her notebook with the plans for the temperature gauge and asked him if he used Celsius or Fahrenheit. "I divn't bother with tweither" he retorted. "So how do you tell the temperature?" asked Matilda. Farmer Hogg looked down at his empty tankard and back up at Matilda. This was going to be a long story and Matilda hoped it would not cost her too much in beer to hear it out.
Matilda returned presently with two tankards, "Happen ah rises" started Farmer Hogg, "ah looks oot on fell an happen aal oer with white snow happen jumper n jacket, happen green with grass, " Farmer Hogg paused and took a large swig from his drink, "happen oor shirt, tupping n raddling, happen brimming yellow with lockity gowan happen vest n sheerlings" , Matilda took a swig from her own tankard to see of it might aid her comprehension. As she placed her drink back on the table Farmer Hogg tapped his empty tankard on the brim, "get yasells yan". Matilda finished her drink and got two refills from the bar. "Happen purple fell with heather" Farmer Hogg continued, "happen jacket, backend, feltle pens, snag the neeps. Happen that till be that" Farmer Hogg concluded and Matilda looked at him puzzled. Farmer Hogg looked annoyed and snatched the notebook.
He scribbled the following:
White Snow
Green Grass
Yellow Flowers
Purple Heather
Matilda thanked the farmer and staggered home, she waved the paper triumphantly at Hans before collapsing in an arm chair and falling fast asleep.
Matilda sees the light
In the morning Matilda was suffering from her "lunch" with Farmer Hogg. But she wrote up her notes from the meeting. She explained to Hans that the idea was, rather than having a complex display for the temperature they could use an RGB LED to show the temperature and status. They could use the Infineon shield, not because they needed it's power driving capability but because it could offload some of the processing. Hopefully it would also make the Arduino code simpler too.
| Colour | Temperature°C / Status |
|---|---|
| White | <0 - below zero aka Ice |
| Purple | 0 - 5 |
| Blue | 5 - 10 |
| Green | 10 - 15 |
| Yellow | 15 - 25 |
| Orange | 25 - 30 |
| Red | 30 + |
| Off | Off / Sleeping |
| Slow Flash | Booting / Getting data |
| Quick Flash | Error (Using Historic or Local Data) |
| Colour cycle | Needs configuring |
How low can you go?
The Infineon shield does not implement large resistors to limit the current through the LEDs, rather it senses the current flow as a voltage over a small sense resistor and adjusts the modulation of the driving MOSFET based on that. To vary the current a reference voltage can be configured. It should also be possible to bring the average current down by increasing the off time parameter which in turn increases the LED current ripple.


The data sheet did not provide a calculation for the current, recommending an experimental technique using an oscilloscope, it also had a big table full of examples. These values were plotted and a trend line added to produce a formula to calculate current from input parameter.
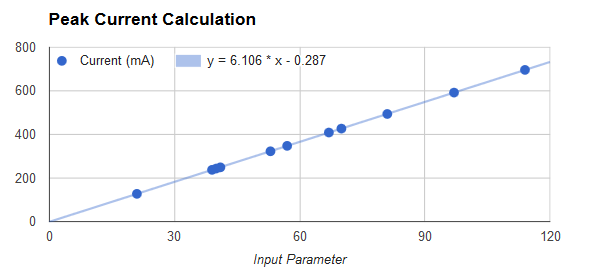
That gave a value of 3 representing 18mA or 2 representing 11mA which might be a safer starting point. The average current could then be measured with a multimeter as an oscilloscope was not available.
Standing on the shoulders of giants
Rather that starting from scratch Hans decided that he could use one of the code libraries already created during the Holiday Lights challenge which are in turn wrappers for the Infineon library. Using Jan Cumps' review the library from ipv1 was selected.
The first test was to see if it was possible to drive a regular red LED with no current limiting resistor. Based on the above graph/equation, the "max current" setting was set to 1, it's lowest value (although 0 has not been tried). A multimeter was put in series with the LED to measure the current. This read a little high at 24mA so the off time parameter was incremented and successfully brought that back down to 20mA. Then a little programme was written to sweep the brightness up and down. The other thing that was tested was that the shield could be run from just 5v rather than needing a higher supply, Hans had already checked the schematic, the regulator and microcontroller on the shield were capable of running at the lower voltage. This would simplify the circuitry. The Arduino was powered from an adapter and the shield from the battery with Adafruit boost regulator.
Code at Github
Now that the system had been proven using a cheaper red LED the jumbo RGB LED could be swapped in with reduced risk of a costly burn out. The brightness was set at a mid level and code changed to cycle through the colours.
Code at Github
Whilst the circuit was being powered off it was noted that the LED stayed the same colour even once the Arduino was powered off. That could come in handy.
A small PCB had been considered for the LED but given that it fitted ok into the breadboard and that there are no other components than a connector, a simple stripboard will be used with some form of fastening to hold it into the wooden frame. Standoffs attached with glue have previously shown to work.
Reference:
http://www.lakelanddialectsociety.org/dialect_glossary.htm
http://www.element14.com/community/docs/DOC-70582
Next: Enchanted Objects Design Challenge - Taming the Python
Top Comments
-

Workshopshed
-
Cancel
-
Vote Up
+1
Vote Down
-
-
Sign in to reply
-
More
-
Cancel
Comment-

Workshopshed
-
Cancel
-
Vote Up
+1
Vote Down
-
-
Sign in to reply
-
More
-
Cancel
Children