


Ending the series with remote monitoring
With this fifth blog, I conclude my series of optional blogs for the Experimenting with Extreme Environments design challenge sponsored by Hammond Manufacturing. Throughout this nearly bi-weekly series, I have introduced the UrbanRest Guardian project for monitoring nighttime city sounds. I described how I selected the components, developed the physical prototype inside the 1554VA2GYCL Hammond enclosure provided to all participants, and created and implemented the sound classifier software. In this final blog, I describe how I implemented a remote monitoring server using the open-source solution ThingsBoard and discuss other tests conducted over the past two weeks.
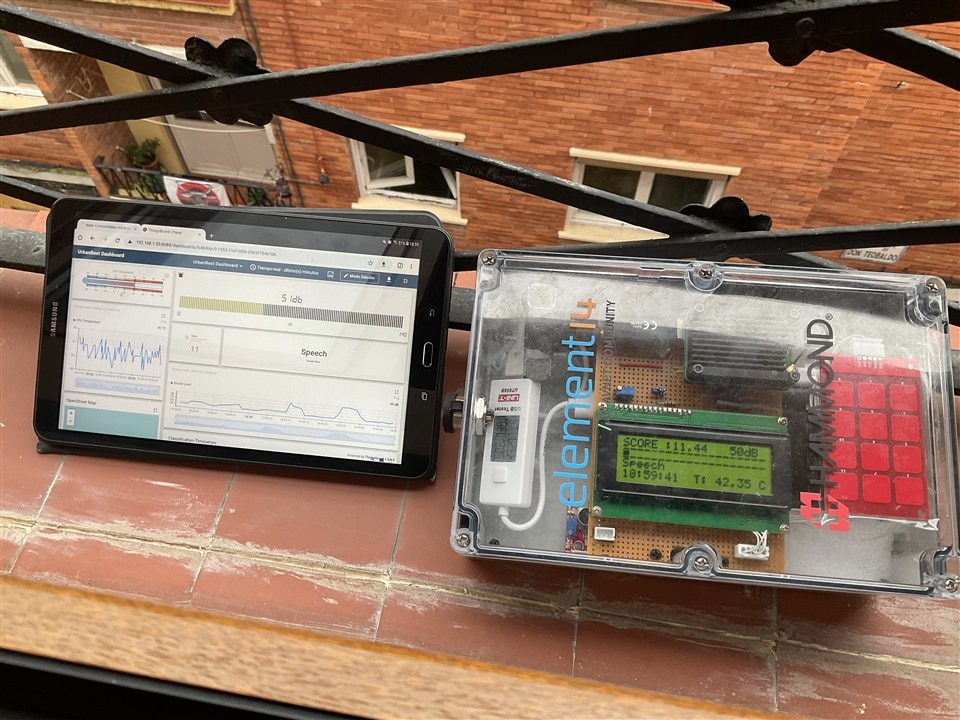
Table of Contents
- Ending the series with remote monitoring
- How can all this be monitored remotely?
- I don't want to spend a dime, how do I monitor this?
- Why I chose ThingsBoard. What's good about It?
- And where do I store the data? Is there anything good, nice, and cheap?
- How do I install all this? Is there anything else to install first?
- Wow! Impressed with the Thingsboard Web UI
- And now, how do I connect my Raspberry Pi CM 4 to this?
- Let's simulate a connection via command line.
- How hard is it to create a dashboard for my UrbanRest Guardian?
- Enough mockups, how do I update the data from Python?
- My Python program shuts down when I log out. What I do?
- A lot of talk, I want to see this working!
- Which is the CPU temperature?
- Can I use any microphone with this?
- Surprise. What's that sound in my neighborhood?
- Police, cars, dogs, glass, dishes...?
- Where is my rest?
- Who in the world is typing on the lid?
- Summary and conclusions
- UrbanRest Guardian blog series
How can all this be monitored remotely?
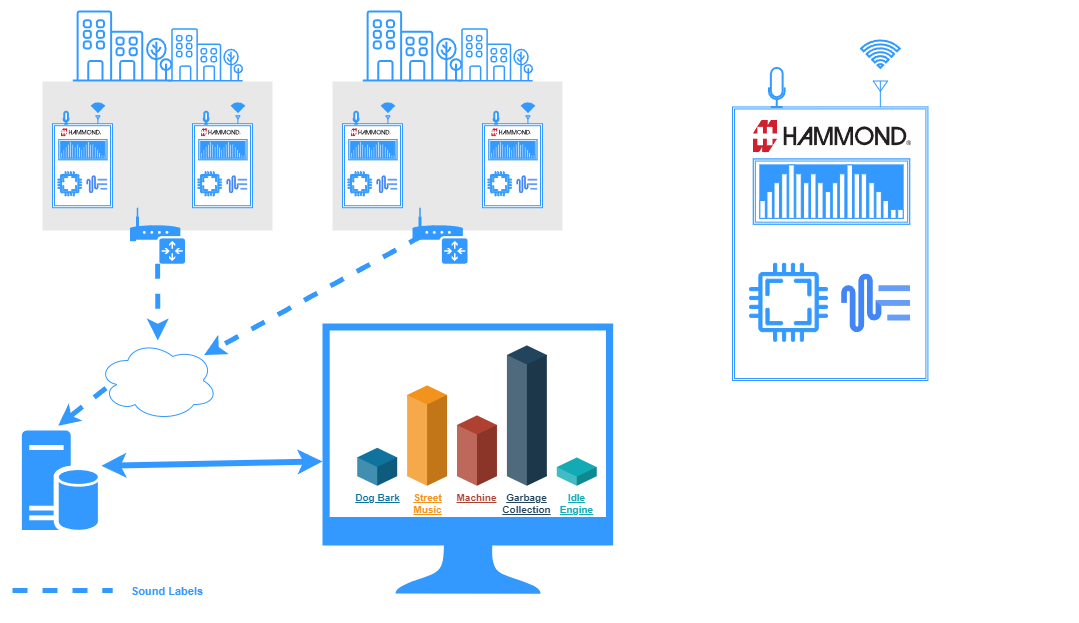
When managing and monitoring the UrbanRest Guardians network, I decided to explore the available IoT platforms on the market. An IoT (Internet of Things) platform provides a comprehensive suite of tools and services to manage, connect, and operate IoT devices. These platforms offer a centralized infrastructure to collect, store, and analyze data from a wide range of IoT devices. Key functions of an IoT platform include device management, data collection and storage, data processing and analysis, security, and integration with other systems.
I don't want to spend a dime, how do I monitor this?
Several leading players dominate the IoT platform market, including Amazon's AWS IoT, Microsoft Azure IoT, Google Cloud IoT, and IBM Watson IoT. Many offer free entry plans, but long-term costs can be difficult to predict. Since this is a prototype and I want to avoid unexpected expenses, I leaned towards open-source solutions such as ThingSpeak or ThingsBoard.


ThingSpeak is familiar to me; I have used it in other projects but I used their cloud services. This time, I wanted to install the platform locally on my own server to control the entire installation and data. Between ThingSpeak and ThingsBoard, I chose ThingsBoard. The deciding factor was the development environment: while ThingSpeak is developed in Ruby on Rails, ThingsBoard is developed in Java with Spring Boot. As a professional Java programmer familiar with Spring Boot, I knew I could handle any installation issues without wasting time on forums. In just a few minutes, I had the platform installed and running. I only needed to make a couple of adjustments to resolve port collision issues with other services. This could have been avoided by using a Docker image.

Spring is a framework for building enterprise-grade applications in Java, providing dependency injection, transaction management, and aspect-oriented programming. Spring Boot is a project within the Spring framework that makes it easy to quickly build standalone, production-grade Spring applications by providing configuration convention, an integrated server, and a set of preconfigured components, thereby reducing configuration complexity and development.
Why I chose ThingsBoard. What's good about It?
ThingsBoard works for both cloud and on-premises deployment, as is my case, providing essential infrastructure for IoT applications. Key features include device and asset management, data collection and visualization, complex event processing for triggering alarms, and remote device control. It supports creating workflows based on events and designing interactive dashboards. ThingsBoard uses customizable rule chains and can integrate with other systems to push device data. Its modular architecture allows for easy customization and scalability.
ThingsBoard High Level Design:
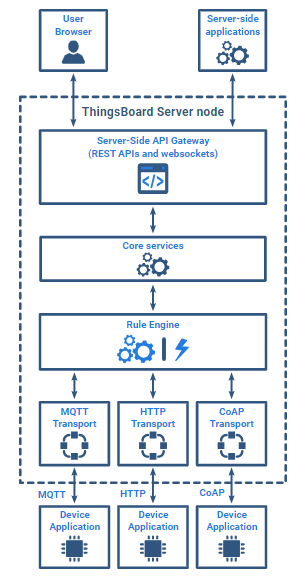
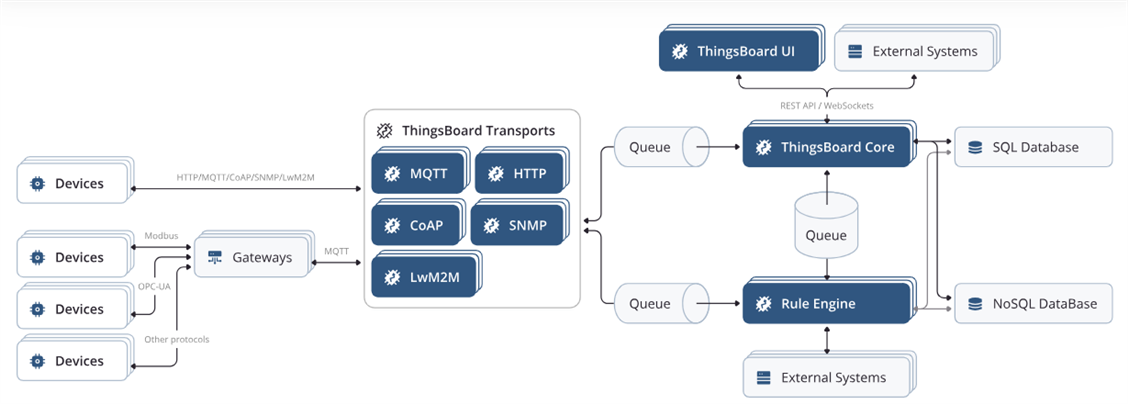
ThingsBoard is designed for scalability and reliability, distributing the workload across multiple nodes without a single point of failure. Each ThingsBoard node is identical, capable of handling requests from both devices and server-side applications. It supports various protocols for device connectivity, including MQTT, LwM2M, CoAP, and HTTP, with the flexibility to add or customize protocols.
ThingsBoard includes a Rule Engine for processing messages from devices and triggering configurable processing modules called Plugins. Its core services manage devices, credentials, rule chains, tenants, customers, widgets, dashboards, alarms, and events. Additionally, the Server-side API Gateway provides a REST API for registered users to manage attributes, fetch timeseries data, and push custom commands to devices via websockets and REST API.
And where do I store the data? Is there anything good, nice, and cheap?
As database for storing data I used postgresSQL, a open source object-relational database. I installed PostgreSQL Version for 64 bit Windows.

PostgreSQL
PostgreSQL offers robust indexing and querying capabilities, ensuring high levels of data integrity and support for complex transactions. Its Multi-Version Concurrency Control (MVCC) allows multiple transactions to occur simultaneously without interference. Additionally, PostgreSQL provides granular locking mechanisms, such as row-level locks, which minimize contention between transactions.

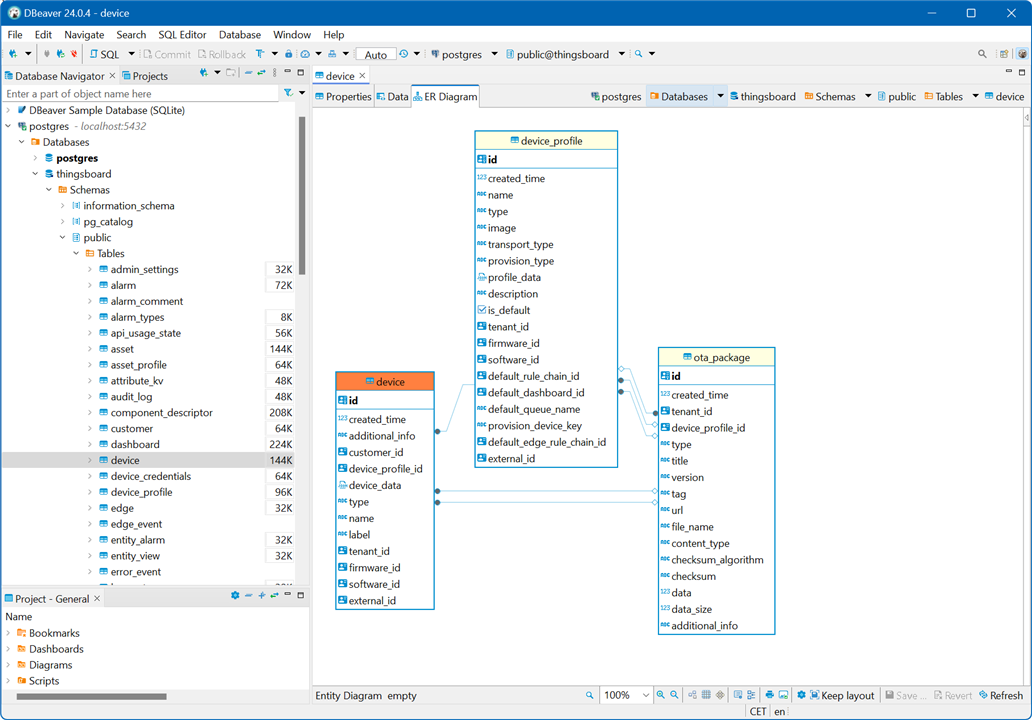
DBeaver
I also installed DBeaver, a free cross-platform universal database tool. It is not needed but very useful to understand well the Thingsboard database architecture.
How do I install all this? Is there anything else to install first?
I installed ThingsBoard on a machine with Windows 11. The first step is to install a version of the Java JDK or JRE, version 11.

Since I usually use Java for application development, I installed the JDK. There are different open-source Java SE projects based on OpenJDK in the market. In this case, I chose Eclipse Temurin, which is supported by the Adoptium community.
Download and install PostgreSQL version 12. Note the database server TCP port if you change it. Default TCP port is 5432.
Then, from the public ThingsBoard repository on GitHub, I downloaded the latest precompiled release of ThingsBoard.
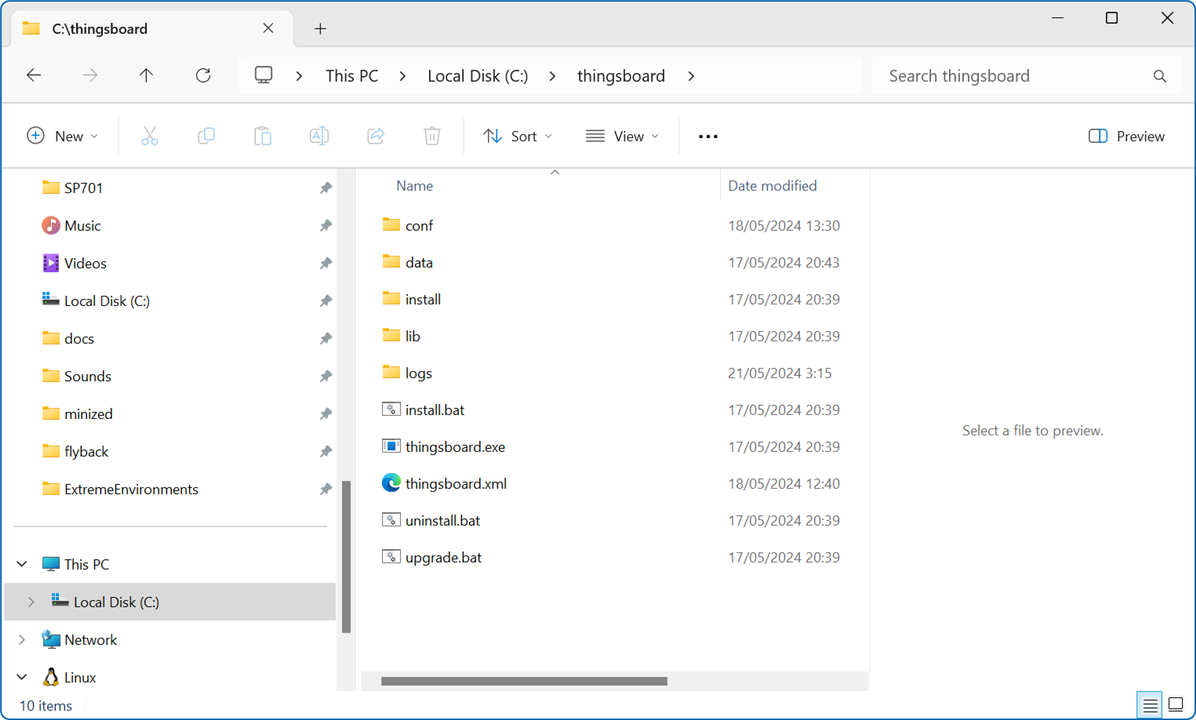
Download and unzip the package in the chosen directory
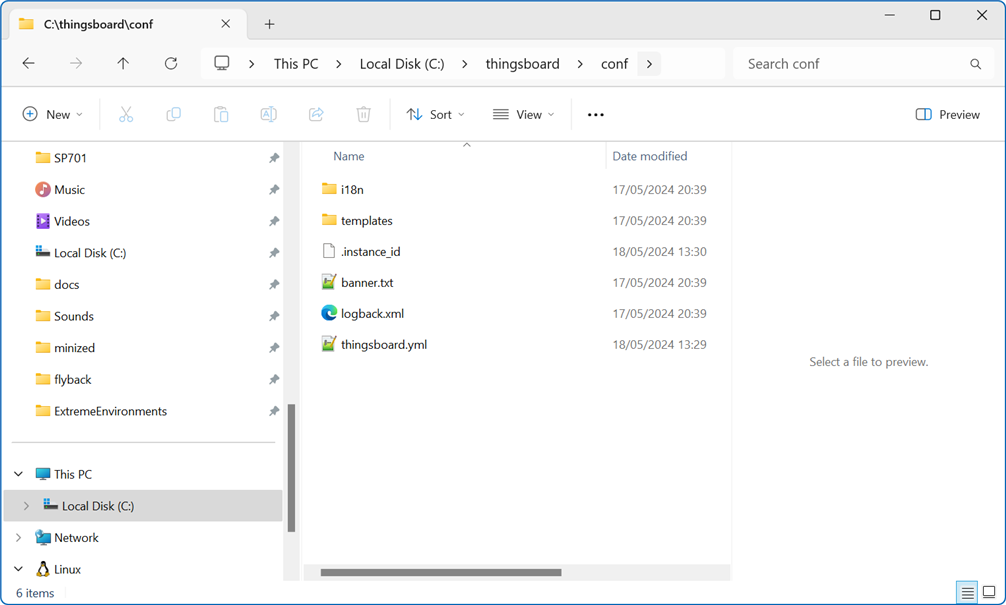
Using DBeaver, create a PostgreSQL database named thingsboard. Note the username and password, and modify the conf/thingsboard.yml file accordingly.

Then run the installation script install.bat as an administrator.
You can populate the database with demo data, using --loadDemo arg
install.bat --loadDemo
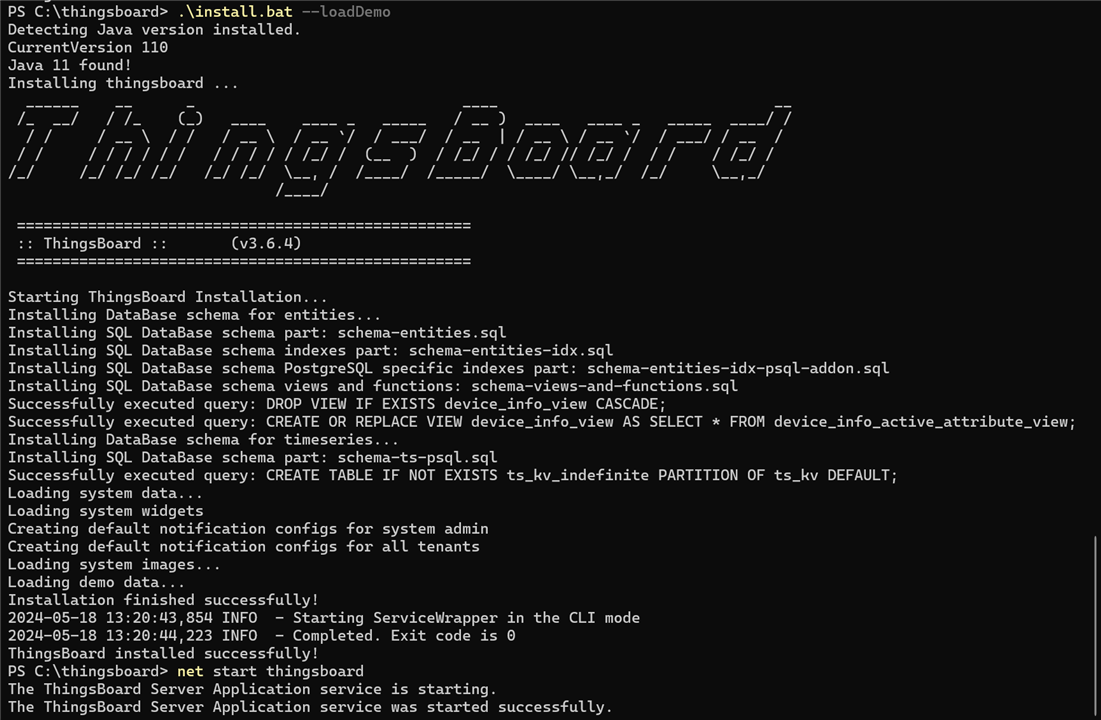
More information on the installation process on this guide https://thingsboard.io/docs/user-guide/install/windows/
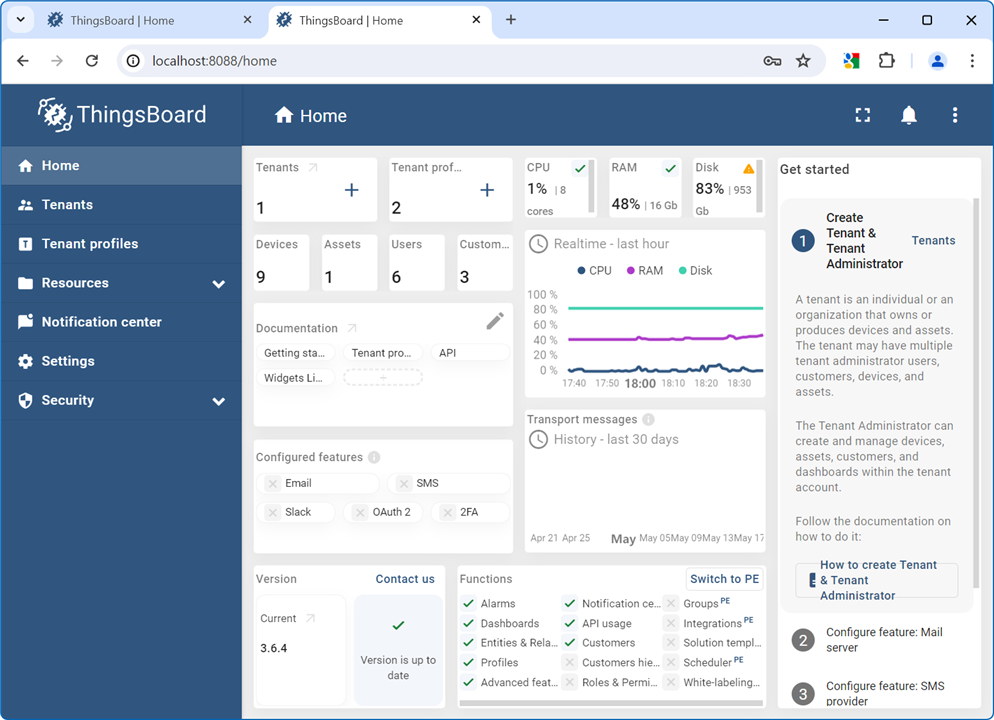
Wow! Impressed with the Thingsboard Web UI
Once started, we can open Web UI using the following link:
http://localhost:8088/
I've configured the server to use TCP port 8088.
The default credentials provided are accessible when you have included the –loadDemo parameter during the execution of the installation script:
- System Administrator: sysadmin@thingsboard.org / sysadmin
- Tenant Administrator: tenant@thingsboard.org / tenant
- Customer User: customer@thingsboard.org / customer

Login as an administrator:
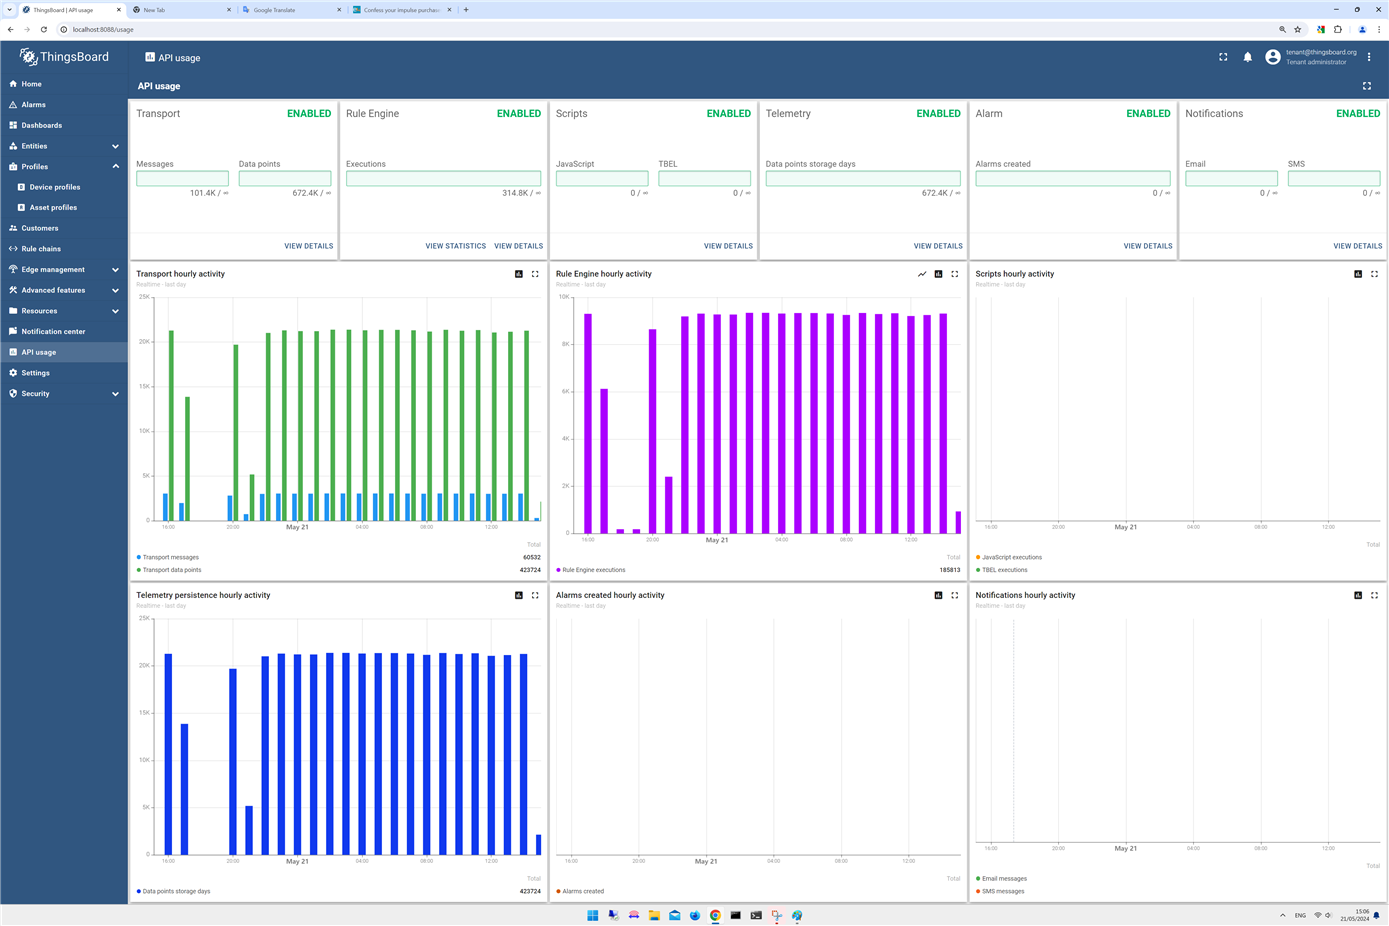
Monitoring of API uses:
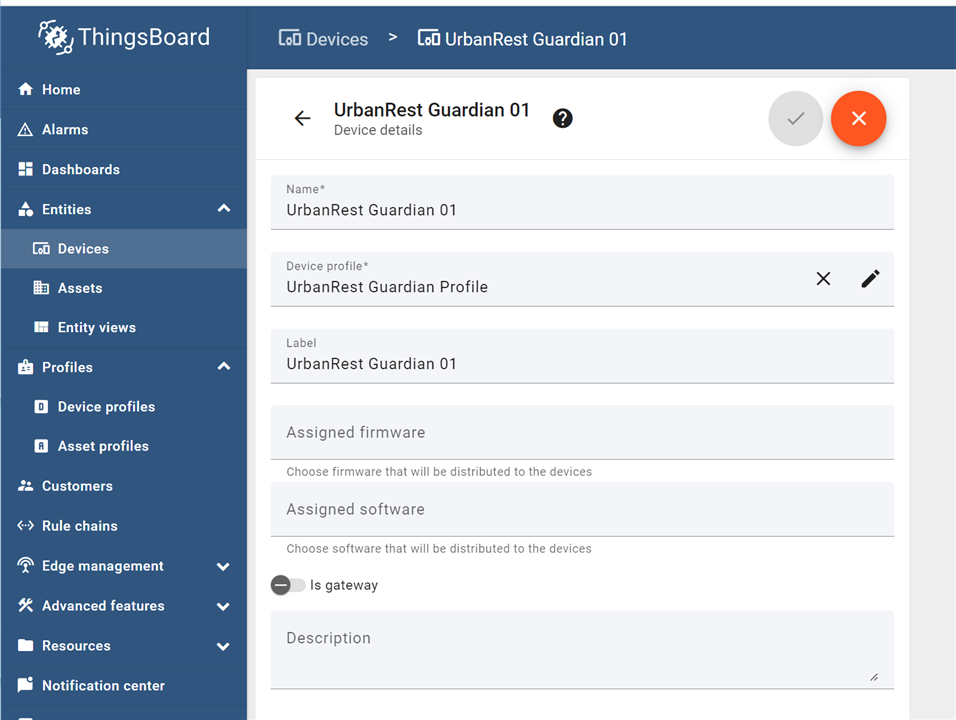
And now, how do I connect my Raspberry Pi CM 4 to this?
Next thing we want to do is provisioning a new device. We will create a new UrbanRest Guardian device.
Let's simulate a connection via command line.
Once the device is set up, we can verify connectivity from our Raspberry Pi Compute Module 4. The ThingsBoard WebUI offers comprehensive instructions for different environments, including Linux in our case.
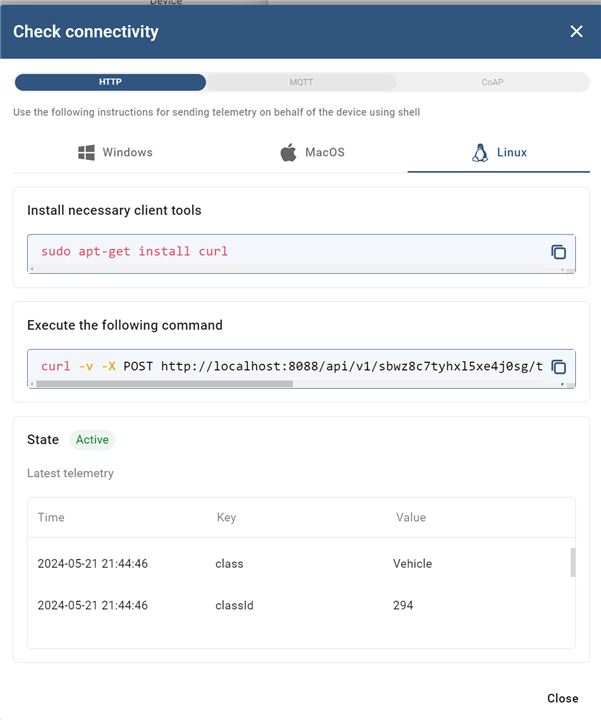
Let's go to the Raspberry Pi and execute our first activity post from the device:
ealbertos@urbanrest:~ $ curl -v -X POST
http://DESKTOP-KD82ADA.local:8088/api/v1/sbwz8c7tyhxl5xe4j0sg/telemetry
--header Content-Type:application/json
--data "{temperature:50,
db:54,
score:70,
class:'bird',
latitude:41.65658725063826,
longitude:-0.8789170307124832}"
Note: Unnecessary use of -X or --request, POST is already inferred.
*   Trying 192.168.1.33:8088...
* Connected to DESKTOP-KD82ADA.local (192.168.1.33) port 8088 (#0)
> POST /api/v1/sbwz8c7tyhxl5xe4j0sg/telemetry HTTP/1.1
> Host: DESKTOP-KD82ADA.local:8088
> User-Agent: curl/7.88.1
> Accept: */*
> Content-Type:application/json
> Content-Length: 106
>
< HTTP/1.1 200
< Vary: Origin
< Vary: Access-Control-Request-Method
< Vary: Access-Control-Request-Headers
< X-Content-Type-Options: nosniff
< X-XSS-Protection: 1; mode=block
< Cache-Control: no-cache, no-store, max-age=0, must-revalidate
< Pragma: no-cache
< Expires: 0
< Content-Length: 0
< Date: Sat, 18 May 2024 20:36:41 GMT
<
* Connection #0 to host DESKTOP-KD82ADA.local left intact
Later we will create all the attributes for our telemetry.
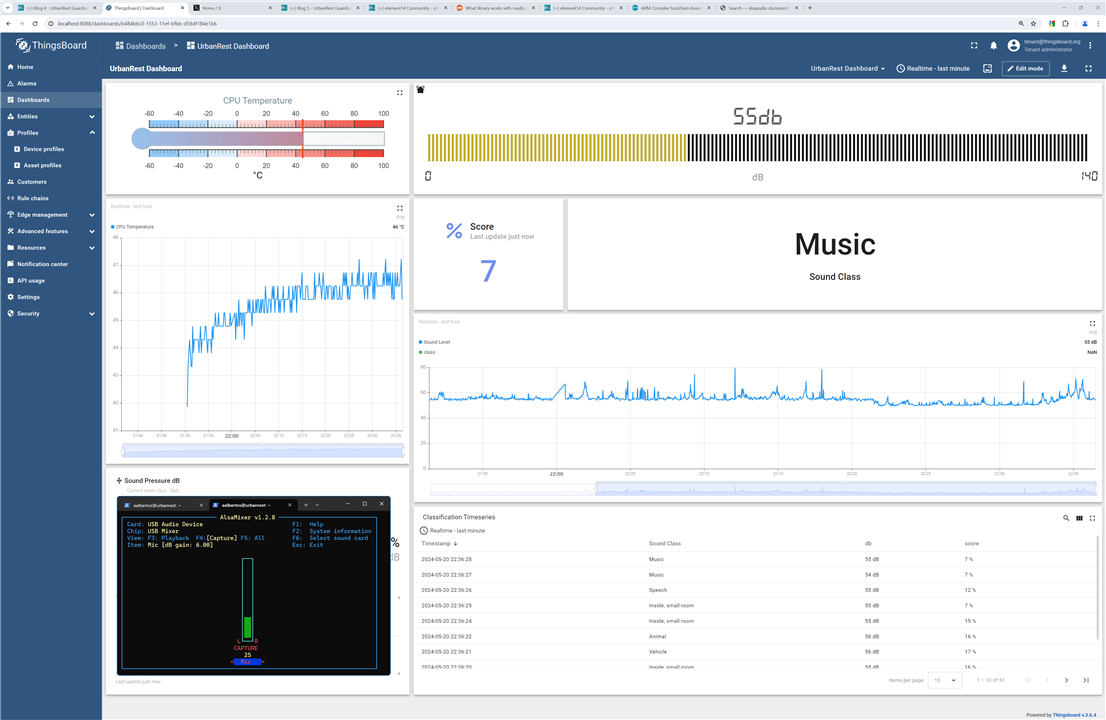
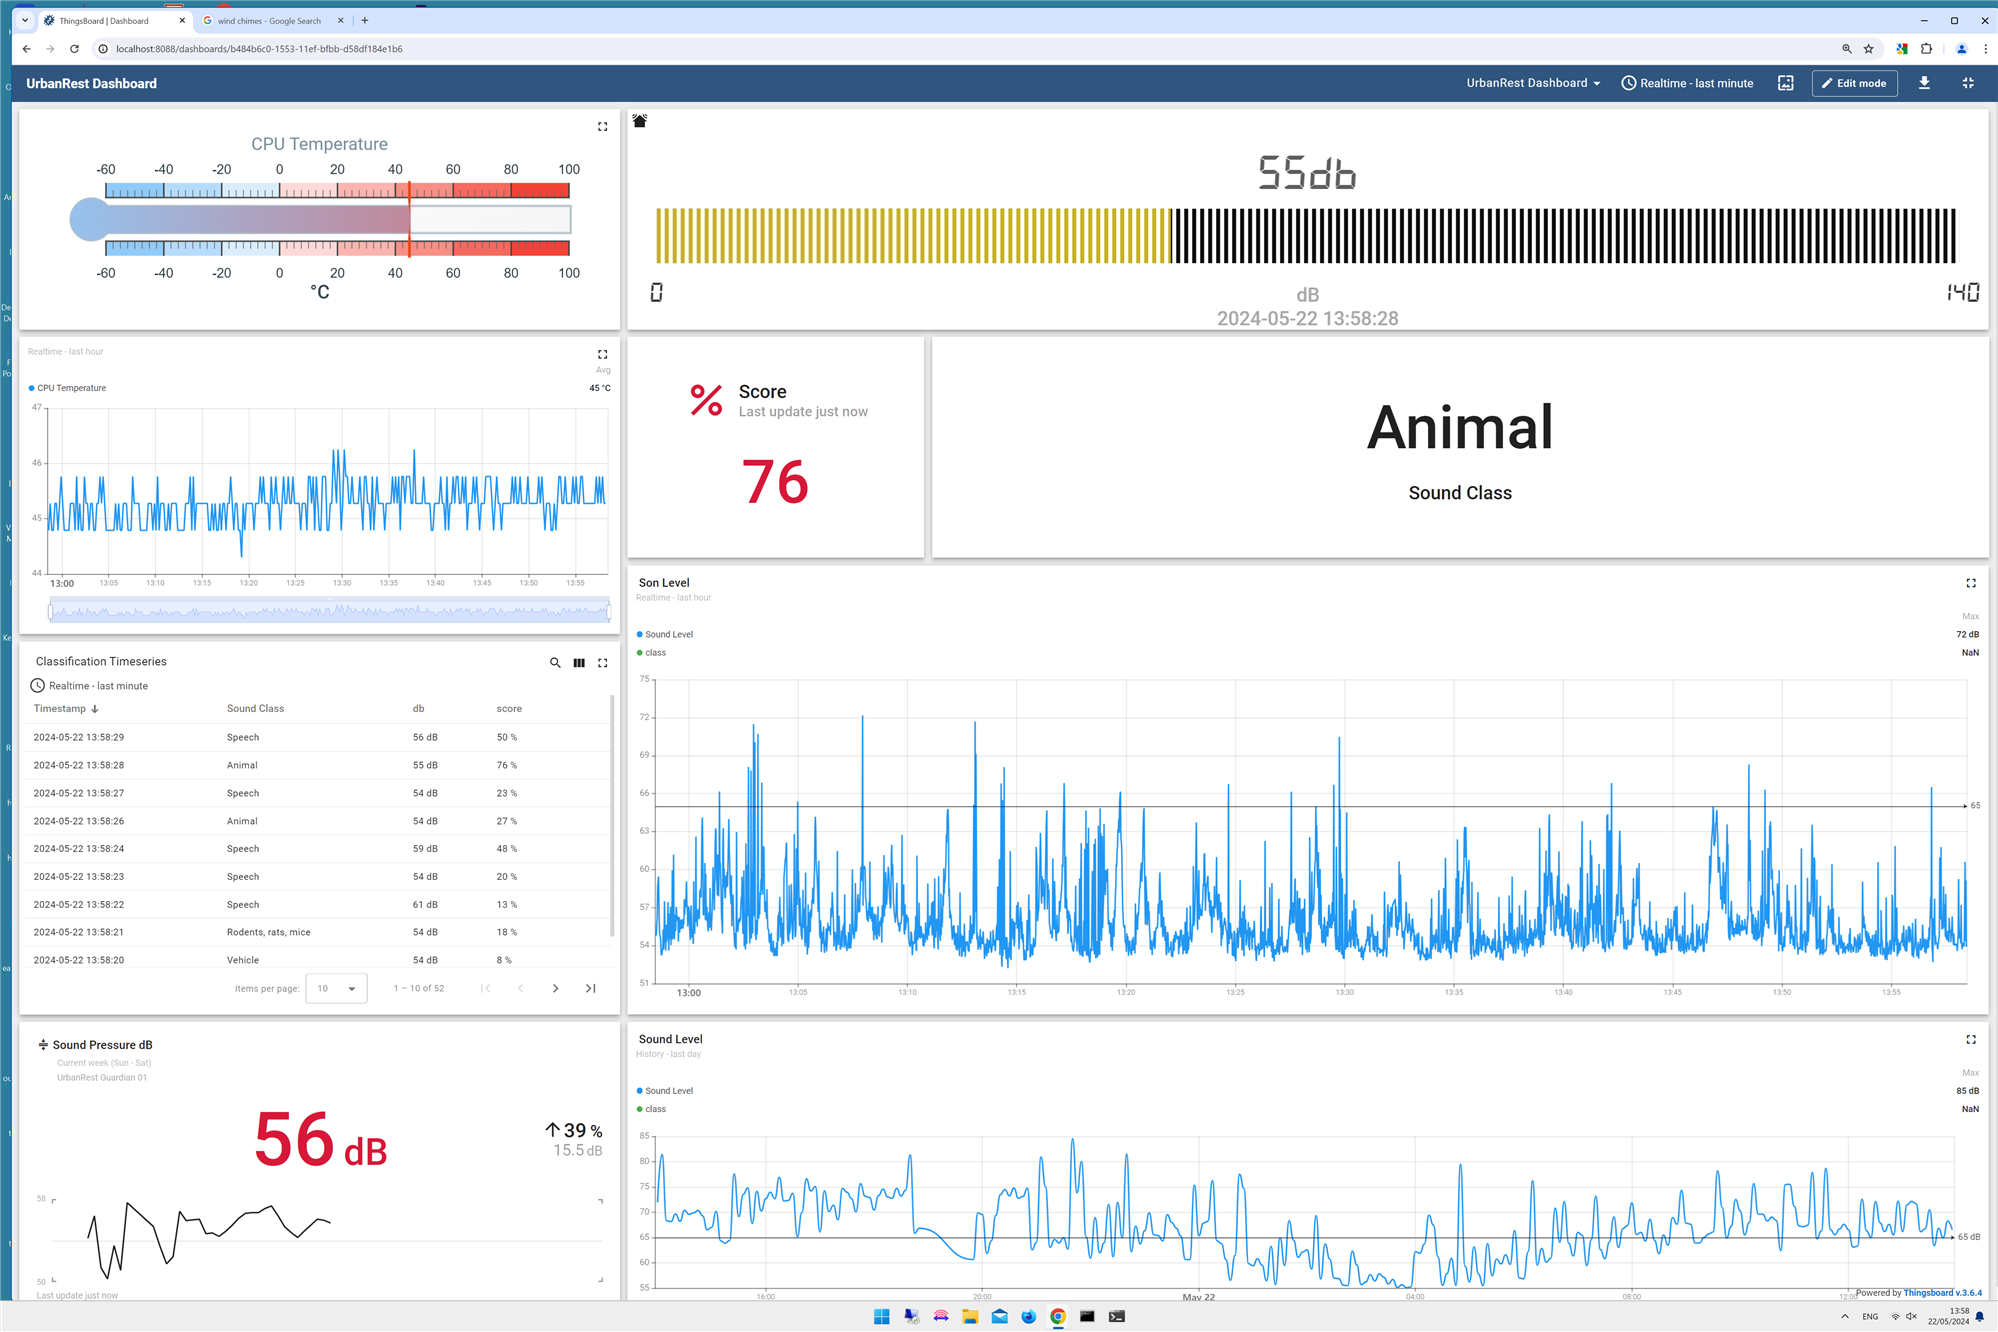
How hard is it to create a dashboard for my UrbanRest Guardian?
A ThingsBoard dashboard enables users to visualize and monitor data from IoT devices.
I created a dashboard and added eight widgets that display the latest telemetry for the newly created device.
These widgets will present the most recent internal CPU temperature, the latest sound pressure level detected by the sensor, the last identified class along with its probability, and various graphs and tables with up-to-date data.
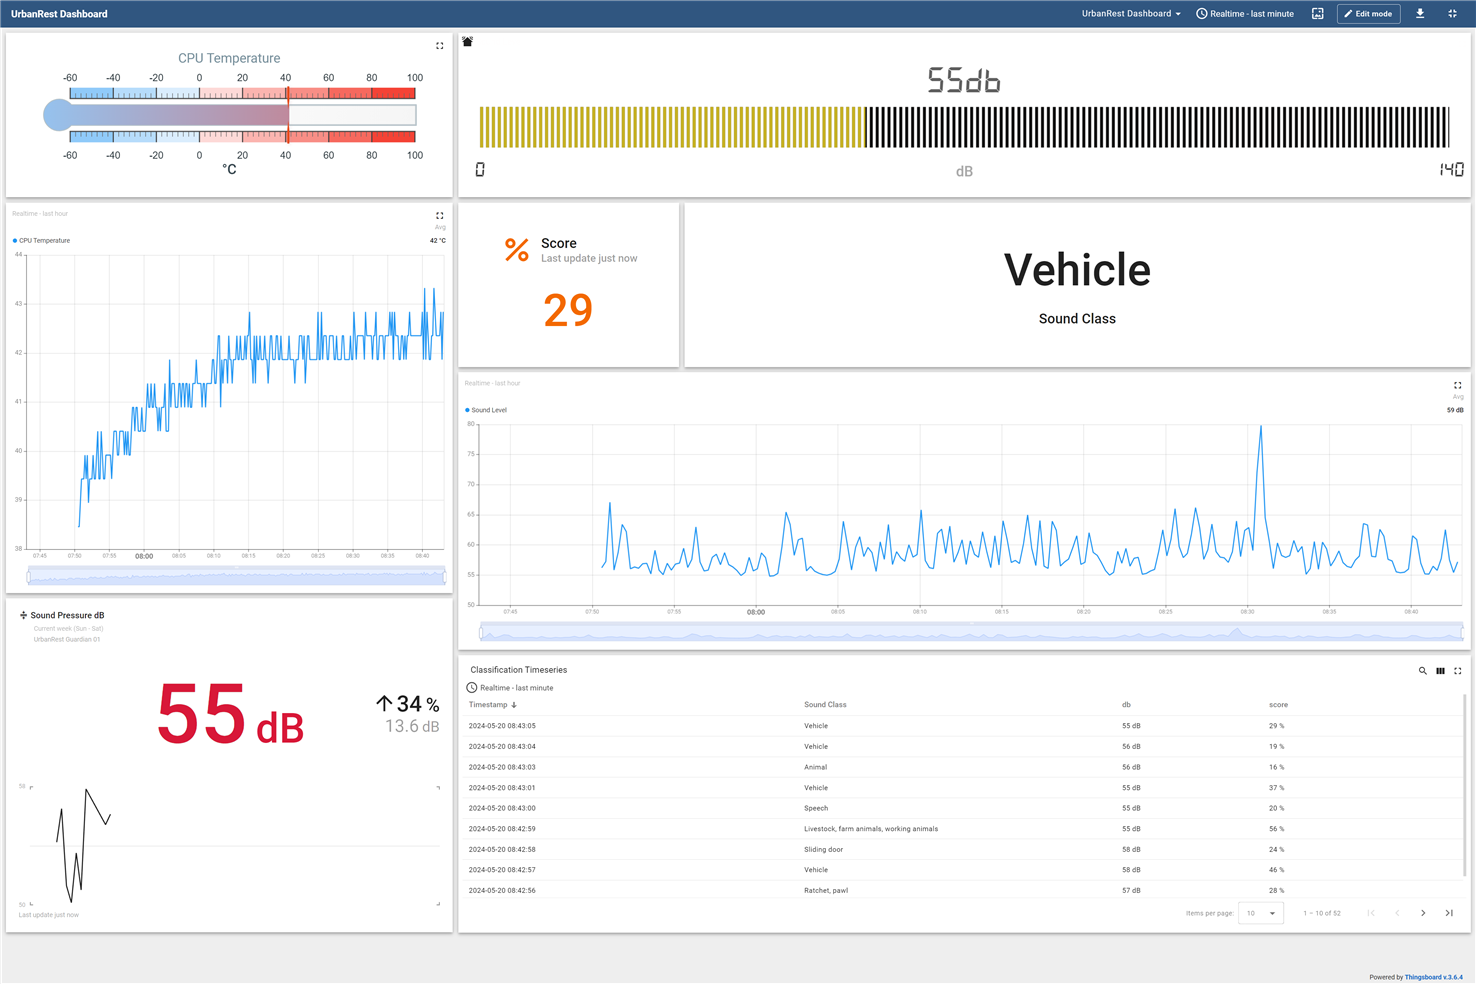
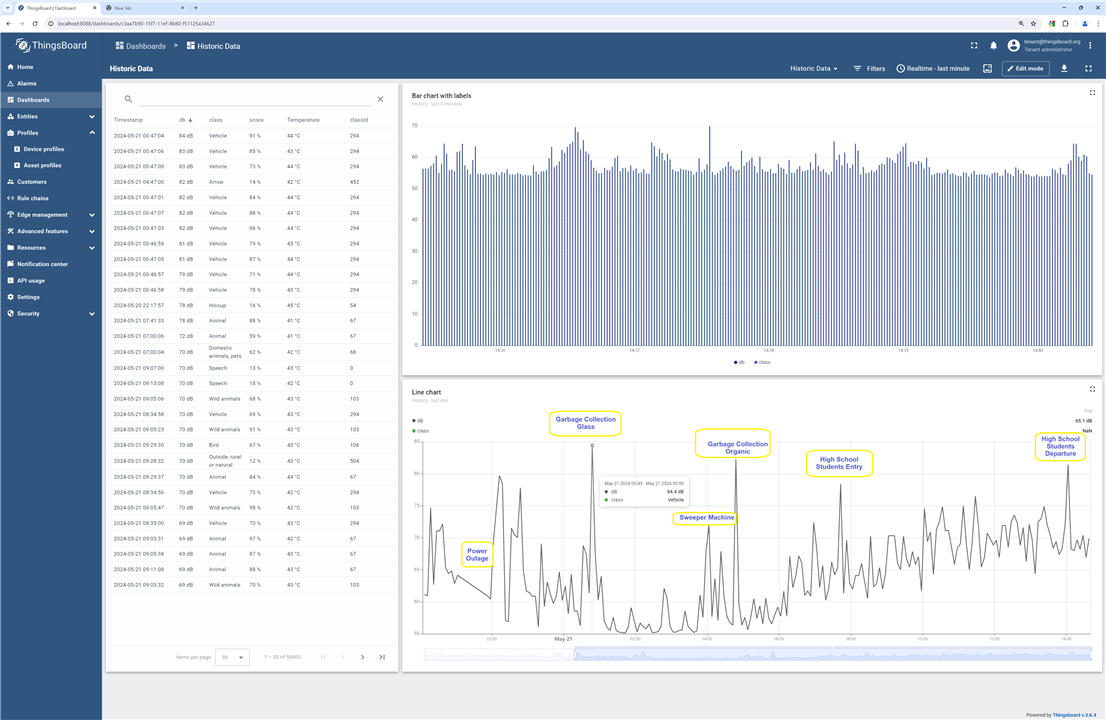
I have also created an additional dashboard featuring historical data.
In summary, I wanted to know if it was difficult to create a new dashboard with real-time information, the answer is that it is very simple. The one shown in the image was finished by my little son who has also created the historical data dashboards. A child's game.
Enough mockups, how do I update the data from Python?
I am developing the UrbanRest Guardians using Python scripts. Although I have a preference for compiled languages like Java, it's undeniable that Python offers superior capabilities for rapid prototyping.
With Debian Bookworm any code that uses a library added via the pip utility should be added and executed inside a virtual environment.
We will do the following:
- Open a terminal window and create a new directory: mkdir MyWorkingDirectory
- Enter the new directory with: cd MyWorkingDirectory
- Create a new virtual environment that inherits all currently installed packages with: python -m venv --system-site-packages env
- Enter the virtual environment with: source env/bin/activate
- Your command line prompt should now have a prefix of (env): (env) _
- We can now use pip to install : (env) pip install ...
- If you need to exit the virtual environment, execute deactivate from the command line: (env) deactivate
- To reenter the virtual environment simply execute source env/bin/activate again from inside the MyWorkingDirectory folder.: source env/bin/activate
Since the entire prototype is going to work locally and I have no problems with costs, I have chosen to consume a REST API. In Python the easiest way to consume REST services is with the Requests library. To install requests library type
python -m pip install requests
We will make a request, first importing the Requests module:
import requests
r = requests.post('http://DESKTOP-KD82ADA.local:8088/api/v1/sbwz8c7tyhxl5xe4j0sg/telemetry', json = {'temperature':50,'db':74,'score':38,'class':'bird','latitude':41.65658725063826,'longitude':-0.8789170307124832})
Note that we cannot use localhost address from the Raspberry Pi. We use the server name or the server address. In my case I use my server local name: DESKTOP-KD82ADA.local
Now that we have seen that it works, we can incorporate the telemetry update into our code.
Just a few lines of Python code are needed to post new telemetry records.
Using Retry and HTTPAdapter we get rid off network problems or server downtimes.
import requests
from requests.adapters import HTTPAdapter
from urllib3.util.retry import Retry

urlThingsBoard = 'http://DESKTOP-KD82ADA.local:8088/api/v1/sbwz8c7tyhxl5xe4j0sg/telemetry'
score = 0
cpuTemperature = 0
soundPresuredB = 0
classDetected = 'Silent'
classId = 0

session = requests.Session()
retry = Retry(connect=3, backoff_factor=0.5)
adapter = HTTPAdapter(max_retries=retry)
session.mount('http://', adapter)
session.mount('https://', adapter)

jsonDataValues = {'temperature':cpuTemperature,'db':soundPresuredB,'score':score,'class':classDetected,'classId':int(classId)}

try:
 r = session.post(urlThingsBoard, json = jsonDataValues, timeout=(2, 10))
except Exception as e:
 print(e)
My Python program shuts down when I log out. What I do?
Until now our Python program is running under a user connection, so when user will finish the connection the process will be killed. Let's convert the Python script into a Linux service.
First we create a shell script
nano urbanrest.sh
!#/bin/usr/bash
# Configure python environment for UrbanRest  sound monitor and classifier
echo "******************************************";
echo "**        UrbanRest Guardian            **";
echo "******************************************";
echo "";
echo "Activating Python Environment";
source /home/ealbertos/Documents/pyenv/bin/activate
cd /home/ealbertos/Documents/pyenv/yamnet
python yamnet2.py
deactivate
Then we make it executable
sudo chmod +x urbanrest.sh
And create a file that defines the service by telling systemd what program to run
sudo nano /etc/systemd/system/urbanrest.service
[Unit]
Description=Urbanrest systemd service.

[Service]
Type=simple
User=ealbertos
ExecStart=/bin/bash /home/ealbertos/urbanrest.sh

[Install]
WantedBy=multi-user.target
Run the following to start the service:
sudo systemctl start urbanrest
Run the following to check the status of the service:
sudo systemctl status urbanrest
Configure systemd: Now the unit file has been defined we can tell systemd to start it during the boot sequence :
sudo systemctl daemon-reloadsudo systemctl enable urbanrest
A lot of talk, I want to see this working!
We can now monitor our UrbanRest Guardian from any device on the network. As I'm using an inhouse private wifi network only devices enabled on my firewall can access the devices or the server.
Note: the sound is not recorded by the UrbanRest Guadian but by the computer that is doing the video capture. The computer is inside the house about 6 meters away from the window where the UrbanRest Guardian is.
Which is the CPU temperature?
I'm also monitoring CPU internal temperature.

During this series of experiments, the UrbanRest Guardian device has been in the shadow.
But what happens when the device is under the sun?
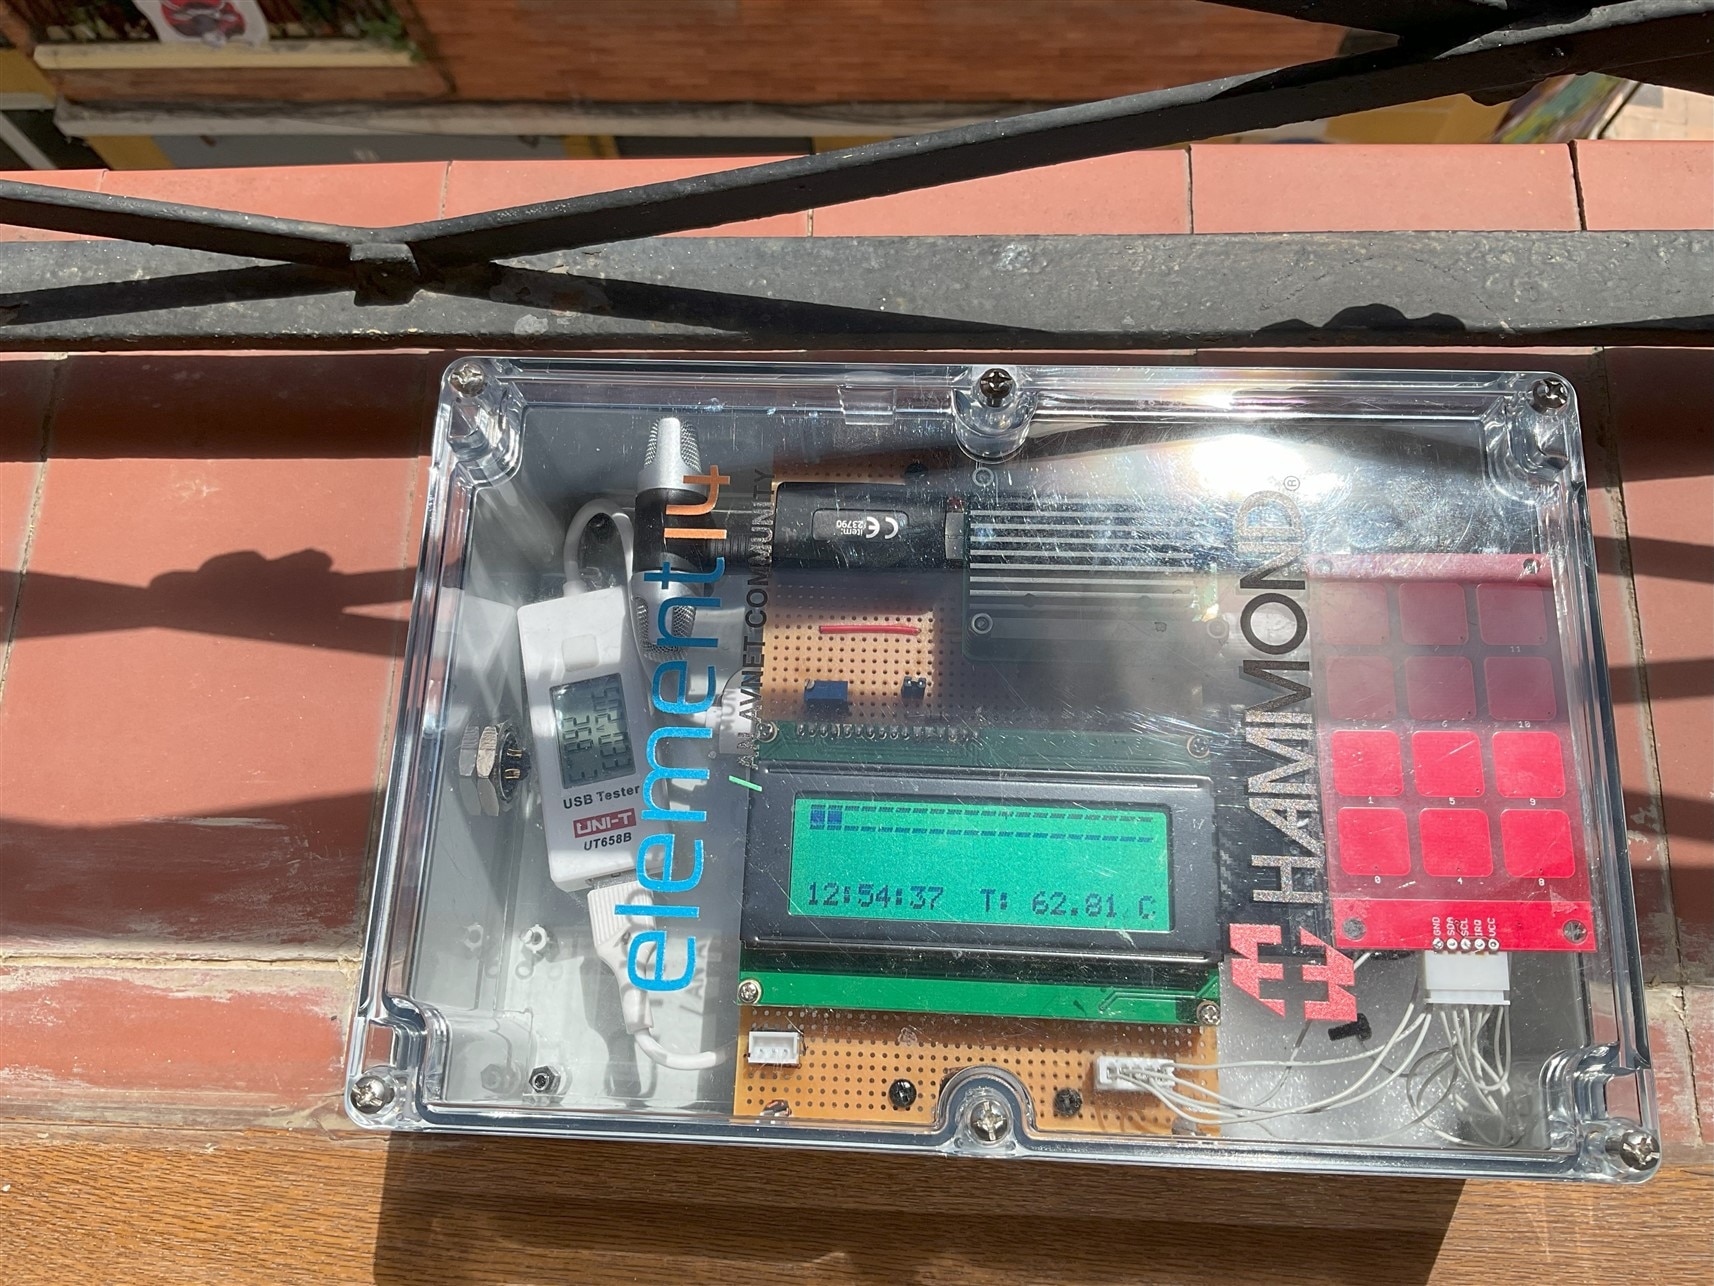
62.81 ºC? That's not healthy!
Can I use any microphone with this?
Depending on the quality of our microphone we will have to adjust the audio capturing gain. If we are only interested in loud noises this is simple but in case we want to extract more information we are going to want to have enough gain to capture low sounds but not too much gain to get into saturation or electrical buzz.
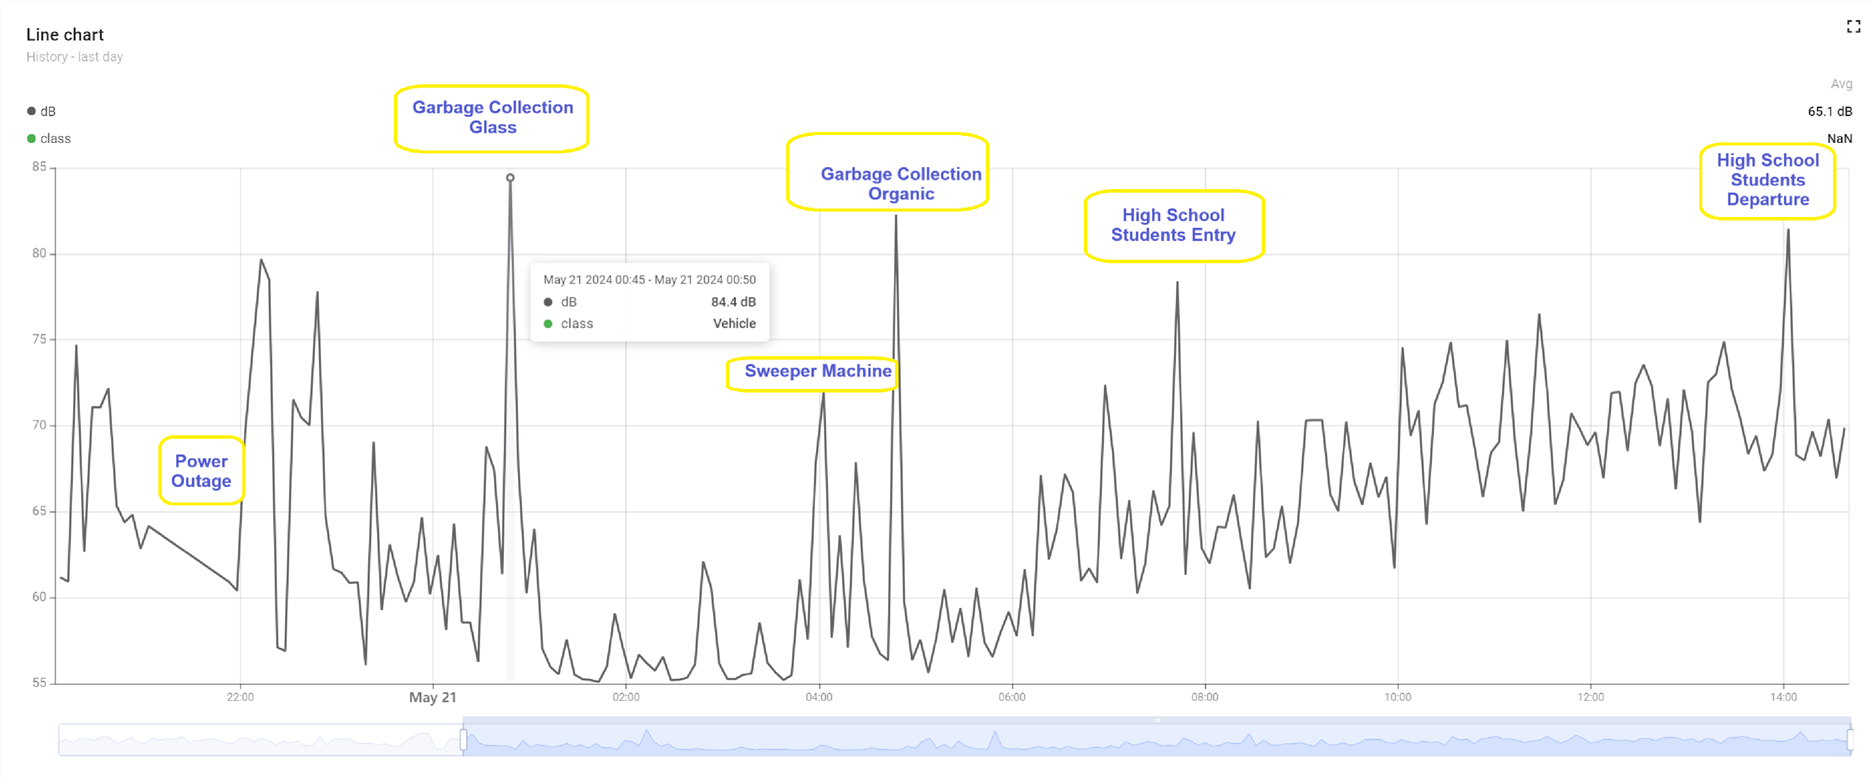
Surprise. What's that sound in my neighborhood?
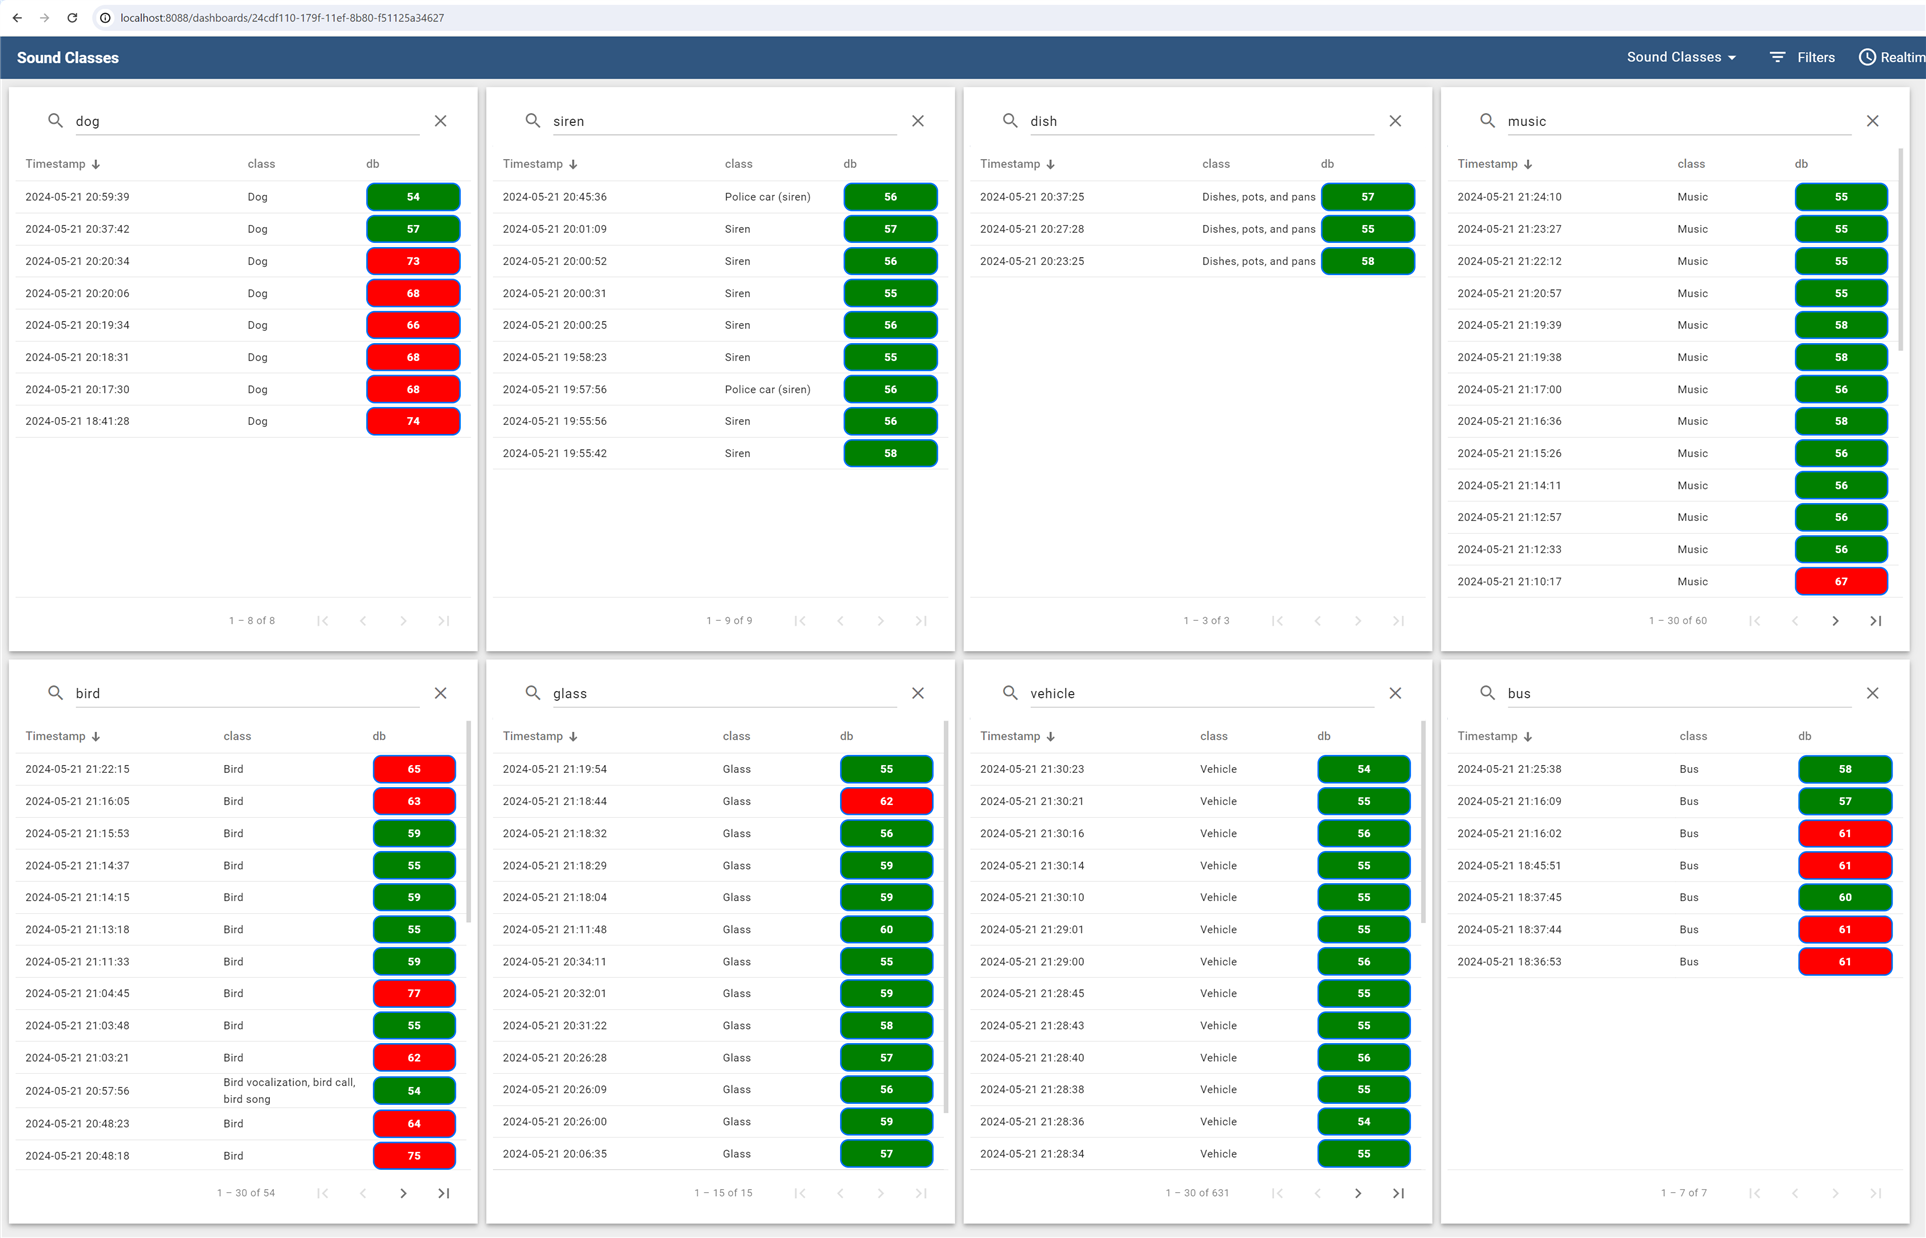
This project is being an adventure for the whole family. We all have some concern to monitor. My little son can monitor when his classmates enter or leave the school in front of the house by the noise of their conversations, or the buzzer calling them to enter or leave class. I can monitor the discharges of recycling containers. We can know at what time the neighbors prepare the table for food or start washing dishes. How many times is the entrance door opened? How many emergency vehicles pass on the street?
One of the most intriguing discoveries for me has been the rare moments of silence we experience. Living below me, my neighbor has several cages housing dozens of birds and other animals. Consequently, we're constantly capturing sounds of chirping birds and other rural-like noises
Police, cars, dogs, glass, dishes...?
Even if you have no idea how to consult a database, ThingsBoard makes it easy for you and we can easily extract curious data from the recorded information, such as extracting the times in which emergency vehicles have passed, or the times in which they have been registered dogs barking or when your neighbors wash or organize cutlery or dishes.
Where is my rest?
Even if I set a threshold of 15 dB above the level of the quietest moment, most of the day I experience a lot of noise.
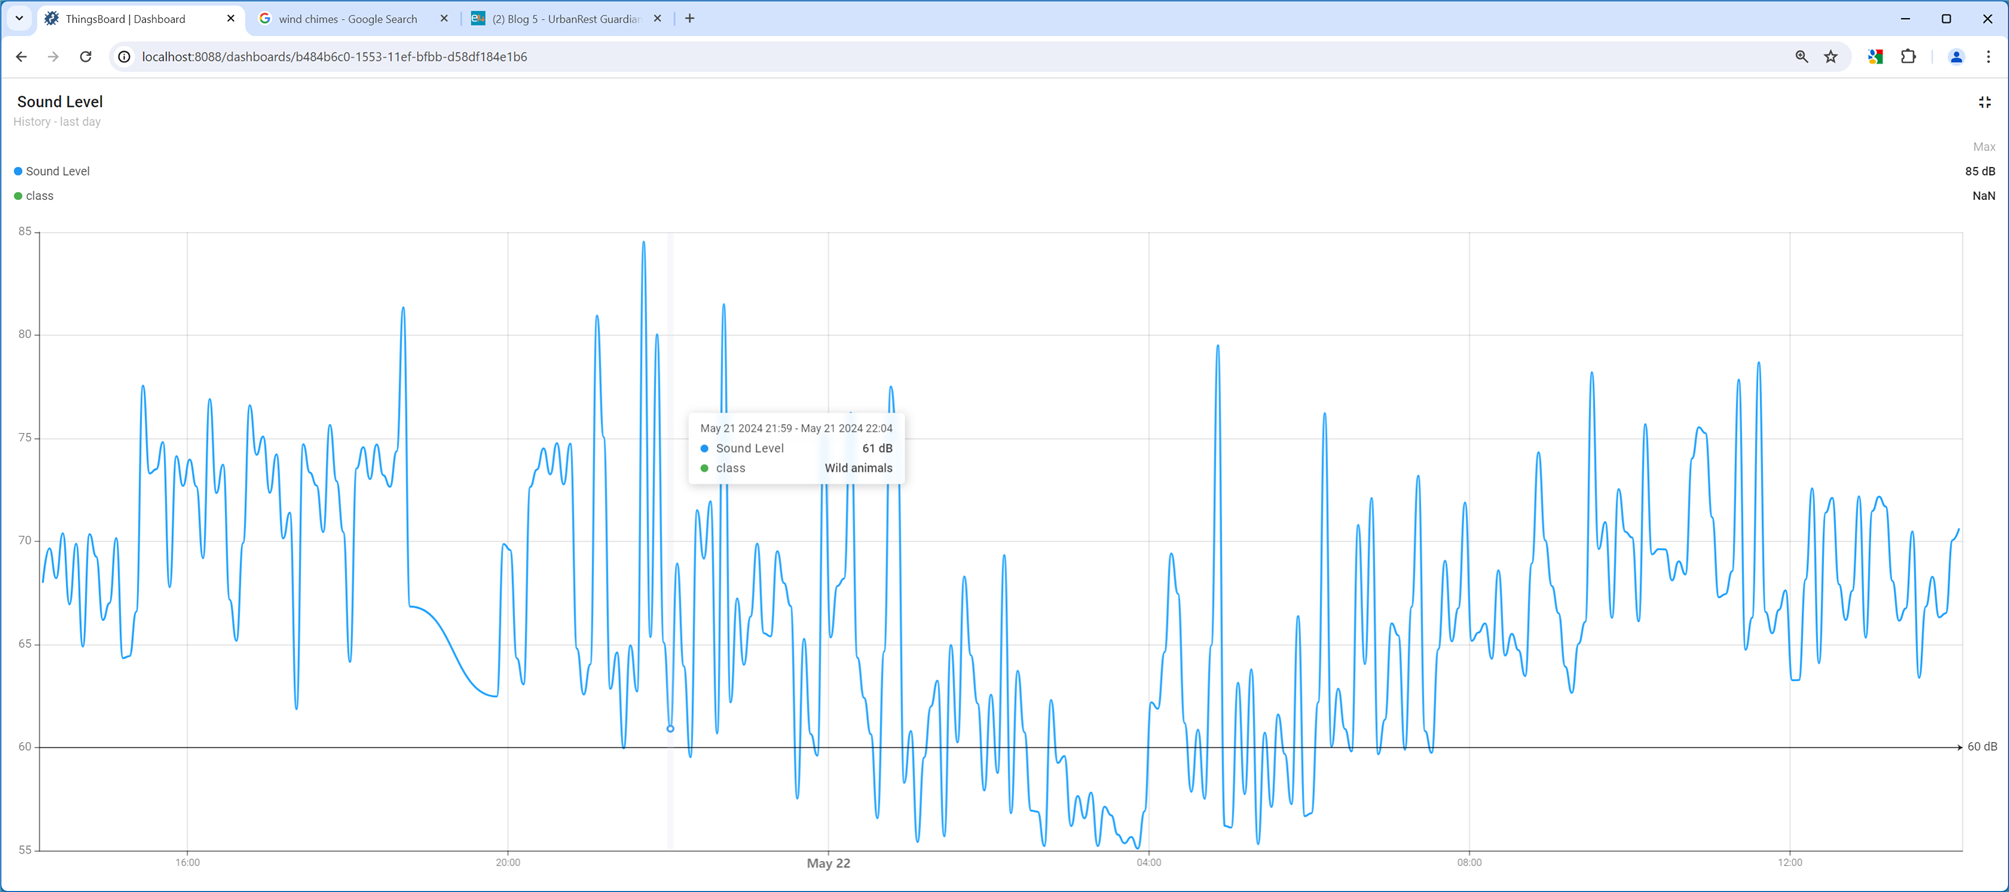
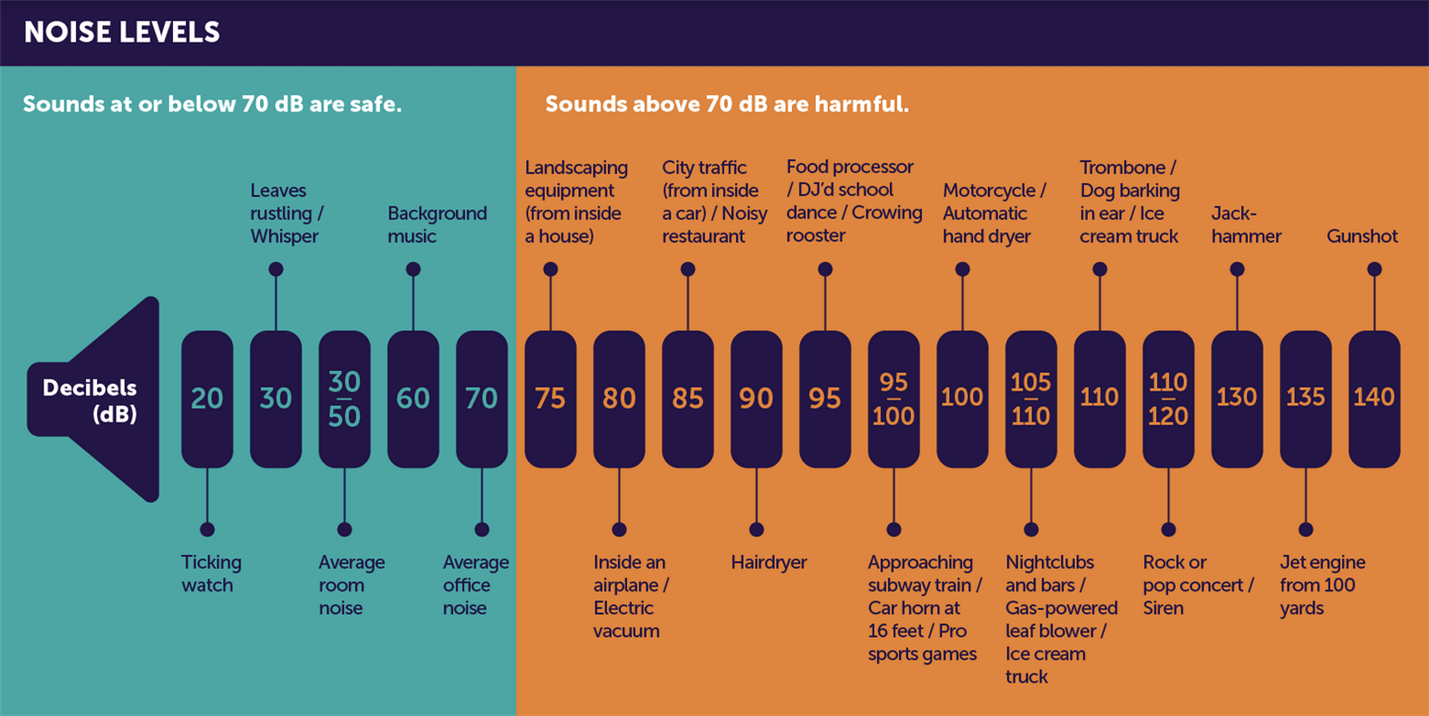
source: https://hearinghealthfoundation.org/keeplistening/decibels
Who in the world is typing on the lid?
Saturday afternoon, I noticed typing sound events on the dashboard. Curious, I headed to where I keep the UrbanRest Guardian by the window. It was the rain "typing" on the transparent lid of the enclosure!
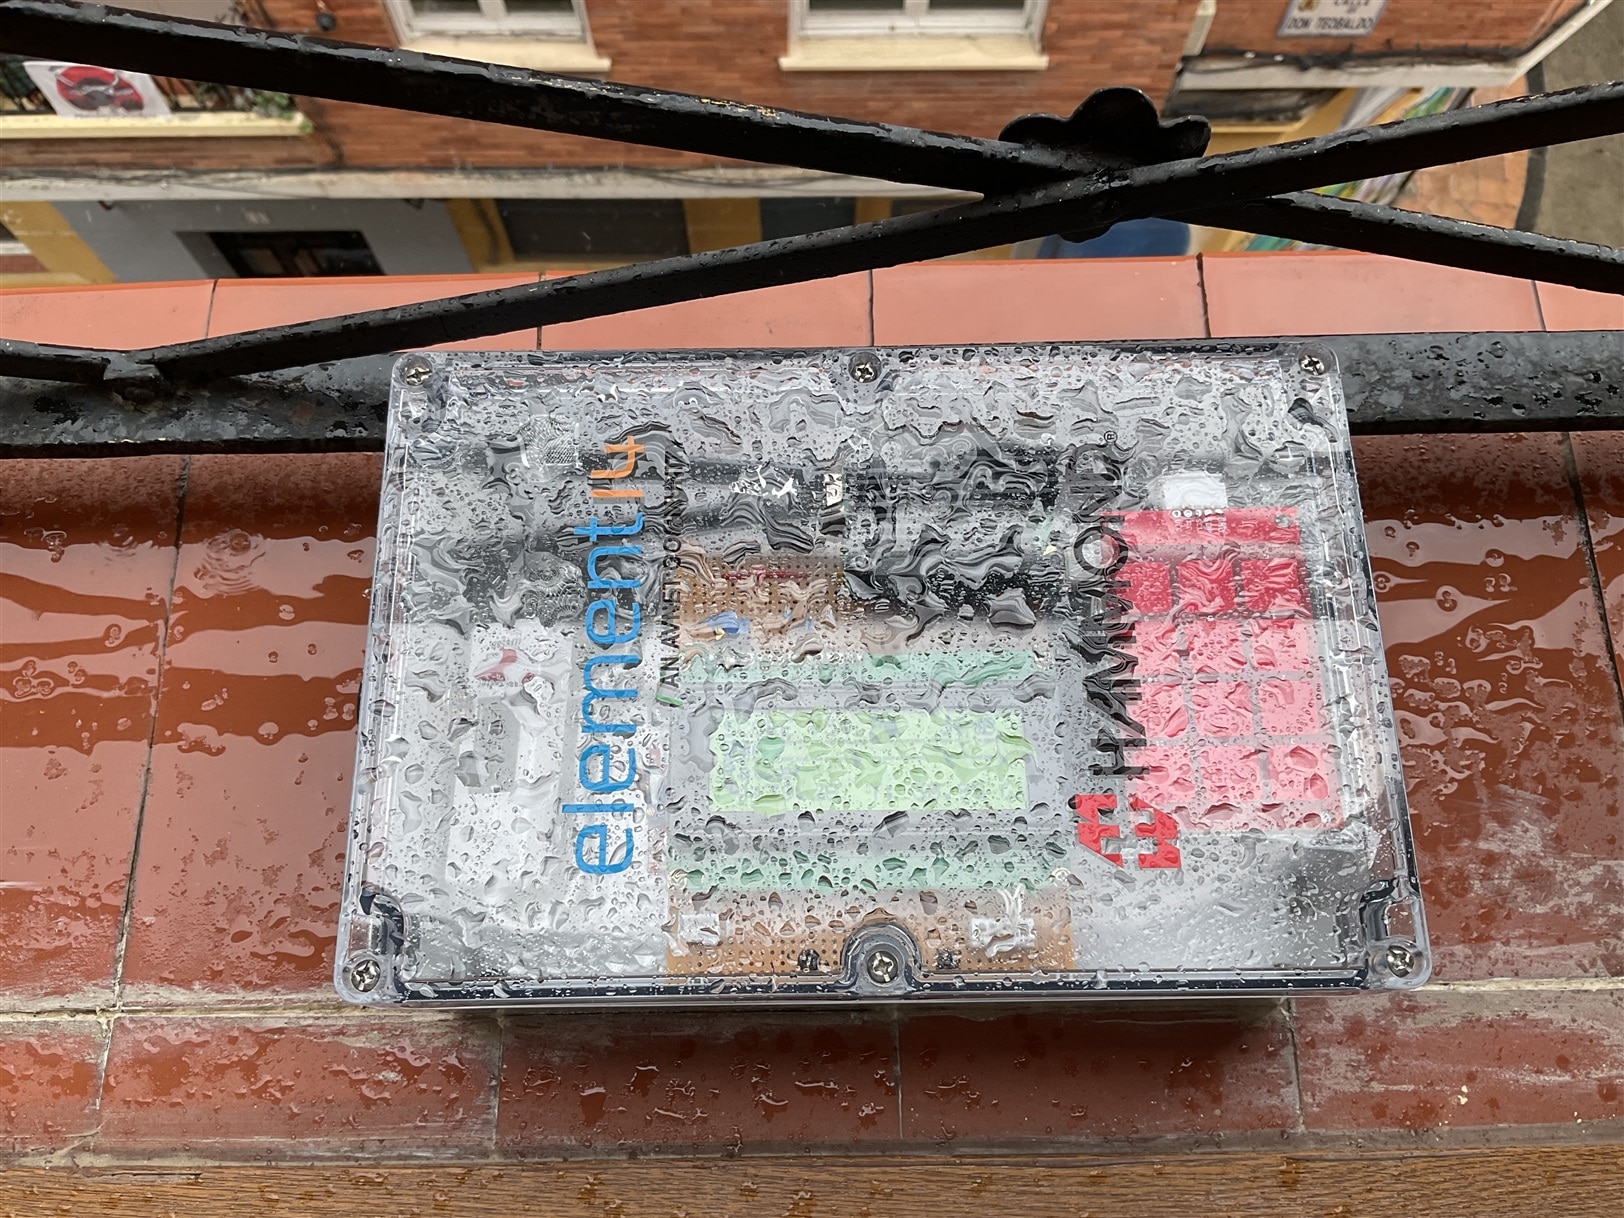
A sudden deluge fell so hard that it caused a transformer in the neighborhood to explode, cutting off our power supply. Fortunately, UrbanRest Guardian is battery-powered, so it continued analyzing sounds despite the blackout.
Not a drop of water entered the box!
This is the record of precipitation per hour, but it all happened in a few minutes.

Summary and conclusions
I conclude the series of optional blogs on the UrbanRest Guardian project, designed to monitor the nighttime sounds of the city. The series has covered everything from component selection and the development of a physical prototype within the provided enclosure to the creation and implementation of sound classifier software. This final post centers on the setup of a remote monitoring server using the open-source ThingsBoard platform, along with additional testing performed over the past two weeks.
I chose ThingsBoard for its compatibility with my needs and my proficiency in Java and Spring Boot. The installation process involved configuring PostgreSQL for data storage and setting up ThingsBoard to manage device telemetry. I provided tutorials on how to provision the UrbanRest Guardian device and verify connectivity from a Raspberry Pi CM 4. I also demonstrated the creation of real-time and historical data dashboards to visualize device telemetry, showcasing the ease of use and features of the ThingsBoard web UI.
In field tests, the UrbanRest Guardian effectively monitored various street sounds. Using Python scripts, I continuously updated the telemetry data in ThingsBoard and configured the system as a Linux service to run independently. The device can track neighborhood activities and unexpected events.
Now, I will focus on refactoring the software, uploading it to the repository, and preparing the final blog with the results obtained.
Thanks for reading.
UrbanRest Guardian blog series
Want to know more about this project? Check out the full blog series here:
- Blog 1 - UrbanRest Guardian - Project Introduction
- Blog 2 - UrbanRest Guardian - First contact with the kit components.
- Blog 3 - UrbanRest Guardian - Prototype Construction Journey
- Blog 4 - UrbanRest Guardian - Classifying Urban Sounds
- Blog 5 - UrbanRest Guardian - Remote Monitoring
- Final Blog - UrbanRest Guardian - Smart Street Noise Monitor
-

dougw
-
Cancel
-
Vote Up
0
Vote Down
-
-
Sign in to reply
-
More
-
Cancel
-

javagoza
in reply to dougw
-
Cancel
-
Vote Up
0
Vote Down
-
-
Sign in to reply
-
More
-
Cancel
-

beacon_dave
in reply to javagoza
-
Cancel
-
Vote Up
0
Vote Down
-
-
Sign in to reply
-
More
-
Cancel
Comment-

beacon_dave
in reply to javagoza
-
Cancel
-
Vote Up
0
Vote Down
-
-
Sign in to reply
-
More
-
Cancel
Children