This blog is the finale blog of the series of blogs listed below
Blog #2 Image Processing on Zynq 7000 APSoC
Blog #5 CNN's on Zynq 7000 using Tensil.ai
In our first installment, we laid the groundwork with an introduction to the challenger's kit, setting the stage for what was to come. We then delved into the fascinating world of image processing, uncovering the capabilities of this SoC in handling complex visual data. Our discussions on PMOD ALS illuminated how we can integrate various sensors to enhance our projects, while the exploration of SLAM techniques showcased the potential for real-time spatial awareness. Finally, we ventured into the realm of Convolutional Neural Networks (CNNs) on Zynq 7000 using Tensil.ai, demonstrating how deep learning can be effectively deployed on this platform.
As we conclude this series, we’ll reflect on the key takeaways and insights gained throughout our journey. Join us as we summarize the highlights and discuss the future possibilities that lie ahead.
Deploying the ML Model on to the FPGA
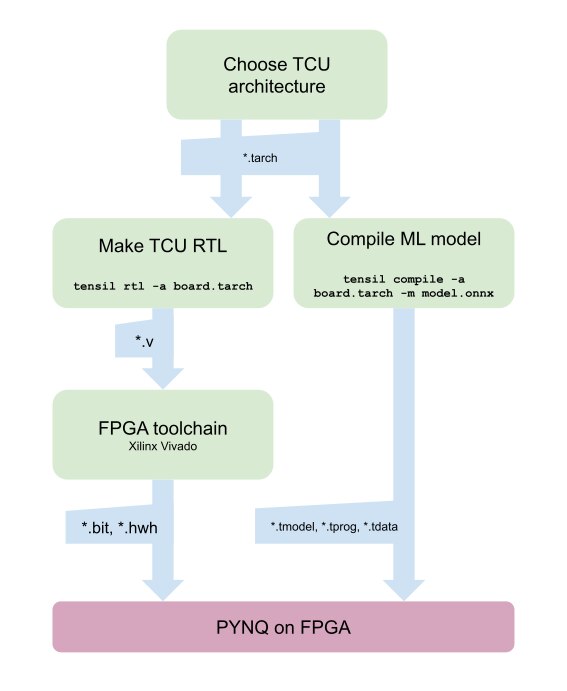
For this we are going to use the PYNQ v3.0.1 and for this version of PYNQ, we need Vivado 2022.1 to generate overlays for the ML Accerlation on the PL side.The below diagram shows the typical design flow
First, we need to get the Tensil toolchain. The easiest way is to pull the Tensil docker container from Docker Hub.

Then run the container.

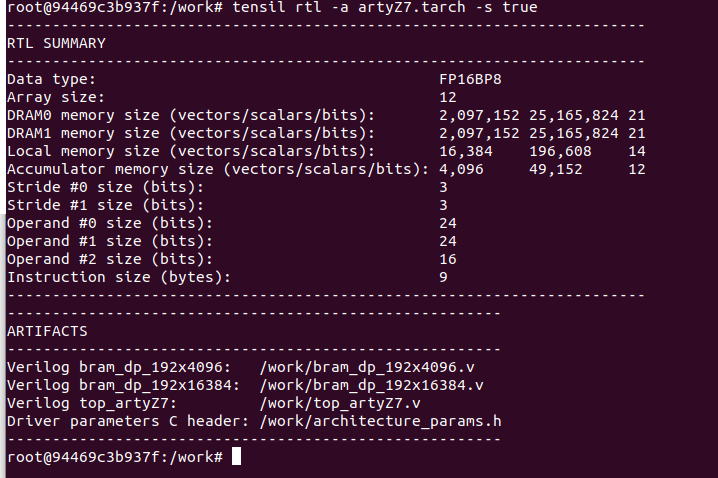
Tensil’s strength is customizability, making it suitable for a very wide range of applications. The Tensil architecture definition file (.tarch) specifies the parameters of the architecture to be implemented. These parameters are what make Tensil flexible enough to work for small embedded FPGAs as well as large data-center FPGAs. This should select parameters that provide the highest utilization of resources on the XC7Z020 FPGA part at the core of the Arty Z7-20 board.
The architecture file for Arty Z7-20 is as follows
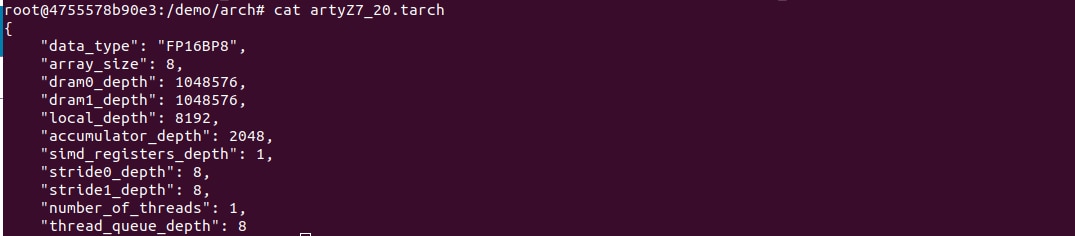
The first, data_type, defines the data type used throughout the Tensor Compute Unit (TCU), including in the systolic array, SIMD ALUs, accumulators, and local memory. We will use 16-bit fixed-point with an 8-bit base point (FP16BP8), which in most cases allows simple rounding of 32-bit floating-point models without the need for quantization. Next, array_size defines a systolic array size of 8x8, which results in 64 parallel multiply-accumulate (MAC) units. This number was chosen to balance the utilization of DSP units available on XC7Z020 in case you needed to use some DSPs for another application in parallel, but you could increase it for higher performance of the TCU.
With dram0_depth and dram1_depth, we define the size of DRAM0 and DRAM1 memory buffers on the host side. These buffers feed the TCU with the model’s weights and inputs, and also store intermediate results and outputs. Note that these memory sizes are in number of vectors, which means array size (8) multiplied by data type size (16-bits) for a total of 128 bits per vector.
Next, we define the size of the local and accumulator memories which will be implemented on the FPGA fabric itself. The difference between the accumulators and the local memory is that accumulators can perform a write-accumulate operation in which the input is added to the data already stored, as opposed to simply overwriting it. The total size of accumulators plus local memory is again selected to balance the utilization of BRAM resources on XC7Z020 in case resources are needed elsewhere.
With simd_registers_depth, we specify the number of registers included in each SIMD ALU, which can perform SIMD operations on stored vectors used for ML operations like ReLU activation. Increasing this number is only needed rarely, to help compute special activation functions. Finally, stride0_depth and stride1_depth specify the number of bits to use for enabling “strided” memory reads and writes.
Here's the updated file
{
"data_type": "FP16BP8",
"array_size": 12
"dram0_depth": 2097152, // Increased to accommodate more data (optional)
"dram1_depth": 2097152, // Increased to accommodate more data (optional)
"local_depth": 16384, // Increased from 8192 to 16384 (proportional increase)
"accumulator_depth": 4096, // Increased from 2048 to 4096 (proportional increase)
"simd_registers_depth": 1,
"stride0_depth": 8,
     "stride1_depth": 8,
    "number_of_threads": 1,
    "thread_queue_depth": 8

}
Then import the generated files to create a block design in the Vivado 2022.1
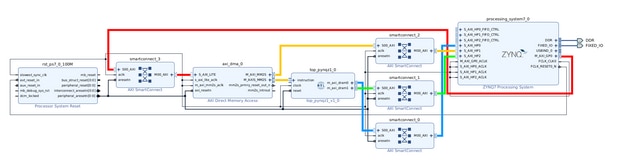
Then compile the model and then move the model on to the PYNQ after the generation of the required hardware files and bitstream.
Observations and Testing
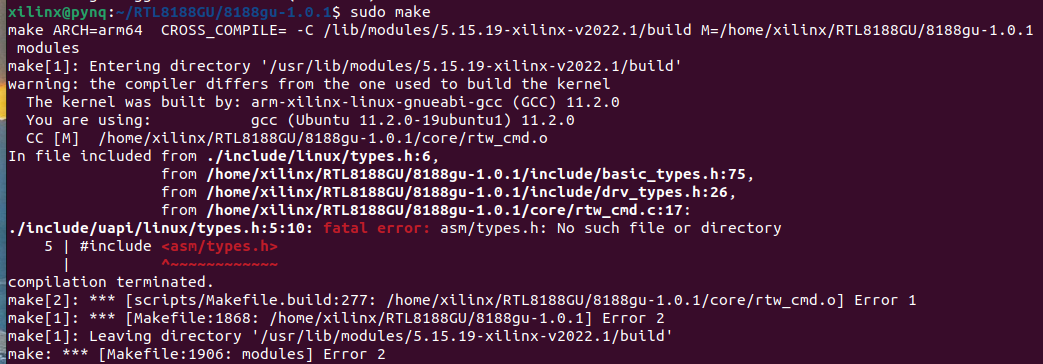
Compiling the drivers for Wireless USB Adapter
I had a plan of getting the Wireless USB Adapter(so as to get the board connected to the network without the Ethernet cable)working for the Arty Z7's PYNQ Image but, the drivers couldn't be compiled due to the missing header files and some compiler issues.
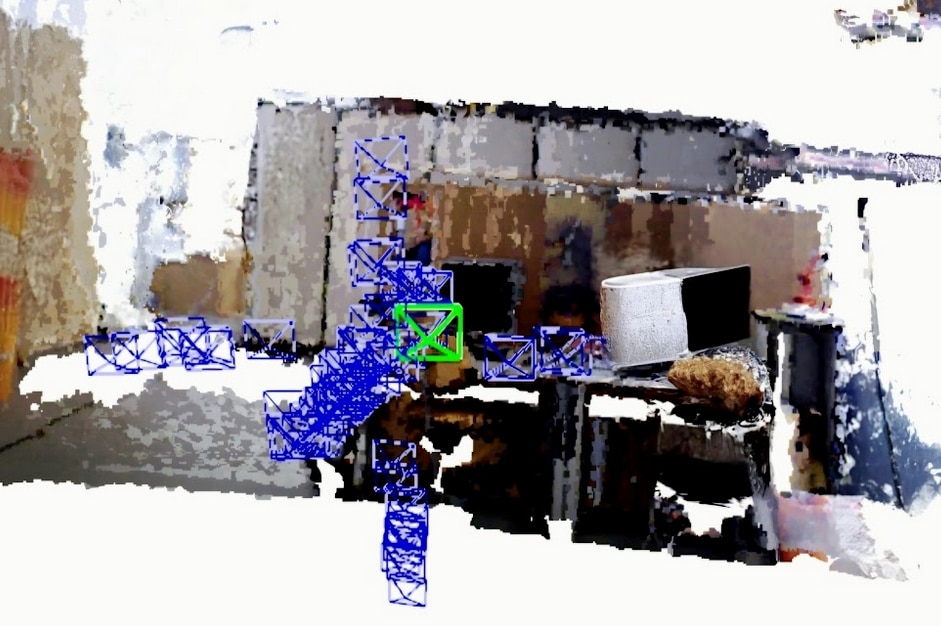
Monocular vSLAM Inference
After deploying the overlay on to the PYNQ the below frame is obtained using the input from the USB Web Camera Video Feed.