element14 Community
element14 Community
    Register Log In
  • Site
  • Search
  • Log In Register
  • About Us
  • Community Hub
    Community Hub
    • What's New on element14
    • Feedback and Support
    • Benefits of Membership
    • Personal Blogs
    • Members Area
    • Achievement Levels
  • Learn
    Learn
    • Ask an Expert
    • eBooks
    • element14 presents
    • Learning Center
    • Tech Spotlight
    • STEM Academy
    • Webinars, Training and Events
    • Learning Groups
  • Technologies
    Technologies
    • 3D Printing
    • FPGA
    • Industrial Automation
    • Internet of Things
    • Power & Energy
    • Sensors
    • Technology Groups
  • Challenges & Projects
    Challenges & Projects
    • Design Challenges
    • element14 presents Projects
    • Project14
    • Arduino Projects
    • Raspberry Pi Projects
    • Project Groups
  • Products
    Products
    • Arduino
    • Avnet Boards Community
    • Dev Tools
    • Manufacturers
    • Multicomp Pro
    • Product Groups
    • Raspberry Pi
    • RoadTests & Reviews
  • Store
    Store
    • Visit Your Store
    • Choose another store...
      • Europe
      •  Austria (German)
      •  Belgium (Dutch, French)
      •  Bulgaria (Bulgarian)
      •  Czech Republic (Czech)
      •  Denmark (Danish)
      •  Estonia (Estonian)
      •  Finland (Finnish)
      •  France (French)
      •  Germany (German)
      •  Hungary (Hungarian)
      •  Ireland
      •  Israel
      •  Italy (Italian)
      •  Latvia (Latvian)
      •  
      •  Lithuania (Lithuanian)
      •  Netherlands (Dutch)
      •  Norway (Norwegian)
      •  Poland (Polish)
      •  Portugal (Portuguese)
      •  Romania (Romanian)
      •  Russia (Russian)
      •  Slovakia (Slovak)
      •  Slovenia (Slovenian)
      •  Spain (Spanish)
      •  Sweden (Swedish)
      •  Switzerland(German, French)
      •  Turkey (Turkish)
      •  United Kingdom
      • Asia Pacific
      •  Australia
      •  China
      •  Hong Kong
      •  India
      •  Korea (Korean)
      •  Malaysia
      •  New Zealand
      •  Philippines
      •  Singapore
      •  Taiwan
      •  Thailand (Thai)
      • Americas
      •  Brazil (Portuguese)
      •  Canada
      •  Mexico (Spanish)
      •  United States
      Can't find the country/region you're looking for? Visit our export site or find a local distributor.
  • Translate
  • Profile
  • Settings
In the Air Design Challenge
  • Challenges & Projects
  • Design Challenges
  • In the Air Design Challenge
  • More
  • Cancel
In the Air Design Challenge
Blog [AirCare] InTheAir - Week 7: Dust sensor
  • Blog
  • Forum
  • Documents
  • Polls
  • Files
  • Events
  • Mentions
  • Sub-Groups
  • Tags
  • More
  • Cancel
  • New
  • Share
  • More
  • Cancel
Group Actions
  • Group RSS
  • More
  • Cancel
Engagement
  • Author Author: fvan
  • Date Created: 12 Dec 2014 9:40 AM Date Created
  • Views 3035 views
  • Likes 5 likes
  • Comments 17 comments
  • eclipse_iot
  • mqtt
  • openhab
  • beaglebone_black
  • internet_of_things
  • in_the_air
  • texas_instruments
  • iot_sensor_nodes
  • cc3200
  • launchpad
Related
Recommended

[AirCare] InTheAir - Week 7: Dust sensor

fvan
fvan
12 Dec 2014

Previous posts for this project:

  • [AirCare] InTheAir - Project Description
  • [AirCare] InTheAir - Week 1: Getting a Launchpad to Blink
  • [AirCare] InTheAir - Week 2: Preparing the Beaglebone Black
  • [AirCare] InTheAir - Week 3: Fuel Tank Testing
  • [AirCare] InTheAir - Week 4: Using the CC3200
  • [AirCare] InTheAir - Week 5: openHAB and MQTT
  • [AirCare] InTheAir - Week 6: Accessing Fuel Tank's Data


  • Introduction
  • Sensor info
  • Circuit
  • Sketch
  • Measurements


Introduction


For this week's post, I experimented with the Sharp GP2Y1010AU0FSharp GP2Y1010AU0F dust sensor which I plan to use in my project.


Sensor info


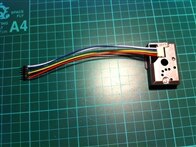
The Sharp GP2Y1010AU0F dust sensor uses an IR LED and detector to provide information on the dust concentration in the air.

The output of the sensor is analog and provides a voltage which can be used to correlate the dust concentration. (See paragraph "Measurements" in this post)

imageimage

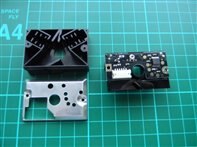
In the pictures above, you can see a disassembled sensor with both the LED and detector crossing paths at the ventilation hole.


The sensor is also low power, with a typical supply current of 11mA and maximum supply current of 20 mA (at 5V).


Circuit


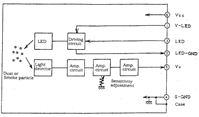
An example circuit is provided in the datasheet. It provides the function of every pin and indicates the need of an RC circuit on the LED input.

imageimage


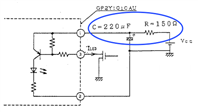
I didn't have the exact same values available, so I used the closest I could find.


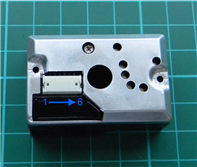
To be able to test the sensor, I soldered breadboard friendly headers on the sensor cable.

imageimage


The test setup:

image

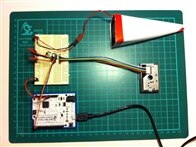
The white cone contains a fan used to create an airflow to the sensor. I plan on 3D printing a more compact version so that it will fit inside the build.


In the circuit above, the fan is always on. This will not be the case in the final solution: the fan should be turned on before sampling, and turned off after it.

Through testing, I will need to find the best timing between turning the fan on and sampling, as initially, turning the fan on might give different results (dust on fan blowing through sensor).


Sketch


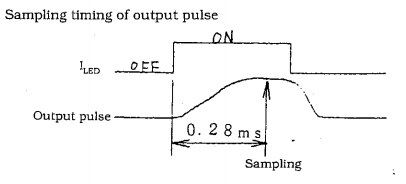
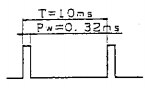
Based on the datasheet information on sampling timing, I made a quick Arduino sketch i order to test the sensor and the circuit.

imageimage

The resulting sketch is as follows:


int sensorPin = A0;
int sensorValue = 0;

int ledPin = 2;

int delaySampling = 280; // wait 280 us before sampling after turning on LED
int delayLed = 40; // wait 40 us after sampling before turning off LED
int delayCycle = 10000 - delaySampling - delayLed; // 10ms cycle

void setup() {
  Serial.begin(9600);

  pinMode(sensorPin, INPUT);
  pinMode(ledPin, OUTPUT);

  digitalWrite(ledPin, HIGH); // turn LED off
}

void loop() {
  digitalWrite(ledPin, LOW); // turn LED on
  delayMicroseconds(delaySampling); // wait before sampling

  sensorValue = analogRead(sensorPin); // sample
  delayMicroseconds(delayLed); // wait before turning LED off

  digitalWrite(ledPin, HIGH); // turn LED off
  delayMicroseconds(delayCycle); // wait for end of cycle

  Serial.print("Sensor Value: ");
  Serial.println(sensorValue);

  float voltage = sensorValue * (5.0 / 1023.0);

  Serial.print("Voltage Value: ");
  Serial.println(voltage);
  Serial.println();

  delay(1000);
}


Measurements


I performed two measurements for initial testing.


The first test, was to use the sensor as is, measuring the dust concentration in the room.

The second, was to trigger an extreme condition using a smoking matchstick.

image


The change in value is clearly indicating the smoke was detected. Looking further in the datasheet, following graph is provided.

image

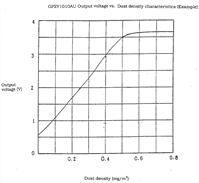
The maximum value in the graph matches the result when using the smoking matchstick, meaning a density larger than 0.6mg/m3.

As for the dust, it would seem there is an approximate concentration of 0.05mg/m3 in the room I was testing.


I'll be testing the sensor further and porting the Arduino code to the Launchpad (which should be straightforward with Energia ?!).

I'm curious to see the results when measuring in different rooms (who has the dirtiest room).

  • Sign in to reply

Top Comments

  • michaelwylie
    michaelwylie over 10 years ago in reply to fvan +2
    That's to be expected. By itself the sensor is diffusion based, that is, it's based on the natural convection in the environment. By employing the fan you are turning it into a flow-through system. The…
  • mcb1
    mcb1 over 10 years ago +1
    Good work. I'm pleased to see you starting simple and ensuring that your measurements are the real deal. Mark
  • tomaja
    tomaja over 10 years ago +1
    Good work, Frederick. Have you tried running it without a fan? Dragan
  • Former Member
    Former Member over 10 years ago

    Hi sir

    How is the sensor converts the received pulse output into equivalent voltage depending on the dust available?


    Thanks

    • Cancel
    • Vote Up 0 Vote Down
    • Sign in to reply
    • More
    • Cancel
  • Former Member
    Former Member over 10 years ago in reply to fvan

    Hi frederick

    Thanks for your reply. I have tried that one and I am not sure to ensure the particle weight of the PM2.5 particles. I have placed the sensor in the soldering area. and please suggest the weight of the particles there so that I can convert the particles count per second per cubic feet to mg per cubic meter.


    Thanks

    • Cancel
    • Vote Up 0 Vote Down
    • Sign in to reply
    • More
    • Cancel
  • fvan
    fvan over 10 years ago in reply to Former Member

    Check pages 4 to 6 of the application note to see how to determine the dust concentration based on the sensor's output.

    • Cancel
    • Vote Up 0 Vote Down
    • Sign in to reply
    • More
    • Cancel
  • Former Member
    Former Member over 10 years ago

    Hi sir!

    I am using amphenol dust senor SM-PWM-01A to know the dust levels in our soldering area. Its output is PWM and I am unable to convert the output into mg/m3. So please kindly provide the necessary information required if anyone know it.


    Thanks

    • Cancel
    • Vote Up 0 Vote Down
    • Sign in to reply
    • More
    • Cancel
  • DAB
    DAB over 10 years ago in reply to fvan

    That might work, it depends upon the ambient air concentrations.


    Maybe slap a filter over the intake while you blow out the chamber.


    DAB

    • Cancel
    • Vote Up 0 Vote Down
    • Sign in to reply
    • More
    • Cancel
>
element14 Community

element14 is the first online community specifically for engineers. Connect with your peers and get expert answers to your questions.

  • Members
  • Learn
  • Technologies
  • Challenges & Projects
  • Products
  • Store
  • About Us
  • Feedback & Support
  • FAQs
  • Terms of Use
  • Privacy Policy
  • Legal and Copyright Notices
  • Sitemap
  • Cookies

An Avnet Company © 2025 Premier Farnell Limited. All Rights Reserved.

Premier Farnell Ltd, registered in England and Wales (no 00876412), registered office: Farnell House, Forge Lane, Leeds LS12 2NE.

ICP 备案号 10220084.

Follow element14

  • X
  • Facebook
  • linkedin
  • YouTube