


Previous post: In-the-Air-Challenge: NDIR CO2 meter connected to IoT via TI CC3200 Wi-Fi connectivity board
Next post: In-the-Air-Challenge: Air filter checking with a home-built laser+photodiode dust counter
After trying to count dust using image processing I turned to a classical dust counter approach with a laser and a photodiode.
Background materials to read: Measuring dust with a commercial "Dylos" air quality monitor. http://woodgears.ca/dust/dylos.html
My device is based on article by a A. Morpurgo "A low-cost instrument for environmental particulate analysis based on optical scattering".

I made a 445 nm 1W laser pointer salvaged from Casio beamer and tried first to use a commercial amplified photodiode Thorlabs PDA36A and see the video below how the signal looks on Iphone:
Summary of observations
- Light pulses are having length of 0.1...1 ms depending on air flow speed.
- Number of particles detected depends on air flow speed.
- Need ADC sampling frequency in >10 kHz range (10 samples/pulse).
- Need a fast algorythm for finding maximum of the peak.
- Need to solder Opamp amplifier. Gain ca 70 dB.
- Prefered a large area photodiode or a lens to collect more light. 10 mm diameter PD from Thorlabs was great. But also 1 mm diameter photodiode is OK.
- Photodiode signal can be AC coupled to suppress light scattered from walls.
- Need large area photodiode or large lense to collect light.
- Can place a mirror on the other side of laser beam to double signal.
- To generate clicks we need a thin sheet of light. That is why laser beam is focussed. With broad beam particles are so many in volume that they overlap and are impossible to count.
- In a small focussed beam scattering intensity is high and disturbing background is less.
- If air speed is increased there are more particles coming in a time unit. Pulses get shorter.
- There is a huge number of small particles in air. They are not molecules. Something bigger. Smoke for example.
Some particles leave multiple peaks. This is due to interference-diffraction if particle size is close to wavelength of light. By pfotographing such diffraction patern one could calculate the size of particles as it was done on pollen:http://www-atom.fysik.lth.se/afdocs/progrep978/c43.htm
Home-built PHOTODETECTOR
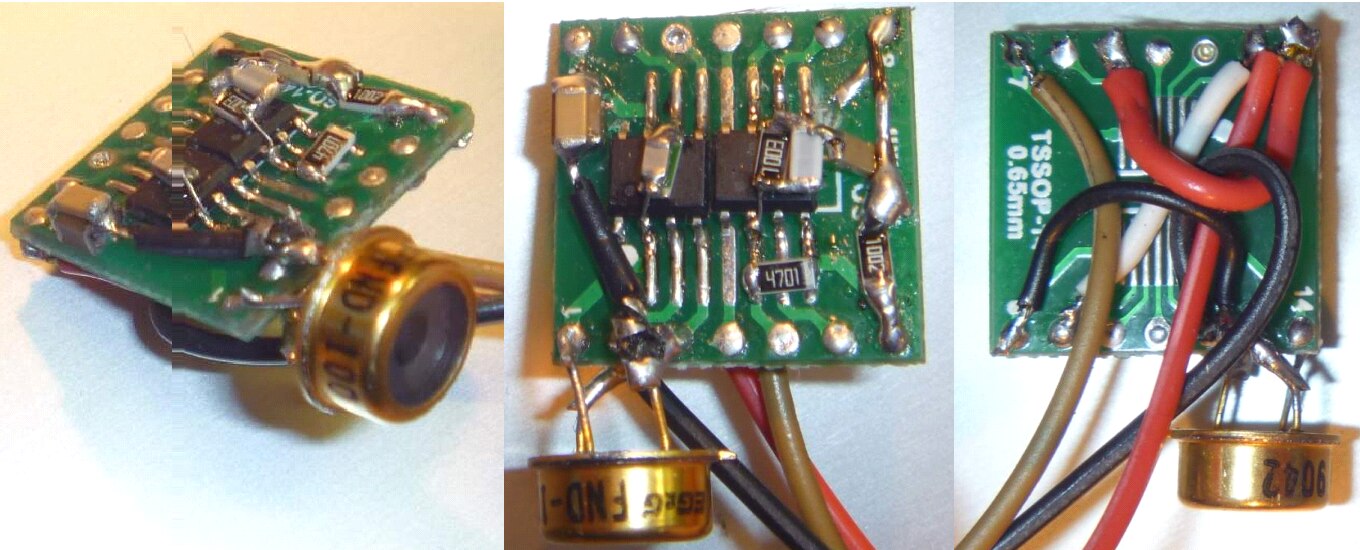
Photodiode can be 1...2 mm active area size. I ordered from Farnell BPX65. I had in drawer older FND100 photodiode and it worked too.
First OP is a transimpedance amplifier. It keeps photodiode input at 0V using the 1M feedback resistor. The output voltage is very linearly proportional to the photocurrent. Photodiode generates negative current on OP inverting input that is compensated to 0V by feedback resistor. So OPamp output becomes positive.
I use Texas Instruments OPA350 that was recommended in the italian paper about dust detection. It is single-supply rail-to-rail OP. Dust produces weak scattered light, so amplifier has to be low noise.
Input noise of OPA350 is 5 nA. One of often used photodiode amplifiers in physics laboratories is OP27 that has twice smaller input noise but requires bipolar power supply.
Note that the OPA350 schematic in the original paper has some mistakes: OP legs are incorrectly numbered and photodiode leg connected to the + input is also grounded.
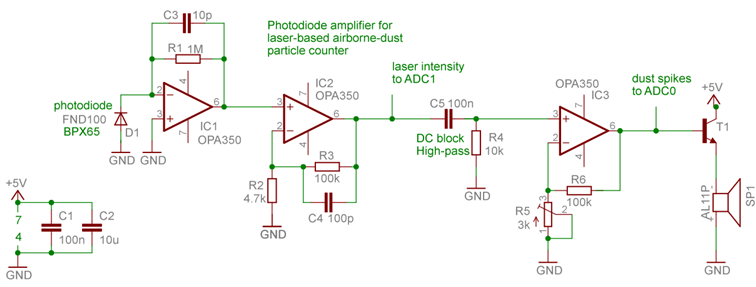
Circuit has to be fast because the light burst is short. I dimension circuit to some 50 kHz bandwidth that is suitable for taking several consecuitive samples with ADC. It is not practical to use larger feedback resistor than 1 Meg as circuit becomes slow. Better is to add one more OP stage. As a rule of thumb OP DC gain should be below 100 and resistors used below few hundred kOhm.
The circuit self oscilates without the capacitors across feedback resistors. So I added a 10 pF capacitor across 1 Meg and a 100pF capacitor across 100k. Low pass filter is dimentioned for 1M+10pF=100k+100pF=100kHz.
At output is a high-pass filter to eliminate continuously scattered light and 50 Hz. 10k+100nF=1ms=1kHz.
Circuit diagram is drawn using Eagle. Both opamps are assembled on a small SSOP chip breakout board. See the photo. The amplifier board is covered with insulating tape and aluminum tape for electric pickup shielding. Photodiode is fixed 3...5 mm from the beam. Position is not very sensitive.
A thing to try: photodiode in a plastic chip with built-in preamplifierTexas Instruments OPT101P-J. But need to check noise specs first
LASER
First diode lasers available were near infrared around 800 nm as used in CD players. Then red lasers appeared and now blue diode lasers are used in blueray disks. Light scattering increases quadratically for shorter light wavelength. So I think it is advantageous to use blue laser. Si photodiodes have sensitivity peak around 900 nm, but around 400 nm signal is only 10%. This might be why
red lasers are still used. I use a blue laser because I have many 1W laser diodes from an old Casio projector. To extend the lifetime I run laser diode at a half of maximum power. I made current controller for laser diode from a LM317 regulator and a 2 ohm resistor that stabilizes maximum current at 0.6A. Resistor is rated for 1W gets dissipation. Similar circuits can be found elsewhere, for example, here:
http://www.loneoceans.com/labs/project405/
Laser diode I soldered to a hole on a copper heat sink. I glued a glass lens with f=5 mm at some distance to make the beam focus at couple centimeters. There are 2 foil diafragms to reduce scattered light.
If you decide to build your own device, be extremely carefull with class 4 laser laser. You can permanently damage vision. (For comparison electricity is more dangerous as you can loose your life!) During alignment try to run laser at low power. Fix everything steadily on the table. Keep other people away from the room. According to safety measures you should wear color protective goggles. Laser beam should be directed at steady dark painted metal surface. Focused beam can start fire and smoke.
When device will be ready the beam will be enclosed inside the metal enclosure and that is considered safe. But the box needs a warning sticker about laser inside.
Enclosure and Signal
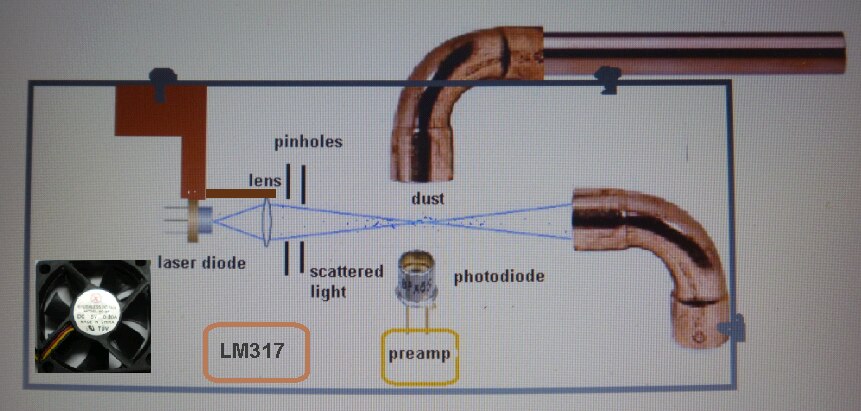
Beam dump is a 90 degree copper plumbing piece sprayed with furnace black paint. Photodiode is looking at 90 degrees to the laser beam into another 90 degree black piece.
Air is sucked into the box through a tube. About 10 cm long tube is practical for checking air coming out from air ducts and filters. A small fan is placed not on the input but on the exit of the box because some dust sticks on the turning blades. Number of particles counted in a time interval depends on air flow speed. As there is relatively much heat from the laser diode and LM317 I had to use a cast aluminum enclosure by Hammond that I got from Farnell as a gift for this challenge. As a 9V power supply I use Ansmann APS600 rated at 0.6A that I got from Element 14 for this challenge. Here is a video showing assembly and dust signal on oscilloscope.
.
Particle counting

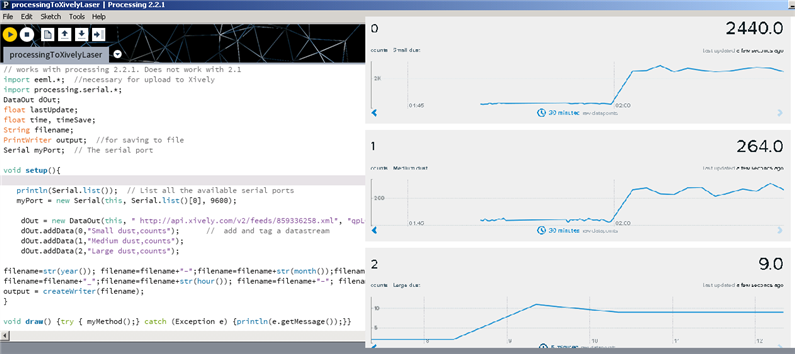
Texas instruments Launchpad supplied for this challenge does not fit inside the compact size metal enclosure. Microcontroller runs in a loop to find out when ADC voltage has reached some threshold. Then it samples and looks for maximum value. ADc peak value I think is proportional to the particle size. Microcontroller bins particles into small medium and large bins. And once in 10 seconds reports to display and serial. Previously I have experienced pickup from Wi-Fi when measuring weak light levels and decided not to use Wi-Ffi in this project.
void loop() {
  Value = analogRead(A0);
  if (Value>2)
  {
    Value1 = analogRead(A0);
    if (Value1>Value){Value=Value1;}
    else { if (Value1<20) {small=small+1;}
          if(Value1>19 && Value1<500){medium=medium+1;};
          if (Value1>501) {large=large+1;}
    Value=0; }

  }

  if(millis()>10000*time){
  time++;
  Serial.print(small);  Serial.print(" ");
  Serial.print(medium); Serial.print(" ");
  Serial.println(large);
In ambient air there are 30...100 clicks per second. To my surprise outside the window the air was not cleaner than in the room. If I sweep the room there is a giant burst of large size dust. Only inside a cleanroom box there were no clicks.
50 dust particles in 1cm3 means 50 million in 1m3. That is a large number.
I attached the Processing 2.2.1 code for Windows PC that receives USB-serial data from the particle counter averaged for one minute, saves in file and posts on Xively. Link to live Xively plot is here:
https://xively.com/feeds/859336258
I left my dust counter on for a weekend in a 20 m2 lab with HEPA13 filter bag on the air duct. After a couple of weeks of running the filter bag color starts to darken from inside.
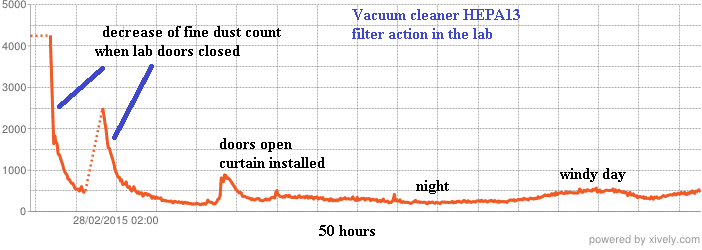
Air gets cleaner in about 5 hours - counts dropped from 4000 to 200 per minute. Dust quickly enters into the lab from adjacent rooms when the doors are left open. So I installed a curtain in the doorway. Curtain helps but is not as good as closed doors. During the weekend levels change when there is wind outside. I will continue logging and prepare a new picture during the week when the people will work in the lab.
https://xively.com/feeds/859336258
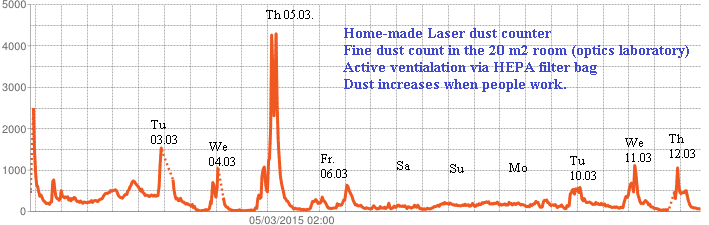
Below is a graph of two weeks of counting dust in the room.
Exercise:
How many Element 14 carbon atoms contains 1 micron size soot particle? C molar mass 12 g/mol, density 2.26g/cm3.
Top Comments
-

DAB
-
Cancel
-
Vote Up
+1
Vote Down
-
-
Sign in to reply
-
More
-
Cancel
-

janisalnis
in reply to DAB
-
Cancel
-
Vote Up
0
Vote Down
-
-
Sign in to reply
-
More
-
Cancel
Comment-

janisalnis
in reply to DAB
-
Cancel
-
Vote Up
0
Vote Down
-
-
Sign in to reply
-
More
-
Cancel
Children