


![]() Blog#6 Conclusion (Case Enclosure Reliability Monitor)
Blog#6 Conclusion (Case Enclosure Reliability Monitor)
This blog is a wrap up of Conclusions and Possible Future Enhancements to this Design Challenge: Just Encase Blog Series. This is my final blog in the series.
I want to thank Hammond Manufacturing for sponsoring this event and both Hammond and Element14 for giving me the opportunity to participate in this very interesting challenge.
I did learn a tremendous amount of new technology.
| <<< PREVIOUS BLOG |
|---|
Conclusions
Here are some conclusions as to what I have gained from this Design Challenge
The Knowledge I Gained from this Design Challenge
- This was a very interesting Challenge.. I was able to gain an education on quit a bit of NEW technologies;
- I learned a lot about LoRa Wan communication
- I was not able to connect one MKR WAN 1300 to the Things network, because I was out of range.
- I did manage to set up the Thing in the Arduino Cloud however, I was unable to connect it.
- This set me off course from my original Idea
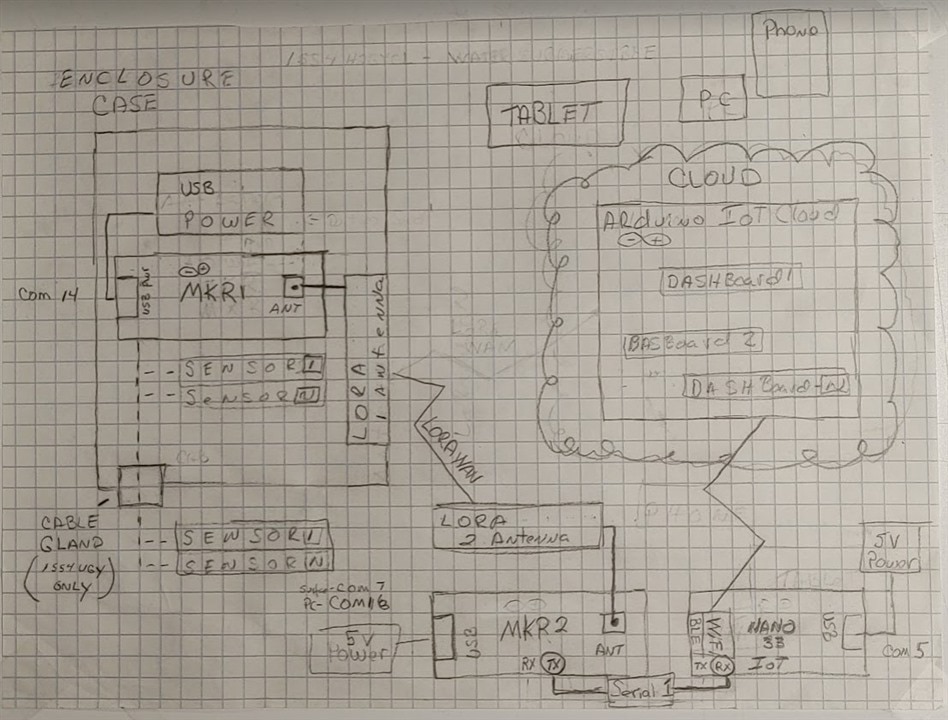
- I ended up with a updated Design that Involved using one MKRWAN 1300 as a LoRa SENDER and the other MKRWAN 1300 as a LoRa RECEIVER.
- I then used an Arduino Nano 33 IoT that I had from a previous Design Challenge, to receive data from the RECEIVER MKRWAN 1300 over a serial jumper wire.
- Then created a thing on the Arduino cloud to receive data from the Nano 33 IoT device.
- I then used an Arduino Nano 33 IoT that I had from a previous Design Challenge, to receive data from the RECEIVER MKRWAN 1300 over a serial jumper wire.
- I was not able to connect one MKR WAN 1300 to the Things network, because I was out of range.
- I was able to successfully connect two MCU's together over a Serial line. Something I have not done before.
- I used the serial connection to pass data between the Receiver MKRWAN 1300 and the Nano 33 IoT MCU's.
- I needed to understand "How this was done" and researched how to do it over the Internet. This was crucial part of my design to be able to get data up to the Cloud.
- I did Learn quit a bit about the Arduino Cloud
- Setting up Things
- Sending data to Things
- Creating Dashboards to display Variables sent to Things
- Using the Web Editor on the Arduino Cloud to code sketches, verify and upload sketches to the boards.
- I did run into some problems with the create agent.
- It kept on hanging and stopping. It slowed me down for a while, but I was able to proceed with using the Cload Editor. It was pretty handy
- I did manage to get the IDE to work with all the test sketch later in the project cycle though.
- I did run into some problems with the create agent.
- I gained knowledge on running the MKRWAN 1300 on Battery power
- I documented this, bit was unable to use the battery connector on the MKRWAN 1300 because
- I was connecting sensors that required 5volts and the battery connector only sends 3V3!
- I guess you can run the LoRa WAN on a 3V3 if you didn't need 5 volts. Which I was able to do with My counter test design.
- I documented this, bit was unable to use the battery connector on the MKRWAN 1300 because
- Version 2 of the Arduino IDE.
- Was really nice to work with.
- Some nice features like:
- Context sensitive help
- Convenient navigator to the IoT Cloud.
- I had never worked with Enclosures before.
- I took some time researching them
- A lot effort getting them to fit into my Design.
- Working with Drilling and attaching the Cable Glands on.
- Working with the Grove sensors was a new experience for me.
- It was pretty easy for me to hook the sensors up and getting a sketch designed.
- I was able to get the entire design of TEST#2 up and running in 8 hours.
- I learned a lot about LoRa Wan communication
Did everything work as designed?
- My original design did not work
- Since I was out of range for connecting to the THINGS network, I had to Redesign a more complex system to get the Telemetry data to the Cloud Dashboard
- Since I was out of range for connecting to the THINGS network, I had to Redesign a more complex system to get the Telemetry data to the Cloud Dashboard
- But Once I redesigned and Tested each component of the NEW design, I was able to get data from the MKR1 board on up the the Dashboard on the Arduino Cloud.
- The implementation run of my design is included in Blogs#4 Part 1and Part 2
What were the biggest hurdles you had to overcome?
- Learning to use the Arduino cloud.
- This was a small learning curve, That I now fell very comfortable with.
- There were a few hurdles involved along the way though.
- The Agent did not always work
- And will stop for no good reason some time.
- The new version of the CMS on Element14, caused some hurdles.
- I lost some work in the early stages.
- I had to learn a new CMS Editor.
- My blogs kept getting flagged as spam, but were quickly released back for me to edit. It did however, hamper my productivity. I do hope they trust there members logins credentials in the future.
- Working with Remote POWER
- I was unable to get the battery connector to work because it does not support 5volts.Being a newbie to Power consumption on MCU's , I learned this the hard way
- But I did learn something
- I ended up using USB chargers and Direct Power in the end
- I was unable to get the battery connector to work because it does not support 5volts.Being a newbie to Power consumption on MCU's , I learned this the hard way
- Working with the Dust Sensor.
- I'm not sure I understand how to use it fully
- I'll need to do some more experimentation with it.
- The Waterproof enclosure did not have low concentrations of dust?
These were some of my biggest hurdles and caused a bit of a delay in my design implementation. But I did overcome these hurdles in the end
Future Enchantments
Here I'll list some possible enhancements that can be added to the design. These are things that I thought about as I was working on the implementation of my design. and if time permitted would have made the project better. I wanted to note them here so after the challenge is over, I can come back and reengineer my design to support these ideas.
- Design and Implement a LoRa gateway finder
- It will allow the presence of LoRa WAN Gateway to be detected.
- It will test for the successful connection of my 1st try design.
- It will run off Battery Power.
- I can experiment with the Things network
- Maybe design and implement my own Things Network gateway.
- I publish another blog on this topic here
Addendum BLOG D - Connecting to the Arduino IoT Cloud directly over LoRaWAN
- Implement the capability of sending data from a Dashboard on the Arduino Cloud to the MKR1 Sensor Board.
- Right now:
- The Data is sent from the MKR1 sensor board to the MKR2 receiver board
- Then over a serial line to the Nano board.
- Then up to the THING on the Arduino cloud
- Then to the dashboard.
- I'd like to implement a widget (LCD switch widget for example) on the dashboard that:
- Sends data down to the Nano 33 IoT board.
- Then that Data is sent over a sender serial jumper wire
- To the MKR2 board
- Then the data packet is sent Over LoRa to the MKR1 board.
- And the MKR1 sketch takes an action on the data (shuts of the LCD for example).
- Right now:
- Use a 9volt battery to power the MKR1 sensor board..
- I have a 9volt battery converter to 5volt breadboard converter.
- I'd like to get this to be used to power the MKR1 board.
- Get all the sketches in the Present design working using the Visual Studio PlatformIO extension.
- I've used this for other Arduino project sketches.
- I'd like to get sketches working with the MKR WAN 1300
- Design and implement a complete weather station using the components from this challenge and other sensors needed.
- Revisit my first challenge blog series INTRODUCTION BLOG -Edible Algae System for the Design Challenge: 1 Meter of Pi | element14
- Use components and knowledge gained from this challenge to re-engineer that 10 blog Series.
That concludes this Design Challenge Bog Series I had a lot of fun participating and enjoyed seeing what the other participants were doing with the kit supplied.
Thanks again, Hammond Manufacturing for sponsoring this event and supplying such a full featured kit to play with. I appreciate the opportunity to participate in this very interesting challenge.
| <<< PREVIOUS BLOG |
|---|
Top Comments