


I'm waiting for the MusicTech challenger kit parts to make their way downunder, so in the meantime I’m experimenting with an old BeagleBone Black. It’s a couple of years old, so I figured I would install a new image on a micro-SD card to make sure I'm using a recent OS. I'm not sure what OS the BBB in the challenger kit will have onboard, perhaps it will be fairly recent anyway, but this process is also useful to make sure I have a backup of everything on the micro-SD card in case I mess anything up over the course of the project and want to restore.
Preparing the micro-SD card
I’m using Debian Jessie (8.2), which I downloaded from the official latest images page. The getting started guide has some instructions on how to update the image from Windows, but here’s what I had to do to get it working on Mac OSX:
The image that I downloaded was compressed using 7zip, so I installed the xz utility to extract the file. There are probably GUI tools to use for the following steps, but I prefer to use the command line:
$ brew install xz
$ xz -d bone-debian-8.2-tester-2gb-armhf-2015-11-12-2gb.img.xz
That resulted in a .img file, which needed to be written to my micro-SD card. First, I identified the device path for my micro SD card using diskutil.
$ diskutil listOn my system it was /dev/disk4
Then I used dd to write the image file to card. I needed to umount the disk first because when I tried it without unmounting I got a ‘Resource busy’ error.
$ diskutil unmountDisk /dev/disk4Then I ran the dd command with the following parameters. Note that I’m using the raw device that corresponds to disk4 because this is much faster when I’m writing Raspberry Pi images, so I assume it’s faster for BBB images too.
$ sudo dd bs=1m if="bone-debian-8.2-tester-2gb-armhf-2015-11-12-2gb.img" of=/dev/rdisk4
1700+0 records in
1700+0 records out
1782579200 bytes transferred in 313.960984 secs (5677709 bytes/sec)
This took about 5 minutes, and after that I ejected the card:
$ sudo diskutil eject /dev/rdisk4With the BBB off, I inserted the micro SD card into the slot at the base of the BBB.
Connecting to the BBB
I installed the FTDI and HoRNDIS network drivers linked from the getting started guide.
The docs say that to boot the BBB from the micro-SD card, you need to hold down the “User Boot” button (it’s marked S2 and is in the bottom right hand corner if you are looking at the board with the power and ethernet sockets at the top), and power up the BBB while still holding the button. Release it when the user LEDs light up. However, this step seems to be optional, my BBB boots from the SD card by default anyway.
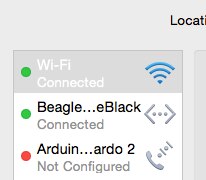
In the Mac OSX Network Preferences panel, the BeagleBone Black device appears as connected.
It takes a few seconds for the web server on the device to start up, after which the welcome screen can be visited at http://192.168.7.2/ using Chrome or Firefox.
I ssh to the BBB:
$ ssh debian@192.168.7.2(The temporary password is displayed in the prompt message)
Then I can confirm that the BBB is running the Debian Jessie image and not the old onboard OS:
$ sudo cat /etc/dogtag
BeagleBoard.org Debian Image 2015-11-12
I can also confirm that Node.js and the Node Package Manager are installed in this image:
$ node -v
v0.10.38
$ npm -v
1.4.21
These aren't the latest versions, but they will do for now. I'll upgrade them later using npm after I have a network connection.
Setting up networking
To fetch libraries and updates using npm, the BBB needs to be online.
I have a Ralink USB wifi dongle that I will be using with the BBB so it can operate standalone, but the drivers for it aren't in the standard image, so to bootstrap, I used Internet Connection Sharing on my Mac to share a connection with the BBB.
I had no luck with getting connection sharing working across the USB connection - when sharing was turned on I couldn't connect to or ping the BBB over the USB connection at all, even after trying static IPs and delving into system configuration files on both the BBB and my Mac. I ended up using a patch cable from the ethernet port on the BBB to the ethernet port on my Mac and enabling Internet Connection Sharing via that instead.

SSHing into the BBB via the USB interface, I ran the following to get the sharing over the ethernet interface working:
$ sudo dhclient eth0Once I had a network connection I updated the system:
$ sudo apt-get update
$ sudo apt-get upgrade
$ sudo apt-get dist-upgrade
Backing up the micro-SD card
I can clone the micro-SD card contents using dd on my Mac, to create a backup. This is similar to the command that was used to write to the card, but reverses if and of: The input becomes the SD card device and a file on disk is the output:
$ sudo dd of="myimage.img" if=/dev/rdisk4Now I have a file to restore from if I mess something up getting my wireless dongle working or Node.js environment set up.
Note on flashing the eMMC
The BBB can boot from micro-SD card or from the onboard flash (eMMC). There is a mechanism for re-flashing the eMMC from the micro-SD card. This is an optional step - I am booting Debian off the micro-SD directly for now because the old BBB I am using in the interim only has 2GB flash storage while the latest BBBs have 4GB. I’m making a note of the process here so I can flash the new BBB from the micro-SD card at some point in the future:
- Hold down the “User Boot” button.
- Power up and connect to the BBB and uncomment the cmdline line in /boot/uEnv.txt - See the BeagleBoneBlack Debian page for details. Then shutdown and power down.
- Hold down “User Boot” and power up BBB again.
- Wait for the row of user LEDs to light up before releasing the button.
- Wait for the LEDs to stop flashing - they will go solid - after about half an hour. Then power the board down, remove the micro-SD card and the BBB is ready to use.
Top Comments