element14 Community
element14 Community
    Register Log In
  • Site
  • Search
  • Log In Register
  • About Us
  • Community Hub
    Community Hub
    • What's New on element14
    • Feedback and Support
    • Benefits of Membership
    • Personal Blogs
    • Members Area
    • Achievement Levels
  • Learn
    Learn
    • Ask an Expert
    • eBooks
    • element14 presents
    • Learning Center
    • Tech Spotlight
    • STEM Academy
    • Webinars, Training and Events
    • Learning Groups
  • Technologies
    Technologies
    • 3D Printing
    • FPGA
    • Industrial Automation
    • Internet of Things
    • Power & Energy
    • Sensors
    • Technology Groups
  • Challenges & Projects
    Challenges & Projects
    • Design Challenges
    • element14 presents Projects
    • Project14
    • Arduino Projects
    • Raspberry Pi Projects
    • Project Groups
  • Products
    Products
    • Arduino
    • Avnet Boards Community
    • Dev Tools
    • Manufacturers
    • Multicomp Pro
    • Product Groups
    • Raspberry Pi
    • RoadTests & Reviews
  • Store
    Store
    • Visit Your Store
    • Choose another store...
      • Europe
      •  Austria (German)
      •  Belgium (Dutch, French)
      •  Bulgaria (Bulgarian)
      •  Czech Republic (Czech)
      •  Denmark (Danish)
      •  Estonia (Estonian)
      •  Finland (Finnish)
      •  France (French)
      •  Germany (German)
      •  Hungary (Hungarian)
      •  Ireland
      •  Israel
      •  Italy (Italian)
      •  Latvia (Latvian)
      •  
      •  Lithuania (Lithuanian)
      •  Netherlands (Dutch)
      •  Norway (Norwegian)
      •  Poland (Polish)
      •  Portugal (Portuguese)
      •  Romania (Romanian)
      •  Russia (Russian)
      •  Slovakia (Slovak)
      •  Slovenia (Slovenian)
      •  Spain (Spanish)
      •  Sweden (Swedish)
      •  Switzerland(German, French)
      •  Turkey (Turkish)
      •  United Kingdom
      • Asia Pacific
      •  Australia
      •  China
      •  Hong Kong
      •  India
      •  Korea (Korean)
      •  Malaysia
      •  New Zealand
      •  Philippines
      •  Singapore
      •  Taiwan
      •  Thailand (Thai)
      • Americas
      •  Brazil (Portuguese)
      •  Canada
      •  Mexico (Spanish)
      •  United States
      Can't find the country/region you're looking for? Visit our export site or find a local distributor.
  • Translate
  • Profile
  • Settings
Path to Programmable
  • Challenges & Projects
  • Design Challenges
  • Path to Programmable
  • More
  • Cancel
Path to Programmable
Blog Week 2: Done!! Lab 0 Lab1 and Lab2
  • Blog
  • Forum
  • Documents
  • Polls
  • Files
  • Events
  • Mentions
  • Sub-Groups
  • Tags
  • More
  • Cancel
  • New
  • Share
  • More
  • Cancel
Group Actions
  • Group RSS
  • More
  • Cancel
Engagement
  • Author Author: snidhi
  • Date Created: 21 Oct 2018 10:05 PM Date Created
  • Views 1498 views
  • Likes 5 likes
  • Comments 9 comments
  • avnet minized
  • fpga developement
  • minized_hardware_design
Related
Recommended

Week 2: Done!! Lab 0 Lab1 and Lab2

snidhi
snidhi
21 Oct 2018

  • Introduction
  • Lab0
  • Lab1
  • Lab2


Introduction


As I had already mentioned in my application I have worked with FPGAs in the past for 2 years roughly including my masters thesis with the old Xilinx ISE. So I kind of have a basic sense of how FPGAs work and the background behind them. At the time I had also worked with Microblaze which was quite a sensation when the idea of soft-processor was amazing. It has become quite main-stream in the FPGAs today though. So one can say I am a legacy FPGA programmer.

After reading the new training material it is amazing to see how far and advanced the FPGAs have become with multiple soft-core processors capable of doing what not ***. image There are also certain Xilinx ZYNQ devices with Dual Cortex-A9 MPCore and also to mention the Ultrascale+ series with Quad Cortex-A53 MPCore able to run @1.5GHz


The Xilinx Webpack can be freely downloaded from the website and one can easily start to play with sample code. In this training I am using the Vivado Design Suite 2017.4


Lab0


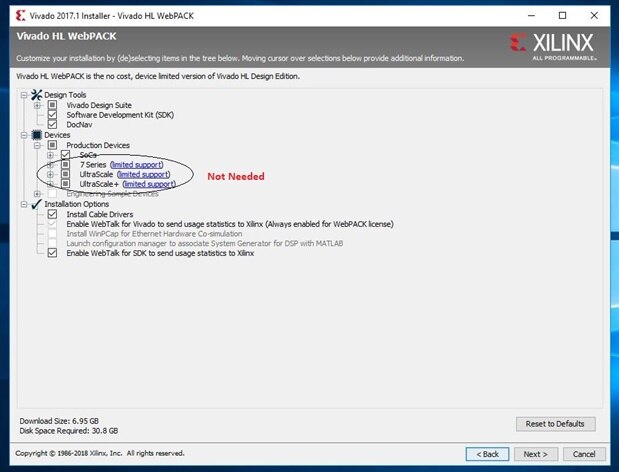
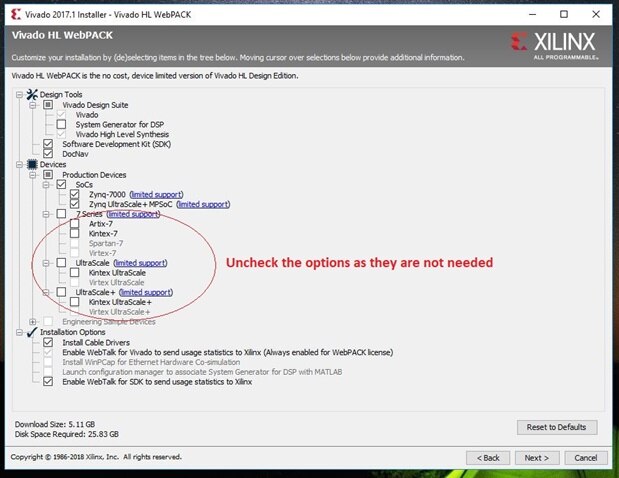
This lab focused on the installation of Xilinx Vivado WebPACK 2017.4; using Tera Term for serial communication and USB-UART drivers for the development board. I am working with windows edition. A trick during Vivado installation to reduce the memory usage by Vivado files is to un-check the devices that we donot need in this training such as Ultrascale and Virtex. By default Vivado tries to install everything which is really not needed and save the precious memory on the C: drive.


I tested it with the Xilinx Vivado WebPACK 2017.1 and Xilinx Vivado WebPACK 2017.4 installer.
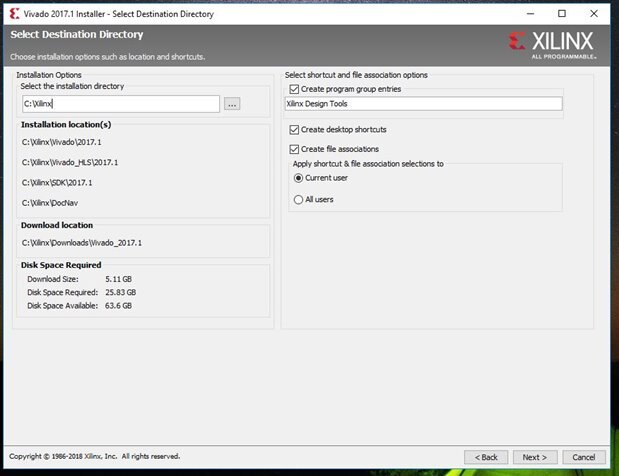
 

image

image

image

Saved me some precious Disk Space imageimage !!!!!!!


Lab1


This lab was pretty simple first one. Here I made the first Vivado project targeted to MiniZed board loaded with the FPGA device xc7z007sclg225-1.


Header 1Header 2
Product categoryGeneral Purpose
FamilyZynq-7000
Packageclg225 (MiniZed)
Speed grade-1
Temp gradeN.A.


image


image


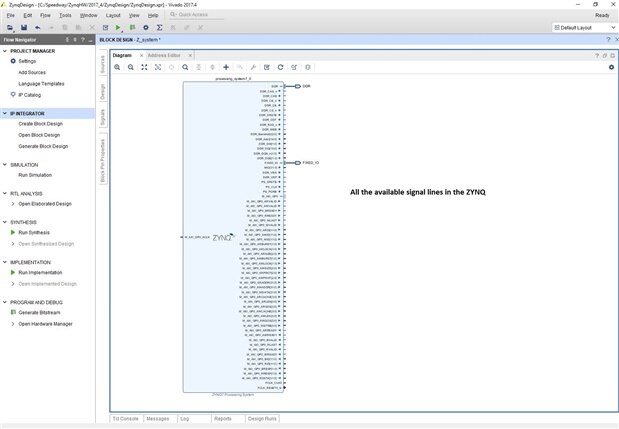
Next important step was to learn to customize the Zynq processing core


image

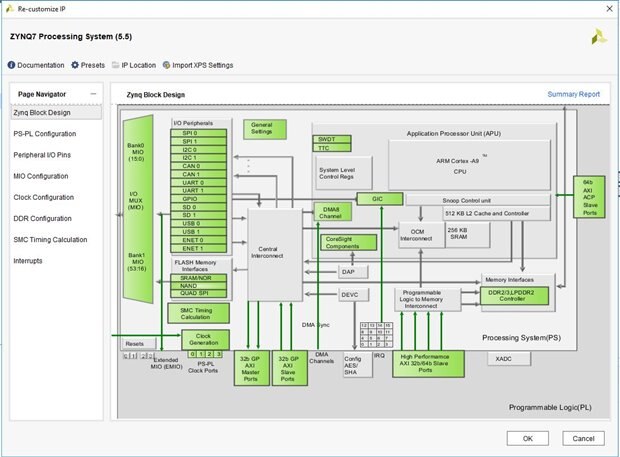
Customizing the ZYNQ and its peripherals can be done here


Lab2


Task1 : Enable and map a Zynq PS UART peripheral


The UART is set to UART1 peripheral with Baud Rate is set to 115200 in the Zynq PS.

And the clock setttings must be check for each board separately.


Task 2: Configure Memory and Clocks for the Zynq PS


For minized board Clock settings are:

  • Input frequency is 33.333333 MHz
  • CPU frequency is 666.666666 MHz
  • DDR frequency is 533.333333 MHz


And also the correct DDR Memory Device must be set in DDR Configuration page. For Minized the DDR3 memory used is MT41K256M16RE-125

Also the correct DQS to Clock Delay and Board Delay settings has to be set. It is specified as delays in the PCB. The parameters are specific to each PCB design and Zynq package. The values are based on the PCB trace lengths and the specific Zynq package.


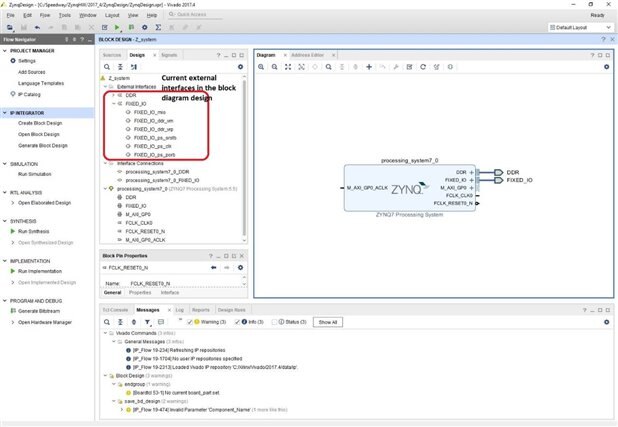
Task 3: Build the hardware platform


image

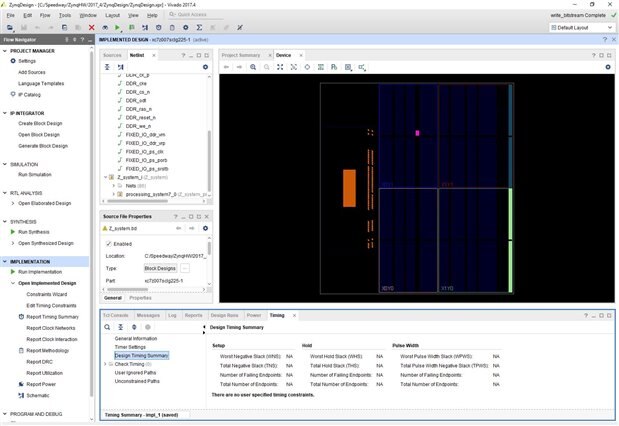
How the design is mapped on the device


image

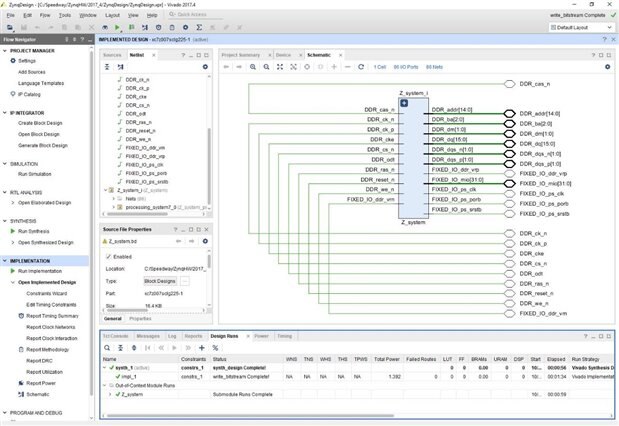
The Schematic Overview


image

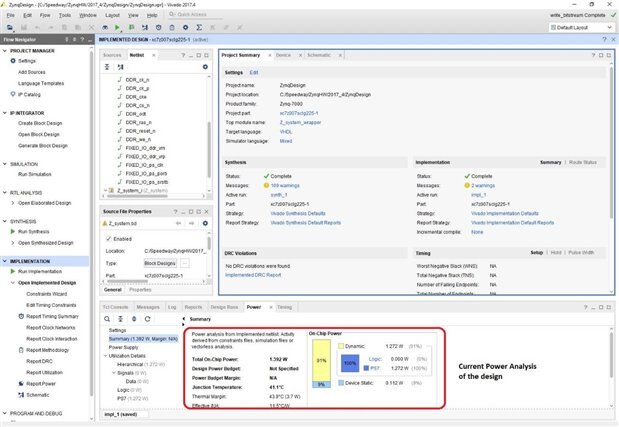
Quick Power Analysis of the design


Task 4: Export a design to SDK


image
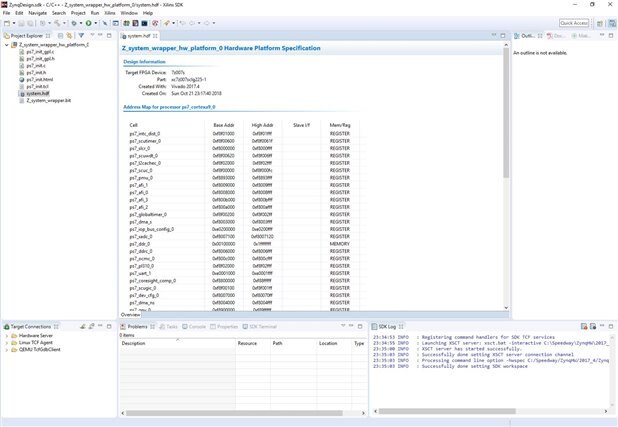
After exporting the bitstream file from Vivado to the SDK


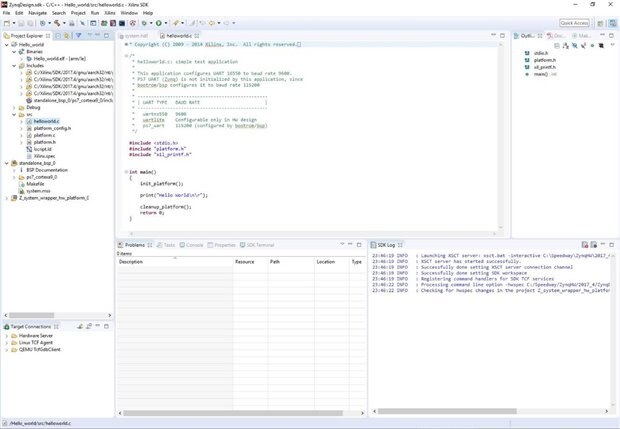
Task 5: Create and run a Hello World application


image


image


image

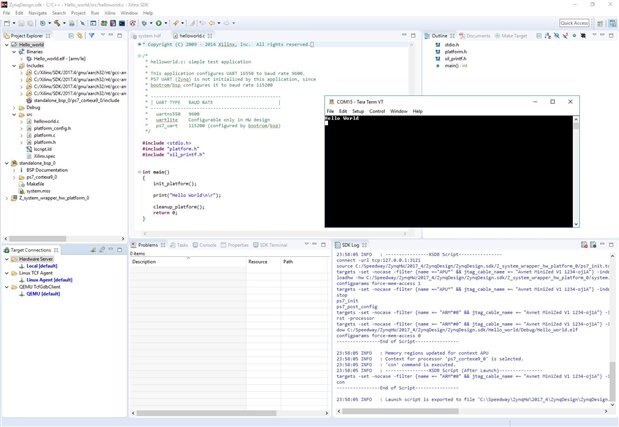
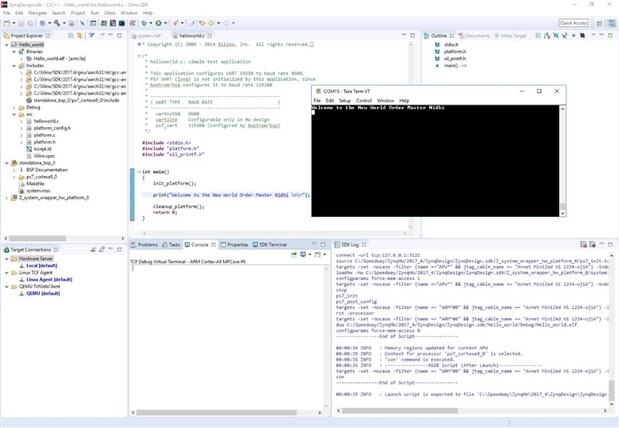
And... The Hello World runs successfully


Conclusion: As one may have noticed there are many steps involved from creating the simple hardware in Vivado to the correct settings for Zynq PS and finally migrating the board support files to run the Hello world in Vivado SDK software.

  • Sign in to reply

Top Comments

  • genebren
    genebren over 6 years ago +3
    Great to see you making progress long your path. Hopefully your progress will continue and you will learn a lot about programming FPGAs. Keep up the good work! Gene
  • Fred27
    Fred27 over 6 years ago +3
    A nice summary of the labs. I'll try to follow your steps and see if I can get things working.
  • snidhi
    snidhi over 6 years ago in reply to genebren +2
    Thanks Gene. I expect to finish all the labs this week. Cheers
  • nixiefairy
    nixiefairy over 6 years ago in reply to snidhi

    Aaah.....Seems pretty neat man. Wish I could be there to see it !

    Thanks !

    • Cancel
    • Vote Up 0 Vote Down
    • Sign in to reply
    • More
    • Cancel
  • snidhi
    snidhi over 6 years ago in reply to nixiefairy

    Thank you Eashan for your comments. My master thesis was long ago almost 8 yrs now when there was no plug and play ips in xilinx. Even the most basic ips of the xilinx was not free so I had to write most of the code in VHDL myself. There was no Vivado or SDK. I used ISE, chipscope and Modelsim with test benches. All that old school stuff. It was based on real time image processing for videos and images with filtering algorithms.


    Cheers

    • Cancel
    • Vote Up +1 Vote Down
    • Sign in to reply
    • More
    • Cancel
  • nixiefairy
    nixiefairy over 6 years ago

    Nice blog man. Just out of curiosity what was your masters thesis ? I have to decide one soon and would love to get an idea from others, especially in this field.

    • Cancel
    • Vote Up 0 Vote Down
    • Sign in to reply
    • More
    • Cancel
  • snidhi
    snidhi over 6 years ago in reply to Fred27

    Add IP from the Design screen there are the pre-built IPs are there. The BD creation is very intuitive. Until now I haven't written any vhdl code to be honest. Only plug n play with the standard stuff in the lib


    I hope this helps you further

    Training and Videos | Zedboard

    • Cancel
    • Vote Up +1 Vote Down
    • Sign in to reply
    • More
    • Cancel
  • Fred27
    Fred27 over 6 years ago in reply to snidhi

    Thanks. I might ask a few questions later, but for now I'm digging into other source material. It wasn't clear how you set up peripherals in Lab1, but your task is not to reiterate the course, it's to evaluate it. I think you're doing a pretty good job of that.

    • Cancel
    • Vote Up +1 Vote Down
    • Sign in to reply
    • More
    • Cancel
>
element14 Community

element14 is the first online community specifically for engineers. Connect with your peers and get expert answers to your questions.

  • Members
  • Learn
  • Technologies
  • Challenges & Projects
  • Products
  • Store
  • About Us
  • Feedback & Support
  • FAQs
  • Terms of Use
  • Privacy Policy
  • Legal and Copyright Notices
  • Sitemap
  • Cookies

An Avnet Company © 2025 Premier Farnell Limited. All Rights Reserved.

Premier Farnell Ltd, registered in England and Wales (no 00876412), registered office: Farnell House, Forge Lane, Leeds LS12 2NE.

ICP 备案号 10220084.

Follow element14

  • X
  • Facebook
  • linkedin
  • YouTube