element14 Community
element14 Community
    Register Log In
  • Site
  • Search
  • Log In Register
  • About Us
  • Community Hub
    Community Hub
    • What's New on element14
    • Feedback and Support
    • Benefits of Membership
    • Personal Blogs
    • Members Area
    • Achievement Levels
  • Learn
    Learn
    • Ask an Expert
    • eBooks
    • element14 presents
    • Learning Center
    • Tech Spotlight
    • STEM Academy
    • Webinars, Training and Events
    • Learning Groups
  • Technologies
    Technologies
    • 3D Printing
    • FPGA
    • Industrial Automation
    • Internet of Things
    • Power & Energy
    • Sensors
    • Technology Groups
  • Challenges & Projects
    Challenges & Projects
    • Design Challenges
    • element14 presents Projects
    • Project14
    • Arduino Projects
    • Raspberry Pi Projects
    • Project Groups
  • Products
    Products
    • Arduino
    • Avnet Boards Community
    • Dev Tools
    • Manufacturers
    • Multicomp Pro
    • Product Groups
    • Raspberry Pi
    • RoadTests & Reviews
  • Store
    Store
    • Visit Your Store
    • Choose another store...
      • Europe
      •  Austria (German)
      •  Belgium (Dutch, French)
      •  Bulgaria (Bulgarian)
      •  Czech Republic (Czech)
      •  Denmark (Danish)
      •  Estonia (Estonian)
      •  Finland (Finnish)
      •  France (French)
      •  Germany (German)
      •  Hungary (Hungarian)
      •  Ireland
      •  Israel
      •  Italy (Italian)
      •  Latvia (Latvian)
      •  
      •  Lithuania (Lithuanian)
      •  Netherlands (Dutch)
      •  Norway (Norwegian)
      •  Poland (Polish)
      •  Portugal (Portuguese)
      •  Romania (Romanian)
      •  Russia (Russian)
      •  Slovakia (Slovak)
      •  Slovenia (Slovenian)
      •  Spain (Spanish)
      •  Sweden (Swedish)
      •  Switzerland(German, French)
      •  Turkey (Turkish)
      •  United Kingdom
      • Asia Pacific
      •  Australia
      •  China
      •  Hong Kong
      •  India
      •  Korea (Korean)
      •  Malaysia
      •  New Zealand
      •  Philippines
      •  Singapore
      •  Taiwan
      •  Thailand (Thai)
      • Americas
      •  Brazil (Portuguese)
      •  Canada
      •  Mexico (Spanish)
      •  United States
      Can't find the country/region you're looking for? Visit our export site or find a local distributor.
  • Translate
  • Profile
  • Settings
Pi IoT
  • Challenges & Projects
  • Design Challenges
  • Pi IoT
  • More
  • Cancel
Pi IoT
Blog Pi Control Hub:Spoke2:Blinds Automation(continued)--Driving Motor with EnOcean PushButton
  • Blog
  • Forum
  • Documents
  • Polls
  • Files
  • Events
  • Mentions
  • Sub-Groups
  • Tags
  • More
  • Cancel
  • New
  • Share
  • More
  • Cancel
Group Actions
  • Group RSS
  • More
  • Cancel
Engagement
  • Author Author: carmelito
  • Date Created: 6 Aug 2016 3:11 PM Date Created
  • Views 788 views
  • Likes 2 likes
  • Comments 3 comments
  • picontrolhub
  • piiot
  • enocean
  • enocean sensor kit
  • raspberry pi
  • piiot challenge
Related
Recommended

Pi Control Hub:Spoke2:Blinds Automation(continued)--Driving Motor with EnOcean PushButton

carmelito
carmelito
6 Aug 2016

Here is a quick update to the previous blog post in which we setup EnOcean Transervir module and tested PushButton switch(PTM210) ,Magnet Contact Transmitter(STM329) and the Temperature sensor(STM332) with FHEM home automation server(Pi Control Hub:Spoke 2:Blinds Automation-- Setting up EnOcean Sensor and Blinking LEDs ). As part of this post we will drive a gear motor when the PushButton switch is pressed as shown in the video below.Basically the gear motor will help us open and close the blinds.


You don't have permission to edit metadata of this video.
Edit media
x
image
Upload Preview
image


Also as part of the video, the gear motor turns clockwise when the Magnet Contact Transmitter switch is closed.

In addition to the Raspberry Pi B+ we will also need a motor driver to connect the gear motor the GPIO pins,here I am using SparkFun Motor Driver - Dual TB6612FNG and we will also need a power source , for this I am temporarily using a 4 AA battery pack..


Once you have setup FHEM installed,as detailed in the previous blog post , here are the additional steps that you will have to follow

#1 Solder  a wire to 5V pin on the Raspberry Pi's back

#2 Build the circuit

image

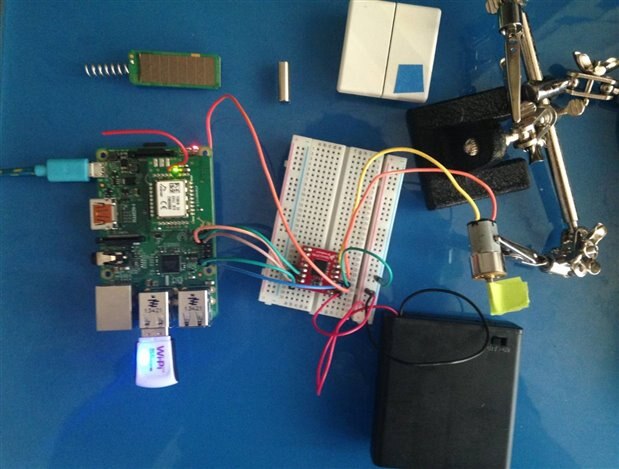
Once you have connected the EnOcean transceiver module to the Pi , add the motor driver to the bread board and make the following connections

  • PWMA  on motor driver to GPIO 21 on the Pi
  • AIN2  to  GPIO  6
  • AIN1 to GPIO 12
  • STBY to GPIO 5
  • VCC to 5V GPIO pin
  • GND to one of the GND pins on the Pi
  • Also connect the GND from the battery source to the GND
  • Vm connect the battery pack +ve
  • A01 connect one end of the motor
  • A02 to the other end of the motor


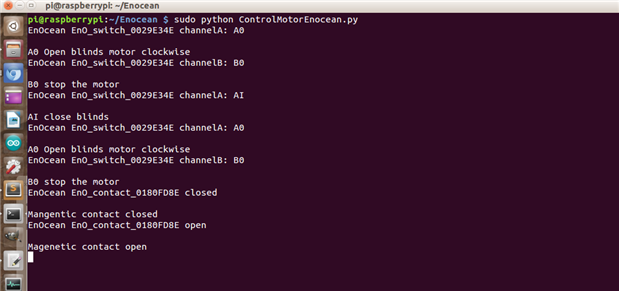
#3 Run the program to test the gear motor as shown in the video above

      Copy paste the code below  to you Pi using nano

         sudo nano ControlMotorEnoceanPi.py

      run the python program using

         sudo python ControlMotorEnoceanPi.py


import telnetlib
import RPi.GPIO as GPIO
import time
#Connection details to the fhem server installed on the same Pi
#For the telnet details check out URL - http://IpAddressOfPi:8083/fhem?detail=telnetPort
HOST = "127.0.0.1"
PORT = 7072
tell = telnetlib.Telnet()
#Connecting to the fhem server
tell.open(HOST,PORT)
#Send command to intiantiate fhem server to get the data
tell.write("inform on\n")


def string_after(s, delim):
    return s.partition(delim)[2]
#Connection to the motor driver,using the SparkFun Motor Driver - Dual TB6612FNG 
PWMA = 21
AIN2 = 6
AIN1 = 12
STBY = 5


GPIO.setmode(GPIO.BCM)
GPIO.setup(PWMA,GPIO.OUT)
GPIO.setup(AIN2,GPIO.OUT)
GPIO.setup(AIN1,GPIO.OUT) 
GPIO.setup(STBY,GPIO.OUT)


def openBlinds():
        GPIO.output(AIN1, GPIO.LOW)
        GPIO.output(AIN2, GPIO.HIGH)
        GPIO.output(STBY, GPIO.HIGH)
  GPIO.output(PWMA, GPIO.HIGH)


def closeBlinds():
        GPIO.output(AIN1, GPIO.HIGH)
        GPIO.output(AIN2, GPIO.LOW)
        GPIO.output(STBY, GPIO.HIGH)
        GPIO.output(PWMA, GPIO.HIGH)


def stopBlinds():
        GPIO.output(AIN1, GPIO.LOW)
        GPIO.output(AIN2, GPIO.LOW)
        GPIO.output(STBY, GPIO.HIGH)
        GPIO.output(PWMA, GPIO.HIGH)


try:
 while True:
        #get the value after the carriage return
  output = tell.read_until("\n")
  #Check the value of the button press of the Pushbutton Transmitter switch module - blinds open close
        if "channel" in output:  
  print output
  if "A0" in output:
  openBlinds()                       
  print "A0 Open blinds motor clockwise"
  if "AI" in output:
  closeBlinds()
  print "AI close blinds"            
  if "B0" in output:
  stopBlinds()
  print "B0 stop the motor"
  if "BI" in output:
  print "Button BI is  pressed"
        #Check the value of the Magnet Contact Transmitter module - Door open close
  if "contact" in output:
  print output                      
  if "closed" in output:
  openBlinds()                   
  print "Mangentic contact closed"
  else:
        stopBlinds()
                       print "Magenetic contact open"
#clean up GPIO when exiting out of the program using ctrl+C
except KeyboardInterrupt:
  GPIO.cleanup()


Here is the output of the program

image


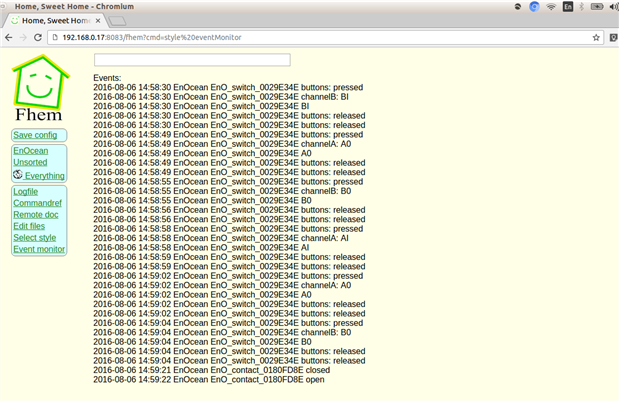
Here is equivalent output on FHEM's event monitor when the PushButton switch(PTM210) pressed,and the magnet is brought close to Magnet Contact Transmitter(STM329)

image

  • Sign in to reply

Top Comments

  • carmelito
    carmelito over 9 years ago in reply to element14Dave +1
    Sure Dave, Thanks for the comment .. I am currently working on 3D designing and printing holder for the setup above to mount it to my blinds..Also need to get started on the other components aka the main…
Parents
  • element14Dave
    element14Dave over 9 years ago

    Excellent demo carmelito, let us know if there is anything we can do to help support the next steps and final push to the final submission date!


    Dave

    • Cancel
    • Vote Up 0 Vote Down
    • Sign in to reply
    • More
    • Cancel
Comment
  • element14Dave
    element14Dave over 9 years ago

    Excellent demo carmelito, let us know if there is anything we can do to help support the next steps and final push to the final submission date!


    Dave

    • Cancel
    • Vote Up 0 Vote Down
    • Sign in to reply
    • More
    • Cancel
Children
  • carmelito
    carmelito over 9 years ago in reply to element14Dave

    Sure Dave, Thanks for the comment .. I am currently working on 3D designing and printing holder for the setup above to mount it to my blinds..Also need to get started on the other components aka the main hub  + the door lock spoke, the next couple of weeks are going to super busy image ... - Carmelito

    • Cancel
    • Vote Up +1 Vote Down
    • Sign in to reply
    • More
    • Cancel
element14 Community

element14 is the first online community specifically for engineers. Connect with your peers and get expert answers to your questions.

  • Members
  • Learn
  • Technologies
  • Challenges & Projects
  • Products
  • Store
  • About Us
  • Feedback & Support
  • FAQs
  • Terms of Use
  • Privacy Policy
  • Legal and Copyright Notices
  • Sitemap
  • Cookies

An Avnet Company © 2025 Premier Farnell Limited. All Rights Reserved.

Premier Farnell Ltd, registered in England and Wales (no 00876412), registered office: Farnell House, Forge Lane, Leeds LS12 2NE.

ICP 备案号 10220084.

Follow element14

  • X
  • Facebook
  • linkedin
  • YouTube