


Before note:
I am not and electrical engineer nor do I have experience working in this field. Please double check anything I say in this post before trying it yourself.
Previous posts:
Pi IoT - Simone - Introduction
Pi IoT - Simone - #1 - Light Controller
Pi IoT - Simone - #2 - Main System
Pi IoT - Simone - #3 - Door / Window notifier
For this part of the project the main idea is to have a device that can calculate the power consumption on each wall outlet in particular. This can give you a good statistic of the power consumption and it can help you minimize the energy needed to run your house.
The control part comes with the ability to turn the sockets on and off. Mostly this feature is not very useful but if you have kids for example you could start a socket only for two hours so you can charge your phone and then it will be safe for the kids to play around. This is only an example but you can find other uses for this.
The switch part is the same as the one for the light switches, it acts the same way and it has a relay so it can be implemented the same way. One thing to take into consideration is the power consumption and the limit of the relay you are using or you could burn it very easily.
The main chalange of this part of the project is to make a component that can accurately calculate the power consumption even for small consumers. The I2C Protocol described in the previous posts is good enough to send the information to the Raspberry Pi and it has the processing power to display it in any form needed.
I will get more into details but first I would like to say that this is very dangerous and this should not be implemented by someone who does not have any experience in working with high currents. Also spend a while searching online for discussions and topics about this and also safety advices.
If you do want to go ahead with this, here are some things to take into consideration one by one before plugging in a device:
1. Reconsider if you really need to do it and if it is worth it.
2. Make sure the component is not plugged in when you are arranging everything for the test
3. Make sure you are at least one meter away from the device during the testing phase when it is plugged in. You don't know for sure what will happen and mistakes can be made.
4. It is better to have somebody with you at a safe distance so he can help but in case you are working alone make sure there are no people in the area so they do not touch anything by mistake
5. Remove all animals from the room.
6. Make sure you isolate your component well from anything that might be a conductor ( I burned a component because it made a contact through a wooden floor )
7. You should always be able to stop the power at any time, without getting close to the component you are testing
8. Minimize the damage if anything is wrong by keeping the device away from other instruments you use and not connected to anything.
9. Try to develop a way that you can see the readings from a distance or record them on to something so you don't have to get close
10. Make sure your calculations are right and double check them.
11. Reconsider again if you really want to do this
12. Never let the component unsupervised while plugged in unless it is well tested and well isolated.
Please comment below any thoughts on this and I will add them to the list above. I would be glad if this list can be a genuine checklist of thing to consider before testing components with high current.
Now that this is said, here are some options that can be used to calculate the power consumption:
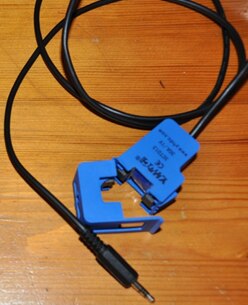
1. The safest way to do this ( not really safe but safer than others I know ) was mentioned to me in a previous post by jc2048 and it refer to the SCT 013-030. More details can be found at 3. AardEnergy – Current and Voltage Transformers . Again, thank you Jon for the advice.
2. A nice component that I found is this one: https://www.sparkfun.com/products/8883 It works pretty well but it is not a non intrusive solution as the one above. I for one tried to replicate it and ended up with a pretty good current sensor ( but it looks horrible mostly because I bought the wrong size trimmers)

3. The device that I mentioned in the lights controller blog (Pi IoT - Simone - #1 - Light Controller ). The schematics is below. There should be an operational amplifier on the receiving end of the device.
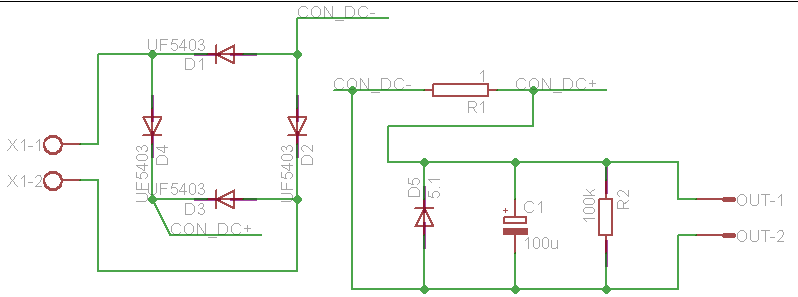
I have to mention that this is by far the unsafest one of the three mentioned here. Below is a picture the one I used and it worked until (as mentioned before) it made a connection through the floor blew (taking along with it on the friendly ride an Arduino board, an ATTiny, some pins on a Raspberry Pi, my computer's Moderboard and a fuse. The fuse was easy to replace so see again the item 8 on the list above):
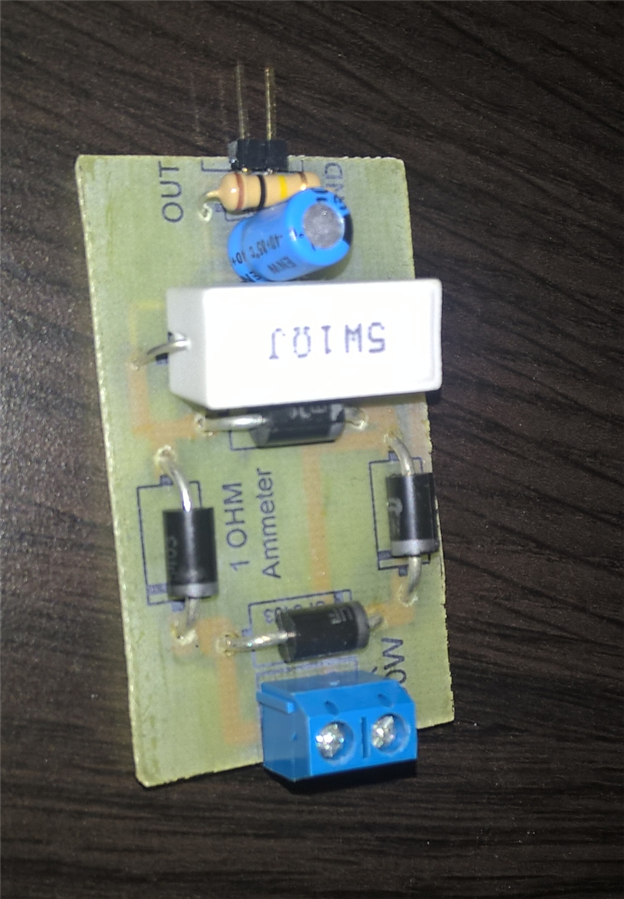
Make sure for something like this that the resistor can hold up the power consumption of the socket.
For this list also let me know if you have other ideas. I will add them to the list.
I will continue this post with more information regarding this component when I have some progress.