element14 Community
element14 Community
    Register Log In
  • Site
  • Search
  • Log In Register
  • About Us
  • Community Hub
    Community Hub
    • What's New on element14
    • Feedback and Support
    • Benefits of Membership
    • Personal Blogs
    • Members Area
    • Achievement Levels
  • Learn
    Learn
    • Ask an Expert
    • eBooks
    • element14 presents
    • Learning Center
    • Tech Spotlight
    • STEM Academy
    • Webinars, Training and Events
    • Learning Groups
  • Technologies
    Technologies
    • 3D Printing
    • FPGA
    • Industrial Automation
    • Internet of Things
    • Power & Energy
    • Sensors
    • Technology Groups
  • Challenges & Projects
    Challenges & Projects
    • Design Challenges
    • element14 presents Projects
    • Project14
    • Arduino Projects
    • Raspberry Pi Projects
    • Project Groups
  • Products
    Products
    • Arduino
    • Avnet Boards Community
    • Dev Tools
    • Manufacturers
    • Multicomp Pro
    • Product Groups
    • Raspberry Pi
    • RoadTests & Reviews
  • Store
    Store
    • Visit Your Store
    • Choose another store...
      • Europe
      •  Austria (German)
      •  Belgium (Dutch, French)
      •  Bulgaria (Bulgarian)
      •  Czech Republic (Czech)
      •  Denmark (Danish)
      •  Estonia (Estonian)
      •  Finland (Finnish)
      •  France (French)
      •  Germany (German)
      •  Hungary (Hungarian)
      •  Ireland
      •  Israel
      •  Italy (Italian)
      •  Latvia (Latvian)
      •  
      •  Lithuania (Lithuanian)
      •  Netherlands (Dutch)
      •  Norway (Norwegian)
      •  Poland (Polish)
      •  Portugal (Portuguese)
      •  Romania (Romanian)
      •  Russia (Russian)
      •  Slovakia (Slovak)
      •  Slovenia (Slovenian)
      •  Spain (Spanish)
      •  Sweden (Swedish)
      •  Switzerland(German, French)
      •  Turkey (Turkish)
      •  United Kingdom
      • Asia Pacific
      •  Australia
      •  China
      •  Hong Kong
      •  India
      •  Korea (Korean)
      •  Malaysia
      •  New Zealand
      •  Philippines
      •  Singapore
      •  Taiwan
      •  Thailand (Thai)
      • Americas
      •  Brazil (Portuguese)
      •  Canada
      •  Mexico (Spanish)
      •  United States
      Can't find the country/region you're looking for? Visit our export site or find a local distributor.
  • Translate
  • Profile
  • Settings
Pi IoT
  • Challenges & Projects
  • Design Challenges
  • Pi IoT
  • More
  • Cancel
Pi IoT
Blog [Pi IoT] Alarm Clock #16: Wiring
  • Blog
  • Forum
  • Documents
  • Polls
  • Files
  • Events
  • Mentions
  • Sub-Groups
  • Tags
  • More
  • Cancel
  • New
  • Share
  • More
  • Cancel
Group Actions
  • Group RSS
  • More
  • Cancel
Engagement
  • Author Author: fvan
  • Date Created: 15 Aug 2016 1:06 PM Date Created
  • Views 2254 views
  • Likes 4 likes
  • Comments 7 comments
  • fvan_piiot
  • piiot
  • wiring
Related
Recommended

[Pi IoT] Alarm Clock #16: Wiring

fvan
fvan
15 Aug 2016

  • Proto Board
  • Colour Coding
  • PWR & ACT LEDs
  • Testing


With the enclosure finished, the next step is to wire everything together, as so far, most components have either been used individually or were connected using a breadboard: a more permanent solution is required.


Proto Board


Because there are different components requiring the same pins (5V, GND, I2C), a prototyping HAT was used to provide multiple connections. The board was cut in such a way that one row of 90° male headers pins could be soldered on to make connections. On the bottom side, adjacent pins were connected, creating different groups, each associated with a certain GPIO pin.


The required connections are:


7-Segment display8x8 Matrix displayLED ButtonI2S Audio Amplifier
  • +5V
  • GND
  • GPIO 2 (I2C SDA)
  • GPIO 3 (I2C SCL)
  • +5V
  • GND
  • GPIO 2 (I2C SDA)
  • GPIO 3 (I2C SCL)
  • +5V
  • GND
  • GPIO 6
  • +5V
  • GND
  • GPIO 18 (I2S BCK)
  • GPIO 19 (I2S LRCK)
  • GPIO 21 (I2S DOUT)


imageimageimage


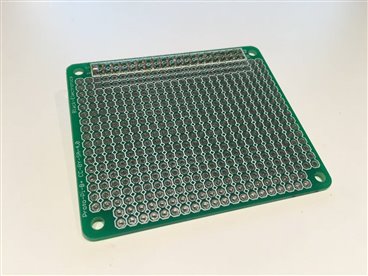
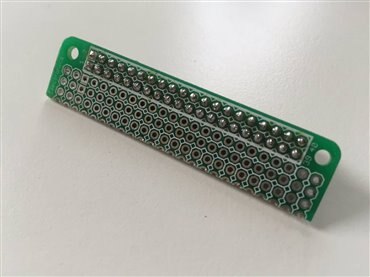
I used some leftover LED leads I cut off to make the connections on the proto board image


Colour Coding


To facilitate the identification of wires and possible troubleshooting, colour coded wires were used.


In the wiring below, the following colours were used:

  • GREEN: I2C SDA
  • YELLOW: I2C SCL
  • RED: +5V
  • BLACK: GND
  • PURPLE: button
  • WHITE/GREY/BROWN: I2S Audio


imageimageimage


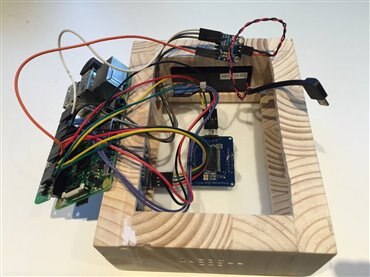
To keep things removable, female Dupont wires were used. Since these are off the shelf wires, they are a bit too long, but there is enough space inside the enclosure to fit everything.
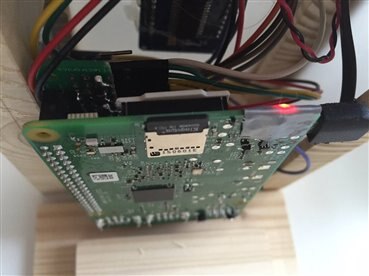
 

PWR & ACT LEDs


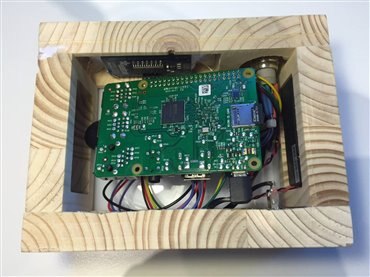
A thing to pay attention to with this semi transparent enclosure, are the red and green glows created by the Pi's activity and power LEDs. In the dark, they manage to shine through the white acrylic. There is a method to disable these LEDs in software, which is the preferred option, but it doesn't seem to work (yet?) for the power LED on the Pi 3: https://www.raspberrypi.org/forums/viewtopic.php?f=91&t=149126


Turning off the activity LED works though, and can be done as follows:


pi@piclock:~ $ sudo nano /boot/config.txt

# Disable the ACT LED
dtparam=act_led_trigger=none
dtparam=act_led_activelow=off


As a workaround, until a software solution is available for the power LED, I used a little piece of tape to mask the LED in a non-permanent way. For a permanent solution, a dab of nail polish could be used.

A single piece of tape wasn't enough to stop the light from shining through (those things are bright!), so I ended up adding four layers of tape to cover the LED!

imageimage

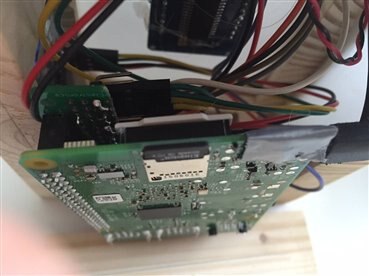
The light can no longer shine through, and the other components don't have any power/activity LEDs either. The only light shining is now the white light from the 7-segment display, the LED matrix and the button
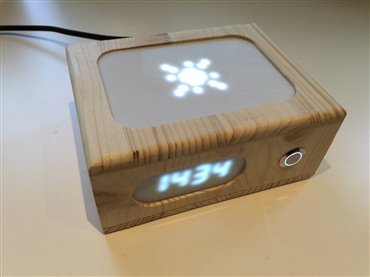
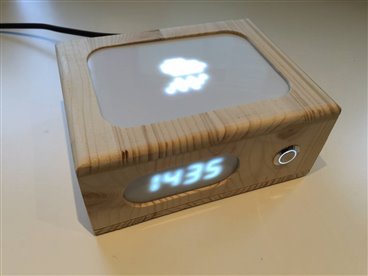
 image


Testing


To test the wiring, I ran the different scripts controlling the various components: everything worked as expected. In the pictures below, I'm testing different weather icons: sun and rain. It's hard to take decent pictures due to the brightness (more blurred on the pictures than it actually is), but looks great in real life, slightly diffused by the acrylic.

imageimage


Wiring: complete!


image


Navigate to the next or previous post using the arrows.

image
  • Sign in to reply

Top Comments

  • DAB
    DAB over 9 years ago +1
    Nice update. I am assuming you wanted the numbers to be a little diffuse. I have developing cateracts, so everything looks a little fuzzy to me. DAB
  • mcb1
    mcb1 over 9 years ago +1
    Not sure I know why the photo should appear more blurrry ... Now it's all together I can see it is a very useful and attractive bedside project. Last night we had someone talking about the very displays…
  • fvan
    fvan over 9 years ago in reply to mcb1 +1
    I'll be introducing another component I discovered only recently, for the second unit. Let's see if you still resist then
  • mcb1
    mcb1 over 9 years ago in reply to fvan

    Why slowly ?

    You're an aquired taste ...

    ... unless you open those special unmarked beers.   image

    • Cancel
    • Vote Up +1 Vote Down
    • Sign in to reply
    • More
    • Cancel
  • fvan
    fvan over 9 years ago in reply to vish

    Why slowly ? image Just kidding, really appreciate the kind words, thank you!

    • Cancel
    • Vote Up +1 Vote Down
    • Sign in to reply
    • More
    • Cancel
  • vish
    vish over 9 years ago

    Nice work - both technically and artistically. image

    I'm slowly becoming fan of your aesthetic sense image

    • Cancel
    • Vote Up +1 Vote Down
    • Sign in to reply
    • More
    • Cancel
  • fvan
    fvan over 9 years ago in reply to mcb1

    I'll be introducing another component I discovered only recently, for the second unit. Let's see if you still resist then image

    • Cancel
    • Vote Up +1 Vote Down
    • Sign in to reply
    • More
    • Cancel
  • mcb1
    mcb1 over 9 years ago

    Not sure I know why the photo should appear more blurrry ...


    Now it's all together I can see it is a very useful and attractive bedside project.


    Last night we had someone talking about the very displays you used.

    Glad I'd done some homework, and NO ....  I resisted that shopping temptation. image


    Mark

    • Cancel
    • Vote Up +1 Vote Down
    • Sign in to reply
    • More
    • Cancel
>
element14 Community

element14 is the first online community specifically for engineers. Connect with your peers and get expert answers to your questions.

  • Members
  • Learn
  • Technologies
  • Challenges & Projects
  • Products
  • Store
  • About Us
  • Feedback & Support
  • FAQs
  • Terms of Use
  • Privacy Policy
  • Legal and Copyright Notices
  • Sitemap
  • Cookies

An Avnet Company © 2025 Premier Farnell Limited. All Rights Reserved.

Premier Farnell Ltd, registered in England and Wales (no 00876412), registered office: Farnell House, Forge Lane, Leeds LS12 2NE.

ICP 备案号 10220084.

Follow element14

  • X
  • Facebook
  • linkedin
  • YouTube