element14 Community
element14 Community
    Register Log In
  • Site
  • Search
  • Log In Register
  • About Us
  • Community Hub
    Community Hub
    • What's New on element14
    • Feedback and Support
    • Benefits of Membership
    • Personal Blogs
    • Members Area
    • Achievement Levels
  • Learn
    Learn
    • Ask an Expert
    • eBooks
    • element14 presents
    • Learning Center
    • Tech Spotlight
    • STEM Academy
    • Webinars, Training and Events
    • Learning Groups
  • Technologies
    Technologies
    • 3D Printing
    • FPGA
    • Industrial Automation
    • Internet of Things
    • Power & Energy
    • Sensors
    • Technology Groups
  • Challenges & Projects
    Challenges & Projects
    • Design Challenges
    • element14 presents Projects
    • Project14
    • Arduino Projects
    • Raspberry Pi Projects
    • Project Groups
  • Products
    Products
    • Arduino
    • Avnet Boards Community
    • Dev Tools
    • Manufacturers
    • Multicomp Pro
    • Product Groups
    • Raspberry Pi
    • RoadTests & Reviews
  • Store
    Store
    • Visit Your Store
    • Choose another store...
      • Europe
      •  Austria (German)
      •  Belgium (Dutch, French)
      •  Bulgaria (Bulgarian)
      •  Czech Republic (Czech)
      •  Denmark (Danish)
      •  Estonia (Estonian)
      •  Finland (Finnish)
      •  France (French)
      •  Germany (German)
      •  Hungary (Hungarian)
      •  Ireland
      •  Israel
      •  Italy (Italian)
      •  Latvia (Latvian)
      •  
      •  Lithuania (Lithuanian)
      •  Netherlands (Dutch)
      •  Norway (Norwegian)
      •  Poland (Polish)
      •  Portugal (Portuguese)
      •  Romania (Romanian)
      •  Russia (Russian)
      •  Slovakia (Slovak)
      •  Slovenia (Slovenian)
      •  Spain (Spanish)
      •  Sweden (Swedish)
      •  Switzerland(German, French)
      •  Turkey (Turkish)
      •  United Kingdom
      • Asia Pacific
      •  Australia
      •  China
      •  Hong Kong
      •  India
      •  Korea (Korean)
      •  Malaysia
      •  New Zealand
      •  Philippines
      •  Singapore
      •  Taiwan
      •  Thailand (Thai)
      • Americas
      •  Brazil (Portuguese)
      •  Canada
      •  Mexico (Spanish)
      •  United States
      Can't find the country/region you're looking for? Visit our export site or find a local distributor.
  • Translate
  • Profile
  • Settings
Pi IoT
  • Challenges & Projects
  • Design Challenges
  • Pi IoT
  • More
  • Cancel
Pi IoT
Blog [Pi IoT] Alarm Clock #15: Finished Enclosure
  • Blog
  • Forum
  • Documents
  • Polls
  • Files
  • Events
  • Mentions
  • Sub-Groups
  • Tags
  • More
  • Cancel
  • New
  • Share
  • More
  • Cancel
Group Actions
  • Group RSS
  • More
  • Cancel
Engagement
  • Author Author: fvan
  • Date Created: 13 Aug 2016 10:06 PM Date Created
  • Views 1903 views
  • Likes 8 likes
  • Comments 12 comments
  • fvan_piiot
  • piiot
  • enclosure
Related
Recommended

[Pi IoT] Alarm Clock #15: Finished Enclosure

fvan
fvan
13 Aug 2016

  • Sides
  • Back
  • Top
  • Bottom
  • Files


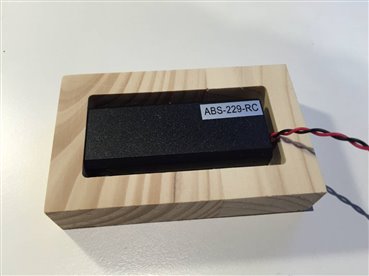
In my previous post, I showed you the start of the enclosure: the front panel. I have since then been working on the rest of the enclosure, trying to figure out which style to go for, one piece at the time. I'm a software guy, not a product designer (or a wood worker for that matter), but I enjoy experimenting and giving projects a finished look image


So without further ado, I present to you the completed Pi IoT  Alarm Clock enclosure in animated GIF form:


image


Of course, a full demo of its features will be made, but for now, let's focus on the enclosure itself. I hope you like what I've done with it. There are some imperfections, but overall, I'm very happy with the way it turned out!


Sides


imageimageimage


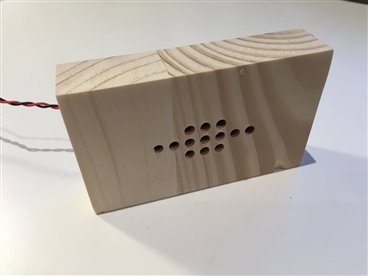
Continuing to work with the same board the front panel was made of, I made two hollowed out side pieces. The first piece houses a speaker which sits comfortably inside the hollowed out space, with just enough tension to keep it in place. The other side remains hollow, providing access to the USB microphone of the Raspberry Pi. The more the hardware components are housed inside the walls of the enclosure, the more space is left in the center for wiring and easy access to the Raspberry Pi itself.


Back

imageimageimage


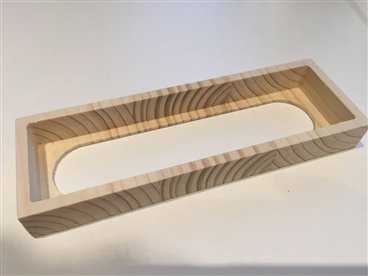
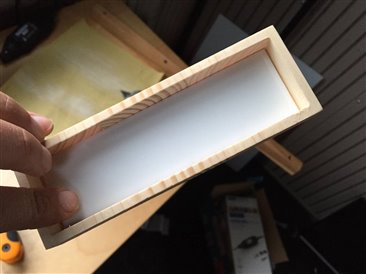
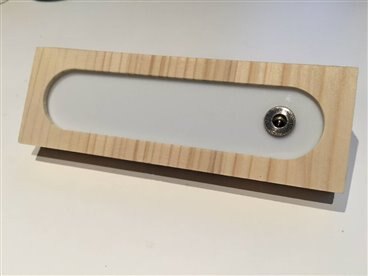
The back panel was made in the same style as the front one. A piece of acrylic is glued in the back of the piece, and a hole was made to insert a power connector. Inside, the power input is split to power the Raspberry Pi, audio amplifier and the displays.


Top

imageimageimage


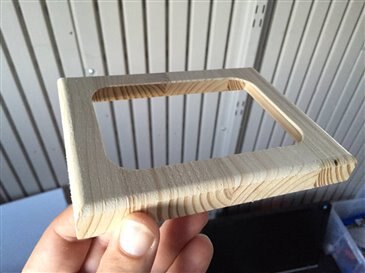
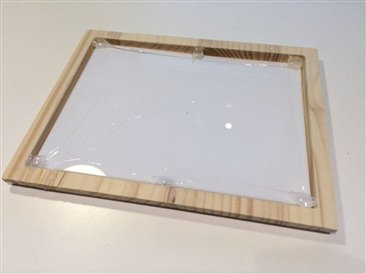
There were some difficulties making the top. The first one is that the board was 18mm thick. Slapping almost 2cm on top (and later bottom) of the from would render the build way too bulky. Using a router, I was able to slim down the piece to a height of approximately 5mm.Needless to say that looked a lot better, but it did make the piece more fragile as well, as can be seen in the middle picture. After glueing it back together using wood glue and attaching the acrylic, the piece became more solid and it was as if it never broke in the first place. The top piece was then glued to the frame (front, sides, back) and a bit of wood filler was used to mask imperfections.


Bottom

imageimageimage

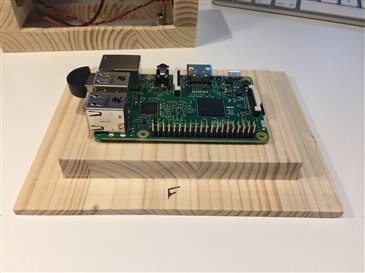
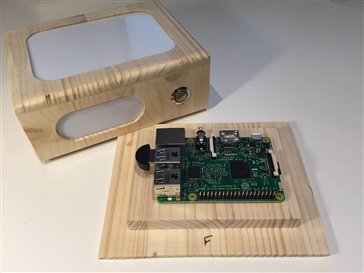
Finally, the bottom part was created (just today!). It is made such that the rest of the frame slides on top of it, with enough tension to keep everything in place. The Raspberry Pi 3 will be mounted on that piece, allowing easy access in case of maintenance. As a finishing touch, transparent rubber feet have been added to the bottom side, preventing the enclosure from slipping, while slightly elevating it.


Files


Well, not sure if these can be called files, but here are the links to the different parts created in Easel. If you are using Easel, you can clone my parts and modify them as you please:

  • Easel - PiIoT Alarm Clock - Front
  • Easel - PiIoT Alarm Clock - Back
  • Easel - PiIoT Alarm Clock - Side
  • Easel - PiIoT Alarm Clock - Bottom
  • Easel - PiIoT Alarm Clock - Top   


That's it! It's been a fun week of experimenting and figuring out how to be put everything together. Stay tuned for the next post, the end of the challenge is nearing rapidly!


image


Navigate to the next or previous post using the arrows.

image
  • Sign in to reply

Top Comments

  • fvan
    fvan over 9 years ago +2
    Thanks mcb1 , clem57 and balearicdynamics Glad you like it! The further I got, the scarier it was to use the router to trim and round edges, etc ... out of fear of breaking it and having to start over…
  • mcb1
    mcb1 over 9 years ago +1
    Very professional looking. Well done. Mark
  • clem57
    clem57 over 9 years ago +1
    The wood finish is marvelous and I like the grains in the box. I would never believed it broke without the picture. Clem
  • fvan
    fvan over 9 years ago

    Enclosure with all effects in action, playing radio in my latest post!: [Pi IoT] Alarm Clock #17: I2S Audio

    • Cancel
    • Vote Up 0 Vote Down
    • Sign in to reply
    • More
    • Cancel
  • fvan
    fvan over 9 years ago

    Added links to the source "files", should anyone be interested image

    • Cancel
    • Vote Up 0 Vote Down
    • Sign in to reply
    • More
    • Cancel
  • fvan
    fvan over 9 years ago in reply to Robert Peter Oakes

    Thanks Robert Peter Oakes! The idea of the acrylic was to give it that slight blur and have it be more gentle on the eyes at night image

    • Cancel
    • Vote Up 0 Vote Down
    • Sign in to reply
    • More
    • Cancel
  • Robert Peter Oakes
    Robert Peter Oakes over 9 years ago

    Very nice job. makes me want to get back out in the garage and do more with my CNC image


    I love the use of the acrylic to blur slightly the images to create a much nicer feel for the whole thing

    • Cancel
    • Vote Up +1 Vote Down
    • Sign in to reply
    • More
    • Cancel
  • clem57
    clem57 over 9 years ago in reply to fvan

    Two thumbs up for fvan

    !Clemimage

    • Cancel
    • Vote Up +1 Vote Down
    • Sign in to reply
    • More
    • Cancel
>
element14 Community

element14 is the first online community specifically for engineers. Connect with your peers and get expert answers to your questions.

  • Members
  • Learn
  • Technologies
  • Challenges & Projects
  • Products
  • Store
  • About Us
  • Feedback & Support
  • FAQs
  • Terms of Use
  • Privacy Policy
  • Legal and Copyright Notices
  • Sitemap
  • Cookies

An Avnet Company © 2025 Premier Farnell Limited. All Rights Reserved.

Premier Farnell Ltd, registered in England and Wales (no 00876412), registered office: Farnell House, Forge Lane, Leeds LS12 2NE.

ICP 备案号 10220084.

Follow element14

  • X
  • Facebook
  • linkedin
  • YouTube