element14 Community
element14 Community
    Register Log In
  • Site
  • Search
  • Log In Register
  • Community Hub
    Community Hub
    • What's New on element14
    • Feedback and Support
    • Benefits of Membership
    • Personal Blogs
    • Members Area
    • Achievement Levels
  • Learn
    Learn
    • Ask an Expert
    • eBooks
    • element14 presents
    • Learning Center
    • Tech Spotlight
    • STEM Academy
    • Webinars, Training and Events
    • Learning Groups
  • Technologies
    Technologies
    • 3D Printing
    • FPGA
    • Industrial Automation
    • Internet of Things
    • Power & Energy
    • Sensors
    • Technology Groups
  • Challenges & Projects
    Challenges & Projects
    • Design Challenges
    • element14 presents Projects
    • Project14
    • Arduino Projects
    • Raspberry Pi Projects
    • Project Groups
  • Products
    Products
    • Arduino
    • Avnet Boards Community
    • Dev Tools
    • Manufacturers
    • Multicomp Pro
    • Product Groups
    • Raspberry Pi
    • RoadTests & Reviews
  • About Us
  • Store
    Store
    • Visit Your Store
    • Choose another store...
      • Europe
      •  Austria (German)
      •  Belgium (Dutch, French)
      •  Bulgaria (Bulgarian)
      •  Czech Republic (Czech)
      •  Denmark (Danish)
      •  Estonia (Estonian)
      •  Finland (Finnish)
      •  France (French)
      •  Germany (German)
      •  Hungary (Hungarian)
      •  Ireland
      •  Israel
      •  Italy (Italian)
      •  Latvia (Latvian)
      •  
      •  Lithuania (Lithuanian)
      •  Netherlands (Dutch)
      •  Norway (Norwegian)
      •  Poland (Polish)
      •  Portugal (Portuguese)
      •  Romania (Romanian)
      •  Russia (Russian)
      •  Slovakia (Slovak)
      •  Slovenia (Slovenian)
      •  Spain (Spanish)
      •  Sweden (Swedish)
      •  Switzerland(German, French)
      •  Turkey (Turkish)
      •  United Kingdom
      • Asia Pacific
      •  Australia
      •  China
      •  Hong Kong
      •  India
      •  Korea (Korean)
      •  Malaysia
      •  New Zealand
      •  Philippines
      •  Singapore
      •  Taiwan
      •  Thailand (Thai)
      • Americas
      •  Brazil (Portuguese)
      •  Canada
      •  Mexico (Spanish)
      •  United States
      Can't find the country/region you're looking for? Visit our export site or find a local distributor.
  • Translate
  • Profile
  • Settings
Pi Chef Design Challenge
  • Challenges & Projects
  • Design Challenges
  • Pi Chef Design Challenge
  • More
  • Cancel
Pi Chef Design Challenge
Blog Automatic Dough Shaper - Blog #6 Mechanical Design Details
  • Blog
  • Forum
  • Documents
  • Polls
  • Files
  • Events
  • Mentions
  • Sub-Groups
  • Tags
  • More
  • Cancel
  • New
  • Share
  • More
  • Cancel
Group Actions
  • Group RSS
  • More
  • Cancel
Engagement
  • Author Author: a_davis_22
  • Date Created: 9 Mar 2018 5:01 AM Date Created
  • Views 1107 views
  • Likes 6 likes
  • Comments 2 comments
  • mechanical design
  • automatic dough shaper
  • pi chef design challenge
  • diy cnc
Related
Recommended

Automatic Dough Shaper - Blog #6 Mechanical Design Details

a_davis_22
a_davis_22
9 Mar 2018

Before I post my mechanical build, I realized I should have already posted about the design. In my  introduction post I explained the basics of my mechanical design. Here I'll go into the details.


The Automatic Dough Shaper consists of three main parts: a dough sheeter, an xy plotter, and a toaster oven.


image


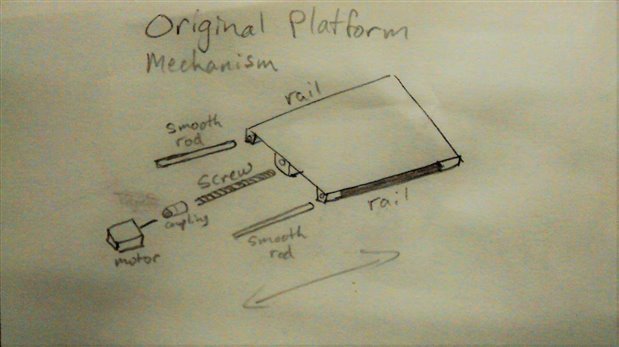
My original idea was this:


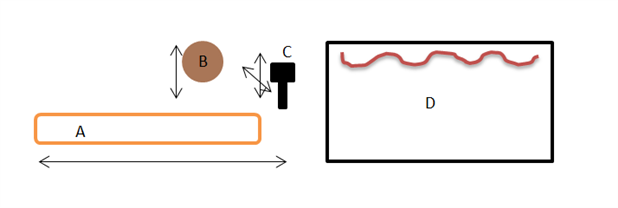
The Platform (A) acts as the basic moving mechanism and the y axis of the xy plotter. A metal pan sits on the platform and the dough is placed on this pan. The platform moves the dough back and forth under the roller (B). The roller flattens the dough (in steps) to a specified height. After the dough reaches the desired thickness, the cutter (C) begins cutting out the programmed shapes. The cutter moves in two degrees, x and z and with the platform controlling the y axis, it functions the same as any simple xy plotter. This cutting head will use gcode instructions and cut whatever is selected with the Raspberry Pi. The oven (D) is temperature controlled. It preheats, the door is then opened and the pan with the pre-shaped dough is placed into the oven by means of the platform and an extension arm. After the programmed time, the pan is removed from the oven in reverse manner.


There will be three stepper motors, two servo motors, and two regular dc motors. One stepper will move the platform by means of a long screw. The second stepper will control the raising and lowering of the roller and cutting mechanism (x axis) together. The third stepper will control the x axis of the cutter with a long screw. The cutter will be raised and lowered by a servo motor and the drill bit run by a regular motor. The door of the oven will be controlled by the other servo motor. The last regular motor will move the extension arm back and forth by a rack and pinion. The extension arm will have an electromagnet on the end to allow it to grab the pan and pull it out of the oven. The temperature control of the oven is accomplished by mains power switching using a triac and a zero cross detection circuit.


image


As I began gathering parts, I decided that I actually wanted to do most of the movement differently. The platform will be controlled by a roller mechanism that I saw on this youtube video. Since I don't know the technical term for this (slab roller?) I'll just describe it. The platform will slide on rails. On the bottom side there is a rope attached to each of the ends that are not connected to the rails. These ropes wrap around a pole that is rotated by the motor.


image


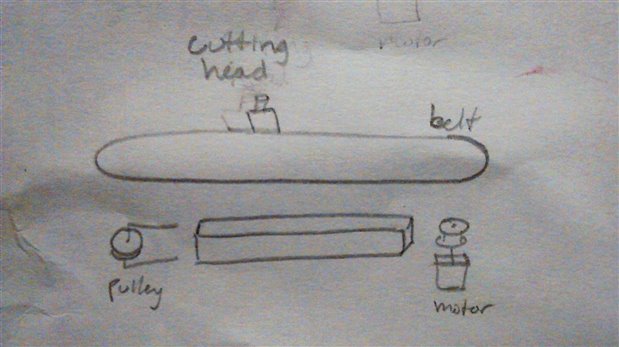
The x-axis will be controlled by a timing belt - similar to most 3D printers.  The belt stretches across a pulley and a gear. The gear sits on the stepper motor shaft. Attached to the belt is the cutting mechanism. As the motor steps, the cutter moves linearly between the gear and pulley. I thought that I needed to have the x-axis and roller connected so that the cutting head would not cut through the dough as it was being rolled out, but I decided that doing that would make it too heavy to move up and down. I just need to be able to lift the cutting head itself as high as the highest setting of the roller.


image


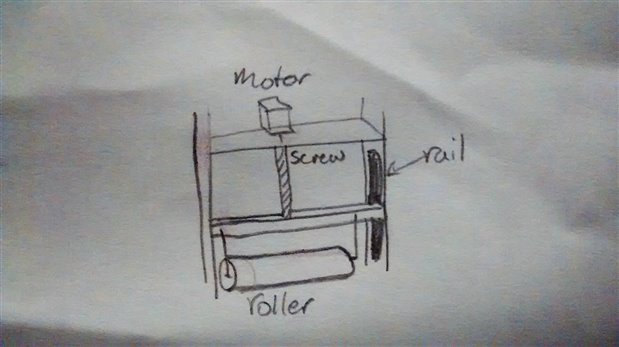
The mechanism to move the roller up and down will be a screw. The roller will connect to rails to allow it to slide up and down. A bar will be above the roller and will have a nut in the middle that will allow the screw to move the roller up and down. The screw will be coupled to the motor shaft.


image


My next post will be about the actual construction.

  • Sign in to reply

Top Comments

  • beacon_dave
    beacon_dave over 7 years ago +1
    The continuous wire parallel motion linkage (figure 8 wire + 4 pulleys) often found on drawing boards may be of interest: https://www.vistaplan-drawingmanagement.co.uk/wp-content/uploads/2016/03/Continous…
  • beacon_dave
    beacon_dave over 7 years ago

    The continuous wire parallel motion linkage (figure 8 wire + 4 pulleys) often found on drawing boards may be of interest:

    https://www.vistaplan-drawingmanagement.co.uk/wp-content/uploads/2016/03/Continous-Wire-Parallel-Motion.jpg

    • Cancel
    • Vote Up +1 Vote Down
    • Sign in to reply
    • More
    • Cancel
  • genebren
    genebren over 7 years ago

    Nice update on your design. I like how you documented your design changes from start to finish.  Like all engineering, it is a process.  Not always a straight line, but at least hopefully moving in the right direction,

    Keep up the good work!

    Gene

    • Cancel
    • Vote Up 0 Vote Down
    • Sign in to reply
    • More
    • Cancel
element14 Community

element14 is the first online community specifically for engineers. Connect with your peers and get expert answers to your questions.

  • Members
  • Learn
  • Technologies
  • Challenges & Projects
  • Products
  • Store
  • About Us
  • Feedback & Support
  • FAQs
  • Terms of Use
  • Privacy Policy
  • Legal and Copyright Notices
  • Sitemap
  • Cookies

An Avnet Company © 2025 Premier Farnell Limited. All Rights Reserved.

Premier Farnell Ltd, registered in England and Wales (no 00876412), registered office: Farnell House, Forge Lane, Leeds LS12 2NE.

ICP 备案号 10220084.

Follow element14

  • X
  • Facebook
  • linkedin
  • YouTube