


Bake Mate - Pi Chef Blog #9 - Mixing hardware & software
Status Update:
Since my last post "Bake Mate - Pi Chef Blog #8 - The software needs a little more cooking", I did a little work on the templates for the GUI to streamline how data will be displayed in the labels.
The most important part of the Python application was parsing data from the .json files and displaying the required screen for the step (with the data that's needed).
With this done, what remained was to integrate the hardware components: the HX711 weighing scale amplifier & the MAX31856 thermocouple amplifier.
I had tested out both of these previously:
HX711 / Weighing Scale: Bake Mate - Pi Chef Blog #5 - Testing the weighing scale: load cell + HX711
MAX31856 / Thermocouple: Bake Mate - Pi Chef Blog #4 - Monitoring temperature: Type K Thermocouple + MAX31856 & Bake Mate - Pi Chef Blog #6 - Measuring Oven Temperature
All I need had to do was integrate both into the main application!
The blog posts contain all the details regarding interfacing the hardware & the Python libraries. To simplify things further, I created 2 new Python modules (one for the HX711 & one for the MAX31856) to serve as a simple layer between the the main Bake Mate app and the libraries. They're very simple and simply contain a few initialization routines that set up the sensors, and the main functions get_weight() & get_tempC() which are called by the main BakeMate GUI application.
Using the temperature sensor is easy because well, it's as simply as calling the get_tempC() and updating the text in the label.
Using the load cell is more complicated because I need to keep track of the cumulative weight (the sum of all weights added in the previous steps) and subtract it so that the weight added at the step of the screen can be displayed. I keep track of the cumulative weight using a variable in the thisrecipe.py file (refer to Bake Mate - Pi Chef Blog #7 - Code Prep).
When the 'next' button is pressed, values from the .json file are parsed to determine what type of step the next step is. If it is a 'addm' (add measureable - which uses the weighing scale), the current weight measured by the weighing scale is stored in cumulative weight variable. The 'addm' screen automatically subtracts this cumulative weight, which means that the weight displayed is the zeroed out weight of whatever is being added. (Easier to understand after watching the video).
To display how much more of an ingredient needs to be added, I read the weight of the ingredient required at the particular step. I've not added the part that automatically converts volumes to weight (using a density lookup table for common liquids like water, milk & oil), so for now it just displays the weights of solids.Once I know the weight that is required, and the weight that has been added in this current step (total weight - cumulative weight measured previously), it's easy to calculate a percentage.
Testing it out:
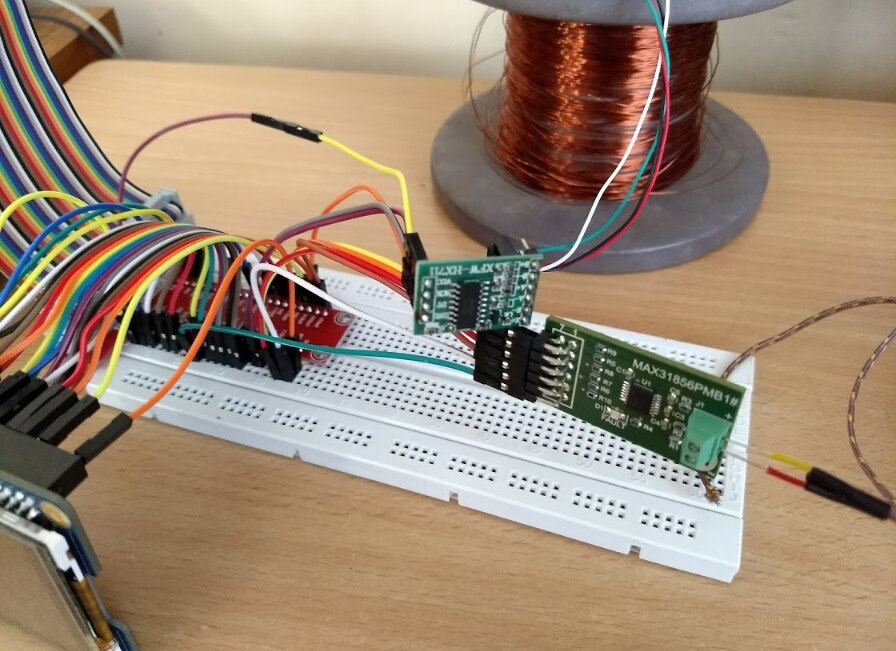
The test setup remains the same as previous blogs. I used a breakout board for the Pi's GPIO header and connected the display HAT to it using many jumper cables (which I haven't disconnected since connecting them because reconnecting them won't be fun.) The display doesn't use all 40 pins on the GPI0 header, so I only connected the pins that are needed (refer to the datasheet and Bake Mate - Pi Chef Blog #4 - Monitoring temperature: Type K Thermocouple + MAX31856)
The MAX31856 & HX711 serial data lines are connected to unused GPIO pins since the libraries use software emulated communication interfaces.
Coming to the video:
I ran the freshest release of BakeMate.py, with a recipe for Pi. I measured the weight of the 'ingredients' and added them to the recipe's .json file so that the 100% weight can be calculated.
After loading up the recipe file, the app moves on to the Scale Page. The user selects the scaling ratio and clicks on 'Next' to move on the steps of the recipe. Clicking 'Next' also calls a function that zeroes out (tare) the weight on the scale. So, if you've got a mixing bowl that weighs 200gms, hitting 'Next' will automatically zero out this value, which takes the weight of the bowl into account.
- Step 1 is a simple 'do' instruction.
- Step 2 asks for the Pi Camera 2 package. It weighs 27 grams (which I entered into the .json file). Notice that the current weight on the scale is 0 gm, which is because the weight of the mixing bowl (flat tin cover in this case) has been accounted for.
- Step 3 asks for the Pi's Universal Power Supply Box. The UI displays the ingredient that needs to be added & its weight in addition to a little comment/text description. This is useful because many recipes need an ingredient to be added in a particular manner.
- Step 4 adds the Sense HAT into the mix.
- Step 5 is a 'addm' step, but I didn't add any particular ingredient/weight in the .json file. I did start adding mechanical pencils to weighing scale to show how weight is displayed.
- Step 6 is a 'addnm' step. This step is used to add ingredients that are too small to measure (like spices). I added jumper cables

- Step 7 is a 'do' step. It is used to display instructions.
- Step 8 is a 'addm' instruction that shows how Bake Mate will work in practice. If a recipe ever asks for 200 grams of Flour (or 56 grams of Screwdrivers in this case), you will not need to measure it out separately before adding it to the mixing bowl. Simply keep adding flour (or screwdrivers) till the bar fills up!
- Step 9 is the 'bake' instruction. This page requires more work, but it'll display the temperature required ( C/F/Gas Mark) by the recipe, and the actual temperature. After placing the baking tin in the oven, pressing the 'start' button will make the timer countdown to zero. If the temperature exceeds an acceptable narrow band of temperatures (deviates too much from the required temperature), or if the timer hits zero, The Pi will generate an alert to notify the user. I haven't worked on the alert yet, but it might be as simple as sounding a buzzer that has been wired to a GPIO pin, or generating an alert on the user's phone using IFTTT. Towards the end of the video, I show how putting my thumb on the Thermocouple causes the temperature to rise (proof that it works!).

Next on the list:
- Do some work on the GUI to make it nicer and implement the bells & whistles
- Implement automatic unit conversion & volume to weight conversion using a lookup table containing densities; and a few other features.
- Alert system
- Stretch goal 1: using the Sense HAT! I'll need to look at the documentation for it once again. One potential problem is that the I2C line is used by the touchscreen controller (which I'm assuming is a kernel level change), so I'll need to see whether the Sense HAT can be used simultaneously. If not, I'll need to use software emulated I2C on the GPIO pins. I couldn't find much information about the I2C protocol for the Sense HAT, but if a second search turns up nothing, I'll need to tackle this problem using a logic analyzer.
Top Comments