element14 Community
element14 Community
    Register Log In
  • Site
  • Search
  • Log In Register
  • Community Hub
    Community Hub
    • What's New on element14
    • Feedback and Support
    • Benefits of Membership
    • Personal Blogs
    • Members Area
    • Achievement Levels
  • Learn
    Learn
    • Ask an Expert
    • eBooks
    • element14 presents
    • Learning Center
    • Tech Spotlight
    • STEM Academy
    • Webinars, Training and Events
    • Learning Groups
  • Technologies
    Technologies
    • 3D Printing
    • FPGA
    • Industrial Automation
    • Internet of Things
    • Power & Energy
    • Sensors
    • Technology Groups
  • Challenges & Projects
    Challenges & Projects
    • Design Challenges
    • element14 presents Projects
    • Project14
    • Arduino Projects
    • Raspberry Pi Projects
    • Project Groups
  • Products
    Products
    • Arduino
    • Avnet & Tria Boards Community
    • Dev Tools
    • Manufacturers
    • Multicomp Pro
    • Product Groups
    • Raspberry Pi
    • RoadTests & Reviews
  • About Us
  • Store
    Store
    • Visit Your Store
    • Choose another store...
      • Europe
      •  Austria (German)
      •  Belgium (Dutch, French)
      •  Bulgaria (Bulgarian)
      •  Czech Republic (Czech)
      •  Denmark (Danish)
      •  Estonia (Estonian)
      •  Finland (Finnish)
      •  France (French)
      •  Germany (German)
      •  Hungary (Hungarian)
      •  Ireland
      •  Israel
      •  Italy (Italian)
      •  Latvia (Latvian)
      •  
      •  Lithuania (Lithuanian)
      •  Netherlands (Dutch)
      •  Norway (Norwegian)
      •  Poland (Polish)
      •  Portugal (Portuguese)
      •  Romania (Romanian)
      •  Russia (Russian)
      •  Slovakia (Slovak)
      •  Slovenia (Slovenian)
      •  Spain (Spanish)
      •  Sweden (Swedish)
      •  Switzerland(German, French)
      •  Turkey (Turkish)
      •  United Kingdom
      • Asia Pacific
      •  Australia
      •  China
      •  Hong Kong
      •  India
      • Japan
      •  Korea (Korean)
      •  Malaysia
      •  New Zealand
      •  Philippines
      •  Singapore
      •  Taiwan
      •  Thailand (Thai)
      • Vietnam
      • Americas
      •  Brazil (Portuguese)
      •  Canada
      •  Mexico (Spanish)
      •  United States
      Can't find the country/region you're looking for? Visit our export site or find a local distributor.
  • Translate
  • Profile
  • Settings
Pi Chef Design Challenge
  • Challenges & Projects
  • Design Challenges
  • Pi Chef Design Challenge
  • More
  • Cancel
Pi Chef Design Challenge
Blog Pi Chef Design Challenge - Automatic Dough Shaper - blog #2
  • Blog
  • Forum
  • Documents
  • Polls
  • Files
  • Events
  • Mentions
  • Sub-Groups
  • Tags
  • More
  • Cancel
  • New
  • Share
  • More
  • Cancel
Group Actions
  • Group RSS
  • More
  • Cancel
Engagement
  • Author Author: a_davis_22
  • Date Created: 31 Jan 2018 2:45 AM Date Created
  • Views 556 views
  • Likes 9 likes
  • Comments 5 comments
  • cookie
  • pi chef design challenge
  • diy cnc
Related
Recommended

Pi Chef Design Challenge - Automatic Dough Shaper - blog #2

a_davis_22
a_davis_22
31 Jan 2018

Time is marching along and it's time for an update!


My first post was a general overview of my project: Automatic Dough Shaper - Blog #1

The idea is essentially this: dough goes in, gets flattened, shaped, baked, and comes out.


Project Timeline:

Week 1: Order parts
Weeks 2-3: Set up Raspberry Pi and toaster oven control
Weeks 4: Roller control
Week 5-6: XY control
Weeks 7-9: Fine tune functionality and user interaction
Weeks 10-11: Troubleshooting and last minute fixes


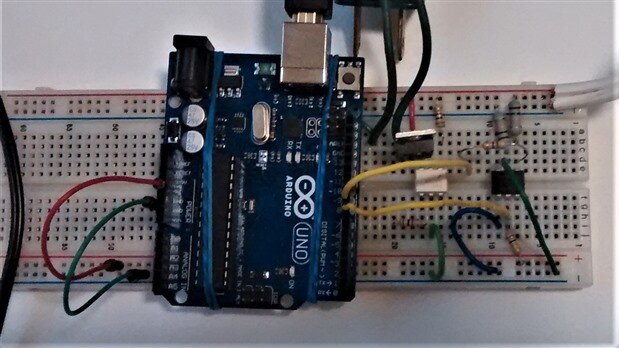
While I was waiting for my kit and other parts to arrive, I began working on the toaster oven control circuit. My plan is to create a mains power switching circuit using zero cross detection, a triac, and a thermistor. This way I can plug the toaster oven into the circuit, and by having the thermistor in the oven acting as feedback, I can control when the oven turns on or off and to what temperature it heats. So far I've set up the circuit and tested the zero cross detection part with an arduino.  For the schematic U1 is the H11AA1 optocoupler, R1 is 10k ohms, R2 is 470 ohms.

image

image


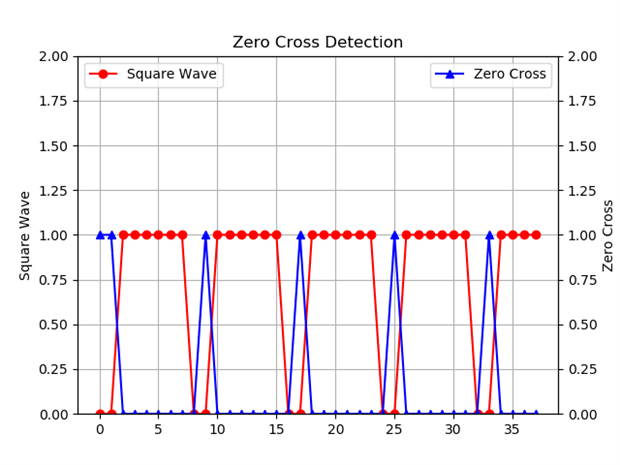
I sent a square wave signal from my arduino to the circuit and then used the arduino to read when the chip sensed the "zero cross" from the ZC_out pin. I plotted both signals against each other by sending the information over serial to a live data plotting program in Python. Here you can see that the circuit is giving the desired result.

image


Now I need to set up the rest of the toaster oven control.


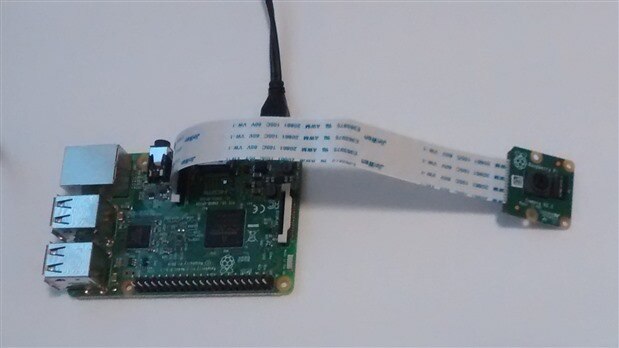
Last Monday, my kit arrived and I got to work setting up the pi. (The only other time I've used a raspberry pi was my neighbor's and he did all the set up for me, so this was a good adventure.) I only have a laptop, so I did a bunch of reading online and figured I could set up the pi and then enable it to work remotely with ssh. So I did the initial set up at the BYU library, got the camera working and entertained myself and my daughter as I experimented with it. I didn't know how much fun a raspberry pi with camera could be! This makes me want to do a bunch of other fun projects, but those will have to wait until April.


When I got back home, I plugged in the pi and tried to connect remotely before I realized that I had never connected my pi to my home internet. With no other display to connect to, I had no way to connect to the internet or even properly shut down my pi! I got all worried that I would ruin all the work I've done and have to re-format the SD card. After reading several articles and blogs, I tried creating a sub-network from my computer to the raspberry pi using an Ethernet cable and accessing the pi using Putty and VNC, but I couldn't get either to work! Luckily my brother-in-law knew how to solve my problem!  I had it all set up right, but I didn't know the right IP address to use. He showed me how to find that and then (after I connected my pi to the internet) how to go online and find the IP address assigned from the router and remotely access the pi from my laptop without cables. What a godsend!

Of course, then he told me that I would have probably been okay if I had unplugged the pi. (Another perfectly good panic - wasted!)


image


The only thing is I didn't know how to get the pictures off my SD card. My computer said I needed to format it in order to access the data, but I didn't know if I would mess it up by doing that so I'll have to research it.


This week things are going to get heated up with the oven control!

(Let's hope nothing actually gets burned up.)

  • Sign in to reply

Top Comments

  • the48sicks
    the48sicks over 7 years ago +2
    Hi AnnaLisa to get the pictures off your Pi you can use an FTP program like WinSCP and use that to connect to the ip address of your raspberry Pi and copy the pictures back to your machine. Good luck on…
  • mcb1
    mcb1 over 7 years ago +2
    It is nice to see that you have planned the weekly milestones. While some might move around, having these means it is much easier to kee track of progress. For those interested in zero crossing, I use…
  • genebren
    genebren over 7 years ago +1
    AnnaLisa, Good progress on your project. There is a lot to know when trying to put together a system with hardware/software that you have only had a little experience with. It seems like you are doing…
  • mcb1
    mcb1 over 7 years ago

    It is nice to see that you have planned the weekly milestones.

    While some might move around, having these means it is much easier to kee track of progress.


    For those interested in zero crossing, I use MOC 30141 Optocouplers which feature inbuilt zero crossing.

    http://www.onsemi.com/pub/Collateral/MOC3043M-D.pdf


    For driving the triac I prefer to 'pull current' from the gate, rather than supply current into the gate.

    It eliminated a lot of issues we had especially with inductive loads.

    Triac not shutting off (24v AC sprinkler valve control)


    image


    Cheers

    Mark

    • Cancel
    • Vote Up +2 Vote Down
    • Sign in to reply
    • More
    • Cancel
  • three-phase
    three-phase over 7 years ago

    Nice to see some good progress being made, keep up the momentum.


    Kind regards

    • Cancel
    • Vote Up 0 Vote Down
    • Sign in to reply
    • More
    • Cancel
  • e14phil
    e14phil over 7 years ago

    Interesting!

    I am looking forward to this one :-)

    • Cancel
    • Vote Up +1 Vote Down
    • Sign in to reply
    • More
    • Cancel
  • the48sicks
    the48sicks over 7 years ago

    Hi AnnaLisa


    to get the pictures off your Pi you can use an FTP program like WinSCP and use that to connect to the ip address of your raspberry Pi and copy the pictures back to your machine.


    Good luck on your project, looks awesome!


    Matt

    • Cancel
    • Vote Up +2 Vote Down
    • Sign in to reply
    • More
    • Cancel
  • genebren
    genebren over 7 years ago

    AnnaLisa,


    Good progress on your project.  There is a lot to know when trying to put together a system with hardware/software that you have only had a little experience with.  It seems like you are doing a good job at navigating through all of the new stuff.  Keep up the good work and start cranking out the baked goods!

    Gene

    • Cancel
    • Vote Up +1 Vote Down
    • Sign in to reply
    • More
    • Cancel
element14 Community

element14 is the first online community specifically for engineers. Connect with your peers and get expert answers to your questions.

  • Members
  • Learn
  • Technologies
  • Challenges & Projects
  • Products
  • Store
  • About Us
  • Feedback & Support
  • FAQs
  • Terms of Use
  • Privacy Policy
  • Legal and Copyright Notices
  • Sitemap
  • Cookies

An Avnet Company © 2025 Premier Farnell Limited. All Rights Reserved.

Premier Farnell Ltd, registered in England and Wales (no 00876412), registered office: Farnell House, Forge Lane, Leeds LS12 2NE.

ICP 备案号 10220084.

Follow element14

  • X
  • Facebook
  • linkedin
  • YouTube