element14 Community
element14 Community
    Register Log In
  • Site
  • Search
  • Log In Register
  • Community Hub
    Community Hub
    • What's New on element14
    • Feedback and Support
    • Benefits of Membership
    • Personal Blogs
    • Members Area
    • Achievement Levels
  • Learn
    Learn
    • Ask an Expert
    • eBooks
    • element14 presents
    • Learning Center
    • Tech Spotlight
    • STEM Academy
    • Webinars, Training and Events
    • Learning Groups
  • Technologies
    Technologies
    • 3D Printing
    • FPGA
    • Industrial Automation
    • Internet of Things
    • Power & Energy
    • Sensors
    • Technology Groups
  • Challenges & Projects
    Challenges & Projects
    • Design Challenges
    • element14 presents Projects
    • Project14
    • Arduino Projects
    • Raspberry Pi Projects
    • Project Groups
  • Products
    Products
    • Arduino
    • Avnet & Tria Boards Community
    • Dev Tools
    • Manufacturers
    • Multicomp Pro
    • Product Groups
    • Raspberry Pi
    • RoadTests & Reviews
  • About Us
  • Store
    Store
    • Visit Your Store
    • Choose another store...
      • Europe
      •  Austria (German)
      •  Belgium (Dutch, French)
      •  Bulgaria (Bulgarian)
      •  Czech Republic (Czech)
      •  Denmark (Danish)
      •  Estonia (Estonian)
      •  Finland (Finnish)
      •  France (French)
      •  Germany (German)
      •  Hungary (Hungarian)
      •  Ireland
      •  Israel
      •  Italy (Italian)
      •  Latvia (Latvian)
      •  
      •  Lithuania (Lithuanian)
      •  Netherlands (Dutch)
      •  Norway (Norwegian)
      •  Poland (Polish)
      •  Portugal (Portuguese)
      •  Romania (Romanian)
      •  Russia (Russian)
      •  Slovakia (Slovak)
      •  Slovenia (Slovenian)
      •  Spain (Spanish)
      •  Sweden (Swedish)
      •  Switzerland(German, French)
      •  Turkey (Turkish)
      •  United Kingdom
      • Asia Pacific
      •  Australia
      •  China
      •  Hong Kong
      •  India
      •  Korea (Korean)
      •  Malaysia
      •  New Zealand
      •  Philippines
      •  Singapore
      •  Taiwan
      •  Thailand (Thai)
      • Americas
      •  Brazil (Portuguese)
      •  Canada
      •  Mexico (Spanish)
      •  United States
      Can't find the country/region you're looking for? Visit our export site or find a local distributor.
  • Translate
  • Profile
  • Settings
Pi Chef Design Challenge
  • Challenges & Projects
  • Design Challenges
  • Pi Chef Design Challenge
  • More
  • Cancel
Pi Chef Design Challenge
Blog Stove Assistant - Bernhard - Pi Chef #4 - Temperature Camera Overlay
  • Blog
  • Forum
  • Documents
  • Polls
  • Files
  • Events
  • Mentions
  • Sub-Groups
  • Tags
  • More
  • Cancel
  • New
  • Share
  • More
  • Cancel
Group Actions
  • Group RSS
  • More
  • Cancel
Engagement
  • Author Author: bernhardmayer
  • Date Created: 11 Mar 2018 7:04 AM Date Created
  • Views 1709 views
  • Likes 7 likes
  • Comments 8 comments
  • raspberrypicamera
  • pi chef design challenge
  • grid-eye®
  • raspberry3
  • raspberry_pi_design_challenge
Related
Recommended

Stove Assistant - Bernhard - Pi Chef #4 - Temperature Camera Overlay

bernhardmayer
bernhardmayer
11 Mar 2018

Camera mount

As I already mentioned last week I manufactured a camera mount, where the Raspberry Pi camera and the Panasonic Grid-Eye sensor are mounted close together. Here is again the foto of the installation:


image


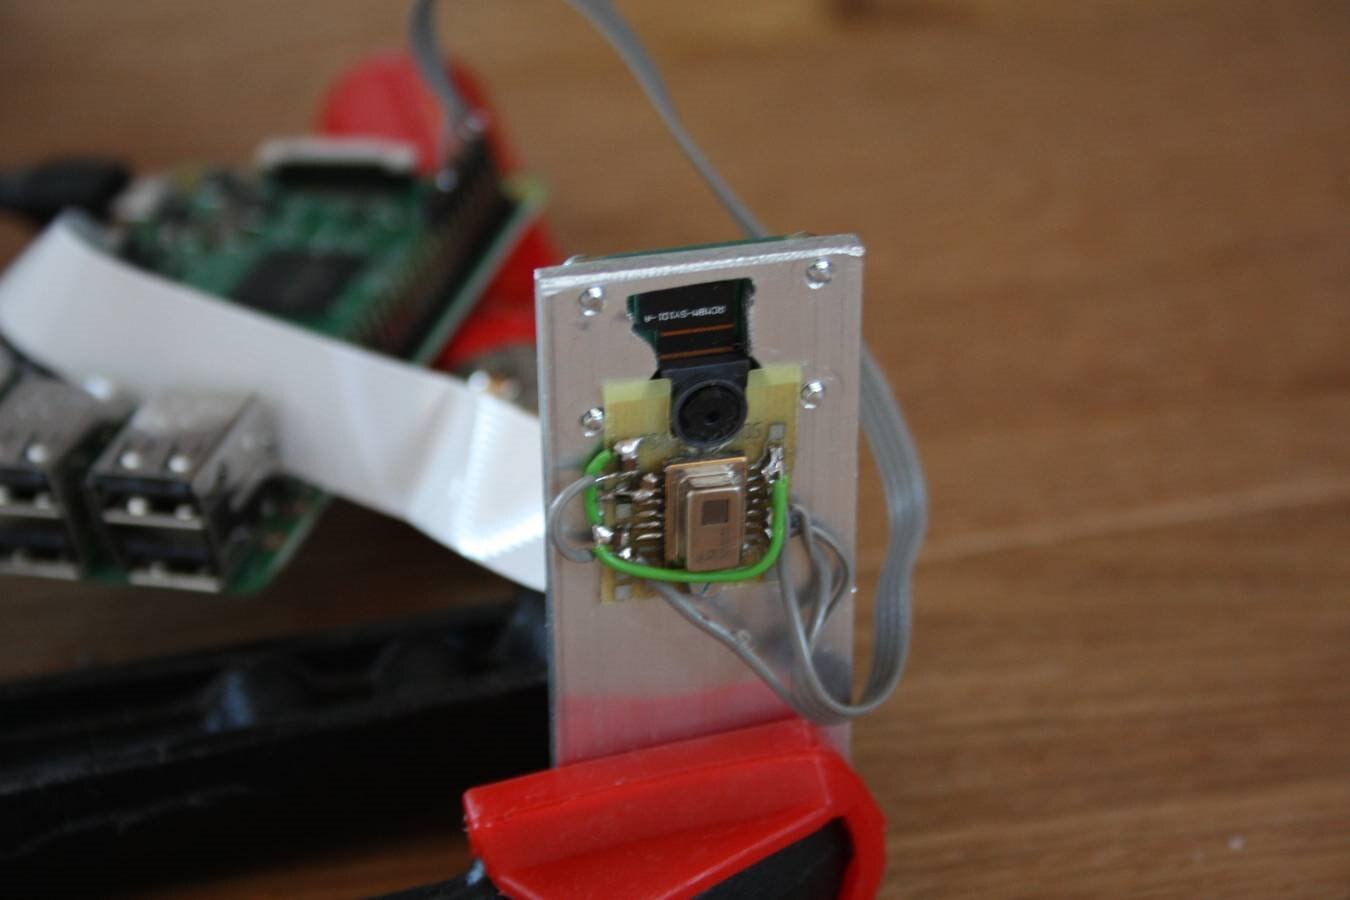
The idea was to overlay the image of the camera and the temperature sensor to 1. get an image with temperature information which is very nice to view and to 2. get information how good the sensors are aligned.


Matching the images together

The grid-eye sensor has an viewing angle of 60 degrees in both directions and the Raspberry Pi Camera Module v2 has a field of view of horizontal 62.2 degrees and vertical 48.8 degrees. So horizontal it should match quite well (with little tolerance) but vertical the grid-eye sensor can see more than the camera. The grid-eye sensor has a aspect ration of 1:1 and the camera has one of 4:3. This is no big deal: I will add some black fields at the top and bottom of the camera and the data matches.

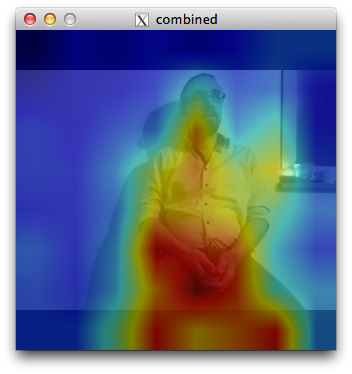
Here is an image of the combined output:


image

Making a video

The next step is to make a video with camera and temperature data to see how the data aligns in the whole sensing area. Making a video with OpenCV is quite simple: you just have to add each image/frame and OpenCV does the rest. First here is my source code (the image above was also made with the same source code):


#include <stdio.h>
#include <stdlib.h>
#include <linux/i2c-dev.h>
#include <fcntl.h>
#include <unistd.h>
#include <opencv2/opencv.hpp>
#include <opencv2/imgproc/imgproc.hpp>
#include <opencv2/contrib/contrib.hpp>

int main(void)
{
    int file;
    int addr=0x68;        // adress of AMG88xx
    int x,y;     // variables to got through the array
    char register_address=0;    // register address of each sensor pixel
    signed short int internal_temp;
    signed short int pixel_temp;
    
    int end=1;  // variable to end program
    printf("Pi Chef Stove Assistant Demo with AMG88xx\n");  // print start message
    if((file=open("/dev/i2c-1",O_RDWR))<0)    // open i2c-bus
    {
        perror("cannot open i2c-1");
        exit(1);
    }
    if(ioctl(file, I2C_SLAVE, addr)<0)    // open slave
    {
        perror("cannot open slave address");
        exit(1);
    }

    internal_temp=(signed short)(i2c_smbus_read_word_data(file, 0x0e)<<4);    // read internal temperature from sensor
    internal_temp=internal_temp/16;        // recalculate correct value
    printf("Internal Temp: %f C (0x%04X = %i)\n",(float)internal_temp*0.0625,internal_temp,internal_temp);    // print internal temperature

    cv::Mat cameraImage;  // create opencv mat for camera
    cv::Mat cameraImageGray; // create opencv mat for grayscale camera image
    cv::Mat cameraImageBig(320,320,CV_8UC3);  // create opencv mat for camera with final resolution
    cv::VideoCapture cap;    // create camera input
    cap.open(0);        // open camera
    cap.set(CV_CAP_PROP_FRAME_WIDTH, 320);    // change camera width to 320 - we do not need more
    cap.set(CV_CAP_PROP_FRAME_HEIGHT, 240);    // change camera height to 240
    cv::VideoWriter outputVideo;    // create video output
    outputVideo.open("output.avi", CV_FOURCC('M','J','P','G'), 10, cv::Size(320,320), true);    // set video output to 10 fps and MJPG
    if (!outputVideo.isOpened())    // check if generation of video output was successful
    {
        perror("Could not open the output video for write\n");
        exit(1);
    }

    cv::Mat outSmall(8,8,CV_8UC1);        // create opencv mat for sensor data
    cv::Mat outSmallnorm(8,8,CV_8UC1);    // create opencv mat for normalized data
    cv::Mat outColor;    // create opencv mat for color output
    cv::Mat combined;    // create opencv mat for combined output

    while(end==1)  // check end variable
    {
        for(x=0;x<8;x++)
        {
            for(y=0;y<8;y++)
            {
                register_address=0x80+2*((x*8)+y);
                pixel_temp=(signed short)(i2c_smbus_read_word_data(file, register_address)<<4);    // read pixel_temp and cast to signed short
                pixel_temp=pixel_temp/16;    // set pixel_temp to original value
                outSmall.at(7-x,7-y)=pixel_temp;    // save data to opencv mat and rotate it
            }
        }

        cv::normalize(outSmall,outSmallnorm,255,0,cv::NORM_MINMAX);    // normalize Mat to values between 0 and 255
        cv::resize(outSmallnorm,outSmallnorm,cv::Size(320,320));    // resize Mat to 320 x 320 pixel
        cv::applyColorMap(outSmallnorm,outColor,cv::COLORMAP_JET);  // generate colored output with colormap
        cap >> cameraImage;    // copy camera input to opencv mat
        cv::cvtColor(cameraImage,cameraImageGray,CV_RGB2GRAY);    // convert camera image to grayscale
        cv::cvtColor(cameraImageGray,cameraImageGray,CV_GRAY2RGB);    // make cameraImage 3 channels again
        cameraImageGray.copyTo(cameraImageBig(cv::Rect(0,40,320,240)));// copy camera ingae to mat with same resolution as temperature mat
        cv::addWeighted(cameraImageBig,0.5,outColor,0.5,0.0,combined);    // combine camera mat and temperature mat into one single image
        cv::imshow("combined",combined);  // display mat on screen
         outputVideo << combined;    // add frame to video

        char key = cv::waitKey(1);  // check keys for input
        if(key=='e') end=0;  // end if e was pressed
    }
    printf("ended regularly!\n");  // print end message
    close(file);
    return 0;
}


This code led to the following video:

You don't have permission to edit metadata of this video.
Edit media
x
image
Upload Preview
image


Unfortunatelly OpenCV and the video input buffer always add a little delay to the video stream. So there is a little delay between the temperature data and the video. One solution would be to handle the video input in a second thread. But this is more complex so I have to live with this little delay for now.


What's next?

In the next days I will mount the sensor combination atop of my cook top and do some test measurements.

  • Sign in to reply

Top Comments

  • shabaz
    shabaz over 7 years ago +3
    Hi Bernhard, Really great project, I think it has a lot of value. It should take a lot of guesswork out of cooking, because no-one knows the rate at which the stove, pan and contents are together working…
  • mcb1
    mcb1 over 7 years ago +3
    There is some very useful info here. 1. Installation — Picamera 1.12 documentation It surprised me the the 35mm equiv lens size changed between versions. It also seems that the fuzziness reported with…
  • beacon_dave
    beacon_dave over 7 years ago in reply to mcb1 +2
    It surprised me the 35mm equiv lens size changed between versions. When they replaced the OmniVision OV5647 imager with the Sony IMX219 imager then it looks like there was both a slight change in the imager…
  • mcb1
    mcb1 over 7 years ago in reply to bernhardmayer

    Waveshare have some, but sadly they lack details.

    https://www.waveshare.com/product/mini-pc/raspberry-pi/cameras.htm?dir=asc&order=price


    The adjustable focus seems to only affect the focus, but they have a fisheye version.

    I've ordered one of the adjustable focus versions for a project, and we'll see what mount they have.


    There are some resources around about adapting a CCTV lens onto the camera.

    How to modify your RPi Camera lens | RaspberryTorte


    wider field of view would be perfect like it is with the GoPro cameras.

    GoPro don't change the lens they manipulate the pixels providing the image ... however they are starting with a lot more than the Pi camera, so dumping a few isn't an issue.

    I note that later offering are also allowing image stabilisation in some modes, so again they are not using all the pixels.


    I have used UV4L in a streaming mode

    https://www.linux-projects.org/uv4l/

    Maybe it has some advantages/features for you.


    Cheers

    Mark

    • Cancel
    • Vote Up +1 Vote Down
    • Sign in to reply
    • More
    • Cancel
  • beacon_dave
    beacon_dave over 7 years ago in reply to bernhardmayer

    The Arducam product may be of interest to you:


    M12 S-Mount

    imx219-pi-camera-m12-6 | Arduino Based Camera


    CS-Mount

    imx219-pi-camera-CS | Arduino Based Camera


    I've also been on the lookout for a 'USB webcam' with a S-Mount or CS-Mount option but not seen much there apart from the high end Point Grey machine vision products. 

    • Cancel
    • Vote Up 0 Vote Down
    • Sign in to reply
    • More
    • Cancel
  • bernhardmayer
    bernhardmayer over 7 years ago in reply to beacon_dave

    Hi Mark and Dave,

    I would also prefer a Raspberry Pi camera where one could change the lense. There are projects like this where a narrower field of view would be better. And there are other projects like in robotics and navigation where a wider field of view would be perfect like it is with the GoPro cameras.

    Bernhard

    • Cancel
    • Vote Up 0 Vote Down
    • Sign in to reply
    • More
    • Cancel
  • bernhardmayer
    bernhardmayer over 7 years ago in reply to shabaz

    Hi.

    I also know that the grid-eye sensors are somewhat limited. But they are they only available thermopile array sensors with a reasonable price. Technically it shouldn't be a big issue to have a greater temperature range (maybe with less accuracy) but Panasonic didn't do it.

    The next problem is the field of view. I would prefer a sensor with a narrower field of view so that i can get further away from the measurement object and get a better ancle. Panasonic announced the AMG8854M01 this January with a field of view of 35 degrees. But I think it is not available yet and it is a 5V device where I need a 3 V device.

    I am excited what they bring out next.

    Bernhard

    • Cancel
    • Vote Up 0 Vote Down
    • Sign in to reply
    • More
    • Cancel
  • DAB
    DAB over 7 years ago

    Nice update.


    DAB

    • Cancel
    • Vote Up 0 Vote Down
    • Sign in to reply
    • More
    • Cancel
>
element14 Community

element14 is the first online community specifically for engineers. Connect with your peers and get expert answers to your questions.

  • Members
  • Learn
  • Technologies
  • Challenges & Projects
  • Products
  • Store
  • About Us
  • Feedback & Support
  • FAQs
  • Terms of Use
  • Privacy Policy
  • Legal and Copyright Notices
  • Sitemap
  • Cookies

An Avnet Company © 2025 Premier Farnell Limited. All Rights Reserved.

Premier Farnell Ltd, registered in England and Wales (no 00876412), registered office: Farnell House, Forge Lane, Leeds LS12 2NE.

ICP 备案号 10220084.

Follow element14

  • X
  • Facebook
  • linkedin
  • YouTube