element14 Community
element14 Community
    Register Log In
  • Site
  • Search
  • Log In Register
  • About Us
  • Community Hub
    Community Hub
    • What's New on element14
    • Feedback and Support
    • Benefits of Membership
    • Personal Blogs
    • Members Area
    • Achievement Levels
  • Learn
    Learn
    • Ask an Expert
    • eBooks
    • element14 presents
    • Learning Center
    • Tech Spotlight
    • STEM Academy
    • Webinars, Training and Events
    • Learning Groups
  • Technologies
    Technologies
    • 3D Printing
    • FPGA
    • Industrial Automation
    • Internet of Things
    • Power & Energy
    • Sensors
    • Technology Groups
  • Challenges & Projects
    Challenges & Projects
    • Design Challenges
    • element14 presents Projects
    • Project14
    • Arduino Projects
    • Raspberry Pi Projects
    • Project Groups
  • Products
    Products
    • Arduino
    • Avnet Boards Community
    • Dev Tools
    • Manufacturers
    • Multicomp Pro
    • Product Groups
    • Raspberry Pi
    • RoadTests & Reviews
  • Store
    Store
    • Visit Your Store
    • Choose another store...
      • Europe
      •  Austria (German)
      •  Belgium (Dutch, French)
      •  Bulgaria (Bulgarian)
      •  Czech Republic (Czech)
      •  Denmark (Danish)
      •  Estonia (Estonian)
      •  Finland (Finnish)
      •  France (French)
      •  Germany (German)
      •  Hungary (Hungarian)
      •  Ireland
      •  Israel
      •  Italy (Italian)
      •  Latvia (Latvian)
      •  
      •  Lithuania (Lithuanian)
      •  Netherlands (Dutch)
      •  Norway (Norwegian)
      •  Poland (Polish)
      •  Portugal (Portuguese)
      •  Romania (Romanian)
      •  Russia (Russian)
      •  Slovakia (Slovak)
      •  Slovenia (Slovenian)
      •  Spain (Spanish)
      •  Sweden (Swedish)
      •  Switzerland(German, French)
      •  Turkey (Turkish)
      •  United Kingdom
      • Asia Pacific
      •  Australia
      •  China
      •  Hong Kong
      •  India
      •  Korea (Korean)
      •  Malaysia
      •  New Zealand
      •  Philippines
      •  Singapore
      •  Taiwan
      •  Thailand (Thai)
      • Americas
      •  Brazil (Portuguese)
      •  Canada
      •  Mexico (Spanish)
      •  United States
      Can't find the country/region you're looking for? Visit our export site or find a local distributor.
  • Translate
  • Profile
  • Settings
Start a Movement Challenge
  • Challenges & Projects
  • Design Challenges
  • Start a Movement Challenge
  • More
  • Cancel
Start a Movement Challenge
Forum ASM - Adjusting Torque and Current Rating
  • Blog
  • Forum
  • Projects
  • DC
  • Leaderboard
  • Files
  • Members
  • More
  • Cancel
  • New
Join Start a Movement Challenge to participate - click to join for free!
Actions
  • Share
  • More
  • Cancel
Forum Thread Details
  • Replies 1 reply
  • Subscribers 45 subscribers
  • Views 225 views
  • Users 0 members are here
  • design challenge
  • trinamic motor control
  • ASM
  • tmc5272-eval-kit
  • tmc5272
  • start a movement
  • tmc5272 evaluation kit
Related

ASM - Adjusting Torque and Current Rating

taifur
taifur 8 months ago

Tuning Current for a Good amount of Torque

After making the linear pressing system with the 3D printed parts and stepper motor I was curious to check it with the foot pedal of the sewing machine. The pedal is not very easy to press and it requires a moderate amount of pressure to operate. It can be comfortably done with the foot but I was a bit afraid of whether my pressing mechanism is capable of moving it down or not. For checking it I placed the foot pedal at the bottom of the armature and started the motor. I was disappointed, it stops when the armature touches the pedal. After thinking for a few moments I got the idea of increasing the supply voltage. I removed the power adapter and connected a power supply to the TMC5272 controller board. I set the voltage to 12V and observed the current and it was only around 60mA while running the motor. I increased the voltage to 20V and this time motor was capable of pressing down the foot pedal as shown in the video below. 

You don't have permission to edit metadata of this video.
Edit media
x
image
Upload Preview
image

Though it worked I was not convinced to do it by increasing the voltage. I wanted to make it workable with 12V. So, I started reading the TM5272 datasheet again to find out whether it has any solution. The article "Setting the Full-Scale Current" on page 54 drew my attention. I got an equation for the RMS and Peak current.

image

image

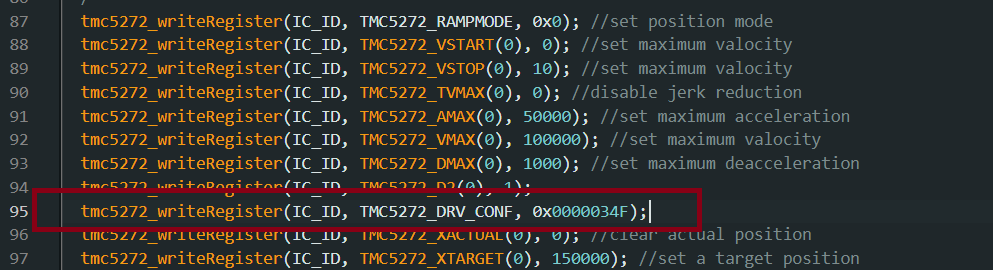
I came to know that by configuring the DRV_CONF register we can set the 100% current or less and the default current setting is not 100%. From the table 14 and 15, I found the required value for the DRV_CONF register for an expected current. I revisited the code and found that the content for four LSB bits is D (1101) which means FSR_Mx bits are 01 and FSR_IREF_Mx bits are 11 which allows a maximum 410mA for the motor. It should work but not!

image

Possibly the current was not bad for pressing the pedal but it was not working for any reason. I changed the contents of the DRV_CONF register and replaced D with F. F will allow maximum current (800mA) to the motor. I added the marked line in my main code inside the setup function with other configurations to write the value to the DRV_CONF register.

image

Surprisingly it worked and this time motor was capable of pressing the pedal very easily even from an 8V supply. Current flowing was also increased reasonably.

You don't have permission to edit metadata of this video.
Edit media
x
image
Upload Preview
image

Making Connections Fixed

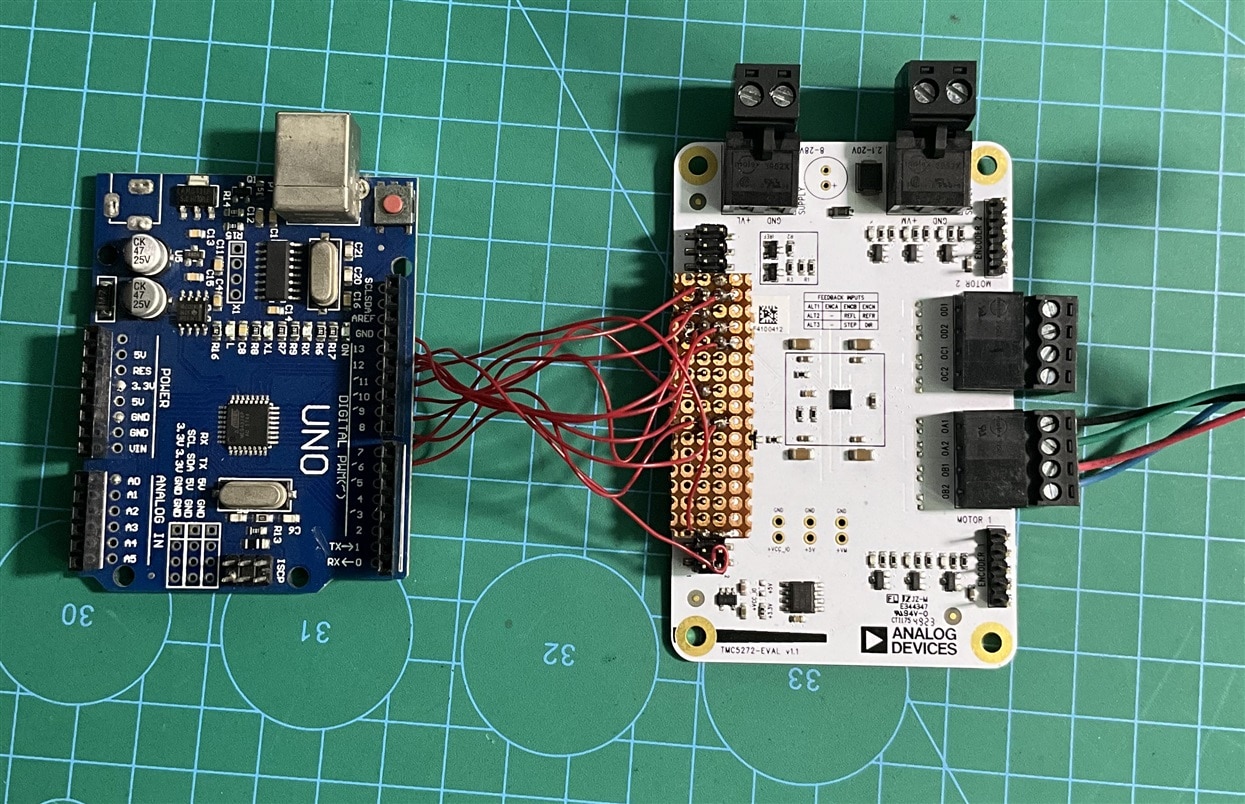
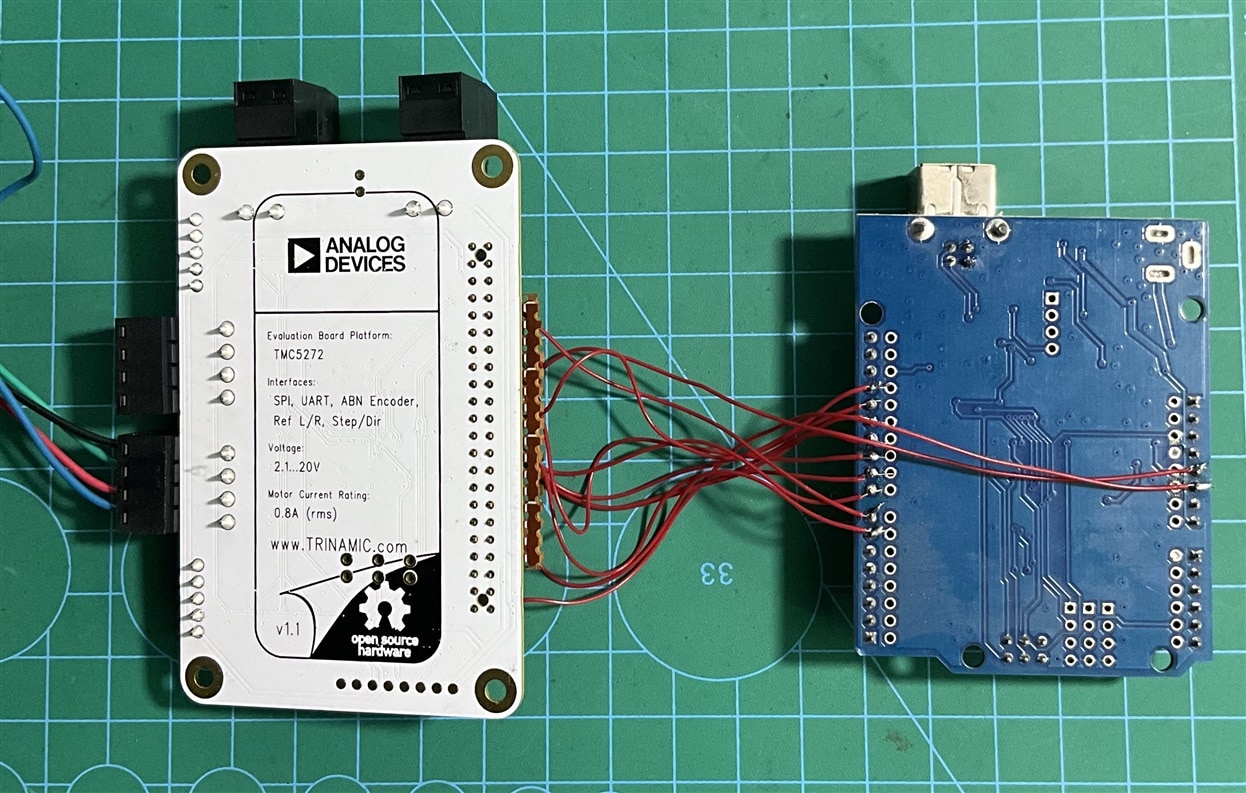
When I started this project I decided to use Landungsbrucke which came with the kit as the main controller of my project. I intended to write custom firmware to read the sensor and control the stepper motor accordingly. The Landungsbrucke board came with preloaded firmware that helps to control the TMC5272 Motor Controller board from TMCL IDE. This is an excellent way for testing and debugging. The most interesting fact is you can monitor and modify all the registers from the IDE. It helped me to clearly understand some of the functionalities of the TMC5272 motor controller. The Landungsbrucke MCU board is based on the GigaDevice Arm Cortex M4 microcontroller and I have no previous experience with GigaDevice MCU. So, I started with Arduino Mega and fortunately, I got a sample Arduino program for the TMC5272 motor controller from Analog Devices official GitHub link. I was able to run the code without any issues and it worked successfully. However, I faced some difficulties while modifying the code and I was able to successfully solve the issues with the help of TMC IDE. After solving the issues I decided to implement the code in GigaDevice Arm Cortex M4 microcontroller. I downloaded the Keil IDE and the required Add-ons for the Keil IDE for GigaDevice. I also downloaded the source code of the pre-loaded firmware. After a few hours of study and experiment, I realized it would be tough for me to implement the GigaDevice MCU within the limited time (I have 6 days only before the deadline). Even I don't have any GD-Link programmers and I am not sure whether ST-Link will work with the GigaDevice MCU or not. So, I changed my mind and decided to use Arduino UNO in my project. I removed all the connections with the Mega and inserted a double-line male pin header into the connector of the TMC5272 and then soldered with the Arduino UNO with jumper wires as shown in the images below.

image

image

I made the necessary pin change in my code and uploaded the code to Arduino UNO. It worked as expected.

image

  • Sign in to reply
  • Cancel

Top Replies

  • taifur
    taifur 8 months ago +1
    Sometimes uploaded images are not showing. It only shows the text image instead of the original image. The image can be seen by clicking the text image. The following two images are not visible in this…
Parents
  • taifur
    taifur 8 months ago

    Sometimes uploaded images are not showing. It only shows the text image instead of the original image. The image can be seen by clicking the text image. The following two images are not visible in this post.

    image

    image

    image

    image

    • Cancel
    • Vote Up +1 Vote Down
    • Sign in to reply
    • Cancel
Reply
  • taifur
    taifur 8 months ago

    Sometimes uploaded images are not showing. It only shows the text image instead of the original image. The image can be seen by clicking the text image. The following two images are not visible in this post.

    image

    image

    image

    image

    • Cancel
    • Vote Up +1 Vote Down
    • Sign in to reply
    • Cancel
Children
No Data
element14 Community

element14 is the first online community specifically for engineers. Connect with your peers and get expert answers to your questions.

  • Members
  • Learn
  • Technologies
  • Challenges & Projects
  • Products
  • Store
  • About Us
  • Feedback & Support
  • FAQs
  • Terms of Use
  • Privacy Policy
  • Legal and Copyright Notices
  • Sitemap
  • Cookies

An Avnet Company © 2025 Premier Farnell Limited. All Rights Reserved.

Premier Farnell Ltd, registered in England and Wales (no 00876412), registered office: Farnell House, Forge Lane, Leeds LS12 2NE.

ICP 备案号 10220084.

Follow element14

  • X
  • Facebook
  • linkedin
  • YouTube