


Title: Wearable Tracking Device for Miners
By: sunnyiut
| Previous Blogs | ||
|---|---|---|
| 01: Introduction | 02: The Kit | 03: Review_MSP432P401R |
Design Challenge: Safe and Sound Wearables
Blog number: 04
Intro:

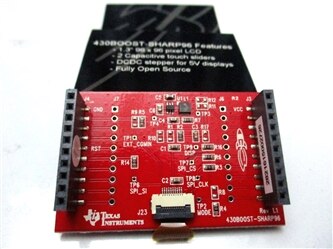
The KIT contains an LCD display booster pack. This blog post will present a review on this booster pack: 430BOOST-SHARP96.
LS013B4DN04 display from Sharp Electronics with capacitive touch sliders makes this Booster Pack an ultra low power display solution for small menu, sensor readings, time and for providing touch inputs to navigate.
Features:
- Ultra low power LS013B4DN04 LCD consumes 10uW
- 9216 pixels in 1.3 inch screen with 96x96 resolution
- 50% reflectance for moving graphics
- visibility at >0.5 LUX without light source
- two capacitive touch sliders, each consists of three elements
- on-board additional 5v DCDC converter for customized power
- additional through hole terminals for Booster Pack headers provide customizable wiring

image taken from TI 430BOOST-SHARP96 User's Guide
Review Description:
This review contains two parts with example codes to demonstrate the functionalities of this plug in display module. The example codes are from TI support for this Booster Pack.
- PART 01 - demonstrates the static graphic display capability for 'text', 'image', 'rectangle', 'round' etc
- PART 02 - demonstrates the moving graphics display capability with capacitive touch inputs from sliders
example codes: 1. 430boost_sharp96_grlibExample
2. 430boost_sharp96_Cap Touch
IDE: Code Composer Studio v7.1.0
Resource: Resource Explorer [dev.ti.com/tirex]
Launchpad: MSP-EXP432P401R
PART 01:
Example code - 01: 430boost_sharp96_grlibExample_msp432p401r
Description -
It demonstrates the use of Graphics Library with the Sharp display to show simple graphics primitives.
like - Pixels, Lines, Circles, Rectangles, Text, Image etc.
It also utilizes functions for Initialization, for switching foreground and background color scheme, for inverting pixels / text / graphics color etc.
Includes - grlib.h and LcdDriver/Shar96x96.h
Display -
Intro Screen:
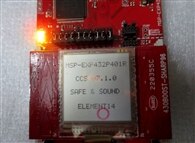
        Graphics_drawStringCentered(&g_sContext, (int8_t *)"MSP-EXP432P401R", GRAPHICS_AUTO_STRING_LENGTH, 48, 15, GRAPHICS_TRANSPARENT_TEXT);
        Graphics_drawStringCentered(&g_sContext, (int8_t *)"CCS v7.1.0", GRAPHICS_AUTO_STRING_LENGTH, 48, 35, GRAPHICS_TRANSPARENT_TEXT);
        Graphics_drawString(&g_sContext, (int8_t *)"SAFE & SOUND", GRAPHICS_AUTO_STRING_LENGTH, 10, 51, GRAPHICS_OPAQUE_TEXT);
        Graphics_drawStringCentered(&g_sContext, (int8_t *)"ELEMENT14", GRAPHICS_AUTO_STRING_LENGTH, 48, 75, GRAPHICS_TRANSPARENT_TEXT);
        Graphics_flushBuffer(&g_sContext);
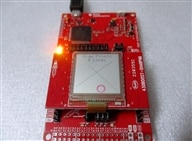
Image of Rocket and TI logo:


        Graphics_drawImage(&g_sContext, &LPRocket_96x37_1BPP_UNCOMP, 3, 28);
        Graphics_flushBuffer(&g_sContext);
        Delay();
        Graphics_clearDisplay(&g_sContext);
        Graphics_drawImage(&g_sContext, &TI_Logo_69x64_1BPP_UNCOMP, 15, 15);
Pixels and Lines:
        Graphics_drawStringCentered(&g_sContext, (int8_t *)"Draw Pixels", GRAPHICS_AUTO_STRING_LENGTH, 48, 5, GRAPHICS_TRANSPARENT_TEXT);
        Graphics_drawStringCentered(&g_sContext, (int8_t *)"& Lines", GRAPHICS_AUTO_STRING_LENGTH, 48, 15, GRAPHICS_TRANSPARENT_TEXT);
        Graphics_drawPixel(&g_sContext, 30, 30);
        Graphics_drawPixel(&g_sContext, 30, 32);
        Graphics_drawPixel(&g_sContext, 32, 32);
        Graphics_drawPixel(&g_sContext, 32, 30);
        Graphics_drawLine(&g_sContext, 35, 35, 90, 90);
        Graphics_drawLine(&g_sContext, 5, 80, 80, 20);
        Graphics_drawLine(&g_sContext, 0, Graphics_getDisplayHeight(&g_sContext) - 1, Graphics_getDisplayWidth(&g_sContext) - 1, Graphics_getDisplayHeight(&g_sContext) - 1);
Circles:

        Graphics_drawString(&g_sContext, (int8_t *)"Draw Circles", GRAPHICS_AUTO_STRING_LENGTH, 10, 5, GRAPHICS_TRANSPARENT_TEXT);
        Graphics_drawCircle(&g_sContext, 30, 70, 20);
        Graphics_fillCircle(&g_sContext, 60, 50, 30);
Rectangles:

        Graphics_drawStringCentered(&g_sContext, (int8_t *)"Draw Rectangles", GRAPHICS_AUTO_STRING_LENGTH, 48, 5, GRAPHICS_TRANSPARENT_TEXT);
        Graphics_drawRectangle(&g_sContext, &myRectangle1);
        Graphics_fillRectangle(&g_sContext, &myRectangle2);
        // Text below won't be visible on screen due to transparency (foreground colors match)
        Graphics_drawStringCentered(&g_sContext, (int8_t *)"Normal Text", GRAPHICS_AUTO_STRING_LENGTH, 50, 50, GRAPHICS_TRANSPARENT_TEXT);
        // Text below draws foreground and background for opacity
        Graphics_drawStringCentered(&g_sContext, (int8_t *)"Opaque Text", GRAPHICS_AUTO_STRING_LENGTH, 50, 65, GRAPHICS_OPAQUE_TEXT);
        Graphics_setForegroundColor(&g_sContext, ClrWhite);
        Graphics_setBackgroundColor(&g_sContext, ClrBlack);
        Graphics_drawStringCentered(&g_sContext, (int8_t *)"Invert Text", GRAPHICS_AUTO_STRING_LENGTH, 50, 80, GRAPHICS_TRANSPARENT_TEXT);
Inverting Foreground and Background colors:

        Graphics_setForegroundColor(&g_sContext, ClrBlack);
        Graphics_setBackgroundColor(&g_sContext, ClrWhite);
        Graphics_fillRectangle(&g_sContext, &myRectangle3);
        Graphics_setForegroundColor(&g_sContext, ClrWhite);
        Graphics_setBackgroundColor(&g_sContext, ClrBlack);
        Graphics_drawStringCentered(&g_sContext, (int8_t *)"Invert Colors", GRAPHICS_AUTO_STRING_LENGTH, 48, 5, GRAPHICS_TRANSPARENT_TEXT);
        Graphics_drawRectangle(&g_sContext, &myRectangle1);
        Graphics_fillRectangle(&g_sContext, &myRectangle2);
        // Text below won't be visible on screen due to transparency (foreground colors match)
        Graphics_drawStringCentered(&g_sContext, (int8_t *)"Normal Text", GRAPHICS_AUTO_STRING_LENGTH, 50, 50, GRAPHICS_TRANSPARENT_TEXT);
        // Text below draws foreground and background for opacity
        Graphics_drawStringCentered(&g_sContext, (int8_t *)"Opaque Text", GRAPHICS_AUTO_STRING_LENGTH, 50, 65, GRAPHICS_OPAQUE_TEXT);
        // Text below draws with inverted foreground color to become visible
        Graphics_setForegroundColor(&g_sContext, ClrBlack);
        Graphics_setBackgroundColor(&g_sContext, ClrWhite);
        Graphics_drawStringCentered(&g_sContext, (int8_t *)"Invert Text", GRAPHICS_AUTO_STRING_LENGTH, 50, 80, GRAPHICS_TRANSPARENT_TEXT);
PART 02:
Example code - 02: 430BOOST_SHARP96_CapTouch_MSP432P401R
Description -
This demonstration has three elements -
- implementation of a simple menu with two objects and navigate using touch sliders
- a digital timer clock, where the time, date and day can be set using Launchpad buttons and touch sliders
- a slider ball game, which demonstrates moving graphics and multi touch control using touch sliders
Display -
Menu:
A simple menu which displays two objects to select -
- Clock
- Slider Ball Game
The left touch slider can be used to navigate and select any of the objects.
There is an 'enter' button at the bottom right corner, which reacts with the S2 button on the launchpad. So, the left touch slider will select whether the MCU will display a digital clock or run a Slider Ball game and the S2 button will execute the selected program.

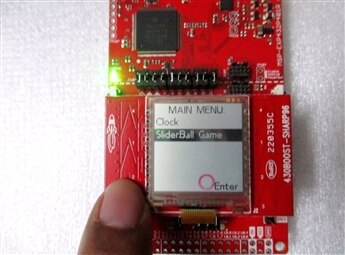

Display main menu left touch slider downward: Slider Ball Game left touch slider upward: Clock
Digital Clock:
A digital clock starts with 12:00 am, 01/01/2015, monday.
There are two options at the bottom side of the screen - Exit and Set
By pressing S1 button on the launchpad, program exits the clock and goes back to main menu.
By pressing S2 button on the launchpad, program selects the time, date and day segments of the clock and the right touch slider can be used to increase or decrease the value.

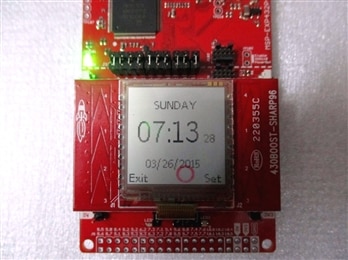
clock starts with 12:00 MONDAY 01/01/2015 S2 -> selects segments, right touch slider -> set different values
However, I set the time -> 07:13, day-> SUNDAY, date -> 03/26/2017
Time and day segments were updated and the clock started ticking. But the date became-> 03/26/2015. 
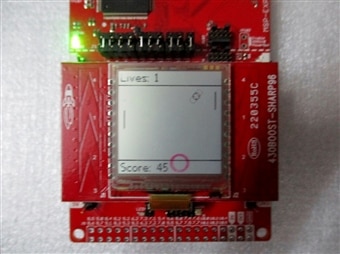
Slider Ball Game:
It demonstrates a nice, slim 'slider ball' game providing a good example of moving display. The ball starts moving from left to right and there are two bars at the left and right edges of the display. If the ball hits the bar it reflects back to the opposite direction. But if the ball misses the bar then it hits the wall and 'game over'.
These two bars can be moved up and down using the left and right touch sliders.
It's a nice example of multi touch sense and a moving graphics display.


However,
In my opinion, the touch sliders are not so sensitive to be effectively used in this case. May be that's because it does not have any material overlay. As, the user's guide suggests that a material overlay will improve the performance, but in that case a re-calibration is required.
This LCD display has good visibility in room environment. But it does not have any backlight. In my project proposal, I may need to use an LCD which is bright enough to be viewed in low light or even dark. So, I may need to think about it ......
That's the end of my review on this 430BOOST_SHARP96 memory LCD booster pack. In my next blog, I'll post a review on the sensor booster pack.
-

pl98
-
Cancel
-
Vote Up
0
Vote Down
-
-
Sign in to reply
-
More
-
Cancel
-

sunnyiut
in reply to pl98
-
Cancel
-
Vote Up
0
Vote Down
-
-
Sign in to reply
-
More
-
Cancel
Comment-

sunnyiut
in reply to pl98
-
Cancel
-
Vote Up
0
Vote Down
-
-
Sign in to reply
-
More
-
Cancel
Children