


After I have two OS's installed and running on the Edison, I wanted to test. I am looking to use NodeJS and Python to complete most or all of my Upcycle It challenge, so with either OS, I need to know things are going to work before I go down the wrong path, spin my wheels in the mud and go back to get on the right path. Now I think there is not a right path in this challenge, but I know there is going to be a path that is less rocky and have fewer mud holes.
My Test Setup
In thing about some of the sensor I am going to be using, I started with some from the kit. I have the touch sensor, button, LED, LCD RGB, and temperature sensor plugged in. I picked these for the following reasons.
- LCD RGB - an I2C device to explore with
- Button - digital input device
- Touch sensor - Another digital input and I have a friend whom is having trouble with his
- LED - digital out
- Temperature - analog input
Ubilinux Path
My first attempt was to try Ubilinux. Ubilinux sounded a bit more what I was used to, being a Debian based distribution. With this board still on the Arduino board, the SHIELD plugged in and the RGB LCD secured to a I2C port, I start experimenting. First things first, what do I have to work with. There is no NodeJS, but there is Python 2.7, but I want to start with NodeJS for some odd reason.
I start with installing Node Version Manager (NVM). This is a fast way to get NodeJS and NPM installed and working, with a big plus that you can use different versions. I thought that this would be very useful since I might need to change versions of NodeJS depending on support. NVM installation is simple, just run "" and watch it do it's thing. When it is done, you can either logout and back in or run the commands that were are shown to be added to your profile script. Post NVM setup, installing NodeJS is simple, just figure out what version you would like, I suggest one of the Long Term Support (LTS) versions, unless you need otherwise, with the command "nvm ls-remote". At the time, the LTS version is v6.10.1, so I installed it with "nvm install v6.10.1". Wait a bit for it to do it's thing and then node is ready to use. NOW WHAT???
My biggest problems are yet to come, as I can get MRAA to compile, but I cannot get the MRAA libraries for node to install. I also had problem with UPM. I did have some success with Python and the LCD, but not that exciting. I have put this on the back burner and I am pushing forward with testing with Yacto. But I will return and get this to work and at that point I will report my success.
Yacto Path
Now for some success. I used the latest Yacto as it seemed to work right out of the gate for what I wanted. First steps were to install Johnny-Five and play with some of the example code they have supplied for the Edison and Grove. This is a very nice library to get started testing. I did find one problem and that is with the button or touch sensor, the LED in their sample code would not turn off. The off command is sent, but it would not turn off the LED. This did not really bother me as I knew I was not going to use Johnny-Five to start with, but I might use it to interact with the LCD, more on that later. Here are my steps to getting started with the Johnny-Five (as root):
# mkdir testing
# npm install johnny-five
# npm install edison-io
# git clone https://github.com/rwaldron/johnny-five.git
# cp johnny-five/eg/grove-lcd-rgb-temperature-display-edison.js .
# vim grove-lcd-rgb-temperature-display-edison.js
# node grove-lcd-rgb-temperature-display-edison.js
Change grove-lcd-rgb-temperature-display-edison.js to reference the johnny-five as the module and not the absolute path it is referenced in the example. It already uses the I2C and the temperature sensor on A0 and that is how I have it all hooked up. Worked like a charm. I then tested out a few of the other examples and trouble shot the LED for a while, but on to better stuff.
Node-red setup
I really think I want to force myself to use something new and I have played with Node-Red, but always have turned to something that I know better when it is crunch time. So for this project I want most of it to be done in Node-Red. So first lets install Node-red and some of what we need to get started.
# npm install --unsafe-perm node-red
# cd /usr/bin/
# ln -s /home/root/node_modules/.bin/node-red node-red
Next install pm2 so that we can control Node-Red better and start it on system restart.
# npm install -g pm2
# cd
# node-red --max-old-space-size=128
# pm2 start node-red --node-args="--max-old-space-size=128"
# pm2 info node-red
# pm2 logs node-red
# netstat -ln
# pm2 save
# pm2 startup
Few modules that will make our experience useful in Node-Red
# cd node_modules/node-red/
# npm install --save node-red-contrib-gpio
# npm install galileo-io
# pm2 restart node-red
Node-Red Examples
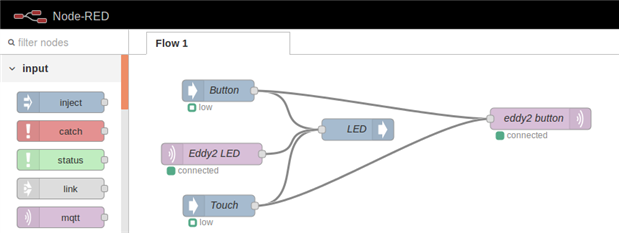
Here is my example to test. I have GPIO inputs of Button and Touch that output to the LED. If the button is pushed or the touch sensor touched the LED turns on, very simple. If the button is released or the touching stops the LED turns off. But also those messages are sent out MQTT (eddy2 button). Also I have the MQTT input, "Eddy2 LED" that I can send a 0 or 1 to to turn off or on the LED respectively.
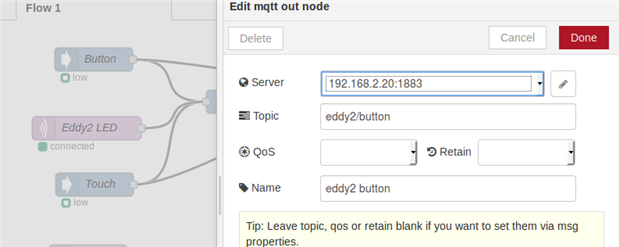
Here is my "eddy2 button" setup.
Next on my agenda will be:
- Block diagram of my project
- Setup more complex MQTT topic structure in working with vlasov01 on his sensor/alarm project.
- Experiment more with the current board in the PDU
- LCD output via MQTT messages (if not in Node-Red)
- More Node-Red
- Trying to get Ubilinux to work
- Use of the Mini-board
Top Comments