


Goals:
- Sending data to the Edison to turn on/off items
- MongoDB and map to how I will use it.
Sending Data to the Edison
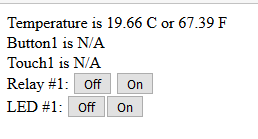
Next on my list was the ability to send data to the Edison when a web event happens. I have added four buttons to the interface to test this. In the future it is much easier to have one button and the button conveys the status of the device. That will be happening, but small step now to get there and right now I have one other hurdle to jump over before I am ready for that. Here is the four new buttons.
Simple code to get that:
<div>
       <div>
               Relay #1:
               <button id='relay1off' data-state=0>Off</button>
               <button id='relay1on' data-state='1'>On</button>
      </div>
      <div>
               LED #1:
               <button id='led1off' data-state='0'>Off</buton>
               <button id='led1on' data-state='1'>On</buton>
      </div>
</div>
In the future the following will be handled by one block of code, but for now there is a block for each line. Then the code to hand that button clicks events:
        $('#relay1on').on('click',function() {
                console.log('Socket Emit Relay1 ON');
                socket.emit('button', {
                        button: 'relay1',
                        msg: 1
                });
        });
        $('#relay1off').on('click',function() {
                console.log('Socket Emit Relay1 OFF');
                socket.emit('button', {
                        button: 'relay1',
                        msg: 0
                });
        });
        $('#led1on').on('click',function() {
                console.log('Socket Emit LED1 ON');
                socket.emit('button', {
                        button: 'led1',
                        msg: 1
                });
        });
        $('#led1off').on('click',function() {
                console.log('Socket Emit LED1 OFF');
                socket.emit('button', {
                        button: 'led1',
                        msg: 0
                });
        });
Then on the server side handle the socket.io traffic and generate WS commands
        socket.on('button',function(data) {
                console.log("data: ", data);
                switch (data.button) {
                        case 'relay1':
                                wscRelay1.send(data.msg);
                                console.log("Relay1: ", data.msg);
                                break;
                        case 'led1':
                                wscLED1.send(data.msg);
                                console.log("LED1: ", data.msg);
                                break;
                }
        });
Here are the node-red flows.
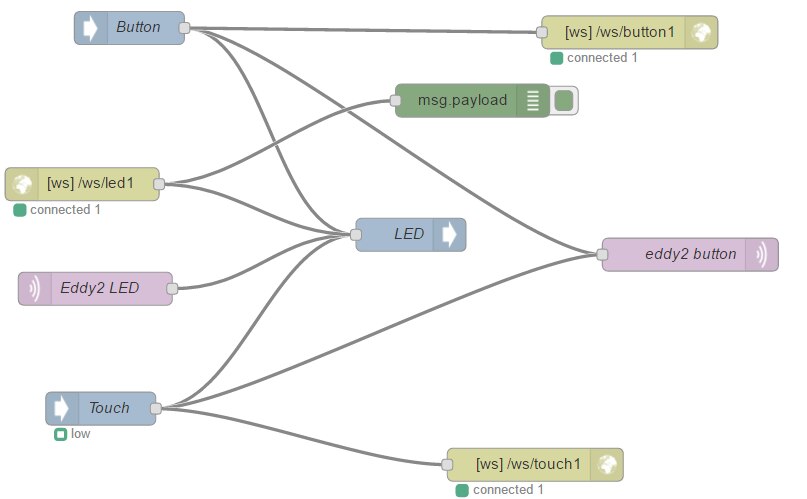
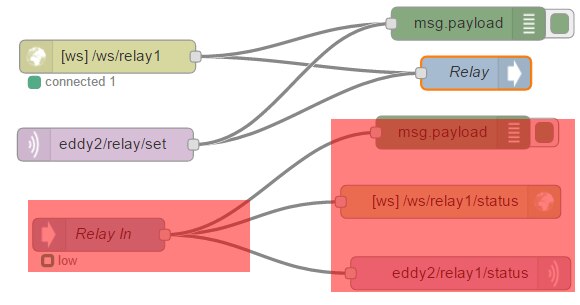
I highlighted some nodes that do not work and are just dreams. These are to handle tracking what state the devices are in. So that is where the next section comes in to play as we need to track what state stuff is in so that we can draw the user interface correctly.
Node-Red Shortcoming
One thing that is hard to do in Node-Red is to know the state of an output. In Python or Node, you can query the the state of an output. This is nice when a new client connects or knowing when a output has been changes via a external source. I have been processing different ways of overcoming information that I need to have and here is a list of how I think I will do it.
- Store the states in a database, MongoDB
- Refresh MongoDB on changes from external sources
- Write a watcher that updates MongoDB and if a state was found incorrect, push out a notification.
Look at MongoDB
I am not going to cover how to install MongoDB, as you can install it as a docker, regular install, or use a cloud instance of it. Also you can use any other database to do this function as long as it is supported by Node-Red. Here is how to install MongoDB support in Node-Red.
MongoDB in Node-Red
cd ~/.node-red
npm install node-red-node-mongodb
pm2 restart node-red
Query data Example

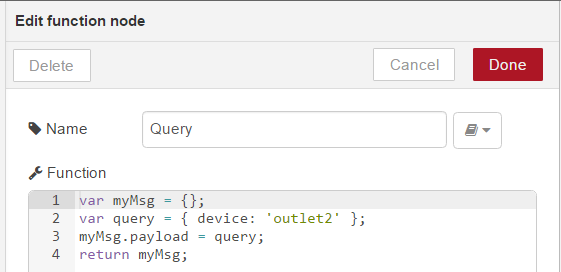
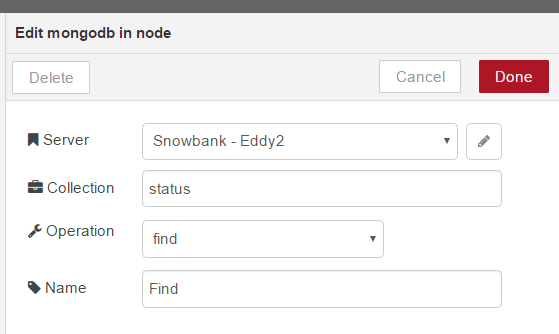
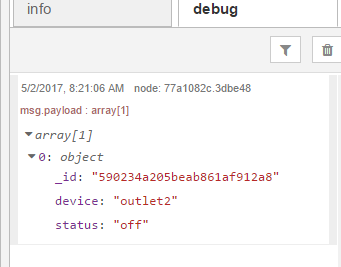
The Query Function Node builds the information for the query.
| {gallery} Mongo Query in Node Red |
|---|
Function Node called Query that builds the query message. |
Query window. This has the server connection and the collection. The collection can be overridden from the query. |
Example of the data from the function above outputted with the debug node. |
The Plan
Following is my plan how I want to store information in Mongo. I hope to have Mongo document that tells the LCD what it should be displaying. Then I can update the time or temperature on a regular interval.
MongoDB item for LCD storage
{
     device: 'eddy2',
     control: 'lcd1',
     state: 'custom',
     updated: 1493374858,
     custom: {
          msg1: 'Intel Edison',
          msg2: 'Element14',
          R: 20,
          G: 20,
          B: 20
     }
}
Other options are: Time, Outside Temperature, Room Temperature, Chassis Temperature, or Outlet State, etc
Other items
{
     device: 'eddy2',
     control: 'outlet1',
     state: 'off',
     updated: 1493374858,
     name: "Soldering Iron"
}
Maybe more information in the future.
Some House Keeping
- Using PM2 for other mqtt-lcd bridge and web interface
- Issue command from the MQTT-LCD-GW folder:
- "pm2 start index.js --name 'MQTT-LCD-GW'"
- I have change the MQTT-LCD-GW to display an initial message
- While developing the web interface and server I have started using Nodemon. This way when changes are made in the server or a server controlled file, the Node process is automattically restarted.
Top Comments
-

jasonwier92
-
Cancel
-
Vote Up
+2
Vote Down
-
-
Sign in to reply
-
More
-
Cancel
Comment-

jasonwier92
-
Cancel
-
Vote Up
+2
Vote Down
-
-
Sign in to reply
-
More
-
Cancel
Children