element14 Community
element14 Community
    Register Log In
  • Site
  • Search
  • Log In Register
  • Community Hub
    Community Hub
    • What's New on element14
    • Feedback and Support
    • Benefits of Membership
    • Personal Blogs
    • Members Area
    • Achievement Levels
  • Learn
    Learn
    • Ask an Expert
    • eBooks
    • element14 presents
    • Learning Center
    • Tech Spotlight
    • STEM Academy
    • Webinars, Training and Events
    • Learning Groups
  • Technologies
    Technologies
    • 3D Printing
    • FPGA
    • Industrial Automation
    • Internet of Things
    • Power & Energy
    • Sensors
    • Technology Groups
  • Challenges & Projects
    Challenges & Projects
    • Design Challenges
    • element14 presents Projects
    • Project14
    • Arduino Projects
    • Raspberry Pi Projects
    • Project Groups
  • Products
    Products
    • Arduino
    • Avnet & Tria Boards Community
    • Dev Tools
    • Manufacturers
    • Multicomp Pro
    • Product Groups
    • Raspberry Pi
    • RoadTests & Reviews
  • About Us
  • Store
    Store
    • Visit Your Store
    • Choose another store...
      • Europe
      •  Austria (German)
      •  Belgium (Dutch, French)
      •  Bulgaria (Bulgarian)
      •  Czech Republic (Czech)
      •  Denmark (Danish)
      •  Estonia (Estonian)
      •  Finland (Finnish)
      •  France (French)
      •  Germany (German)
      •  Hungary (Hungarian)
      •  Ireland
      •  Israel
      •  Italy (Italian)
      •  Latvia (Latvian)
      •  
      •  Lithuania (Lithuanian)
      •  Netherlands (Dutch)
      •  Norway (Norwegian)
      •  Poland (Polish)
      •  Portugal (Portuguese)
      •  Romania (Romanian)
      •  Russia (Russian)
      •  Slovakia (Slovak)
      •  Slovenia (Slovenian)
      •  Spain (Spanish)
      •  Sweden (Swedish)
      •  Switzerland(German, French)
      •  Turkey (Turkish)
      •  United Kingdom
      • Asia Pacific
      •  Australia
      •  China
      •  Hong Kong
      •  India
      • Japan
      •  Korea (Korean)
      •  Malaysia
      •  New Zealand
      •  Philippines
      •  Singapore
      •  Taiwan
      •  Thailand (Thai)
      • Vietnam
      • Americas
      •  Brazil (Portuguese)
      •  Canada
      •  Mexico (Spanish)
      •  United States
      Can't find the country/region you're looking for? Visit our export site or find a local distributor.
  • Translate
  • Profile
  • Settings
Upcycle It
  • Challenges & Projects
  • Design Challenges
  • Upcycle It
  • More
  • Cancel
Upcycle It
Blog [Upcycle It] Interactive Race Car Driver - Lights
  • Blog
  • Forum
  • Documents
  • Polls
  • Files
  • Events
  • Mentions
  • Sub-Groups
  • Tags
  • More
  • Cancel
  • New
  • Share
  • More
  • Cancel
Group Actions
  • Group RSS
  • More
  • Cancel
Engagement
  • Author Author: Workshopshed
  • Date Created: 30 Mar 2017 8:53 PM Date Created
  • Views 618 views
  • Likes 2 likes
  • Comments 3 comments
  • interactiveracecardriver
  • upcycle_it
  • upcycled_interactiveracecardriver
Related
Recommended

[Upcycle It] Interactive Race Car Driver - Lights

Workshopshed
Workshopshed
30 Mar 2017

One of the key features of the car is the lights. This will consist of headlights, brake lights and indicators. The thought is that the headlights can be controlled by the users and the indicators and brake lights will trigger automatically based on the motion of the car. Either way they will all ultimately be controlled by the Intel Edison and it's likely I'll use the Arduino breakout and Grove shield for its pluggable headers.


Headlights

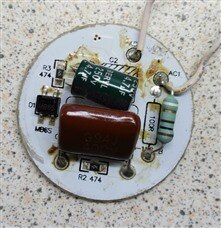
The other year I had some LED downlights that failed on me. Curious to know what they had inside I cracked one open to see. After removing the glass and a load of potting compound I broke out a simple board with some LEDs on one side and a bridge rectifier and some resistors and capacitors on the other.

imageimage

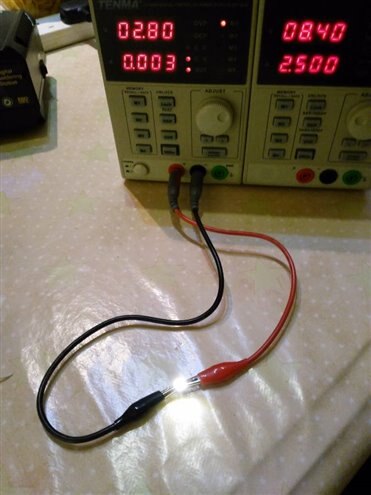
After desoldering the components I tested the LED using an adjustable powersupply. The voltage was set to 2v and the current limit 20mA. I then increased the voltage until it started glowing. At 2.8v I had a workable brightness and at that voltage the LED was drawing between 3 and 5mA.

imageimage

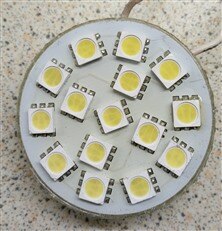
In the process of soldering these to some scrap PCBs, I discovered that the reason for 3 lots of connectors is that there are 3 individual LEDs in each package. I also discovered that some of the packages not all three of the LEDs were working. This might account for why the light failed in the first place as the original circuit seems to chain all the LEDs in series like Christmas tree lights. I'll likely need to re-measure the current now that I've worked out that there are potentially 3 times as many LEDs. If they take a lot of power then I'll use a PWM signal to dim them down a bit.

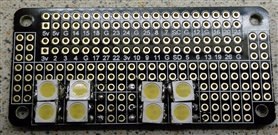
You might recognise the PCB if you are a Raspberry Pi Zero fan, it is from a batch of AverageManVsPi ProtoZeros where the silk screening failed quality control. I got them for the price of postage and they make great "tri-pad" boards for prototyping regardless of if you attach them to a Pi or not.

Once I've worked out the rest of the car chassis design I'll chop up the PCBs to mount them on the front of the car.


Brake Lights

In my box of electronic components I've a large number of 3mm red LEDs, I'm not actually sure where I got these but they have very short legs so I presume they came straight off a PCB. I've checked I've enough for a couple of sets of 6 LEDs to make for a nice bright brake light. The plan is to mount these on some stripboard or PCB similar to above.
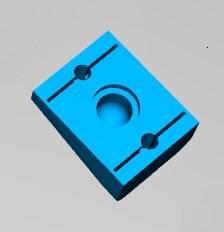
 

Indicators

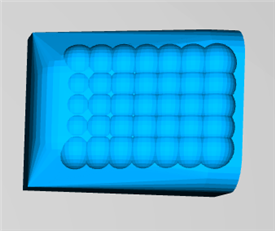
I also checked to see if I had any orange LEDs. I had 3 which was annoying as I'd need 4 for the indicators. However, I did have lots of white LEDs. So I designed an indicator block in OpenSCAD to be printed from some translucent orange filament that I bought the other year. I printed out a few tests and in the process noticed two things. Firstly that the light shone best where there was minimal infill I'd tried 40% and 8%. Also that my initial drill holes were so small that they just closed up. I realised that I could combine these two and have a zero infill to give a hollow box and then add some slits to force the slicer to add some extra supports for my screw holes. I also added a bubbly texture to the top to help diffuse the light.

imageimage

https://github.com/Workshopshed/UpcyclingDesignChallenge/tree/master/3DModels


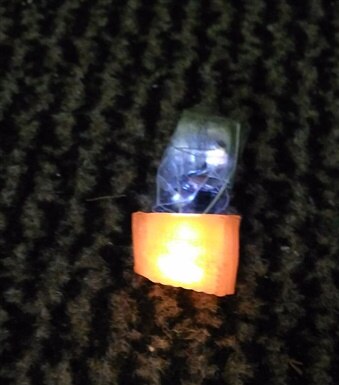
To test the light I inserted a white LED in the back and powered it from a couple of button cells. I'll print out the other three when I've a better idea as to how the bumper assembly will be put together.

image


Other Posts

[Upcycle It] Interactive Race Car Driver - Plan of action

[Upcycle It] Interactive Race Car Driver - Software

  • Sign in to reply

Top Comments

  • jasonwier92
    jasonwier92 over 8 years ago +3
    You got a light sensor, would be a shame not to have automatic headlights!
  • Workshopshed
    Workshopshed over 8 years ago in reply to jasonwier92 +2
    Good suggestion, thanks Jason
  • DAB
    DAB over 8 years ago +2
    Nice post. Just goes to show that you should always check out failed devices. Always something useful inside. Sort of like a treasure hunt. DAB
  • DAB
    DAB over 8 years ago

    Nice post.


    Just goes to show that you should always check out failed devices.


    Always something useful inside.


    Sort of like a treasure hunt.


    DAB

    • Cancel
    • Vote Up +2 Vote Down
    • Sign in to reply
    • More
    • Cancel
  • Workshopshed
    Workshopshed over 8 years ago in reply to jasonwier92

    Good suggestion, thanks Jason

    • Cancel
    • Vote Up +2 Vote Down
    • Sign in to reply
    • More
    • Cancel
  • jasonwier92
    jasonwier92 over 8 years ago

    You got a light sensor, would be a shame not to have automatic headlights!

    • Cancel
    • Vote Up +3 Vote Down
    • Sign in to reply
    • More
    • Cancel
element14 Community

element14 is the first online community specifically for engineers. Connect with your peers and get expert answers to your questions.

  • Members
  • Learn
  • Technologies
  • Challenges & Projects
  • Products
  • Store
  • About Us
  • Feedback & Support
  • FAQs
  • Terms of Use
  • Privacy Policy
  • Legal and Copyright Notices
  • Sitemap
  • Cookies

An Avnet Company © 2025 Premier Farnell Limited. All Rights Reserved.

Premier Farnell Ltd, registered in England and Wales (no 00876412), registered office: Farnell House, Forge Lane, Leeds LS12 2NE.

ICP 备案号 10220084.

Follow element14

  • X
  • Facebook
  • linkedin
  • YouTube