


Hello Vertical Farming Challengers, and anyone else who happens upon this blog! 
Well, I've been a bit remiss in both my blog reading and writing. I like to try and support everyone as much as possible and to keep my reports up to date. But alas, life gets in the way.
So, I have a lot to cover in this blog post so let's get started!
Section 1 : Recap - Ok, in my last blog post I talked about my design for rotating the stackable container cultivation unit. See images below. I had originaly designed a belt driven unit, image on the left, but then opeted for a direct contact design, image on the right, instead. All in all, I've ended up with an implementation that is very close to the chosen design. Again, the purpose of the rotator system is to assist in providing uniform lighting, via a vertically oriented LED grow light bar, to the cultivator unit while maintaing a minimal footprint.
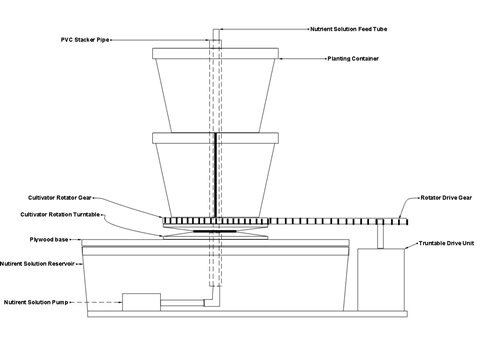
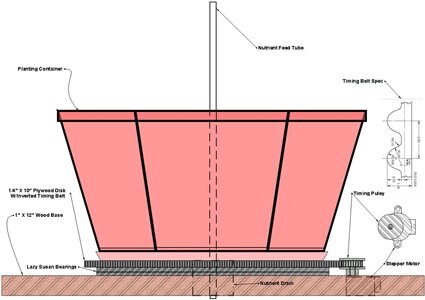
The chosen design for the rotator system uses a stepper motor with a timing pulley driving a "timing disk" based turntable. I chose the direct contact design because it reduced the over all footprint of the entire cultivation unit. The entire cultivation unit footprint, not including lighting, is now 16" x 16". The unit will support between 18 and 36 individual plants, depending on plant type. The actual rotator system can be seen in the image below. I like to call this a prime example of rig-gineering. In the image you can see the stacked container cultivator unit resting on top of the fabricated timing disk/turntable along with the stepper motor/timing pulley drive unit. The motor mount system was fabricated from scrap brackets. It employees rubber spacers to allow for tension adjustement of the direct contact drive system. Nothing fancy but it works pretty well. For a detailed parts list and design description please see my Stacked Container Hydroponics for Vertical Farming : Blog 3 post.

The actual application of the rotator system will be somewhat different than described in my last blog post. I had imagined a contiuous and very slow rotation of the cultivator. In suing the completed rotator however I believe I will instead use a priodic rotation scheme. Rotating one set of plants into position and allowing them to remain for an 8 hour period and then rotating to the next set of plants. As there are basically 6 plant positions around the circumference of the cultivator unit the I will rotate he cultivator so that the lightitng bar is positioned between two planting positions. I am also considerning a periodic oscillation within the 8 hour period to assure that the entire plant sruface, in both planting positions, receives adequate light.
I have also completed the control software for the rotator system. It currently includes control functionality for speed, idle time, direction and stop. The software was written on the EFM2ZG using SimplicityStudio. I am hoping for, and believe it will be, an easy port to the EZR32WG device when I receive starter kit. The plan is to control and monitor the cultivator unit from one of the EZR32WG. I will establish a radio link to the second EZR32WG which will be linked serialy to a Raspberry Pi. I currently have this serial link between the EFM32ZG and the Raspberry Pi. The second EZR32WG will provide the Pi with a method of wirelessly controlling and monitoring the cultivator unit. This setup could be scaled up to some number of cultivator units. I have created a video that demonstrates the EFM32ZG/RPi link and the function of the rotator system. See the video below.
Section 2 : New Business - So, now that the rotator system is done, definitely the most difficult piece of the design for me, it's time to move on to the nutrient feed, the lighting and the automation and sensor monitoring systems.
- Nutrient Feed - I am using a commercially available three part nutrient solution from General Hydroponics. I have used the GenHydro products in a couple of hydroponics projects in the past and am very pleased with the results they achieved. And, since I have some already on hand it's another element I don't have to purchase. I am attempting to keep the cost of the entire project to a minimum.
The nutrient feed system has changed from the original design only in that I don't believe the separate PVC Stacker Pipe and Nutrient Feed Tube are required. The containers I'm using stack nicely and are reasonably stable without additional support. I have all parts in hand now, except the sprinkler head, and will be testing the design over the next couple of days.
The nutrient feed system consists of:
- A nutrient solution reservoir. I am using a medium sized Tupperware storage container for my reservoir. Another piece I already had.
- A small fountain type submersible pump. Again, a piece I already had available.
- A length of 3/8" PVC pipe.
- A sprinkler head. I am designing this piece and will have it 3D printed.
Please see the drawing below for my nutrient feed system basic design.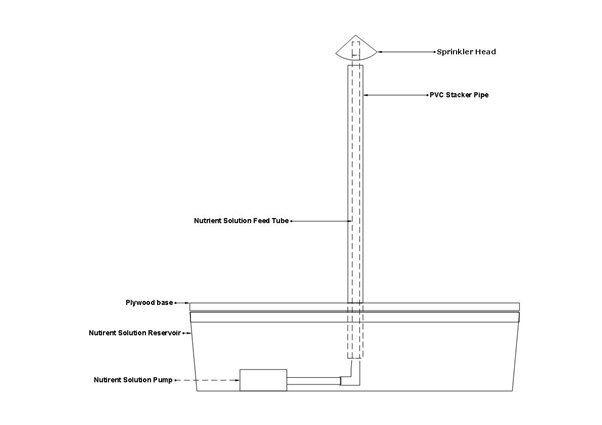
I am considering adding automatic nutrient replenishment and pH balance to the system if budget and time allow. I suspect that I will continue to add some of these automation elements both during and after the challenge. Other than that I will control these elements of my system manually.
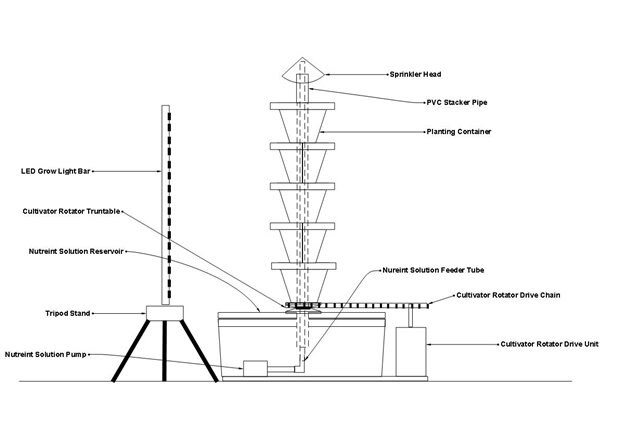
- Lighting - I will be using both natural lighting and LED-based supplemental lighting. The unit is totally open and small enough to be placed in front of a window. This will allow for the use of available natural light. In my research, I have seen both natural, via skylights, and artificial, via various different light sources, being used for indoor farming/gardening. I have chosen to use a little of both. This should provide adequate lighting and minimize the cost of purchasing artificial lighting. The artificial lighting I have chosen consists of 10W red and blue LED bar type grow lights. These light bars are modular in nature and not fully assembled. They consist of several strips of SMD LEDs. This should allow me to configure the lighting perfectly for my design. I started to purchase individual LEDs but did not relish the idea of soldering several hundred SMD LEDs. I was fortunate enough to find a kit that has this bit already done but allows for as much customization as is desired. I will provide more information on exactly what I've chosen, and on my mounting arrangement, in subsequent blog posts. You can see the intended design in the complete system drawing below.
- Automation and Sensor Monitoring - There's not much to report here. I am still working on the design for this element of the project. I know that I will use an EZ32WG and Raspberry Pi at the cultivator unit location. And I will incorporate the Sensor-Puck at the grow location as well. I have purchased a BLE dongle in hopes that I can read the puck sensors from the RPi. Since I have already worked out the serial comm between the EFM32ZG/EZR32WG and RPi it should be a simple matter to read the puck with the Pi, relay that to the EZR32WG and then radio link that back to the central control console application. In this project i could actually just use WiFi as the locations are in close proximity. But the idea of the challenge, and ultimately my design as well, is to use the SILabs devices. In a larger installation it is conceivable that there would be many cultivator units, possibly in separate buildings or greenhouses, and the radio communications would be very useful. All implemented sensors and control elements will be available via the central control center application. And all sensor readings and control actions will be logged at the central control center application as well as in an IoT service. The IoT service I will be using is InitialState.com.
Some of the sensors and control elements I will definitely be implementing at the grow location:
- Total cultivator current sensor for power usage. This will be a simple clamp type sensor.
- U/V and ambient light sensing via the sensor puck.
- Temperature and relative humidity via the EZR32WG and sensor-puck onboard sensors.
- MCU core temperature. Just because I can.
- Various relays to control lighting, the rotator system and nutrient feed pump.
Some sensors and controls under consideration:
- Nutrient solution TDS, conductivity, pH and temperature. These would be used as feed-forward sensing for various nutrient feed automation control elements.
- Cultivator weight sensor. This could be used to get an on-going reading of cultivation progress and estimates of expected yield.
- ???
Section 3 : The Stormy Mind
... is quite pleasantly less stormy, or at least in an anxious way, than usual. The storm can run in two fashions as a rule. Anxiety or creativity. The creative side is definitely in greater control these days. Recently there have been a number very positive and timely events that have occurred in my life. No personal details other than to say that the ankle replacement and recovery have gone exceedingly well. This is definitely a life changer for me and everyone in my family. We take for granted, much too much and much too often, things like the simple act of walking without being in constant pain.
Section 4 : The New Farm Alamanac (previously Alamanc lol...)
Here are couple of interesting FaceBook links that were posted by The Association for Vertical Farming. Very interesting stuff going on around the world concerning vertical and other alternative farming methods.
Are Vertical Farms The Future Of Agriculture?
https://www.facebook.com/verticalharvest
Come and see the final presentations of three vertical farming concepts for Minneapolis!
I found this particularly interesting as there are folks with allergies in my house.
The AVF is now on Instagram!
https://instagram.com/verticalfarm/
And here's a bonus site. It's not directly related to vertical farming but will definitely be of interest to all the engineer types out there. There are definitely some great ideas here and some that could be applied to vertical farming I'm sure.
Videos | Interesting Engineering
Well, that's it for this blog post. Sorry for the delay and i will try to be more diligent in my blogging and in supporting other's posts. Thngs have calmed down a little here so we should be good to go!
Cheers, good luck on the challenge and happy farming!
Rick
Top Comments