element14 Community
element14 Community
    Register Log In
  • Site
  • Search
  • Log In Register
  • About Us
  • Community Hub
    Community Hub
    • What's New on element14
    • Feedback and Support
    • Benefits of Membership
    • Personal Blogs
    • Members Area
    • Achievement Levels
  • Learn
    Learn
    • Ask an Expert
    • eBooks
    • element14 presents
    • Learning Center
    • Tech Spotlight
    • STEM Academy
    • Webinars, Training and Events
    • Learning Groups
  • Technologies
    Technologies
    • 3D Printing
    • FPGA
    • Industrial Automation
    • Internet of Things
    • Power & Energy
    • Sensors
    • Technology Groups
  • Challenges & Projects
    Challenges & Projects
    • Design Challenges
    • element14 presents Projects
    • Project14
    • Arduino Projects
    • Raspberry Pi Projects
    • Project Groups
  • Products
    Products
    • Arduino
    • Avnet Boards Community
    • Dev Tools
    • Manufacturers
    • Multicomp Pro
    • Product Groups
    • Raspberry Pi
    • RoadTests & Reviews
  • Store
    Store
    • Visit Your Store
    • Choose another store...
      • Europe
      •  Austria (German)
      •  Belgium (Dutch, French)
      •  Bulgaria (Bulgarian)
      •  Czech Republic (Czech)
      •  Denmark (Danish)
      •  Estonia (Estonian)
      •  Finland (Finnish)
      •  France (French)
      •  Germany (German)
      •  Hungary (Hungarian)
      •  Ireland
      •  Israel
      •  Italy (Italian)
      •  Latvia (Latvian)
      •  
      •  Lithuania (Lithuanian)
      •  Netherlands (Dutch)
      •  Norway (Norwegian)
      •  Poland (Polish)
      •  Portugal (Portuguese)
      •  Romania (Romanian)
      •  Russia (Russian)
      •  Slovakia (Slovak)
      •  Slovenia (Slovenian)
      •  Spain (Spanish)
      •  Sweden (Swedish)
      •  Switzerland(German, French)
      •  Turkey (Turkish)
      •  United Kingdom
      • Asia Pacific
      •  Australia
      •  China
      •  Hong Kong
      •  India
      •  Korea (Korean)
      •  Malaysia
      •  New Zealand
      •  Philippines
      •  Singapore
      •  Taiwan
      •  Thailand (Thai)
      • Americas
      •  Brazil (Portuguese)
      •  Canada
      •  Mexico (Spanish)
      •  United States
      Can't find the country/region you're looking for? Visit our export site or find a local distributor.
  • Translate
  • Profile
  • Settings
element14 presents
  • Challenges & Projects
  • More
element14 presents
Off-Grid MakerShop Project - The Hydro-Electric System Design & Discussion
  • Blog
  • Forum
  • Documents
  • Polls
  • Files
  • Members
  • Mentions
  • Sub-Groups
  • Tags
  • More
  • Cancel
  • New
Join element14 presents to participate - click to join for free!
  • Share
  • More
  • Cancel
Group Actions
  • Group RSS
  • More
  • Cancel
Engagement
  • Author Author: KalebTheMaker
  • Date Created: 22 Oct 2022 2:28 AM Date Created
  • Views 3142 views
  • Likes 14 likes
  • Comments 29 comments
  • micro-hydro
  • diy
  • power
  • off-grid
Related
Recommended

Project - The Hydro-Electric System Design & Discussion

KalebTheMaker
KalebTheMaker
22 Oct 2022

In addition to the main Solar generation system, I am going to build a backup Hydro-Electric system in the year-round stream. Currently, it is the dryest part of the year and there is still a good amount of water flowing in the stream. From the water lines I can see in the stream it's going to get *much* higher in the winter months which should be more than enough for the turbine. I should be able to generate enough electricity from a turbine to offset the lack of sun in the winter.

The coolest part of hydro is that it generates 24h a day rather than the 5-6 hours of sunlight one might expect on Solar Panels. It's much less wattage, but running all night and day makes up for that.

I am not starting this project just yet, there are a couple more that need to be done first (keep an eye out for those as well), I just wanted to get the topic open so we can discuss. 

This topic is open for discussion, I would love to hear your ideas and have you all involved. I will be documenting every step of the build here with descriptions, pictures and videos.

Why Hydro if I am installing Solar?

The solar array is going to be the main power generator. But during the winter months, it will generate much less than the summer months. I need a way to offset that. Many people run a generator for several hours every couple of days, or as needed. Since I am running a shop with CNC routers, welders, laser cutters, etc, I would need to run the generator quite often. And with gas prices around $6.70/gal right now, It's the most expensive way to generate electricity that I can think of. With the stream flowing all winter, It's a perfect opportunity to harness that potential energy to generate power. 

Setting the Stage

image      image

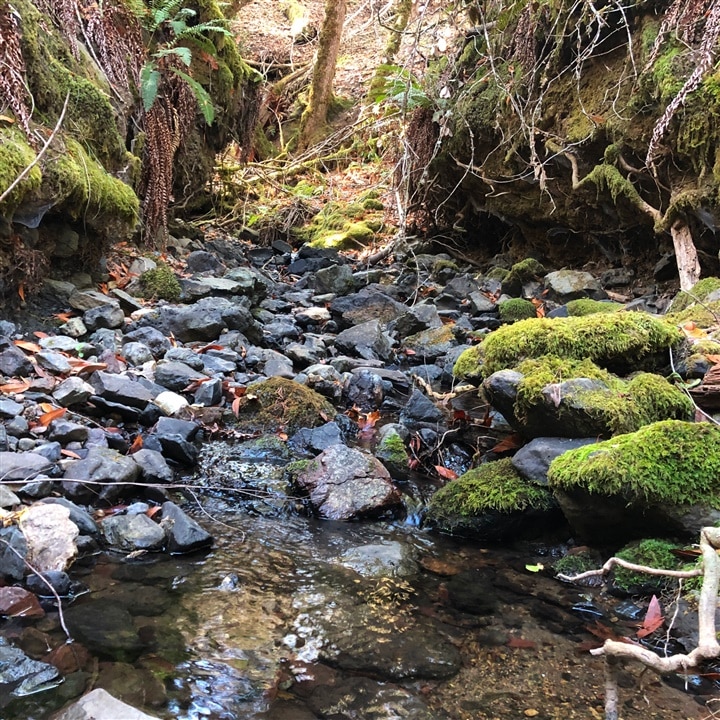
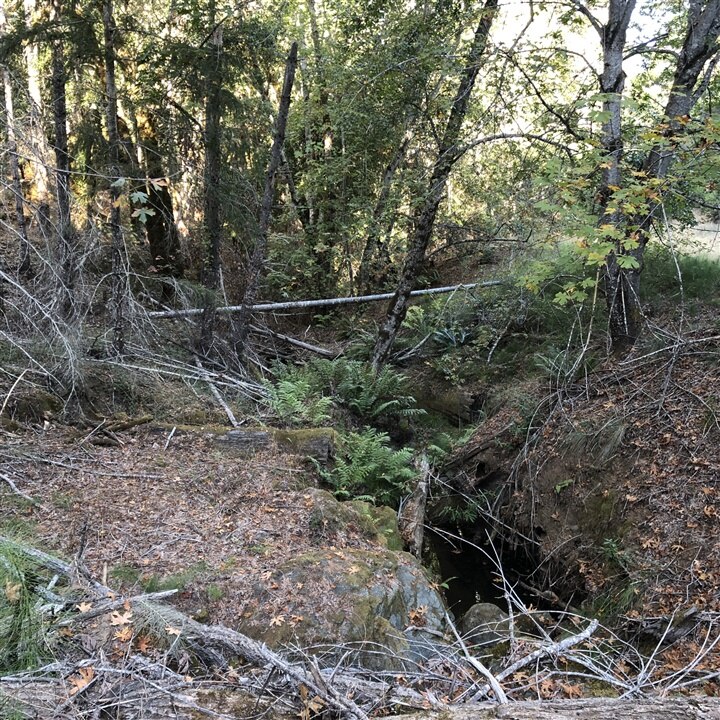
The stream runs through a large part of the property dropping in elevation. I walked the creek from the bottom to the top looking for good sites to collect water, and to place the turbine. The graph below shows the elevation & distance between these locations. Yes, it's in reverse, but I walked from bottom to top and did battle with google sheets and lost... Currently, it is October and the dryest part of the year in my area. There is still flow in the stream right now. Not much, but it is running. From observing (what I think are) the high water lines, it will have quite a bit of water flowing during the winter months. 

image

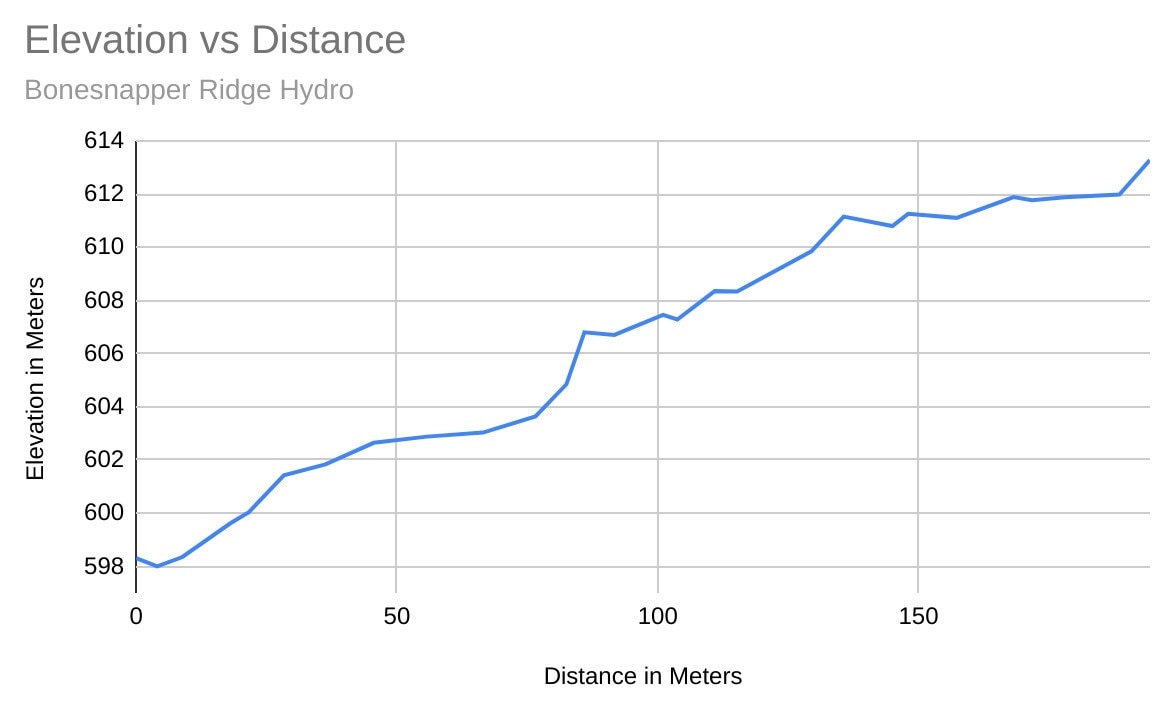
As you can see, we get about 16m of elevation drop over about 200 meters in distance. I think this qualifies as a "low head" system. I won't know a GPM or L/S rate until it the rain starts, and I get a capture system in place.

I will also need to run a conduit from the hydro generation site up to the solar site since that is where all of the batteries will be.  

The Current Plan

The current plan is to build some sort of intake system with filtration to filter out large debris and pipe that into a 50gal plastic barrel. The water will enter from the top of the barrel and exit about half way up the barrel in a 2" poly tube. The water will then run through approximately 500-700' of 2" poly tube to a motorized ball valve and then into the turbine distribution. The 2" pipe needs to be reduced to much smaller nozzles that shoot the water into the pelton wheel of the turbine. As beacon_dave suggested, I could also install motorized valves on each of the nozzles to control the amount of flow to the pelton wheel. 

The Intake

The intake will divert water from the natural streambed into (probably multiple) 2" poly tubes. It will have to be constructed at a place in the stream where there is a small but dramatic elevation change. It could be as simple as cutting a plastic barrel at a diagonal and fitting it with 2" fittings. It will also have to have a screen to filter out large debris. I have seen some pretty clever methods for intakes. One was a rotating screen drum with catchment on the bottom 1/3rd. The rotating screen let all the large debris fall off back into the flowing stream. 

The Barrel

Water flows into the barrel from the top, and exits in the center. This serves two purposes. First, it is another stage of filtration by having any heavy debris fall to the bottom of the barrel (I will have to have some sort of cleanout), and second, it removes any air in the line by having the water enter at the top, and exit at the center. 

The 2" Poly Tube

This may be the most critical part of the system. The 2" tube needs to be as long as possible, and drop in as much elevation as possible to build up enough "head" to run the turbine. "Head" is the height measurement from where the water enters the system down to where it exits the system at the turbine. Combined with the amount of water flowing through the 2" poly tube we can calculate how much pressure will be in the tube, and even calculate how much power could be generated. This is a very simplified description of how this works and there are formulas for all of this which I do not understand yet but have a general idea. 

The Turbine

I have looked into building my own, and that's not off the table, but there are off-the-shelf options available that are within the budget. If they are more efficient and can generate more power, that is going to be very attractive. Dont worry, there is plenty of other DIY in the rest of the system.

These systems typically use a Pelton wheel connected to a generator, with multiple reducer nozzles firing the water at the wheel from different angles. These are what I think of as a "side load" type of turbine. Another style which I have not investigated much yet, but supposedly works better for a "low head" are what I think of as a "top load" where the water falls down onto some sort of impeller to turn the generator. 

The turbine type is all up in the air still. I have not decided on which type to buy, use, or build.

That is about all the information I have on this project so far. Please feel free to discuss this, I will be monitoring this blog and will try to respond to everyone. 

-Kaleb

  • Sign in to reply
Parents
  • beacon_dave
    beacon_dave over 2 years ago

    "...I have looked into building my own, and that's not off the table, but there are off-the-shelf options available that are within the budget. If they are more efficient and can generate more power, that is going to be very attractive..."

    Off-the-shelf may get you started quicker, but when it comes to optimising the system then it may become more problematic.

    I can see a couple of tricky bits in the design for an optimal system all year round.

    Working with nature here, so wide range of changes in water supply throughout the year from virtually none to flash-flooding. Whereas generation appears to tend to be optimised for steady rate.

    You perhaps either tame the river e.g. Hoover Dam style (no project too big !) or alternatively need to adapt the generation such that it can dynamically changes to the supply (we have microcontrollers!).

    My gut feeling would be that you have multiple generators that you bring online as the supply increases and divide the supply between them. That way you can have a lighter more efficient generator optimised for the lowest flow rates and as soon as it maxes out a second identical one kicks in to make use of the surplus. Alternatively, you completely divert the input from the light flow generator over to a medium flow generator and then over to a high flow generator. Each optimised for a different range of flow rates.

    If you attempt to do this by switching nozzles alone, then your generator needs to be designed to be strong enough for the max nozzles / max flow scenario, however that means that during low flow rates there are going to be extra losses due to the increased weight and friction.

    If you build your own, then Clem's super strength engineering resin might be worth trying for the turbine blades. 

    /challenges-projects/element14-presents/f/forum/51028/i-am-3dprinting-nails

    Being able to 3D print your own would allow for optimising the design.

    The intake screen / collection box looks like it can be a bit problematic as well. Eventually you want to optimise for different flow rates so as not to waste any of that precious water. However, at the same time you want to keep the debris out which generally requires some overflow flushing going on. Perhaps this could be made dynamic where the flushing is periodic rather than continual so as not to waste water.

    Just looking at the autumn leaf fall here in the back garden, and the wet leaves rapidly smother a drain, so I suspect it wouldn't take much to smother an intake box and divert the water over to top.

    You could perhaps have multiple collection boxes in a ladder to handle different flow rates as well as redundancy should one clog. Debris traps could be placed between them. Alternatively, a siphon intake could perhaps solve a lot of surface debris problems.

    • Cancel
    • Vote Up 0 Vote Down
    • Sign in to reply
    • More
    • Cancel
  • KalebTheMaker
    KalebTheMaker over 2 years ago in reply to beacon_dave

    Hi Dave, great ideas as always!

    For intake, I like the idea of a DIY coanda-style intake. Taking the idea from the first video you posted, and add an accelerator ramp on the top to speed up the debris and remove some of the turbulence from the water. And possibly multiple intakes if required. 

    When I walked the creek the other day, there was a lot of large debris wedged in rocks and sharp bends. This may be a problem, but I am not really sure where that is all coming from, it must be on the lower side of the culvert and the proposed intake would be above that.

    I will take a quick video of the current flow from a culvert that is about 1/4 of the way down the proposed penstock, and then post another once we have some rainfall. GPM is the big variable right now since I have not seen this flowing in the winter months. 

    I don't have a resin printer anymore, but maaaybe if I ask mayermakes nicely, he might print one for me with his awesome resin!

    • Cancel
    • Vote Up 0 Vote Down
    • Sign in to reply
    • More
    • Cancel
Comment
  • KalebTheMaker
    KalebTheMaker over 2 years ago in reply to beacon_dave

    Hi Dave, great ideas as always!

    For intake, I like the idea of a DIY coanda-style intake. Taking the idea from the first video you posted, and add an accelerator ramp on the top to speed up the debris and remove some of the turbulence from the water. And possibly multiple intakes if required. 

    When I walked the creek the other day, there was a lot of large debris wedged in rocks and sharp bends. This may be a problem, but I am not really sure where that is all coming from, it must be on the lower side of the culvert and the proposed intake would be above that.

    I will take a quick video of the current flow from a culvert that is about 1/4 of the way down the proposed penstock, and then post another once we have some rainfall. GPM is the big variable right now since I have not seen this flowing in the winter months. 

    I don't have a resin printer anymore, but maaaybe if I ask mayermakes nicely, he might print one for me with his awesome resin!

    • Cancel
    • Vote Up 0 Vote Down
    • Sign in to reply
    • More
    • Cancel
Children
  • beacon_dave
    beacon_dave over 2 years ago in reply to KalebTheMaker

    "...When I walked the creek the other day, there was a lot of large debris wedged in rocks and sharp bends..."

    Natural first stage filtration Slight smile

    I guess you could aim to have a series of graded rock/gravel beds before the intake filter to try and remove most of the debris upstream of the final filter.

    The coanda box appears a bit inefficient in some ways as you waste a lot of water over the top just to provide the self-cleaning action. A submerged intake filter would avoid the floaty debris however I suspect is likely to silt up without regular cleaning, or at least a cunning plan.

    • Cancel
    • Vote Up 0 Vote Down
    • Sign in to reply
    • More
    • Cancel
  • beacon_dave
    beacon_dave over 2 years ago in reply to KalebTheMaker

    "...For intake, I like the idea of a DIY coanda-style intake..."

    Have you spotted any locations that will suit a coanda box naturally like a drop in a rock or do you think a small weir like this might be on the cards?

    image

    I think with a weir you will have a better chance of directing the water toward the intake.

    With this one set into a step in the rock, it does a pretty good job at catching most of the water at lower flow rates

    image

    but at higher flow rates a lot appears to be lost over the top. 

    image

    At higher flow rates still, I suspect a lot will be lost around the sides.

    imageMight need a bit more than a few flat stones to direct it.

    Some of the overshoot I suspect is due to an incorrectly shaped top. If it was more precisely shaped, then the coanda effect might help it hold the flow to the profile. I think there is specially profiled mesh available to 'catch' the water more effectively as it hugs the curve.

    At higher flow rates however I suspect that the box may fill up faster than it can empty into the filtration barrel. 

    Which is another area that probably requires attention. You've gone to all the effort to catch the water and filter it but then only to allow a substantial amount to overflow the top straight back out to the stream without going through the turbine first.

    image

    I guess if you had a second weir then this could drain into it along with any fast-flowing water that makes it over the top of the first coanda box and eventually to a second generator for winter flow rates.

    • Cancel
    • Vote Up 0 Vote Down
    • Sign in to reply
    • More
    • Cancel
  • KalebTheMaker
    KalebTheMaker over 2 years ago in reply to beacon_dave

    There is a road that crosses the stream with a culvert. There are some large rocks right on the down side of the culvert, but I may be able to setup something like this there. Its closer to the turbine location, so a little less head. There may be another spot upstream a bit that I can build a weir. I will have to go walk that part again and look more closely with this in mind. 

    • Cancel
    • Vote Up 0 Vote Down
    • Sign in to reply
    • More
    • Cancel
  • mayermakes
    mayermakes over 2 years ago in reply to KalebTheMaker

    Sure can do..also massive envy for that huge project.

    • Cancel
    • Vote Up 0 Vote Down
    • Sign in to reply
    • More
    • Cancel
  • beacon_dave
    beacon_dave over 2 years ago in reply to KalebTheMaker

    Perhaps consider doing both - maximize on the available resources.

    • Cancel
    • Vote Up 0 Vote Down
    • Sign in to reply
    • More
    • Cancel
element14 Community

element14 is the first online community specifically for engineers. Connect with your peers and get expert answers to your questions.

  • Members
  • Learn
  • Technologies
  • Challenges & Projects
  • Products
  • Store
  • About Us
  • Feedback & Support
  • FAQs
  • Terms of Use
  • Privacy Policy
  • Legal and Copyright Notices
  • Sitemap
  • Cookies

An Avnet Company © 2025 Premier Farnell Limited. All Rights Reserved.

Premier Farnell Ltd, registered in England and Wales (no 00876412), registered office: Farnell House, Forge Lane, Leeds LS12 2NE.

ICP 备案号 10220084.

Follow element14

  • X
  • Facebook
  • linkedin
  • YouTube