


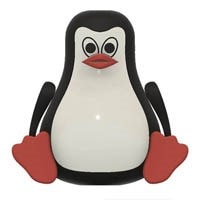
This is the second post in a series about Xut the animatronic penguin. In the first post we learned about Xut's origin and how he was designed in Fusion 360 and printed on a 3D printer in PLA. The wings are driven by two SG90 9 gram micro servos.
In this post the mechanical and electronic components are completed. Xut tells jokes!
More on Xut's Origin
I have always found the names and origins of some of the more prominent operating systems and computer languages humorous. For example, according to Wikipedia, GNU is a recursive acronym for "GNU's Not Unix" and it is Unix-like but differs and contains no Unix code. And of course there are various kernels / operating systems such as Linux, Xenix, Venix, AIX, etc. with names reminiscent of Unix. Did you know that the Linux mascot is named Tux?
Xut is a recursive acronym for "XUT's Unlike TUX". A joke that didn't make it to Xut's repertoire is appropriate here:
A penguin walks into a police station to report that his father is missing. The desk sergeant looks up and asks " Can you describe him?"
While they are both Penguin-like, Xut is a nobody penguin with a dream about making it big someday in sit down comedy while Tux is mascot for a big name Unix-like kernel.
Making an Animatronic Penguin
Hardware
Adafruit EdgeBadge
2 SG90 9 gram Microservos
Salvaged speaker
Firmware / Software
Adafruit CircuitPython
Tools
iPhone - record sound
Anycubic I3 Mega
Soldering iron
Design Software
iTunes - convert to WAV
Audacity - change pitch
Fusion360 - design penguin and mechanism
Cura - Slicer
Consumables
PLA - black, white, orange
Solder
Wire
The design and fabrication of the penguin body and the mechanics of the motorized wings were described in detail in the first post. Briefly, the body was freehand sketched and roughly dimensioned. It was then modeled and tweaked in Fusion 360 and printed in PLA on an Anycubic I3 Mega 3D printer. The mechanical modifications since that time are limited to minor aesthetic modifications to the wings and the addition of a speaker inside the body. Hot glue and cyanoacrylate adhesive (superglue) was used to secure everything. An Adafruit EdgeBadge was also wired securely to the motors and speakers.

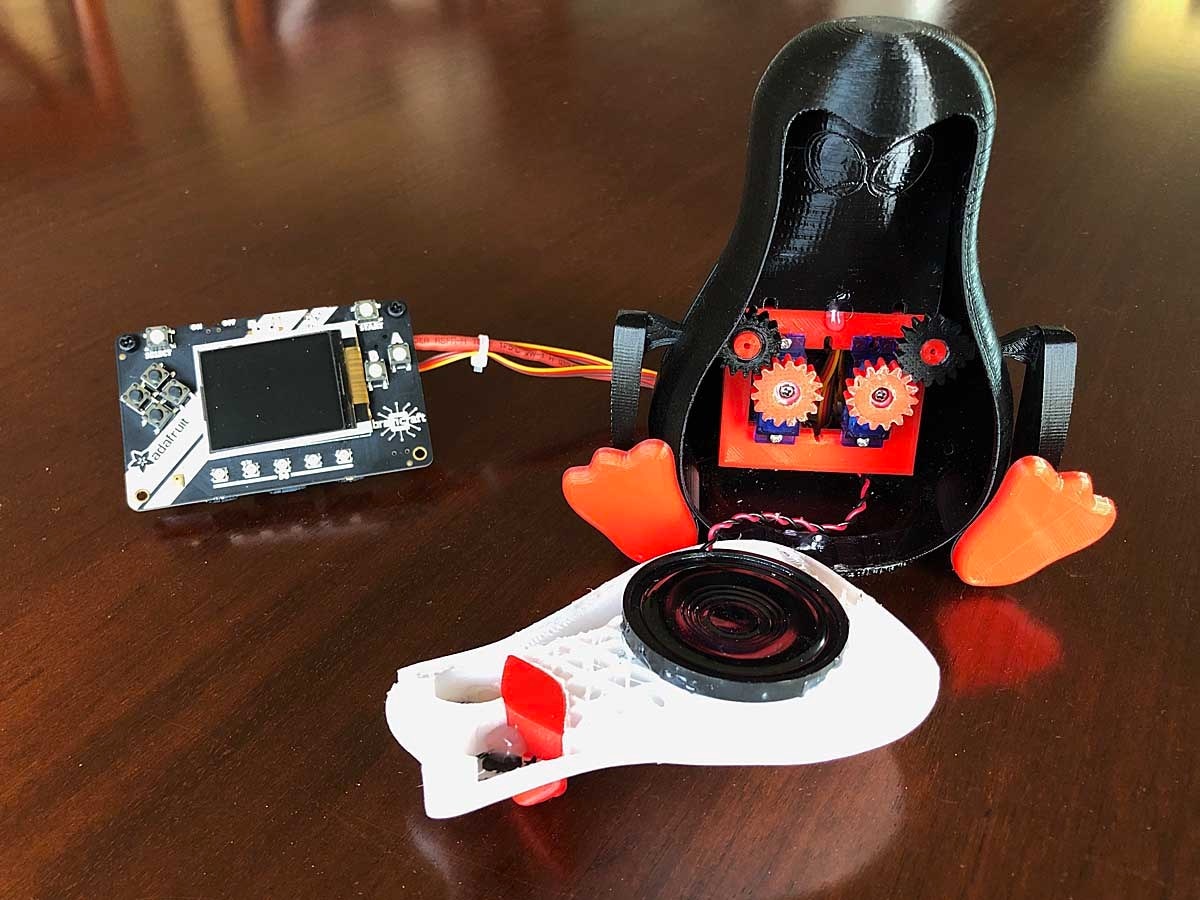
Why use the EdgeBadge? The quick answer is that they were handed out at the Superconference on hacking that I attended a week back and it was readily available. The original intent was to place a microcontroller and LiPo battery inside the body but it turned out to not fit well. So the EdgeBadge, described as a microcontroller that can run a miniature version of TensorFlow Lite was pressed into service. To get adequate volume, the trace to the onboard speaker was cut and a speaker salvaged from an old printer was placed inside Xut. It turned out that the LEDs and display on the EdgeBadge are attention getters and do not detract too much from the build.
The jokes were recorded with my voice on an iPhone and then converted in iTunes to WAV files which are required by CircuitPython. The pitch was then altered with Audacity. CircuitPython is picky about how conversion is done and format so follow the instructions closely.
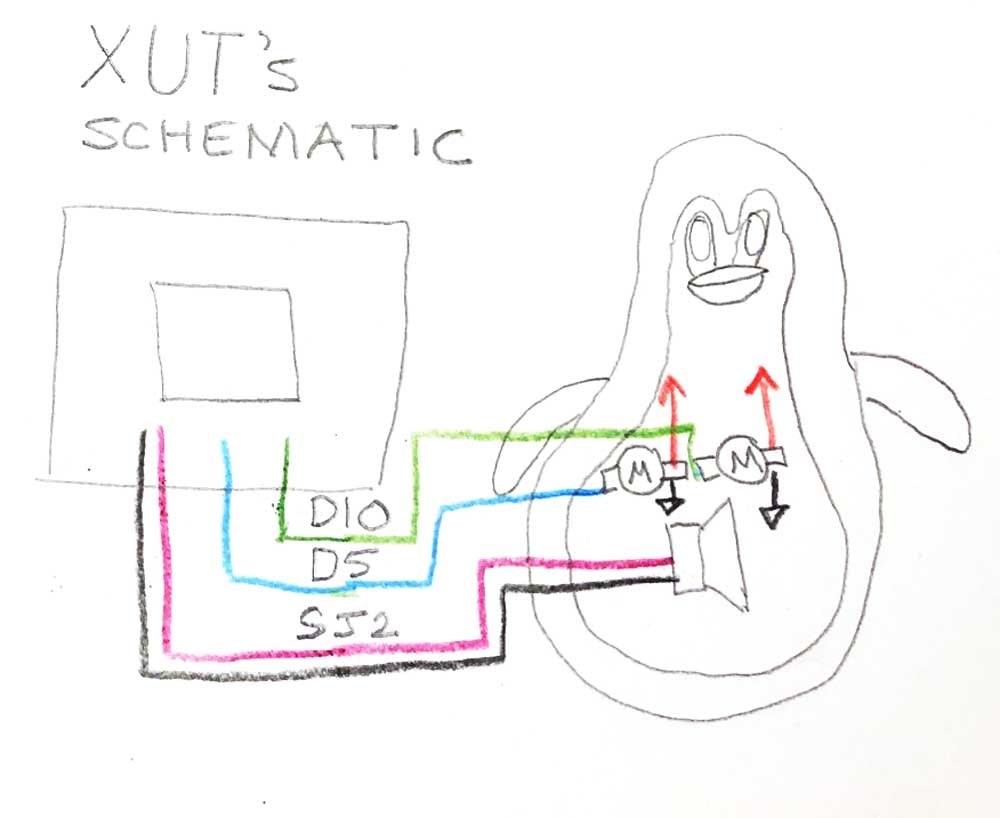
Schematic
The schematic is very simple. Digital pins D5 and D10 on the EdgeBadge are used to drive the two servos. The motors are also connected to 5V provided by the board and ground. The speaker is connected to the speaker connection provided on the board. All connections for display, buttons, and LEDs are on the EdgeBadge board.
CircuitPython Script
The script uses a CircuitPython PyBadge Conference Badge example as an outline and can be found here. In addition, Adafruit libraries for motors and audio have been added so that the wings can flap and Xut can talk. The buttons on the EdgeBadge are used to select the jokes. The EdgeBadge also advertises Xut's presence when he isn't telling a joke by flashing the LEDs in a pattern and displaying his name and instructions.
This is Xut's Conference Badge.
Push any button and he flaps his wings and
tells a joke.
"""
import time
from math import sqrt, cos, sin, radians, pi
import board
from micropython import const
import displayio
import digitalio
import neopixel
from gamepadshift import GamePadShift
from adafruit_display_shapes.rect import Rect
from adafruit_display_text.label import Label
from adafruit_bitmap_font import bitmap_font
import pulseio
from adafruit_motor import servo
import audioio
# Button Constants
BUTTON_LEFT = const(128)
BUTTON_UP = const(64)
BUTTON_DOWN = const(32)
BUTTON_RIGHT = const(16)
BUTTON_SEL = const(8)
BUTTON_START = const(4)
BUTTON_A = const(2)
BUTTON_B = const(1)
# Servo Pin Constants
leftServoPin = board.D5
rightServoPin = board.D10
# Customizations
HELLO_STRING = "HELLO"
MY_NAME_STRING = "MY NAME IS"
NAME_STRING = "XUT"
TEXT_FONTNAME = "/fonts/Arial-12.bdf"
TEXT_STRING = "Push buttons for joke"
NAME_FONTNAME = "/fonts/Alef-Bold-18.bdf"
NEOPIXEL_COUNT = 5
BACKGROUND_COLOR = 0xFF0000
FOREGROUND_COLOR = 0xFFFFFF
BACKGROUND_TEXT_COLOR = 0xFFFFFF
FOREGROUND_TEXT_COLOR = 0x000000
# Default Values for neopixels
brightness = 0.01
direction = 1
speed = 4
# Define the NeoPixel and Game Pad Objects
neopixels = neopixel.NeoPixel(board.NEOPIXEL, NEOPIXEL_COUNT, brightness=brightness,
                              auto_write=False, pixel_order=neopixel.GRB)
pad = GamePadShift(digitalio.DigitalInOut(board.BUTTON_CLOCK),
                   digitalio.DigitalInOut(board.BUTTON_OUT),
                   digitalio.DigitalInOut(board.BUTTON_LATCH))
# Make the Display Background
splash = displayio.Group(max_size=20)
board.DISPLAY.show(splash)
color_bitmap = displayio.Bitmap(160, 128, 1)
color_palette = displayio.Palette(1)
color_palette[0] = BACKGROUND_COLOR
bg_sprite = displayio.TileGrid(color_bitmap,
                               pixel_shader=color_palette,
                               x=0, y=0)
splash.append(bg_sprite)
# Draw a Foreground Rectangle where the name goes
rect = Rect(0, 50, 160, 70, fill=FOREGROUND_COLOR)
splash.append(rect)
# Load the Hello font
large_font_name = "/fonts/Alef-Bold-18.bdf"
large_font = bitmap_font.load_font(large_font_name)
large_font.load_glyphs(HELLO_STRING.encode('utf-8'))
# Load the "My Name Is" font
small_font_name = "/fonts/Arial-12.bdf"
small_font = bitmap_font.load_font(small_font_name)
small_font.load_glyphs(MY_NAME_STRING.encode('utf-8'))
# Load the Name font
name_font_name = NAME_FONTNAME
name_font = bitmap_font.load_font(name_font_name)
name_font.load_glyphs(NAME_STRING.encode('utf-8'))
# Load the Last Name font
last_name_font_name = TEXT_FONTNAME
last_name_font = bitmap_font.load_font(last_name_font_name)
last_name_font.load_glyphs(TEXT_STRING.encode('utf-8'))
# Setup and Center the Hello Label
hello_label = Label(large_font, text=HELLO_STRING)
(x, y, w, h) = hello_label.bounding_box
hello_label.x = (80 - w // 2)
hello_label.y = 15
hello_label.color = BACKGROUND_TEXT_COLOR
splash.append(hello_label)
# Setup and Center the "My Name Is" Label
mni_label = Label(small_font, text=MY_NAME_STRING)
(x, y, w, h) = mni_label.bounding_box
mni_label.x = (80 - w // 2)
mni_label.y = 35
mni_label.color = BACKGROUND_TEXT_COLOR
splash.append(mni_label)
# Setup and Center the Name Label
name_label = Label(name_font, text=NAME_STRING, line_spacing=0.75)
(x, y, w, h) = name_label.bounding_box
name_label.x = (80 - w // 2)
name_label.y = 75
name_label.color = FOREGROUND_TEXT_COLOR
splash.append(name_label)
# Setup and Center the Text Label
last_name_label = Label(last_name_font, text=TEXT_STRING, line_spacing=0.75)
(x, y, w, h) = last_name_label.bounding_box
last_name_label.x = (80 - w // 2)
last_name_label.y = 100
last_name_label.color = FOREGROUND_TEXT_COLOR
splash.append(last_name_label)
# Create the servos for the wings
leftWingPWM =  pulseio.PWMOut(leftServoPin,  duty_cycle=0, frequency=50)
rightWingPWM = pulseio.PWMOut(rightServoPin, duty_cycle=0, frequency=50)
leftServo =  servo.Servo(leftWingPWM)
rightServo = servo.Servo(rightWingPWM)
# Enable sound (required for CircuitPlayground Express)
speaker_enable = digitalio.DigitalInOut(board.SPEAKER_ENABLE)
speaker_enable.switch_to_output(value=True)
# Remap the calculated rotation to 0 - 255
def remap(vector):
    return int(((255 * vector + 85) * 0.75) + 0.5)
# Calculate the Hue rotation starting with Red as 0 degrees
def rotate(degrees):
    cosA = cos(radians(degrees))
    sinA = sin(radians(degrees))
    red = cosA + (1.0 - cosA) / 3.0
    green = 1./3. * (1.0 - cosA) + sqrt(1./3.) * sinA
    blue = 1./3. * (1.0 - cosA) - sqrt(1./3.) * sinA
    return (remap(red), remap(green), remap(blue))
palette = []
pixels = []
# Generate a rainbow palette
for degree in range(0, 360):
    color = rotate(degree)
    palette.append(color[0] << 16 | color[1] << 8 | color[2])
# Create the Pattern
for x in range(0, NEOPIXEL_COUNT):
    pixels.append(x * 360 // NEOPIXEL_COUNT)
# function to generate sounds from wav files
def play_file(sound_file):
    with audioio.AudioOut(board.A0) as audio:
        wave_file = open(sound_file, "rb")
        wave = audioio.WaveFile(wave_file)
        audio.play(wave)
        while audio.playing:
            pass
# function to flap wings
def flap_wings():
    leftOffset = 8
    for i in range(30, 91, 4):
        rightServo.angle = 120-i
        leftServo.angle =  i-5
        time.sleep(0.01)
    for i in range(90, 29, -4):
        rightServo.angle = 120-i
        leftServo.angle =  i-5
        time.sleep(0.01)
# function to tell jokes
def tell_joke(joke):
    flap_wings()
    play_file(joke)
    flap_wings()
# Main Loop
current_buttons = pad.get_pressed()
last_read = 0
while True:
    for color in range(0, 360, speed):
        for index in range(0, NEOPIXEL_COUNT):
            palette_index = pixels[index] + color * direction
            if palette_index >= 360:
                palette_index -= 360
            elif palette_index < 0:
                palette_index += 360
            neopixels[index] = palette[palette_index]
        neopixels.show()
        neopixels.brightness = brightness
        # Reading buttons too fast returns 0
        if (last_read + 0.1) < time.monotonic():
            buttons = pad.get_pressed()
            last_read = time.monotonic()
        if current_buttons != buttons:
            # Respond to the buttons
            if (buttons & BUTTON_RIGHT) > 0:
                tell_joke("Lost.wav")
            elif (buttons & BUTTON_LEFT) > 0:
                tell_joke("Picky.wav")
            elif (buttons & BUTTON_UP) > 0:
                tell_joke("Shell.wav")
            elif (buttons & BUTTON_DOWN) > 0:
                tell_joke("Waved.wav")
            elif (buttons & BUTTON_A) > 0:
                tell_joke("Clouds.wav")
            elif (buttons & BUTTON_B) > 0:
                tell_joke("Flight.wav")
            elif (buttons & BUTTON_START) > 0:
                tell_joke("Aunt.wav")
            elif (buttons & BUTTON_SEL) > 0:
                tell_joke("Bank.wav")
            current_buttons = buttons
The jokes are loaded onto the EdgeBadge along with the script. It turns out the file size of the jokes is large enough that it is limited to eight WAV files.
Demonstration
In the demonstration video below you can hear all Xut's jokes.
The laugh track was added to the recording afterwards in Adobe Premier Elements.
Business Case
According to this unimpeachable source, there are 30 to 100 million Linux users in the world. Let's assume 30 million. Of those 30 million only about 0.1% might be hard core enough to want a Xut penguin on their desk telling jokes (fully hackable, insert your own jokes). But that is still 30,000 people. If I can market this thing as a kit and make a $10 per unit profit that is $300,000! The best timing would be to have it ready for market this time next year for the holiday season. It takes approximately 20 hours to print one Xut and it is aggressive but assume two machines can print one Xut per day. There are roughly 200 work days between now and when they need to be ready for sale for the holidays. Assuming I can sell 10,000 Xut kits the first year ($100,000 profit!) I need to set up and start running 100 printers in my house. Better order printers and PLA and get started now!
Conclusion
I am real happy with the way the body looks and learned a lot about printing complex 3D shapes. The basic concept of an animatronic penguin telling jokes also works well in my opinion. On this prototype it turned out there was insufficient room for everything to be placed in the body. Ideally the animatronic mechanism and electronics would have been refined prior to dimensioning and printing the body. The project will be added to my growing list of things I would like to redo and improve. Improvements might include:
- Move control and battery inside the body as originally planned.
- Use Raspberry Pi Zero W - Xut needs to be running Linux!
- Animate the beak and synch to the sound
Comments and suggestions are always welcome.
Useful Links
Xut: The Animatronic Penguin, Part 1
Linux: https://www.linux.org/
Adafruit CircuitPython: https://circuitpython.org/
Adafruit EdgeBadge: https://www.adafruit.com/product/4400/
SG90 Servo: https://www.adafruit.com/product/1143
Audacity: https://www.audacityteam.org/
Laugh Tracks: https://www.audioblocks.com/stock-audio/laugh-track-bxojlthupsk0wxxux7.html
Top Comments