


Rube Goldberg style alarm clock system,The entire system is powered from a 12V battery and a 100W inverter. There is a solar panel for recharge.
while the alarm clock radio is ON or Wake to Music, radio stations play as normal, with a light organ providing visual entertainment
HOWEVER
the alarm setting gives a 10 second (or more) cold shower to the sleeper when the alarm goes off.
The light organ is Arduino based and MSGEQ7 control .
The light organ software is updated (from its orginal 2015 program) to detect the alarm audio signature and then turns on a relay to drive the sizable 11 gallons/minute aquarium pump.
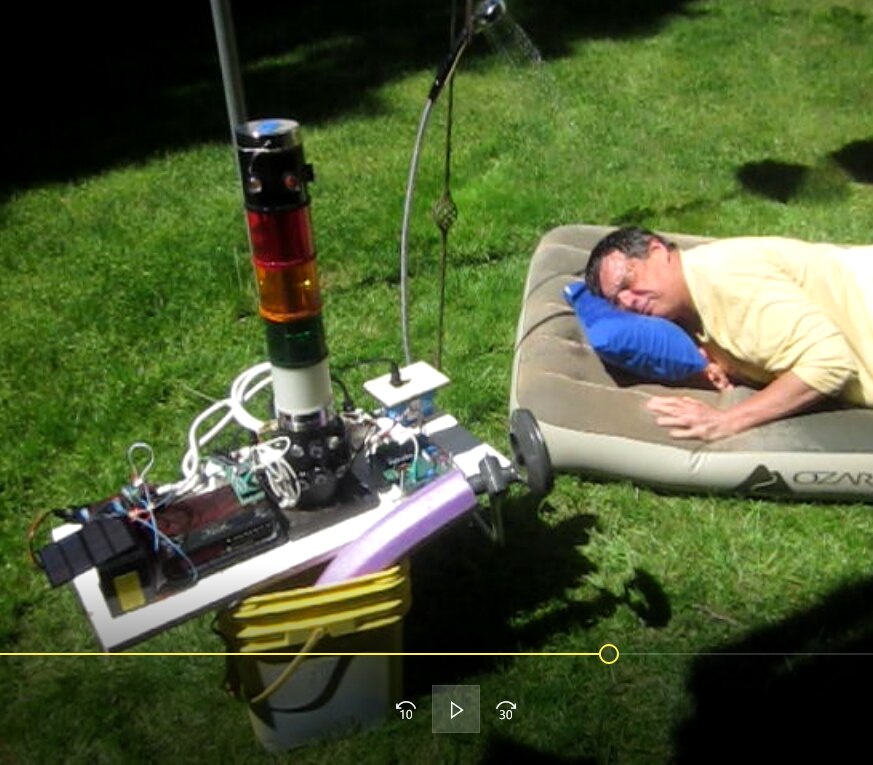
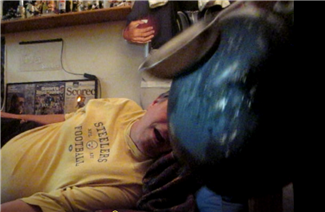

You Gotta watch the hilarious video:
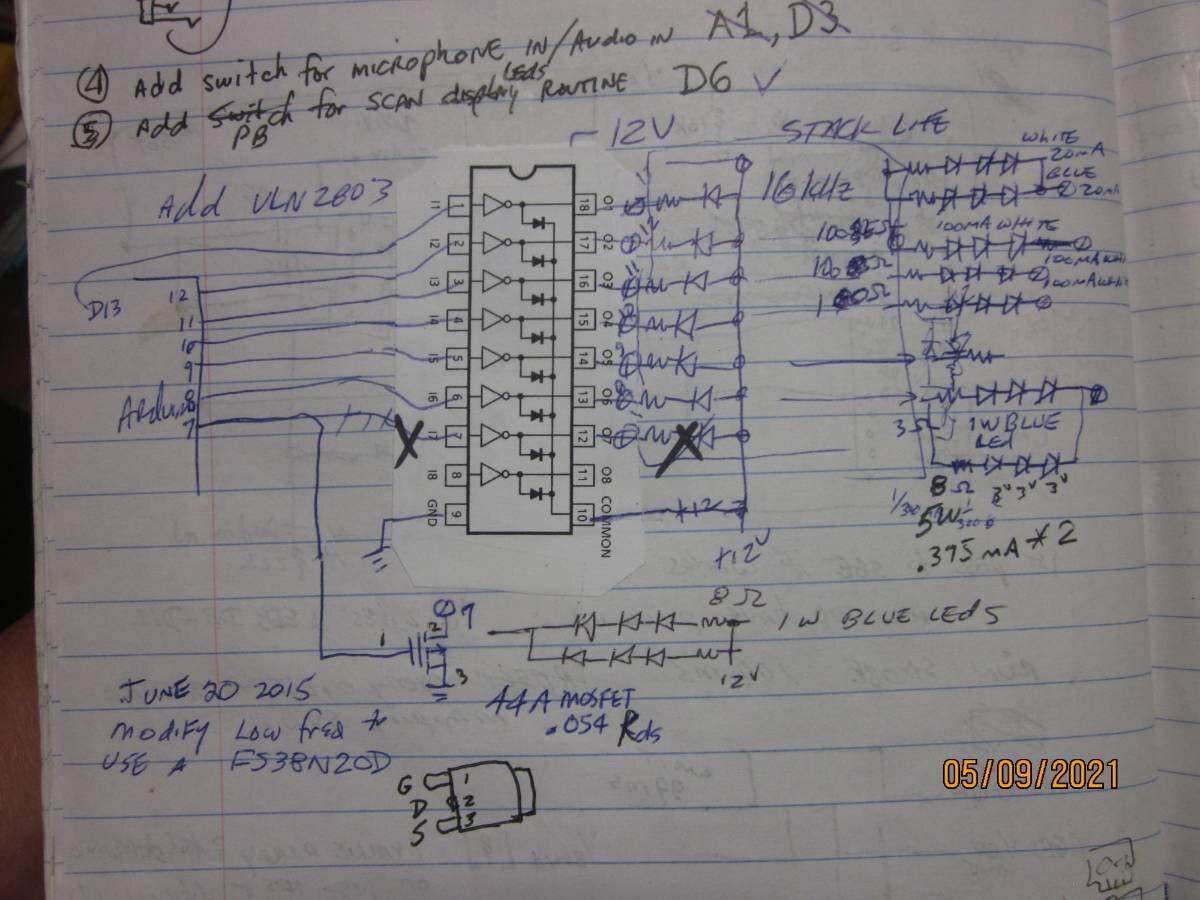
schematics & Arduino Nano software attached


/*
EqiilizerLEDsWakeNshower
is started from EquilizerLEDsRev1_Working is EquilizerLEDsRev0_Working with bands 1 and 7 with lower thresholds
EquilizerLEDsRev0_Working is a relabled version of Test 3 Working, based on Test2Working
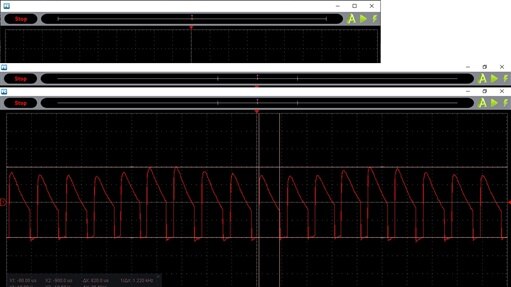
showing the MSWGEQ7 is reading an analog input from a ipod earphone jack, and providing volts from the multiplexor.
-> added pot to analog input 1 for threshold adjust on LED trigger
-> add a PB to D6 to run a test routine that strobes the lights
-> add ULN2803 driver for LEDS, requires to un-invert the HIGH LOW states
control interface to MSGEQ7 IC
strobe control for equalizer bands, read in multiplexed voltage per band, drive outputs LEDs
Arduino D4 wires to MSGEQ7 pin 4 strobe
Arduino D5 wires to MSGEQ7 pin 7 reset
all ins have pull ups
Arduino D7 = 63Hz LED , LOW = ON
Arduino D8 = 160Hz LED
Arduino D9 = 400Hz LED
Arduino D10 = 1kHz LED
Arduino D11 = 2.5 kHz LED
Arduino D12 = 6kHz LED
Arduino D13 = 16kHz LED
Arduino A0 wires to MSGEQ7 pin 3 Vout
The WakeNShower audio input comes from an alarm clock, tapped from its speaker thru an audio transformer.
The code adds a relay output to D3.
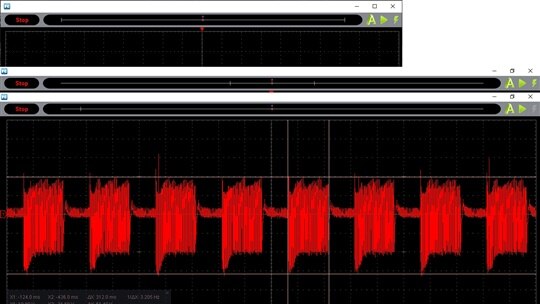
The alarm sound is a loud 1kHz square wave that triggers D10 thru D13.
Use those signals to determine if the alarm sounded, and to pick up the relay.
The relay activates a water pump for the shower.
*/
int BandMagnitude[8];
int Vin =0 ;
int LEDThreshold = 500;
int strobeBit=1;
int pausetime =1000;
int AlarmCnt=0;// how many consecutive times AlarmCnt is seen
int value=0; // setup register for checking for alarm sound
// the setup function runs once when you press reset or power the board
void setup()
{
Serial.begin(9600); // setup serial
// initialize digital output pins for LEDS.
pinMode(13, OUTPUT);
pinMode(12, OUTPUT);
pinMode(11, OUTPUT);
pinMode(10, OUTPUT);
pinMode(9, OUTPUT);
pinMode(8, OUTPUT);
pinMode(7, OUTPUT);
pinMode(3, OUTPUT);
// initialize digital output pins for strobe and reset MSGEQ7
pinMode(5, OUTPUT); //reset MSGEQ7 WHEN HIGH, LOW enables STROBE
pinMode(4, OUTPUT); //strobe MSGEQ7 output, edge triggered LOW is active state for strobe
// defines and integer array for the 7 band values, array location 0 is unused
pinMode(6, INPUT_PULLUP); //tie pin D6 to ground to run the strobe LED routine
int BandMagnitude[8];
int Vin =0 ;
}
// the loop function runs over and over again forever
void loop()
{
digitalWrite(3, HIGH); // turn off pump, relay LOW activates
value = 0; // initialze alarm buzzer detector
// initialze the strobe and reset after every scan to ensure synchronization
initializeMSGEQ7 ();
//delay (1);
delayMicroseconds(100); // minimum delay is 72 usec for strobe reset
LEDThreshold = analogRead(1) ;
for (int i=1; i <= 7; i++)
{
digitalWrite(4, LOW); // strobe is edge trigger LOW active
delayMicroseconds(30); // minimum delay is 18 usec for strobe reset
// delay (1);
Vin = analogRead(0) ;
BandMagnitude[i] = Vin ;
digitalWrite(4, HIGH); // strobe off, strobe is edge trigger LOW active
// Serial.println("BandMagnitude[i] ="); // debug value
// Serial.println(BandMagnitude[i]); // debug value
// Serial.println("[i] ="); // debug value
// Serial.println(i); // debug value
if (i==7) LEDThreshold = 150 ; // fire the hi band at a lower threshold
if (BandMagnitude[i]>LEDThreshold)
{ digitalWrite((6+i), HIGH);
if ((6+i)==10) { value=value+1; }
if ((6+i)==11) { value=value+2; }
if ((6+i)==12) { value=value+4; }
}
if (BandMagnitude[i]<LEDThreshold)
{ digitalWrite((6+i), LOW); }
if ((i==7)&& (value ==7)){ runpump(); }
delayMicroseconds(30); // minimum delay is 18 usec for strobe reset
// delay (90); // delay time with strobe low for the next read cycle
}
strobeBit = digitalRead(6);
if (strobeBit == LOW) { strobe();}
// Serial.println("BandMagnitude[i] ="); // debug value
Serial.println("[strobebit] ="); // debug value
Serial.println(strobeBit);
}
void initializeMSGEQ7 ()
{
digitalWrite(5, HIGH); // make RESET line HIGH
digitalWrite(4, HIGH); // turn on strobe bit
delayMicroseconds(30); // minimum delay is 18 usec for strobe width
digitalWrite(4, LOW); // turn off strobe bit
delayMicroseconds(1); // minimum delay is 100 ns
// delay(1);
digitalWrite(4, HIGH); // turn off strobe bit
// delay(1);
digitalWrite(5, LOW); // make RESET line LOW to enable the strobe line
delayMicroseconds(100); // minimum delay is 72 usec for strobe reset
// digitalWrite(5, LOW); // make RESET line LOW to enable the strobe line
// delay (1);
// digitalWrite(4, HIGH); // turn off strobe bit (low is active)
// delay(1);
}
void strobe ()
{ pausetime=500;
for (int j=1; j <= 15; j++)
{
pausetime=(pausetime/2);
if (pausetime<8){pausetime=8;}
for (int i=1; i <= 7; i++)
{ digitalWrite((6+i), HIGH);
delay (pausetime);
digitalWrite((6+i), LOW);
delay (5);
}
for (int i=0; i <= 7; i++)
{ digitalWrite((12-i), HIGH);
delay (pausetime);
digitalWrite((12-i),LOW);
delay (5);
}
}
}
void runpump ()
{
digitalWrite(3, LOW); // turn on pump
delay (5000); // leave on for 10 secs
digitalWrite(3, HIGH); // turn off pump
value=0;
}
Top Comments
-

javagoza
-
Cancel
-
Vote Up
+1
Vote Down
-
-
Sign in to reply
-
More
-
Cancel
Comment-

javagoza
-
Cancel
-
Vote Up
+1
Vote Down
-
-
Sign in to reply
-
More
-
Cancel
Children