element14 Community
element14 Community
    Register Log In
  • Site
  • Search
  • Log In Register
  • About Us
  • Community Hub
    Community Hub
    • What's New on element14
    • Feedback and Support
    • Benefits of Membership
    • Personal Blogs
    • Members Area
    • Achievement Levels
  • Learn
    Learn
    • Ask an Expert
    • eBooks
    • element14 presents
    • Learning Center
    • Tech Spotlight
    • STEM Academy
    • Webinars, Training and Events
    • Learning Groups
  • Technologies
    Technologies
    • 3D Printing
    • FPGA
    • Industrial Automation
    • Internet of Things
    • Power & Energy
    • Sensors
    • Technology Groups
  • Challenges & Projects
    Challenges & Projects
    • Design Challenges
    • element14 presents Projects
    • Project14
    • Arduino Projects
    • Raspberry Pi Projects
    • Project Groups
  • Products
    Products
    • Arduino
    • Avnet Boards Community
    • Dev Tools
    • Manufacturers
    • Multicomp Pro
    • Product Groups
    • Raspberry Pi
    • RoadTests & Reviews
  • Store
    Store
    • Visit Your Store
    • Choose another store...
      • Europe
      •  Austria (German)
      •  Belgium (Dutch, French)
      •  Bulgaria (Bulgarian)
      •  Czech Republic (Czech)
      •  Denmark (Danish)
      •  Estonia (Estonian)
      •  Finland (Finnish)
      •  France (French)
      •  Germany (German)
      •  Hungary (Hungarian)
      •  Ireland
      •  Israel
      •  Italy (Italian)
      •  Latvia (Latvian)
      •  
      •  Lithuania (Lithuanian)
      •  Netherlands (Dutch)
      •  Norway (Norwegian)
      •  Poland (Polish)
      •  Portugal (Portuguese)
      •  Romania (Romanian)
      •  Russia (Russian)
      •  Slovakia (Slovak)
      •  Slovenia (Slovenian)
      •  Spain (Spanish)
      •  Sweden (Swedish)
      •  Switzerland(German, French)
      •  Turkey (Turkish)
      •  United Kingdom
      • Asia Pacific
      •  Australia
      •  China
      •  Hong Kong
      •  India
      •  Korea (Korean)
      •  Malaysia
      •  New Zealand
      •  Philippines
      •  Singapore
      •  Taiwan
      •  Thailand (Thai)
      • Americas
      •  Brazil (Portuguese)
      •  Canada
      •  Mexico (Spanish)
      •  United States
      Can't find the country/region you're looking for? Visit our export site or find a local distributor.
  • Translate
  • Profile
  • Settings
Cool LED Display
  • Challenges & Projects
  • Project14
  • Cool LED Display
  • More
  • Cancel
Cool LED Display
Blog Cool LED Displays: Boost That LED!
  • Blog
  • Forum
  • Documents
  • Events
  • Polls
  • Files
  • Members
  • Mentions
  • Sub-Groups
  • Tags
  • More
  • Cancel
  • New
Join Cool LED Display to participate - click to join for free!
  • Share
  • More
  • Cancel
Group Actions
  • Group RSS
  • More
  • Cancel
Engagement
  • Author Author: jc2048
  • Date Created: 22 Nov 2017 11:24 PM Date Created
  • Views 3425 views
  • Likes 18 likes
  • Comments 16 comments
  • arduino_projects
  • leddisplaych
  • arduino_classic
  • arduino uno project
  • arduino projects
Related
Recommended

Cool LED Displays: Boost That LED!

jc2048
jc2048
22 Nov 2017

Cool LED displays. I don't have a lot of time at the moment, but wanted to do something [I did vote for it, after all] so I've

thrown together this - a simple bit of experimenting with an Arduino.


Rather than just light an LED, I thought I'd make it a little bit of a challenge and see if I could light a series string

of seven LEDs. The red LEDs I'm using have a forward voltage of around 2V, so that means I need something like 13V or 14V

to get them illuminated. I could have just used a bench supply to provide the LED voltage but that's not much fun and

wouldn't have made a very interesting blog so I'm going to generate the voltage from the Arduino's 5V with a very simple

and crude boost converter.


Here it is working (warning: world's worst video)


You don't have permission to edit metadata of this video.
Edit media
x
image
Upload Preview
image


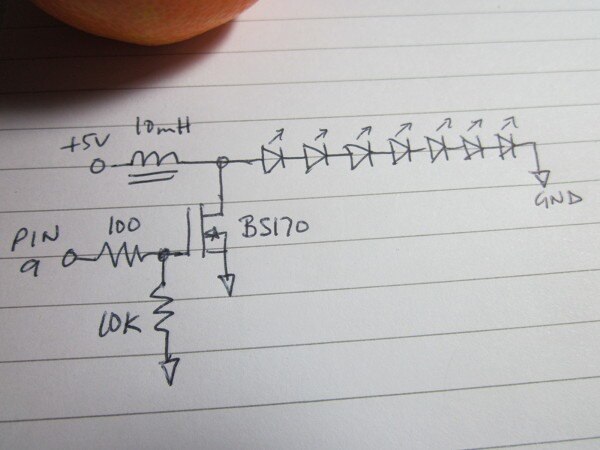
and here it is drawn as a circuit diagram


image


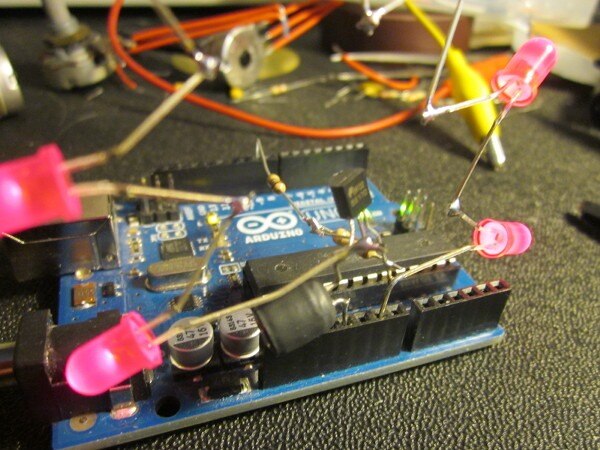
you can see how I just lashed the components together, without a breadbord or pcb, in this next photograph


image


How does it work? The MOSFET is switched by the Arduino. Let's consider a time where the output has been low for a while

and is just about to switch high - the gate voltage (relative to the source) is very low and the MOSFET is off. When the

Arduino pin goes high, the gate rises to something close to 5V and the MOSFET turns on. That happens fairly quickly. When

the MOSFET is on it behaves much as a small value resistor would (in this case, a few ohms), so at that point we have 5V

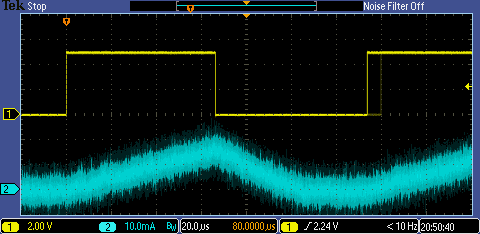
across the coil. The current through the coil can't change instantaneously, instead it starts to ramp up with the rate of

change dependent on the inductance - I chose the 10mH value so that it would ramp to about 20mA in a few tens of

microseconds, a time period which we could control quite accurately with the processor on the board. If you look at the

waveforms below, you can see the ramp up of the current [yellow trace is the output pin, blue trace is the coil current].


image


As it ramps, energy is being stored in the form of a magnetic field around the coil. After 60uS, the Arduino turns off

the MOSFET, and then the interesting bit happens; the magnetic field storing the energy can't remain there indefinitely,

so the coil needs to be rid of it. If it needs to, and in this case it does, it will do that by increasing the voltage at

the MOSFET end so as to maintain the current that was flowing at the time the switch turned off [as the energy stored is

used up, the current will fall until we are back to zero again]. Initially, the coil can charge the intrinsic capacitance

at the drain of the MOSFET and the capacitance of the LEDs, but those capacitances aren't all that large and it will

quickly attain a voltage where the LEDs turn on and then most of the energy will go to running the LEDs for a short

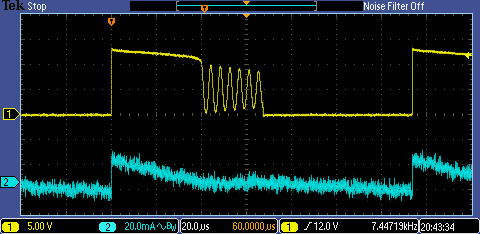
period. Repeating the process gives the illusion that the LEDs are on continuously. The next set of waveforms show the

voltage at the coil/MOSFET/LED node and the current that flows through the LEDs. As the current declines, the voltage

falls because the forward voltage of the LEDs depends on the current. When the energy stored by the coil is almost used

up, it no longer runs the LEDs but instead what's left of the energy moves back and forth from the coil to the

capacitance at that node [which of course includes the capacitance of the scope probe tip]. The ringing looks a bit

alarming but there's little energy there and it's not doing any real harm.


image


Sorry the current waveforms are a bit of a mess. The probe is a bit noisy and isn't that good with small currents.


A couple of points if you want to replicate this. Firstly, check the waveform timing produced by the Arduino before connecting the

circuit - there's no protection if the timing is wrong. Secondly, if the LED string is disconnected for any reason, the voltage

will increase until the current does flow, even if that means the coil has to avalanch the MOSFET to do it - so make sure

the LEDs are the right way round and connect properly - if you're a bit nervous, a 24V zener across the LED string would

provide an alternative path in the event of a fault.


Finally, here's the sketch I used.


int outPin = 9;   // output pin to use  
// the setup routine runs once when you press reset:
void setup() {
  // set output pin:
  pinMode(outPin, OUTPUT);
}
// the loop routine runs over and over again forever:
void loop() {
word onPeriod = 0;
  // LED on 
  for(onPeriod=0;onPeriod<5000;onPeriod++) {    // repeat for about half a second
    noInterrupts();
    digitalWrite(outPin, HIGH);   // pin is high
    delayMicroseconds(60);        // ...for 60 microseconds
    digitalWrite(outPin, LOW);    // then low
    interrupts();
    delayMicroseconds(60);        // ...for 60 microseconds
    }
  // LED off
  delay(500);   // off for half a second
}


If you want to try fading the LEDs, keep the high time constant and lengthen the low time.

  • Sign in to reply

Top Comments

  • jc2048
    jc2048 over 7 years ago +8
    players.brightcove.net/.../index.html Another one. This time it's twenty LEDs and a better shape - a star. I've increased the on time so that the current is higher to compensate for the increased number…
  • jc2048
    jc2048 over 7 years ago +7
    players.brightcove.net/.../index.html I couldn't resist doing a bit more with this, so I added two more strings of LEDs (with the LEDs all interleaved) and used MOSFETs to switch one string at a time into…
  • jw0752
    jw0752 over 7 years ago +7
    Hi Jon, I love the way you let us look at the technical beauty that lies behind the scenes. Just about anyone can make an LED flash but making one flash in a new way is pretty neat. John
Parents
  • jc2048
    jc2048 over 7 years ago

    You don't have permission to edit metadata of this video.
    Edit media
    x
    image
    Upload Preview
    image


    I couldn't resist doing a bit more with this, so I added two more strings of LEDs (with the LEDs all interleaved) and used MOSFETs to switch one string at a time into circuit giving a travelling pixel effect. The LEDs aren't very even and I needed a small piece of cardboard halfway round to stop them shorting, but it sort of works, if a bit slapdash.

    • Cancel
    • Vote Up +7 Vote Down
    • Sign in to reply
    • More
    • Cancel
Comment
  • jc2048
    jc2048 over 7 years ago

    You don't have permission to edit metadata of this video.
    Edit media
    x
    image
    Upload Preview
    image


    I couldn't resist doing a bit more with this, so I added two more strings of LEDs (with the LEDs all interleaved) and used MOSFETs to switch one string at a time into circuit giving a travelling pixel effect. The LEDs aren't very even and I needed a small piece of cardboard halfway round to stop them shorting, but it sort of works, if a bit slapdash.

    • Cancel
    • Vote Up +7 Vote Down
    • Sign in to reply
    • More
    • Cancel
Children
  • shabaz
    shabaz over 7 years ago in reply to jc2048

    That's awesome! : )

    • Cancel
    • Vote Up +1 Vote Down
    • Sign in to reply
    • More
    • Cancel
element14 Community

element14 is the first online community specifically for engineers. Connect with your peers and get expert answers to your questions.

  • Members
  • Learn
  • Technologies
  • Challenges & Projects
  • Products
  • Store
  • About Us
  • Feedback & Support
  • FAQs
  • Terms of Use
  • Privacy Policy
  • Legal and Copyright Notices
  • Sitemap
  • Cookies

An Avnet Company © 2025 Premier Farnell Limited. All Rights Reserved.

Premier Farnell Ltd, registered in England and Wales (no 00876412), registered office: Farnell House, Forge Lane, Leeds LS12 2NE.

ICP 备案号 10220084.

Follow element14

  • X
  • Facebook
  • linkedin
  • YouTube