


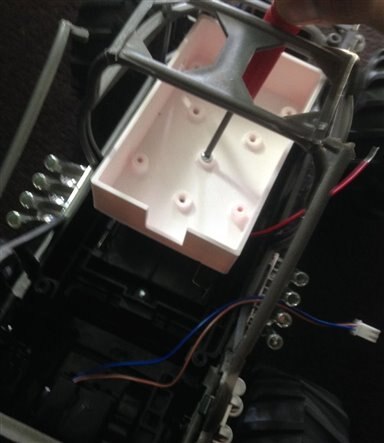
If you ever run into a scenario when you RC controller stops working or does not connect to the transmitter for some weird reason, and you have tried all the tricks up you sleeve to fix the issue, the best thing to do is to gut most of the components and add either a Raspberry Pi or an Arduino with a motor controller. In my case, I am using a Raspberry Pi 3 B+ and Adafruit's motor driver Pi Hat to breathe new life into my broken monster Toy Truck. Here is a picture of the final setup

First I started of by removing most of the electronic components from the truck, but keeping the battery holder and motors intact.

Once done I ran a quick test o see that the two DC motor are still working, I used a 4 AA battery back of the this, as the truck takes 6 AA batteries, and dint want to risk the motor. It say a sigh of relief that both the motor are functional  ..
..

To setup the Raspberry, download the latest version of Raspbian from https://www.raspberrypi.org/downloads/ .Once the SD card is setup ,insert it in the slot of your Pi and boot it up, and enable SSH and I2C interface using raspi-config, and also setup the WiFi on the Pi.
Once done, connected the back DC motor to M2 on the Pi hat and the front motor that drives the direction to M3. And also connect the battery +ve and -ve to the hat. For more info check out the learning https://learn.adafruit.com/adafruit-dc-and-stepper-motor-hat-for-raspberry-pi

SSH into to Pi and run the following commands, to clone the Motor HAT python library and set it up
sudo git clone https://github.com/adafruit/Adafruit-Motor-HAT-Python-Library
cd Adafruit-Motor-HAT-Python-Library
sudo python setup.py
Once done I ran a python program to test the motors using a Keyboard connected to the Pi, the python file below, and here are what the keyboard keys correspond to -
- w - for moving forward
- s - back
- a - move left
- d - move right
- q - to increase the speed
- e - to decrease the speed
!/usr/bin/env python
# Add Pi control to the broken Monster toy truck - Feel free to use and remix
# you can run this directly using the shell or add it to Contab
#using the Adafruit DC motor Pi Hat --http://www.adafruit.com/product/2348
import pygame #for more info on keyboard events -- https://www.pygame.org/docs/ref/key.html
import time
from Adafruit_MotorHAT import Adafruit_MotorHAT, Adafruit_DCMotor # follow the learning guide for the setup https://learn.adafruit.com/adafruit-dc-and-stepper-motor-hat-for-raspberry-pi
import atexit


# create a default object, no changes to I2C address or frequency
mh = Adafruit_MotorHAT(addr=0x60) #Modified from 0X61


# recommended for auto-disabling motors on shutdown!
def turnOffMotors():
mh.getMotor(1).run(Adafruit_MotorHAT.RELEASE)
mh.getMotor(2).run(Adafruit_MotorHAT.RELEASE)
mh.getMotor(3).run(Adafruit_MotorHAT.RELEASE)
mh.getMotor(4).run(Adafruit_MotorHAT.RELEASE)


atexit.register(turnOffMotors)
#motor pin setup on the Adafruit DC motor Pi Hat
motorBack = mh.getMotor(2) #Back motor of the monster truck connect to terminals 2 on the DC Motor Hat
motorFront = mh.getMotor(3)#Front motor connection
interval = 0.1 #interval to check for key press/release - change to increase/decrease sensetivity
minSpeed = 100 # change this value if you want to reduce the speed of your Truck/Car further. Here 0 will put the motor off.
maxSpeed = 200 # value for Max speed. Here 255 is the Maximum
speed = 100 #Default speed for the back motor


#move foward for
def moveFoward(speed,runTime):
motorBack.setSpeed(speed)
motorBack.run(Adafruit_MotorHAT.FORWARD);
#time.sleep(runTime);#this is not required as motors are release on key release
# turn on motor
#motorBack.run(Adafruit_MotorHAT.RELEASE); #release when key is release
return;


#moving backward
def moveBackward(speed,runTime):
motorBack.setSpeed(speed)
motorBack.run(Adafruit_MotorHAT.BACKWARD);
#time.sleep(runTime);
# turn on motor
#motorBack.run(Adafruit_MotorHAT.RELEASE);
return;


#Turn Right - note this was created for a monster truck toy - which uses a dc motor to move the axel to about 30 degress
def turnFowardRight(speedBackMotor,speedFrontMotor,runTime):
motorBack.setSpeed(speedBackMotor)
motorBack.run(Adafruit_MotorHAT.FORWARD);
motorFront.setSpeed(speedFrontMotor)
motorFront.run(Adafruit_MotorHAT.FORWARD);
#time.sleep(runTime);
# turn on motor
#motorBack.run(Adafruit_MotorHAT.RELEASE);
#motorFront.run(Adafruit_MotorHAT.RELEASE);
return;


#Turn left - note this was created for a monster truck toy - which uses a dc motor to move the axel to about 30 degress
def turnFowardLeft(speedBackMotor,speedFrontMotor,runTime):
motorBack.setSpeed(speedBackMotor)
motorBack.run(Adafruit_MotorHAT.FORWARD);
motorFront.setSpeed(speedFrontMotor)
motorFront.run(Adafruit_MotorHAT.BACKWARD);
#time.sleep(runTime);
# turn on motor
#motorBack.run(Adafruit_MotorHAT.RELEASE);
#motorFront.run(Adafruit_MotorHAT.RELEASE);
return;


#Turn Right - note this was created for a monster truck toy - which uses a dc motor to move the axel to about 30 degress
def turnBackwardRight(speedBackMotor,speedFrontMotor,runTime):
motorBack.setSpeed(speedBackMotor)
motorBack.run(Adafruit_MotorHAT.BACKWARD);
motorFront.setSpeed(speedFrontMotor)
motorFront.run(Adafruit_MotorHAT.BACKWARD);
#time.sleep(runTime);
# turn on motor
#motorBack.run(Adafruit_MotorHAT.RELEASE);
#motorFront.run(Adafruit_MotorHAT.RELEASE);
return;


#Turn left - note this was created for a monster truck toy - which uses a dc motor to move the axel to about 30 degress
def turnBackwardLeft(speedBackMotor,speedFrontMotor,runTime):
motorBack.setSpeed(speedBackMotor)
motorBack.run(Adafruit_MotorHAT.BACKWARD);
motorFront.setSpeed(speedFrontMotor)
motorFront.run(Adafruit_MotorHAT.FORWARD);
#time.sleep(runTime);
# turn on motor
#motorBack.run(Adafruit_MotorHAT.RELEASE);
#motorFront.run(Adafruit_MotorHAT.RELEASE);
return;


pygame.init()
screen = pygame.display.set_mode([400,400]) #this seems to work without a montior connected and also when .py is run via SSH
pygame.display.set_caption("Monster Truck controller")


def funcPygameKey(events):
    # Variables accessible outside this function
    global speed
    global maxSpeed
    global minSpeed
    for event in events:
        if event.type == pygame.QUIT:
        print 'quite pygame'
        elif event.type == pygame.KEYDOWN:
            # checking if a key is pressed
            if event.key == pygame.K_w: #change the mapping if your not comfotable refer to the url for mapping - https://www.pygame.org/docs/ref/key.html
                print 'Key w -foward pressed'
                print speed
                moveFoward(speed,0.25)
            elif event.key == pygame.K_s:
                print 'Key s -backward pressed'
                moveBackward(speed,0.25)
            elif event.key == pygame.K_a:
                print 'Key a -left turn pressed'
                turnFowardLeft(speed,200,0.25)
            elif event.key == pygame.K_d:
                print 'Key d -right turn pressed'
                turnFowardRight(speed,200,0.25)
            elif event.key == pygame.K_q:
                print 'Key q -increase speed pressed'
                if speed <= maxSpeed:
                speed = speed + 10 #increaseing speed by 10
                print 'speed +10'
                else:
                speed = maxSpeed
                print 'speed else'
            elif event.key == pygame.K_e:
                print 'Key e - slower speed pressed'
                if speed <= minSpeed:
                speed = minSpeed
                print 'speed = minSpeed'
                else:
                speed = speed - 10
                print 'speed -10'
            elif event.key == pygame.K_r:
                print 'Key r -back right pressed'
                turnBackwardRight(speed,200,0.25)
            elif event.key == pygame.K_f:
                print 'Key f -back left pressed'
                turnBackwardLeft(speed,200,0.25)
        elif event.type == pygame.KEYUP:
            # checking if a key is released
            if event.key == pygame.K_w:
                print 'Key w-foward released'
                motorBack.run(Adafruit_MotorHAT.RELEASE);
            elif event.key == pygame.K_s:
                print 'Key s-backward released'
                motorBack.run(Adafruit_MotorHAT.RELEASE);
            elif event.key == pygame.K_a:
                print 'Key a -left turn released'
                motorBack.run(Adafruit_MotorHAT.RELEASE);
                motorFront.run(Adafruit_MotorHAT.RELEASE);
            elif event.key == pygame.K_d:
                print 'Key d -right turn released'
                motorBack.run(Adafruit_MotorHAT.RELEASE);
                motorFront.run(Adafruit_MotorHAT.RELEASE);
            elif event.key == pygame.K_q:
                print 'Key q -increase speed released'
            elif event.key == pygame.K_e:
                print 'Key e - slower speed released'
            elif event.key == pygame.K_r:
                print 'Key r -back right released'
                motorBack.run(Adafruit_MotorHAT.RELEASE);
                motorFront.run(Adafruit_MotorHAT.RELEASE);
            elif event.key == pygame.K_f:
                print 'Key f -back left released'
                motorBack.run(Adafruit_MotorHAT.RELEASE);
                motorFront.run(Adafruit_MotorHAT.RELEASE);
#moving foward ..
moveFoward(speed,0.25)
time.sleep(0.5);
# turn on motor
motorBack.run(Adafruit_MotorHAT.RELEASE);


try:
print 'Program running- use your keyboard as a controller'
while True:
funcPygameKey(pygame.event.get())


time.sleep(interval)


except KeyboardInterrupt:


print 'you choose to exit out of the keyboard controller'
Here is quick video demo of testing the keyboard.py file.
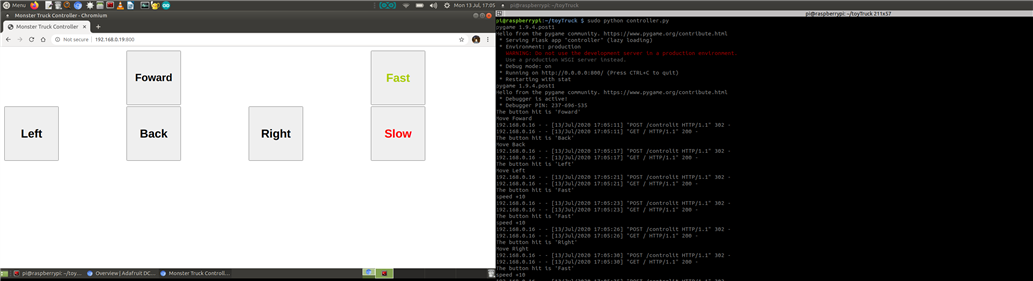
In addition, I also created a small web app so that I can control the toy truck using a Phone/Tablet, as you see in the picture below.

Here are the instruction to setup the web app, first I had to install flask http://flask.pocoo.org/ (sudo pip install flask).Flask is a microframework, which means you should be able to get it up an running quick, and test out your setup was successful. To do this, save the following python program to a hello.py file
from flask import Flask
app = Flask(__name__)
@app.route("/")
def hello():
  return "Hello World!"
if __name__ == "__main__":
  app.run(host='0.0.0.0', port=80, debug=True)
And to start the webserver run the hello.py file using - sudo python hello.py
Now to open the website on you laptop/computer browser use the http://ipaddress-of-pi , and you should see Hello World! printed on your browser.For more info/documentation about Flask follow the link http://flask.pocoo.org/docs/0.10/
Now if you are able to open the hello world webpage on you Laptop,Tablet or Phone you are ready to download the Truck-Pi.zip , extract it and upload it to the pi using Filezilla. Then run the controller.py program in the folder - sudo python controller.py, And access the web app hosted on your Pi use- http://ipaddress-of-Pi:800
Here is a quick video of testing front and back motors using the web app
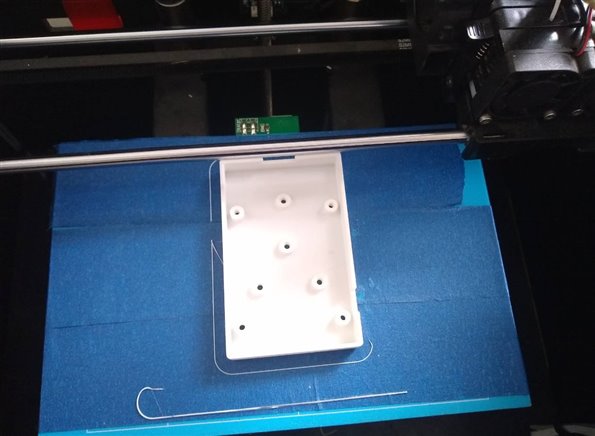
In addition, since I wanted to mount the Pi board on the Truck, I had to 3D print case for the bottom, so that the Pi does not get damaged and to avoid unnecessary short circuits.
Now since I plan to take the truck out, away from my WiFi network , I setup the Pi to act like your wifi router, so that I can connect my mobile to the Pi's Wifi and use the flask web app to control the truck.To do this we will have to setup an Ad-Hoc network on the Pi with its own DHCP service which will server IP address to device that want to connect to it, which in my case is my mobile.SSH into your Pi and install the DHCP package using -- sudo apt-get install isc-dhcp-server
Add the following to the bottom of the dhcpd.conf, here observe we have set the Pi ip address as 192.168.1.1, run sudo nano /etc/dhcp/dhcpd.conf
ddns-update-style interim;
default-lease-time 600;
max-lease-time 7200;
authoritative;
log-facility local7;
subnet 192.168.1.0 netmask 255.255.255.0 {
range 192.168.1.5 192.168.1.100;
}
And also modify the interfaces file using - sudo pico /etc/network/interfaces
auto wlan0
iface wlan0 inet static
address 192.168.1.1
netmask 255.255.255.0
wireless-channel 1
wireless-essid TruckPiWiFi
wireless-mode ad-hoc
And then reboot the Pi - sudo reboot
You should now see the new Wifi network created called "TruckPiWifi" in the wifi setup section of your computer and mobile, and then use the URL http://192.168.1.1:800 as shown in the video below to control the truck when your out n about at the park..
Top Comments