element14 Community
element14 Community
    Register Log In
  • Site
  • Search
  • Log In Register
  • About Us
  • Community Hub
    Community Hub
    • What's New on element14
    • Feedback and Support
    • Benefits of Membership
    • Personal Blogs
    • Members Area
    • Achievement Levels
  • Learn
    Learn
    • Ask an Expert
    • eBooks
    • element14 presents
    • Learning Center
    • Tech Spotlight
    • STEM Academy
    • Webinars, Training and Events
    • Learning Groups
  • Technologies
    Technologies
    • 3D Printing
    • FPGA
    • Industrial Automation
    • Internet of Things
    • Power & Energy
    • Sensors
    • Technology Groups
  • Challenges & Projects
    Challenges & Projects
    • Design Challenges
    • element14 presents Projects
    • Project14
    • Arduino Projects
    • Raspberry Pi Projects
    • Project Groups
  • Products
    Products
    • Arduino
    • Avnet Boards Community
    • Dev Tools
    • Manufacturers
    • Multicomp Pro
    • Product Groups
    • Raspberry Pi
    • RoadTests & Reviews
  • Store
    Store
    • Visit Your Store
    • Choose another store...
      • Europe
      •  Austria (German)
      •  Belgium (Dutch, French)
      •  Bulgaria (Bulgarian)
      •  Czech Republic (Czech)
      •  Denmark (Danish)
      •  Estonia (Estonian)
      •  Finland (Finnish)
      •  France (French)
      •  Germany (German)
      •  Hungary (Hungarian)
      •  Ireland
      •  Israel
      •  Italy (Italian)
      •  Latvia (Latvian)
      •  
      •  Lithuania (Lithuanian)
      •  Netherlands (Dutch)
      •  Norway (Norwegian)
      •  Poland (Polish)
      •  Portugal (Portuguese)
      •  Romania (Romanian)
      •  Russia (Russian)
      •  Slovakia (Slovak)
      •  Slovenia (Slovenian)
      •  Spain (Spanish)
      •  Sweden (Swedish)
      •  Switzerland(German, French)
      •  Turkey (Turkish)
      •  United Kingdom
      • Asia Pacific
      •  Australia
      •  China
      •  Hong Kong
      •  India
      •  Korea (Korean)
      •  Malaysia
      •  New Zealand
      •  Philippines
      •  Singapore
      •  Taiwan
      •  Thailand (Thai)
      • Americas
      •  Brazil (Portuguese)
      •  Canada
      •  Mexico (Spanish)
      •  United States
      Can't find the country/region you're looking for? Visit our export site or find a local distributor.
  • Translate
  • Profile
  • Settings
NanoRama
  • Challenges & Projects
  • Project14
  • NanoRama
  • More
  • Cancel
NanoRama
Blog Arduino Nano -- controlling things using a RC controllers - Servos
  • Blog
  • Forum
  • Documents
  • Events
  • Polls
  • Files
  • Members
  • Mentions
  • Sub-Groups
  • Tags
  • More
  • Cancel
  • New
Join NanoRama to participate - click to join for free!
  • Share
  • More
  • Cancel
Group Actions
  • Group RSS
  • More
  • Cancel
Engagement
  • Author Author: carmelito
  • Date Created: 10 May 2020 9:12 PM Date Created
  • Views 5119 views
  • Likes 8 likes
  • Comments 5 comments
  • flysky
  • arduino-ide
  • rc remote controller
  • servo
  • nanoramach
Related
Recommended

Arduino Nano -- controlling things using a RC controllers - Servos

carmelito
carmelito
10 May 2020
image

NanoRama

Enter Your Project for a chance to win a Nano Grand Prize bundle for the most innovative use of Arduino plus a $400 shopping cart!

Submit an EntrySubmit an Entry  Back to homepage image
Project14 Home
Monthly Themes
Monthly Theme Poll


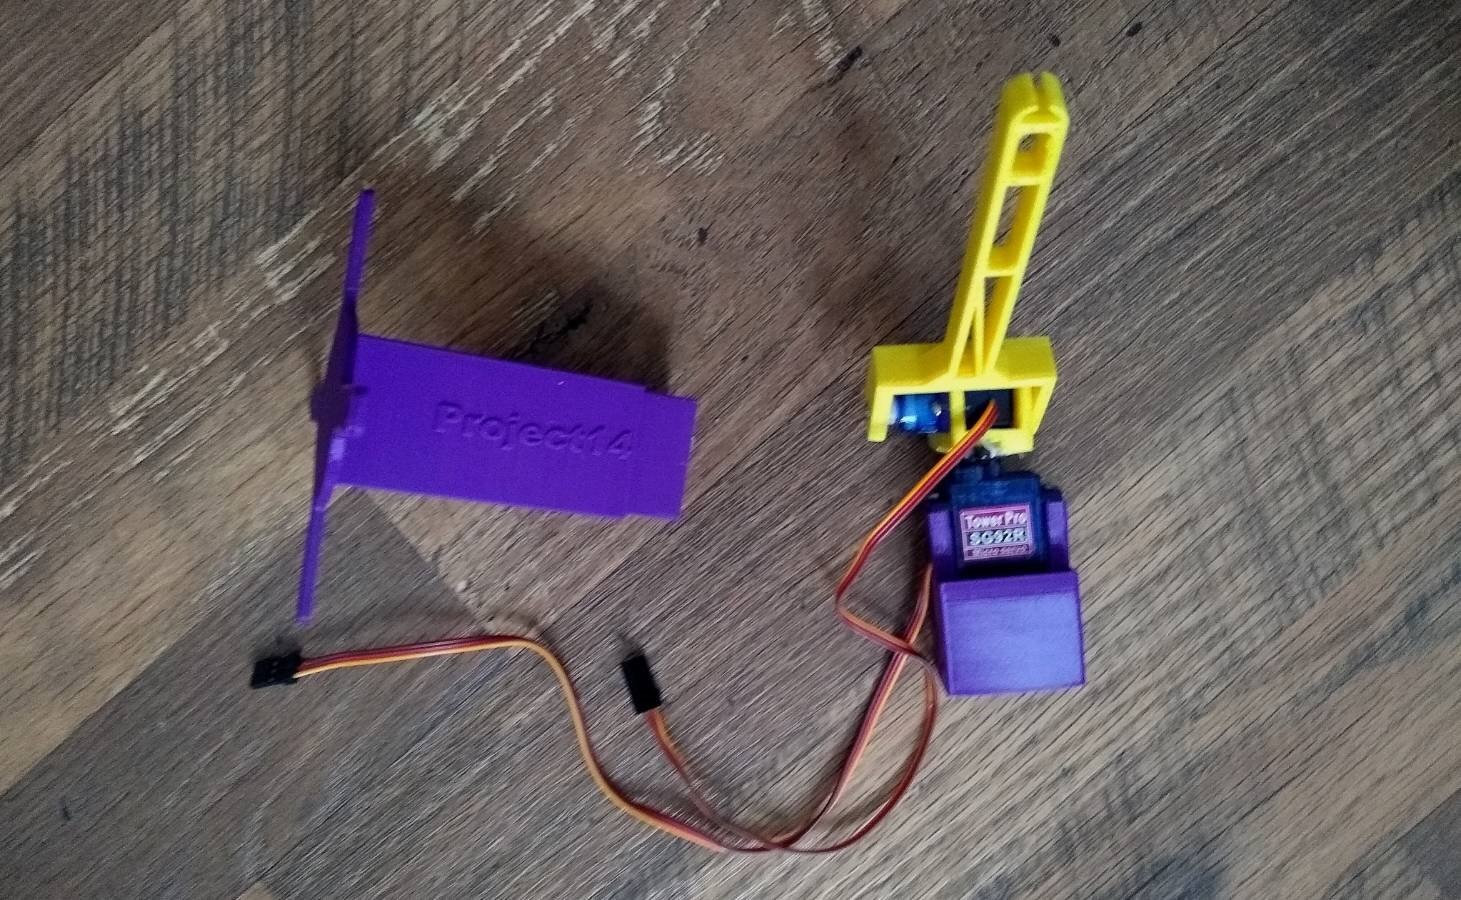
This blog post will show you how you can use a FLYSKY RC controller with an Arduino. As part of this demo project I am using the RC controller to control a couple of servos, this concept can be used to control animatronic projects which need DC motors and servos or any other kind of lighting setup. Basically, this project is just a demo and could have achieved by connecting the servo's directly to the receiver, but my plan as part of a couple of future projects is to drive DC motors/steppers and servos to build battle bots..


image


Circuit


The RC controller receiver FLYSKY AFHDS 6 channel is connected to the Arduino Nano PWM pins, the receiver pins are meant to connect servos

  • Any middle pin on the receiver is connected to 5V pin on the Arduino Nano
  • and the outermost pin is connected to the GND pin
  • CH1 is connected to PWM pin#6 on the Nano, which corresponds to roll on the plane
  • CH2 is connected to PWM pin#10 on the Nano, which corresponds to pitch on the plane


And the servos are connect to

  • Servo for the base of the 3D printed arm is connected to PWM pin#3
  • And the Arm is connected to PWM pin#5

image


Arduino Code


Here is the Arduino Code used to print the RC controller inputs to Serial monitor of the Arduino IDE, and control  the two servos


//Created for Project14 using Arduino Nano , Flysky RC(AFHDS) controller and Servos.


#include <Servo.h>


int ch1=6; //roll on the RC controller 
int ch3=10;//pitch on the RC controller 
const int servoBasePin = 3;   //Servo connected to the top base of the 3D printed part  
const int servoTeaArmPin = 5; //Servo connected to the Tea bag holder arm of the 3D printed part  
Servo servoBase;  
Servo servoTeaArm;  
int servoValRoll, servoValPitch;
   
void setup() {
   Serial.begin(9600);
   pinMode(ch1, INPUT);
   pinMode(ch3, INPUT);
   servoBase.attach(servoBasePin);  
   servoTeaArm.attach(servoTeaArmPin);

}


void loop() {
  int ch3Pitch = pulseIn(ch3,HIGH,25000);
  int ch1Roll = pulseIn(ch1,HIGH,25000);
  Serial.print("ch3_pitch : ");
  Serial.println(ch3Pitch);
  Serial.print("ch1_roll: ");
  Serial.println(ch1Roll);


  //Mapping the postions to the servos  
  servoValPitch = map(ch3Pitch, 1000, 2000, 0, 180);//values from pitch from 900 to 2000
  servoBase.write(servoValPitch);    
  servoValRoll = map(ch1Roll, 1000, 2000, 0, 180);//values for roll from 1000 to 2000
  servoTeaArm.write(servoValRoll); 


  delay(50);// increase/decrease the delay to match the movement on the gimbal of the RC controller.
}


image


3D printed parts

For the 3D printed parts i used the STL files from the Automated Tea Dunker , to print all the 3D printed parts I used Hatchbox 1.75mm  PLA  and a Flashforge creator pro.


image


Here is a quick video demo of the Automated Tea Dunker in action with the RC controller

You don't have permission to edit metadata of this video.
Edit media
x
image
Upload Preview
image

Attachments:
TeaDunkerSTLs.zip
  • Sign in to reply

Top Comments

  • yuricts
    yuricts over 5 years ago +1
    Looking forward to your battle bots. Sooo many things you can do with this... but indeed, first Tea Time! Nice! Thank you for sparkling my mind. Yuri
  • ankur608
    ankur608 over 5 years ago +1
    Nice.
  • dubbie
    dubbie over 5 years ago +1
    Carmelito, This is an interesting project. I have tried something similar to this in the past but I could not get it to operate reliably as sometimes it would miss 'pulses' and then the servos do not get…
Parents
  • ankur608
    ankur608 over 5 years ago

    Nice.

    • Cancel
    • Vote Up +1 Vote Down
    • Sign in to reply
    • More
    • Cancel
Comment
  • ankur608
    ankur608 over 5 years ago

    Nice.

    • Cancel
    • Vote Up +1 Vote Down
    • Sign in to reply
    • More
    • Cancel
Children
No Data
element14 Community

element14 is the first online community specifically for engineers. Connect with your peers and get expert answers to your questions.

  • Members
  • Learn
  • Technologies
  • Challenges & Projects
  • Products
  • Store
  • About Us
  • Feedback & Support
  • FAQs
  • Terms of Use
  • Privacy Policy
  • Legal and Copyright Notices
  • Sitemap
  • Cookies

An Avnet Company © 2025 Premier Farnell Limited. All Rights Reserved.

Premier Farnell Ltd, registered in England and Wales (no 00876412), registered office: Farnell House, Forge Lane, Leeds LS12 2NE.

ICP 备案号 10220084.

Follow element14

  • X
  • Facebook
  • linkedin
  • YouTube