


Here is another version of the Arduino Nano bot that is controlled using an RC controller, basically the pitch and roll on the RC controller is used to move, turn and control the speed of the bot. In the previous version of bot an ultrasonic sensor was used to control the movement of the bot, so that it does not crash into walls, and you can find the info at - Arduino Nano bot - using ultrasonic sensor .

Binding receiver to the transmitter
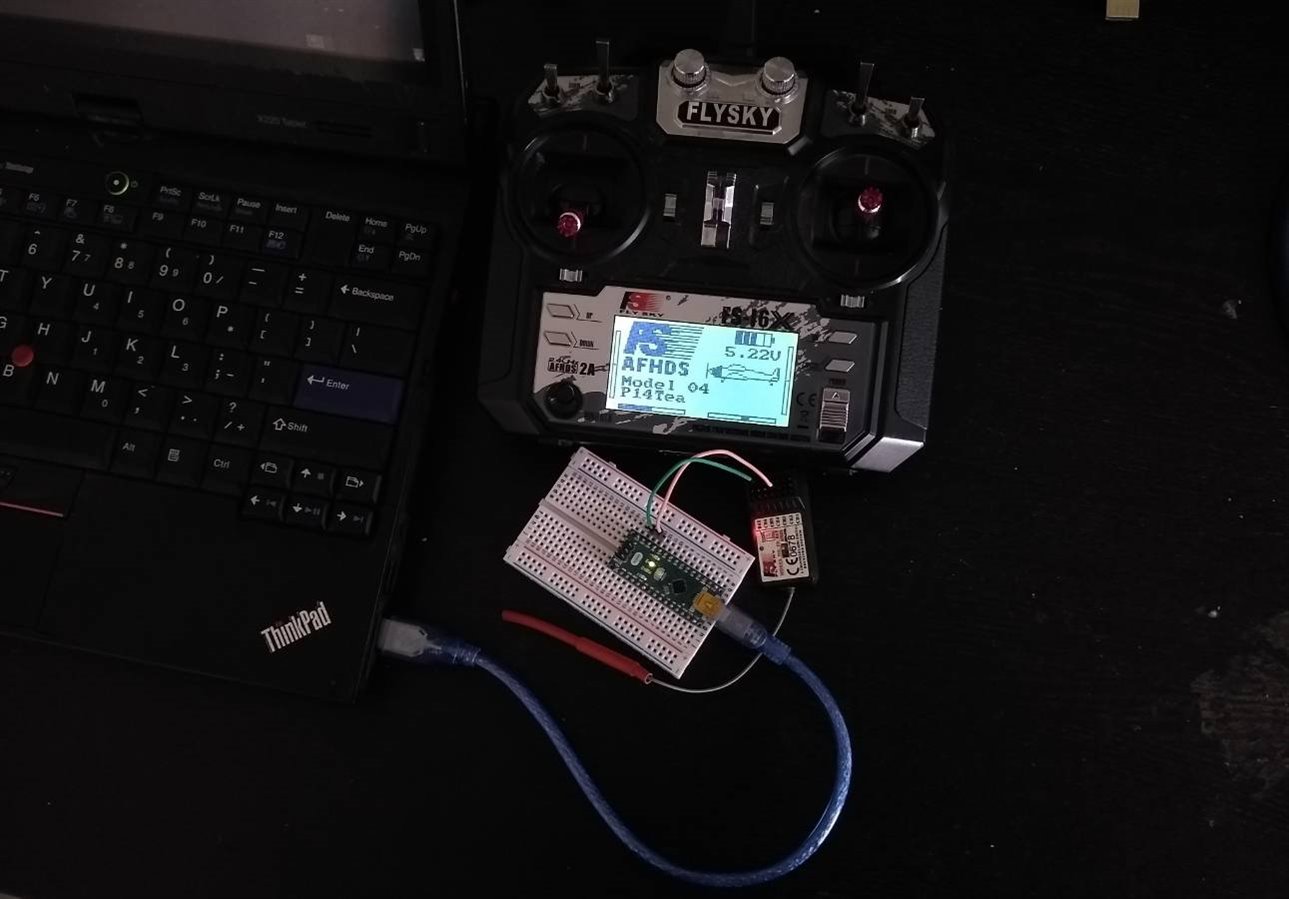
If you bought a transmitter and receiver as one pack the binding should have been taken care off . But if you bought them separately you will have to do the binding yourself, basically you will have to select the correct protocol of the receiver on you transmitter in the setting , in my case I am using a Flysky FS-I6 transmitter with a 6 channel AFHDS reciver.
To bind, add the bind plug and connect any pin on the outermost rail of the receiver to GND, green wire in the picture below, and any pin on the middle rail to 5V on the Arduino nano, this will cause the LED on the receiver to blink, then press the bind button on the transmitter and power it on. Once done, shutdown the transmitter and power off the Nano, remove the bind plug. Now when you turn on the transmitter and power on the Nano , you should see the receiver bound to the transmitter, and the LED on the receiver will be continuously on.
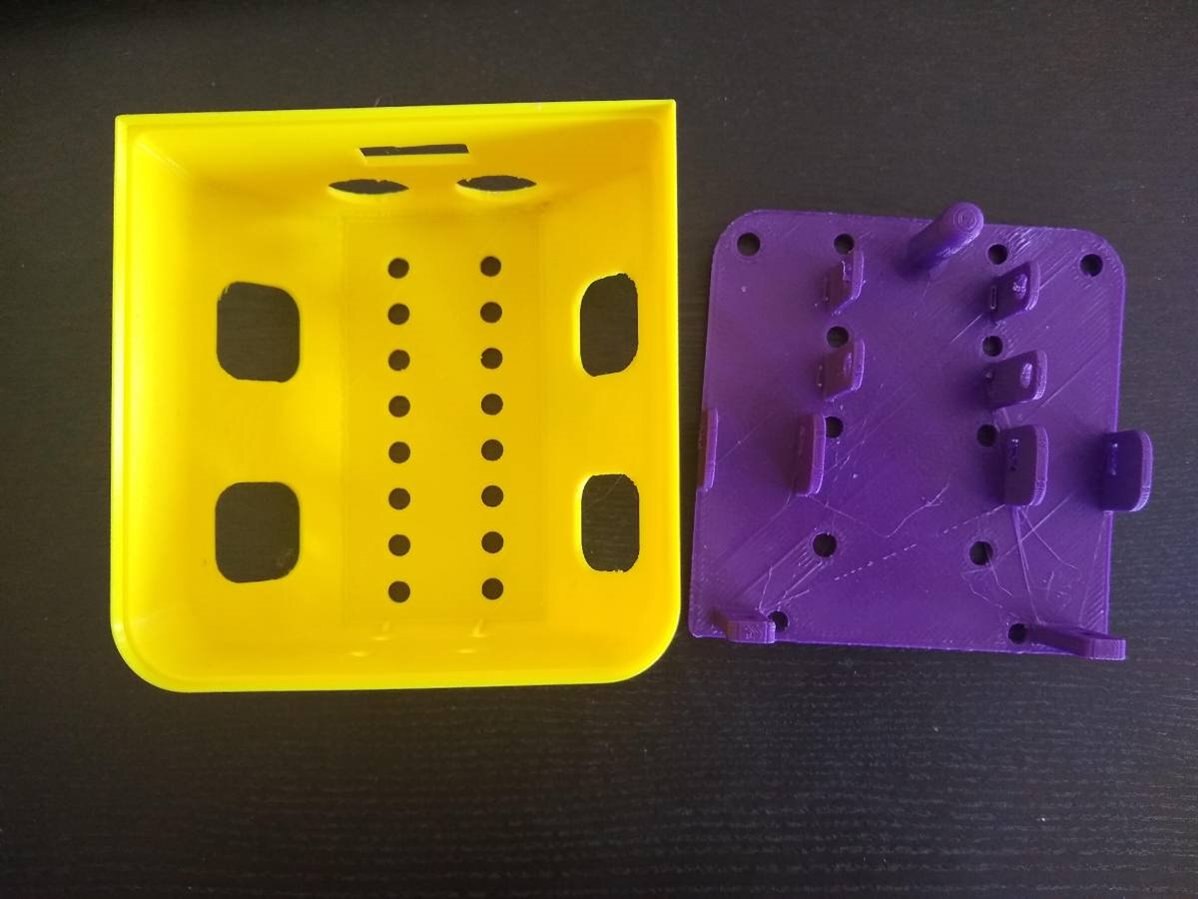
3D printed parts
Here is a picture of the 3D printed parts which are designed in Fusion 360. You can use PLA or ABS, and you will not require any support material while 3D printing. The STL files to 3D print are attached on the previous blog post - Arduino Nano bot - using ultrasonic sensor
- bottom.stl file is used to hold the 2 DC motors, and Lipo/9V batter on the bottom and breadboard/Arduino uno/ Raspberry Pi on the top
- top.stl file is used to hold ultrasonic sensor in the eyes, and mouth allows enough space for a USB cable to connect to Arduino Nano. In addition the holes on the top/back allows for addition sensors to be zip-tied, like a RC receiver etc..
Circuit connections
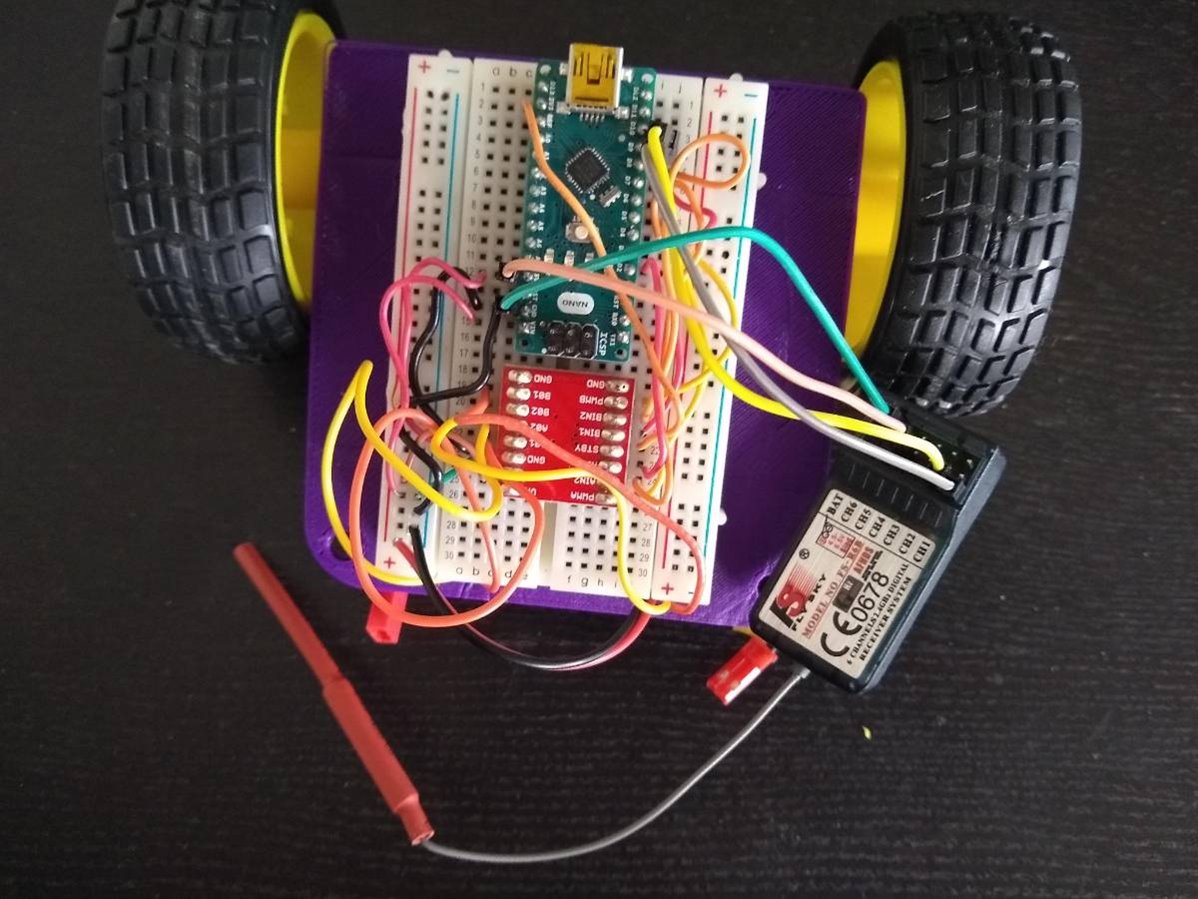
Here are the circuit connections using the Sparkfun motor driver(TB6612FNG) and Arduino Nano.
- PWMA on the motor driver connected to pin# 5
- AIN1 to pin# 4
- AIN2 to pin# 2
- PWMB to pin# 6
- BIN1 to pin# 7
- BIN2 to pin# 8
- STBY to pin# 3
And, the RC controller receiver FLYSKY AFHDS 6 channel is connected to the Arduino Nano PWM pins
- Any middle pin on the receiver is connected to 5V pin on the Arduino Nano
- and the outermost pin is connected to the GND pin
- CH1 is connected to PWM pin#9 on the Nano, which corresponds to pitch on the plane, but as part of this bot we will use it to control the speed and move foward and backward.
- CH2 is connected to PWM pin#10 on the Nano, which corresponds to roll on the plane, and in this case we are going to control the bot movement from left to right.
Code to upload to the Arduino Nano
Here is the Arduino code to upload to Nano using the Arduino IDE.
//Project14-Nanorama- Arduino Nano bot- using RC controller sensor


//Motor Driver Pin Connections to Arduino Nano
int AIN1 = 4;
int AIN2 = 2;
int PWMA = 5;
int BIN1 = 7;
int BIN2 = 8;
int PWMB= 6;
int STBY = 13;
//RC controller pin connection
const int CH1 = 9;//pitch - controls foward/backward and speed
const int CH2 = 10; //roll - controls left and right


// Parameters
const int deadzone = 20;  // Anything between -20 and 20 is stop


void setup() {
  //Serial.begin(9600);
  pinMode(STBY, OUTPUT);
  pinMode(AIN1, OUTPUT);
  pinMode(AIN2, OUTPUT);
  pinMode(PWMA, OUTPUT);
  pinMode(BIN1, OUTPUT);
  pinMode(BIN2, OUTPUT);
  pinMode(PWMB, OUTPUT);

  digitalWrite(STBY, HIGH);
}


void loop() {


  // Reading channel inputs
  int x = pulseIn(CH1, HIGH, 25000);
  int y = pulseIn(CH2, HIGH, 25000);
  /*Serial.print("ch1_pitch : ");
  Serial.println(x);
  Serial.print("ch2_roll: ");
  Serial.println(y);*/


  // Convert to PWM value
  y = pulseToPWM(y);
  x = pulseToPWM(x);


  // using the arcade drive algo based on https://www.youtube.com/watch?v=Bx0y1qyLHQ4
  int left = y + x;
  int right = y - x;
  drive(left, right);
  delay(5);
}


void drive(int speed_a, int speed_b) {
  // Limit speed between -255 and 255
  speed_a = constrain(speed_a, -255, 255);
  speed_b = constrain(speed_b, -255, 255);


  // Set direction for motor A
  if ( speed_a == 0 ) {
    digitalWrite(AIN1, LOW);
    digitalWrite(AIN2, LOW);
  } else if ( speed_a > 0 ) {
    digitalWrite(AIN1, HIGH);
    digitalWrite(AIN2, LOW);
  } else {
    digitalWrite(AIN1, LOW);
    digitalWrite(AIN2, HIGH);
  }


  // Set direction for motor B
  if ( speed_b == 0 ) {
    digitalWrite(BIN1, LOW);
    digitalWrite(BIN2, LOW);
  } else if ( speed_b > 0 ) {
    digitalWrite(BIN1, HIGH);
    digitalWrite(BIN2, LOW);
  } else {
    digitalWrite(BIN1, LOW);
    digitalWrite(BIN2, HIGH);
  }


  analogWrite(PWMA, abs(speed_a));
  analogWrite(PWMB, abs(speed_b));
}


// Convert RC pulse value to motor PWM value
int pulseToPWM(int pulse) {

  // If we're receiving numbers, convert them to motor PWM
  if ( pulse > 1000 ) {
    pulse = map(pulse, 1000, 2000, -500, 500);
    pulse = constrain(pulse, -255, 255);
  } else {
    pulse = 0;
  }


  // Anything in deadzone should stop the motor
  if ( abs(pulse) <= deadzone ) {
    pulse = 0;
  }


  return pulse;
}
if you need to to test you RC receiver connection, un-comment the code below that prints the output of one of the RC channels to the serial monitor, as you see in the picture below.

Add a 2 cell lipo battery to the bottom of the 3D printed part with zip ties as you see in the picture below. In my case I am using Turnigy nano-tech 460mah 2S , but a regular 9V battery will also fit the 3D printed part.
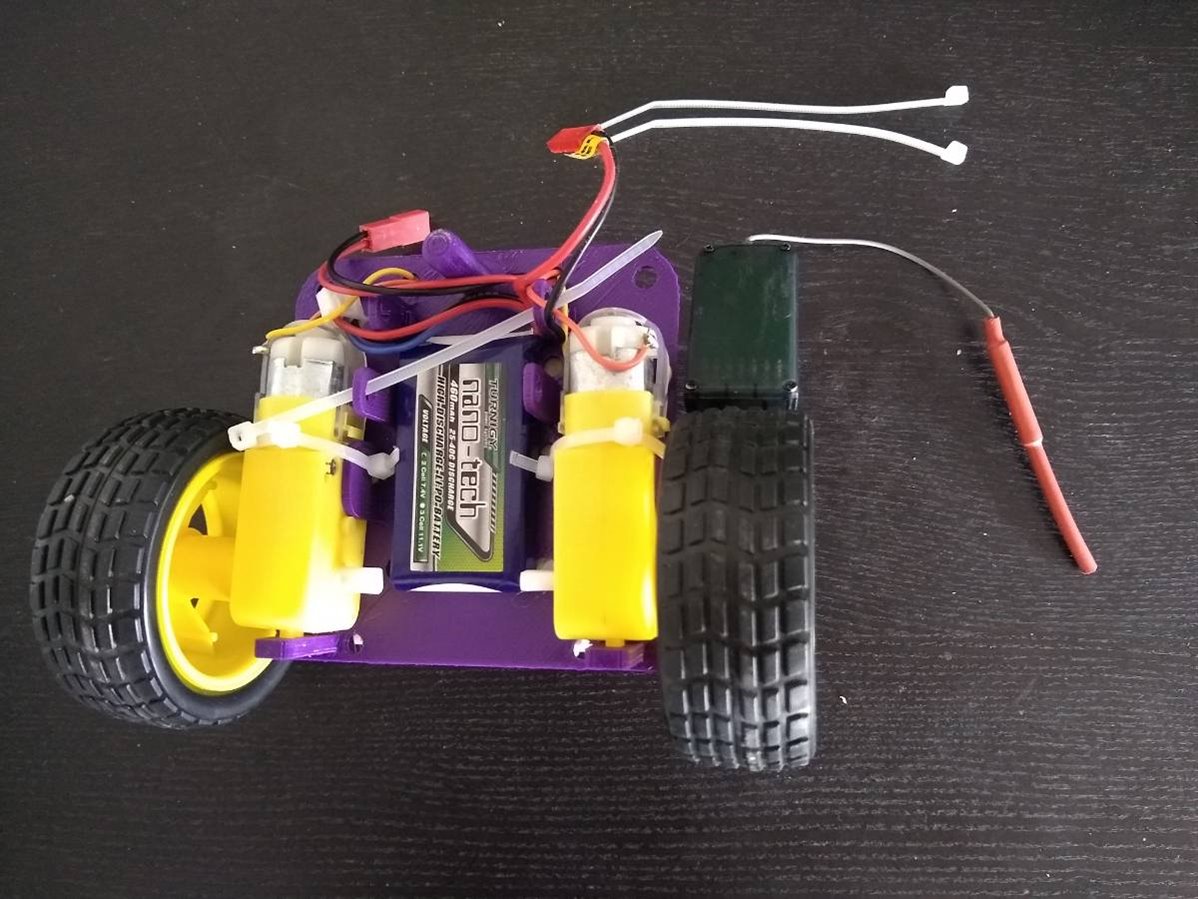
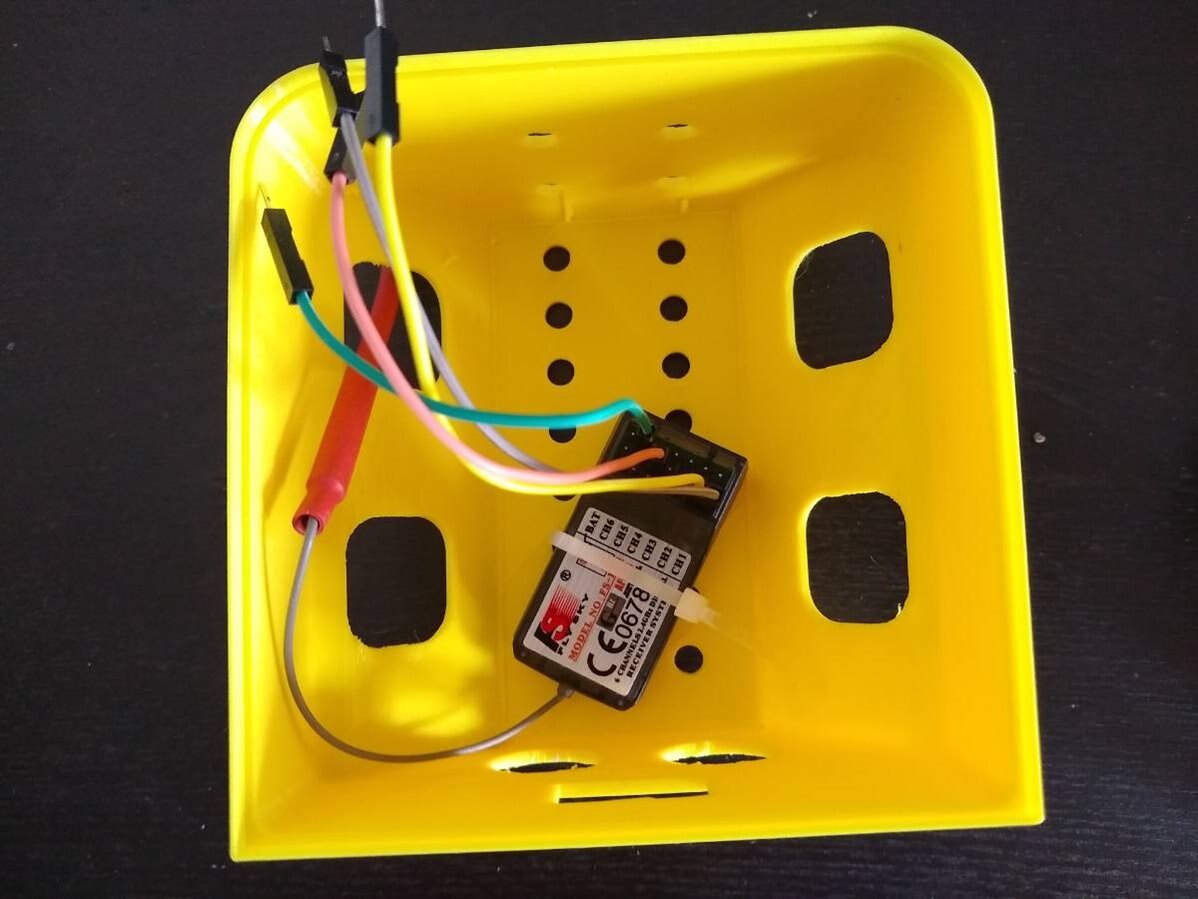
For the RC receiver you can zip tie it to the top cover as shown in the picture below. In addition once you put the lid on top of the base you can secure the base and the top cover with zip ties.
Here is a quick video of the bot in action, controlled by the RC controller.
Previous blog post related to this project
Arduino Nano -- controlling things using a RC controllers - Servos - this blog shows you how to control 2 servos using the same RC controller
Arduino Nano bot - using ultrasonic sensor - which is a simpler version of the bot, using the same 3D printed parts.