element14 Community
element14 Community
    Register Log In
  • Site
  • Search
  • Log In Register
  • About Us
  • Community Hub
    Community Hub
    • What's New on element14
    • Feedback and Support
    • Benefits of Membership
    • Personal Blogs
    • Members Area
    • Achievement Levels
  • Learn
    Learn
    • Ask an Expert
    • eBooks
    • element14 presents
    • Learning Center
    • Tech Spotlight
    • STEM Academy
    • Webinars, Training and Events
    • Learning Groups
  • Technologies
    Technologies
    • 3D Printing
    • FPGA
    • Industrial Automation
    • Internet of Things
    • Power & Energy
    • Sensors
    • Technology Groups
  • Challenges & Projects
    Challenges & Projects
    • Design Challenges
    • element14 presents Projects
    • Project14
    • Arduino Projects
    • Raspberry Pi Projects
    • Project Groups
  • Products
    Products
    • Arduino
    • Avnet Boards Community
    • Dev Tools
    • Manufacturers
    • Multicomp Pro
    • Product Groups
    • Raspberry Pi
    • RoadTests & Reviews
  • Store
    Store
    • Visit Your Store
    • Choose another store...
      • Europe
      •  Austria (German)
      •  Belgium (Dutch, French)
      •  Bulgaria (Bulgarian)
      •  Czech Republic (Czech)
      •  Denmark (Danish)
      •  Estonia (Estonian)
      •  Finland (Finnish)
      •  France (French)
      •  Germany (German)
      •  Hungary (Hungarian)
      •  Ireland
      •  Israel
      •  Italy (Italian)
      •  Latvia (Latvian)
      •  
      •  Lithuania (Lithuanian)
      •  Netherlands (Dutch)
      •  Norway (Norwegian)
      •  Poland (Polish)
      •  Portugal (Portuguese)
      •  Romania (Romanian)
      •  Russia (Russian)
      •  Slovakia (Slovak)
      •  Slovenia (Slovenian)
      •  Spain (Spanish)
      •  Sweden (Swedish)
      •  Switzerland(German, French)
      •  Turkey (Turkish)
      •  United Kingdom
      • Asia Pacific
      •  Australia
      •  China
      •  Hong Kong
      •  India
      •  Korea (Korean)
      •  Malaysia
      •  New Zealand
      •  Philippines
      •  Singapore
      •  Taiwan
      •  Thailand (Thai)
      • Americas
      •  Brazil (Portuguese)
      •  Canada
      •  Mexico (Spanish)
      •  United States
      Can't find the country/region you're looking for? Visit our export site or find a local distributor.
  • Translate
  • Profile
  • Settings
Open Arduino
  • Challenges & Projects
  • Project14
  • Open Arduino
  • More
  • Cancel
Open Arduino
Blog Intelligent Hall Light
  • Blog
  • Forum
  • Documents
  • Events
  • Polls
  • Files
  • Members
  • Mentions
  • Sub-Groups
  • Tags
  • More
  • Cancel
  • New
Join Open Arduino to participate - click to join for free!
  • Share
  • More
  • Cancel
Group Actions
  • Group RSS
  • More
  • Cancel
Engagement
  • Author Author: mcb1
  • Date Created: 6 Apr 2018 1:06 PM Date Created
  • Views 1398 views
  • Likes 11 likes
  • Comments 2 comments
  • neopixel
  • arduino_classic
  • openarduinoch
  • digispark
  • pir sensor
Related
Recommended

Intelligent Hall Light

mcb1
mcb1
6 Apr 2018
image

Open Arduino

Enter Your Project for a chance to win a grand prize for the most innovative use of Arduino or a $200 shopping cart! The Birthday Special: Arduino Projects for Arduino Day!

Back to The Project14 homepage image

Project14 Home
Monthly Themes
Monthly Theme Poll


This project started as an exercise playing with Neopixels.


We were having issues with the existing Hall Light we have and the constant lamp deaths.

Each time you went to buy a new lamp, a replacement device was cheaper.


I thought about using a cheap PIR coupled with a controller and neopixels.

Normally it would be dull and when triggered would steadily increase in brightness.


HARDWARE

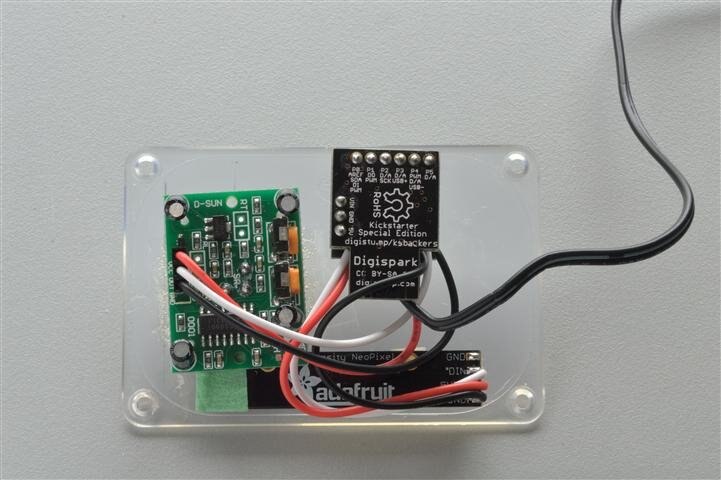
Simple choice really use a Digispark

There is only two I/O required, one input for the PIR trigger, and an Output to drive the NeoPixels.


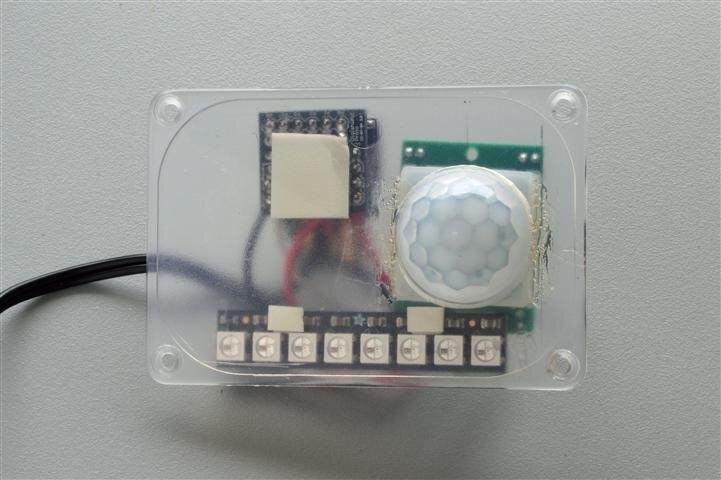
The case was something I had used in a previous Design Challenge eLDERmon  EnOcean Sensors 4 and it still had the PIR.

Recycling or re-purposing has wonderful benefits sometimes.


During that challenge I came up with solution to fit a PIR detector just above a power outlet.


image


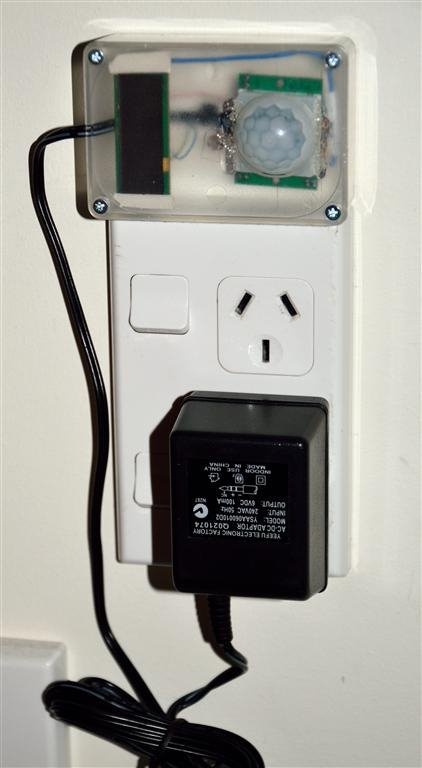
It is a piece of plastic cut to fit behind the power socket, with the housing stuck to it with double sided tape.

image


Some double sided foam tape help secure the Digispark and Neopixels in place for the trial.

imageimage

About this stage I was getting the questions from the other half about why do we need this, how is that going to help, etc.


SOFTWARE

For once the software was relatively easy.

If there is nothing detected then the pixels are red with reduced brightness.


A Heartbeat changes one pixel to white every second and travels across the pixels.


When the PIR detects movement, the pixels change to white and ramp up to full brightness over 8-9 secs.


CODE


/*

      Combining a PIR sensor to NeoPixel to produce a night light for the Hallway.
      If the PIR senses movement it slowly ramps up to white.
      Once the trigger disappears it changes to RED.
 
   Pin assignments
   P0  NeoPixels Data
   P1  
   P2  PIR sensor
   P3  
   P4  
   P5  
   
   
   Created 14 April 2016
   by Mark Beckett
 
   Version
   0.1  Initial Code  started 14 April 2016
  
   
   ---------------------------------------------------
   To Do :

   */

  #include <adafruit_neopixel.h>
  #define PIN 0                           // neopixels are on this pin
  #define NUM_LEDS 8                      // How many leds in your strip?
  
  const int Pir_Trigger = 2;              // PIR output goes high when triggered
  ;const int ledpin = 13;
  int PIRState = 0;
  int ONMode ;                            // 1 = triggered (white), 0 = NIGHT mode (red)
  unsigned long TriggerTime;              // Time when PIR triggered
  unsigned long ONModeTime = 15000;       // Time the NEOPIXEL stays ON in MilliSecs
  unsigned long lastCheckTime;
  
  byte BrightnessVal = 32;        // (0-255) Brightness setting for NIGHT Mode (255 = full, 128 = half, 64 = 1/4) 
  byte HeartBeatLED = 0;          // (0-255) used to determine which LED to make white for the heartbeat

  
  // Parameter 1 = number of pixels in strip
  // Parameter 2 = Arduino pin number (most are valid)
  // Parameter 3 = pixel type flags, add together as needed:
  //   NEO_KHZ800  800 KHz bitstream (most NeoPixel products w/WS2812 LEDs)
  //   NEO_KHZ400  400 KHz (classic 'v1' (not v2) FLORA pixels, WS2811 drivers)
  //   NEO_GRB     Pixels are wired for GRB bitstream (most NeoPixel products)
  //   NEO_RGB     Pixels are wired for RGB bitstream (v1 FLORA pixels, not v2)
  Adafruit_NeoPixel strip = Adafruit_NeoPixel(NUM_LEDS, PIN, NEO_GRB + NEO_KHZ800);


  /*
    IMPORTANT: To reduce NeoPixel burnout risk, add 1000 uF capacitor across
    pixel power leads, add 300 - 500 Ohm resistor on first pixel's data input
    and minimize distance between Arduino and first pixel.  Avoid connecting
    on a live circuit...if you must, connect GND first.
  */
  
  void setup() 
  {
    strip.begin();
    strip.show();

    // PIR trigger goes HIGH if it is set off and stays HIGH until it times out.
    pinMode (Pir_Trigger, INPUT);
    digitalWrite (Pir_Trigger, LOW);   // internal pull-down otherwise the pin floats.
    Display_NIGHTMode();               // ensure we start in NIGHT mode
  }

  void loop() 
  { 
   // You must read the pin state to know what it is.  
   PIRState = digitalRead(Pir_Trigger);
  
   if(PIRState == HIGH)               // PIR is triggered
   {
     TriggerTime = millis();
     if(ONMode == 0)
     {
       Display_ONMode();
       ONMode = 1;     // Set to ON mode for timeout to work.
     }
   }

   if((PIRState == LOW)&& ONMode == 1)    // PIR not triggered but still not NIGHT mode.
   {
     if ((millis() - TriggerTime) > ONModeTime)
     {
       Display_NIGHTMode();
       ONMode = 0;    // Set to NIGHT mode.
     }
   }

    // show that it is working
    if (((millis() - lastCheckTime) > 1000) && ONMode == 0)  // Every second while in NIGHT mode.
    { 
     Heartbeat();
     lastCheckTime = millis();
    }
  }
 
  void Heartbeat()
  {
    strip.setPixelColor(HeartBeatLED, 255,0,0);          // red
    strip.show();
    
    if (HeartBeatLED < (NUM_LEDS-1))
    {
      HeartBeatLED ++;                          // used to determine which LED is the Heartbeat
    }
    else
    {
      HeartBeatLED = 0;
    }
    strip.setPixelColor(HeartBeatLED, 255,255,255);     // white
    strip.show();
  }
    
  void Display_ONMode()
  {
    //Brightness setting 255 = full, 128 = half, 64 = 1/4, 32 =1/8, 16 = 1/16
    for (int j=3; j<=255; j=j+4) //steps from 3 to 255 in steps of 4
    {
      for (int i=0; i      {
        strip.setPixelColor(i, 255, 255, 255);          // white
        strip.setBrightness(j);
        strip.show();
      }
      delay(150);
    }
  }
  
  void Display_NIGHTMode()
  {
    for (int i=0; i    {
      strip.setPixelColor(i, 255, 0, 0);          // red
      strip.setBrightness(BrightnessVal);         // use default setting 
      strip.show();
    }

  }


VIDEO

So three cameras later and my D3200 had to be used.

Poor Lighting then bright lights must be the videographers nightmare.


You don't have permission to edit metadata of this video.
Edit media
x
image
Upload Preview
image


I know it has inspired someone to copy and modify it.

He was rather shocked at how easy it was.


Cheers

Mark

  • Sign in to reply

Top Comments

  • genebren
    genebren over 7 years ago +2
    Mark, Very nice solution. I really like your thinking process on a lot of your projects. On this one, I really liked your heartbeat solution. It is very clever to use existing devices to produce a meaningful…
  • mcb1
    mcb1 over 7 years ago +2
    Video added. What a nightmare trying to find a camera that could handle it. Not a great production but it gives an idea. Mark
  • mcb1
    mcb1 over 7 years ago

    Video added.

    What a nightmare trying to find a camera that could handle it.


    Not a great production but it gives an idea.


    Mark

    • Cancel
    • Vote Up +2 Vote Down
    • Sign in to reply
    • More
    • Cancel
  • genebren
    genebren over 7 years ago

    Mark,

    Very nice solution.  I really like your thinking process on a lot of your projects.  On this one, I really liked your heartbeat solution.  It is very clever to use existing devices to produce a meaningful status as opposed to just adding more parts.  By sweeping the LEDs as status, you create a clear indication that all is well with no added parts.

    Well done!

    Gene

    • Cancel
    • Vote Up +2 Vote Down
    • Sign in to reply
    • More
    • Cancel
element14 Community

element14 is the first online community specifically for engineers. Connect with your peers and get expert answers to your questions.

  • Members
  • Learn
  • Technologies
  • Challenges & Projects
  • Products
  • Store
  • About Us
  • Feedback & Support
  • FAQs
  • Terms of Use
  • Privacy Policy
  • Legal and Copyright Notices
  • Sitemap
  • Cookies

An Avnet Company © 2025 Premier Farnell Limited. All Rights Reserved.

Premier Farnell Ltd, registered in England and Wales (no 00876412), registered office: Farnell House, Forge Lane, Leeds LS12 2NE.

ICP 备案号 10220084.

Follow element14

  • X
  • Facebook
  • linkedin
  • YouTube