element14 Community
element14 Community
    Register Log In
  • Site
  • Search
  • Log In Register
  • About Us
  • Community Hub
    Community Hub
    • What's New on element14
    • Feedback and Support
    • Benefits of Membership
    • Personal Blogs
    • Members Area
    • Achievement Levels
  • Learn
    Learn
    • Ask an Expert
    • eBooks
    • element14 presents
    • Learning Center
    • Tech Spotlight
    • STEM Academy
    • Webinars, Training and Events
    • Learning Groups
  • Technologies
    Technologies
    • 3D Printing
    • FPGA
    • Industrial Automation
    • Internet of Things
    • Power & Energy
    • Sensors
    • Technology Groups
  • Challenges & Projects
    Challenges & Projects
    • Design Challenges
    • element14 presents Projects
    • Project14
    • Arduino Projects
    • Raspberry Pi Projects
    • Project Groups
  • Products
    Products
    • Arduino
    • Avnet Boards Community
    • Dev Tools
    • Manufacturers
    • Multicomp Pro
    • Product Groups
    • Raspberry Pi
    • RoadTests & Reviews
  • Store
    Store
    • Visit Your Store
    • Choose another store...
      • Europe
      •  Austria (German)
      •  Belgium (Dutch, French)
      •  Bulgaria (Bulgarian)
      •  Czech Republic (Czech)
      •  Denmark (Danish)
      •  Estonia (Estonian)
      •  Finland (Finnish)
      •  France (French)
      •  Germany (German)
      •  Hungary (Hungarian)
      •  Ireland
      •  Israel
      •  Italy (Italian)
      •  Latvia (Latvian)
      •  
      •  Lithuania (Lithuanian)
      •  Netherlands (Dutch)
      •  Norway (Norwegian)
      •  Poland (Polish)
      •  Portugal (Portuguese)
      •  Romania (Romanian)
      •  Russia (Russian)
      •  Slovakia (Slovak)
      •  Slovenia (Slovenian)
      •  Spain (Spanish)
      •  Sweden (Swedish)
      •  Switzerland(German, French)
      •  Turkey (Turkish)
      •  United Kingdom
      • Asia Pacific
      •  Australia
      •  China
      •  Hong Kong
      •  India
      •  Korea (Korean)
      •  Malaysia
      •  New Zealand
      •  Philippines
      •  Singapore
      •  Taiwan
      •  Thailand (Thai)
      • Americas
      •  Brazil (Portuguese)
      •  Canada
      •  Mexico (Spanish)
      •  United States
      Can't find the country/region you're looking for? Visit our export site or find a local distributor.
  • Translate
  • Profile
  • Settings
Programmable Logic
  • Challenges & Projects
  • Project14
  • Programmable Logic
  • More
  • Cancel
Programmable Logic
Blog VidorScout - MKR Vidor 4000 Mobile Robot: Camera QR Code Recognition
  • Blog
  • Forum
  • Documents
  • Events
  • Polls
  • Files
  • Members
  • Mentions
  • Sub-Groups
  • Tags
  • More
  • Cancel
  • New
Join Programmable Logic to participate - click to join for free!
  • Share
  • More
  • Cancel
Group Actions
  • Group RSS
  • More
  • Cancel
Engagement
  • Author Author: jomoenginer
  • Date Created: 30 Jun 2019 11:58 PM Date Created
  • Views 3237 views
  • Likes 10 likes
  • Comments 5 comments
  • programmablelogicch
  • mkr_vidor
  • mkr vidor 4000
  • machine vision
  • fpga
  • mobile robot
  • arduino vidor
  • ov5647 camera
Related
Recommended

VidorScout - MKR Vidor 4000 Mobile Robot: Camera QR Code Recognition

jomoenginer
jomoenginer
30 Jun 2019

MKR Vidor 4000 Camera Example


The Arduino MKR Vidor 4000 is not only the first in the Arduino MKR series to provide a FPGA option, it also as the option to add a camera via a MIPI connector near the Mini PCIe connector.  With the assistance of the onboard FPGA, this allows the Vidor 4000 to be used in a variety of computer vision applications. This can include facial recognition, obstacle navigation and avoidance as well as object detection.  There are two examples that are provided by Arduino as a starting point for computer vision with the MKR Vidor 4000;   VidorEnableCam and VidorQrRecognition.  The VidorEnableCam example is a good test to verify the camera option of the MKR Vidor 4000 and the VidorQrRecognition adds QR Code Recognition to this as well as demonstrates the capability to add imagery on top of the camera image. The VidorQrRecognition will be used in this example as well as a bit of NeoPixel functionality.


Related Posts

VidorScout - MKR Vidor 4000 Mobile Robot: Intro

VidorScout - MKR Vidor 4000 Mobile Robot: VidorBitstream compile

VidorScout - MKR Vidor 4000 Mobile Robot: Assembly and Test


VidorEnableCam

https://www.arduino.cc/en/Tutorial/VidorEnableCam


VidorQrRecognition

https://www.arduino.cc/en/Tutorial/VidorQrRecognition


Hardware Required


  •     Arduino MKR Vidor 4000
  •     Omnivision OV5647 camera or Raspberry Pi Camera V1 (OV5647)
    • Used :
      • MakerFocus Camera IR Fisheye Wide-Angle 175 Degree 5MP OV5647 Webcam Built-in IR-Cut
  •     micro-HDMI to HDMI cable or adapter
  •     Monitor with HDMI input
  •    NeoPixel Strip - Addressable 24-Bit RGB LED Strip (White PCB), WS2812B (WS2811)


Hardware Set-up


  To demonstrate the VidorQrRecognition capabilities of the MKR Vidor 4000, a MakerFocus 5MP OV5647 Camera was used. At this time, the examples provided from the Arduino Libraries only support the OV5647 sensor which was used in the v1.x of the Raspberry Pi Camera module, thus the v2.x Raspberry Pi Camera will not work with the code provided without modifying the code.


   MakerFocus 5MP OV5647 Camera and  MKR Vidor 4000

image


    The O5647 camera connects to the MKR Vidor 4000 at the J8 MIPI camera connector near the Mini PCIe connection (J2) .

    Note the orientation of the blue tab on the camera cable.

image


    Connect a micro-HDMI to HDMI cable to a computer monitor.

    NOTE: It took testing with 3 different monitors before an image was seen from the MKR Vidor 4000. The default resolution is  640x480@60Hz .


   MakerFocus IR Fisheye Wide-Angle 175 Degree 5MP OV5647 Camera also comes with 2 large IR sensors that mount on each side of the Camera PCB. These will not be used in this example.  Also, the NeoPixel Strip is connected to A6 of  MKR Vidor 4000 with a 470 Ohm resistor.

image


Connect the MKR Vidor4000 to a computer using a USB to USB-micro cable.


Vidor example install


If not completed already, add the VidorGraphics and VidorPeripheral libraries to the Arduino IDE; see the Intro from the Related Posts list.

For this example, the VidorGraphics, VidorCamera and Vidor_NeoPixel libraries were used.

NOTE: There is a difference between the VidorGraphics examples from the VidorBitstream code and the current released version that is added by the Arduino IDE libraries. Thus, if the VidorGraphics examples are from the VidorBitstream process and code was created from the original examples, a few changes will be necessary since the older code will not compile or run with the newer code.


Diff between original and VidorBitstream VidorQrRecognition Arduino code.


  A comment added to top of new code.

image


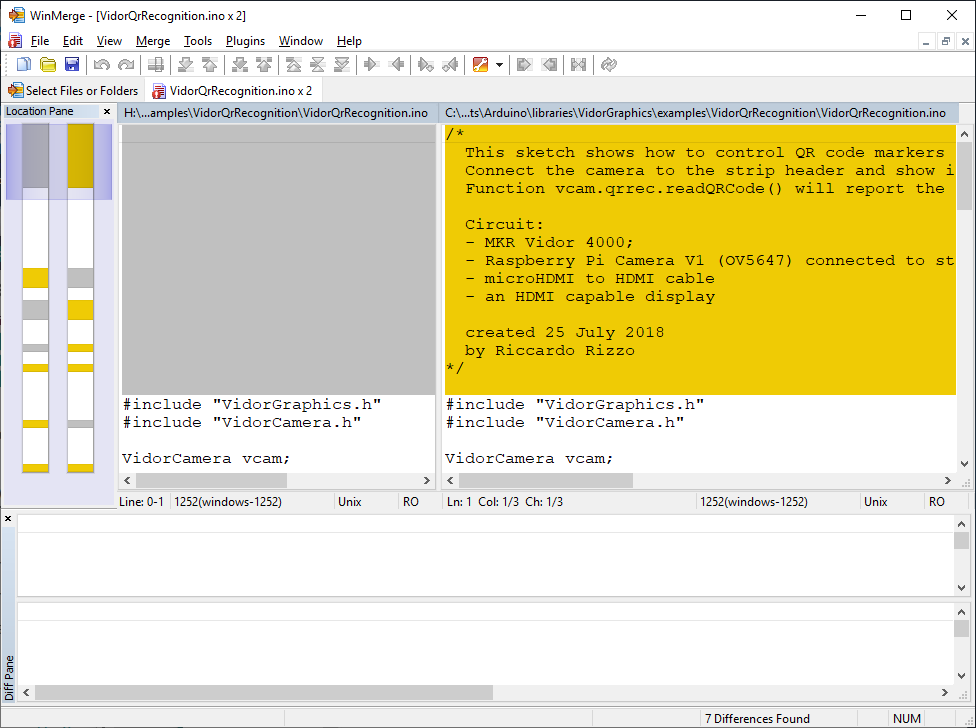
  The wait for Serial was removed and a "vcam.vgfx.begin() was added to initialize the video subsystem.

image


  New code adds "vcam.qrrec.draw()" to enable the camera output for QR code recognition.


image


VidorQrRecognition example


Description of the VidorQrRecognition example can be found on the Arduino site at the following link.

https://www.arduino.cc/en/Tutorial/VidorQrRecognition


image


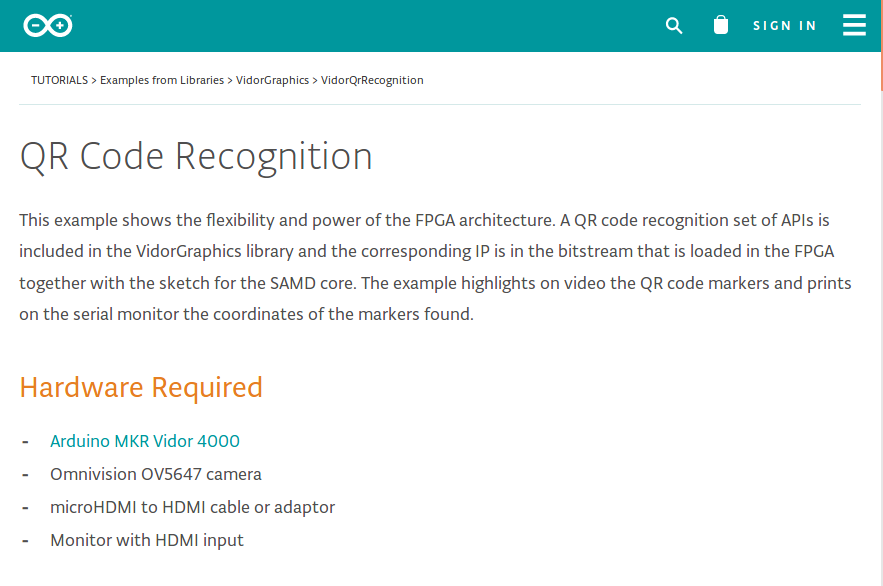
The VidorQrRecognition example demonstrates the interaction between the FPGA BitStream code and the Arduino libraries by recognizing the markers on a QR code and then displaying cross hair images where the QR code markers are located on the screen.  Also, the example was modified to indicate when the QR code markers are found, a NeoPixel LED will light and thus blink accordingly.

If the QR code is covered, then the Cross hair are not displayed on screen and the NeoPixel LED does not blink.  Expose the QR code again and the QR code marker indicators are seen again.


To perform the demonstration, a RadioShack Helping Hand was used to hold the MakerForce camera module and a QR code was created from the works "MKR Vidor 4000".  The image is displayed on an HDMI Monitor and a webcam was used to capture it.


image


   QR Code markers found and NeoPixel LED lights red

image


Video Demo of the VidorQrRecognition example.


You don't have permission to edit metadata of this video.
Edit media
x
image
Upload Preview
image


Next Step

Assemble chassis and mount motors and IR sensors.

  • Sign in to reply

Top Comments

  • aabhas
    aabhas over 6 years ago +3
    Hi jomoenginer Great update ,even I tried raspberry pi camera v1 with mkr vidor 4000 board and it worked fine with QR code recognition, but when I installed Intel Quartus Lite on my Laptop it didn't open…
  • dubbie
    dubbie over 6 years ago +2
    Very interesting. I did a little bit of image processing in the past with black and white images and MATLAB. This might be something that I could use to pick up on that work - which was only for fun, nothing…
  • jomoenginer
    jomoenginer over 6 years ago in reply to aabhas +2
    I'm not quite sure what you mean by "it didn't open at all." Did Quartus not open or did you try to open an example? I have link in this blog post to a previous post I did using the VidorBitstream repo…
  • saiidabifarraj
    saiidabifarraj over 3 years ago

    hello 
    need your help 
    i need to read the QR code not only recognize

    regards

    • Cancel
    • Vote Up 0 Vote Down
    • Sign in to reply
    • More
    • Cancel
  • jomoenginer
    jomoenginer over 6 years ago in reply to aabhas

    I'm not quite sure what you mean by "it didn't open at all."  Did Quartus not open or did you try to open an example?


    I have link in this blog post to a previous post I did using the VidorBitstream repo and following the instructions from that to build the code. 

    VidorScout - MKR Vidor 4000 Mobile Robot: VidorBitstream compile


    However, the code provided by Arduino has limitations due to a licensing issue with Quartus II Lite.


    Someone forked the Arduino VidorBitstream code and modified it so it uses the FPGA to bypass the limitation and this code does load and work fine.  I did not update my post yet but that code can be found here:

    https://github.com/MinatsuT/VidorBitstream_GFX_HW

    • Cancel
    • Vote Up +2 Vote Down
    • Sign in to reply
    • More
    • Cancel
  • aabhas
    aabhas over 6 years ago

    Hi jomoenginer

    Great update ,even I tried raspberry pi camera v1 with mkr vidor 4000 board and it worked fine with QR code recognition, but when I installed Intel Quartus Lite on my Laptop it didn't open at all , were you able to use the Quartus software for use of FPGA in Vidor 4000.

    Thanks

    Aabhas Senapati

    • Cancel
    • Vote Up +3 Vote Down
    • Sign in to reply
    • More
    • Cancel
  • dubbie
    dubbie over 6 years ago

    Very interesting. I did a little bit of image processing in the past with black and white images and MATLAB. This might be something that I could use to pick up on that work - which was only for fun, nothing serious.


    Dubbie

    • Cancel
    • Vote Up +2 Vote Down
    • Sign in to reply
    • More
    • Cancel
  • genebren
    genebren over 6 years ago

    Nice work!  It will interesting to see where you go with this.


    Gene

    • Cancel
    • Vote Up +1 Vote Down
    • Sign in to reply
    • More
    • Cancel
element14 Community

element14 is the first online community specifically for engineers. Connect with your peers and get expert answers to your questions.

  • Members
  • Learn
  • Technologies
  • Challenges & Projects
  • Products
  • Store
  • About Us
  • Feedback & Support
  • FAQs
  • Terms of Use
  • Privacy Policy
  • Legal and Copyright Notices
  • Sitemap
  • Cookies

An Avnet Company © 2025 Premier Farnell Limited. All Rights Reserved.

Premier Farnell Ltd, registered in England and Wales (no 00876412), registered office: Farnell House, Forge Lane, Leeds LS12 2NE.

ICP 备案号 10220084.

Follow element14

  • X
  • Facebook
  • linkedin
  • YouTube