


 | Enter Your Electronics & Design Project for a chance to win a $200 shopping cart! Back to homepage | Project14 Home |
| Monthly Themes | ||
| Monthly Theme Poll |
The Wio Terminal has both WiFi and Bluetooth capability and I thought that I'd demonstrate both of those features using the Blynk application running on my Android tablet. Blynk is an IOT platform that allows you to create simple projects that allow interaction between mobile devices and IOT hardware via WiFi and Bluetooth https://blynk.io/en/getting-started .
Using Blynk is very straightforward and doesn't require any coding on the mobile device.
Here's a quick description of the steps involved.
- Download the Blynk mobile app - in my case I downloaded it from the Google Play Store for my Android tablet
- Create a new account in the app - just requires a valid email address
- Create a new project - need to specify connection method and device type
- Get Auth Token - this is automatically generated and emailed to you when the project is created
- Install Blynk Library in device IDE - in my case I'm using the Arduino IDE and I installed Blynk version 0.6.1 using the Library Manager (there are libraries available in other programming languages besides C++)
- Create the device program and include the Auth Token (also need to include BlynkSimpleWioTerminal.h which includes the Blynk library) - there were both WiFi and Bluetooth examples available for the Wio Terminal https://wiki.seeedstudio.com/Wio-Terminal-Blynk/
WiFi Test
To demonstrate WiFi connectivity I'm going to modify my MS8607 program to send data via WiFi to the Blynk app.
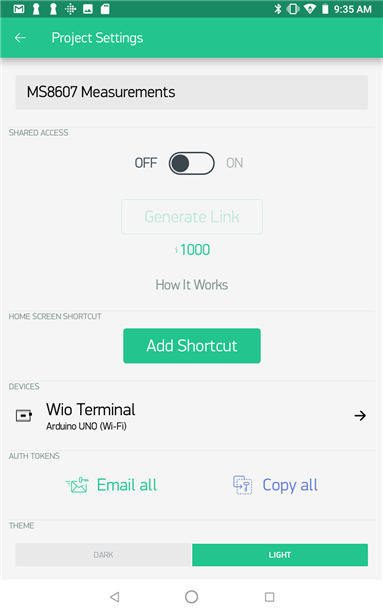
I created the project configured to use WiFi (I selected Arduino Uno for the device since the Wio Terminal isn't listed).
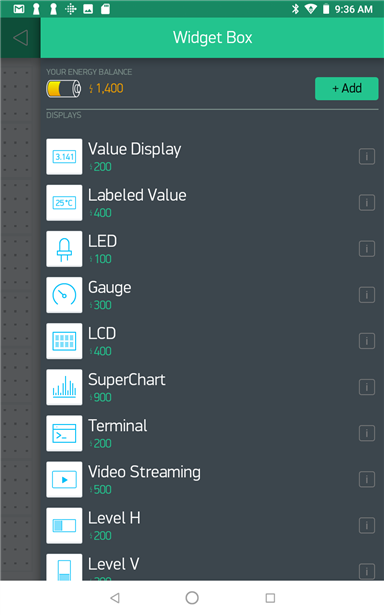
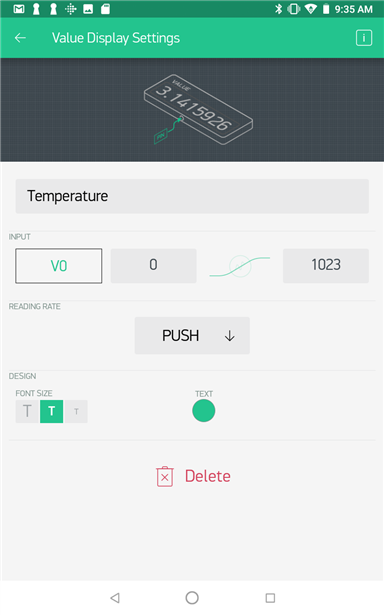
Then added 3 Value Display widgets to display the MS8607 measurements ( simply drag and drop the widgets on the project window).
The widgets are configured to use Virtual Pins.
Here is a screen capture of the project display window from the tablet.
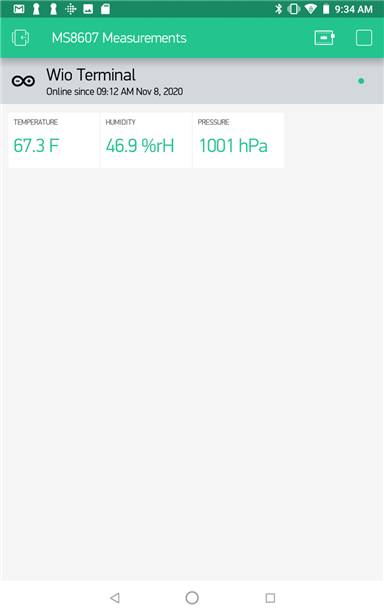
Here is a quick video of the data tracking. I perturbed the readings by touching the sensor but it seems it affected humidity the most.
Arduino code
Wio_Terminal_Blynk_Temperature.ino
#define BLYNK_PRINT Serial

#include <AtWiFi.h>
#include <WiFiClient.h>
#include <BlynkSimpleWioTerminal.h>
#include <Wire.h>
#include <Adafruit_MS8607.h>
#include <Adafruit_Sensor.h>
#include <TFT_eSPI.h>

#if defined(ARDUINO_ARCH_AVR)
    #define debug  Serial

#elif defined(ARDUINO_ARCH_SAMD) ||  defined(ARDUINO_ARCH_SAM)
    #define debug  SerialUSB
#else
    #define debug  Serial
#endif

Adafruit_MS8607 ms8607;
TFT_eSPI tft = TFT_eSPI();

// Your WiFi credentials.
const char* ssid = "xxxxxxxx";
const char* pass = "yyyyyyyy";

// You should get Auth Token in the Blynk App.
// Go to the Project Settings (nut icon).
char auth[] = "aaaaaaaaaaaa";

BlynkTimer timer;

void sendTemperature() {
  float tempC, tempF, humid, press;
  sensors_event_t temp, pressure, humidity;
  ms8607.getEvent(&pressure, &temp, &humidity);

  tempC = temp.temperature;
  tempF = tempC * 9 / 5 + 32;
  humid = humidity.relative_humidity;
  press = pressure.pressure;

  // Display values
  tft.setTextSize(2);

  tft.drawString("Temperature: ",20, 55, 1);
  tft.drawString("Humidity: ", 20, 100, 1);
  tft.drawString("Pressure: ", 20, 145, 1);

  tft.setTextDatum(TR_DATUM);
  tft.setTextPadding(tft.textWidth("999", 1));
  tft.drawNumber(tempF, 255, 55, 1);
  tft.drawNumber(humid, 255, 100, 1);
  tft.setTextPadding(tft.textWidth("99999", 1));
  tft.drawNumber(press, 255, 145, 1);
  tft.setTextPadding(0);
  tft.setTextDatum(TL_DATUM);

  tft.drawString("F", 265, 55, 1);
  tft.drawString("%rH", 265, 100, 1);
  tft.drawString("hPa", 265, 145, 1);

  // Send to Blynk
  // Format: 1 decimal place, add F
  String str = String(tempF, 1) + " F";
  // Send it to the server
  Blynk.virtualWrite(V0, str);
  // Format: 1 decimal place, add %rH
  str = String(humid, 1) + " %rH";
  // Send it to the server
  Blynk.virtualWrite(V1, str);
  // Format: 1 decimal place, add hPa
  str = String(press, 0) + " hPa";
  // Send it to the server
  Blynk.virtualWrite(V2, str);
}

void setup() {
  // Debug console
  debug.begin(115200);
  debug.println("MS8607 Blynk test!");

  tft.init();
  tft.setRotation(3);
  tft.fillScreen(TFT_BLACK);
  tft.setTextSize(1);
  tft.setTextColor(TFT_WHITE, TFT_BLACK);  // Adding a background color erases previous text automatically
  tft.setTextSize(2);
  tft.setTextDatum(TC_DATUM);
  tft.drawString("MS8607 Readings",160, 15, 1);
  tft.setTextDatum(TL_DATUM);


// Try to initialize!
  if (!ms8607.begin()) {
    debug.println("Failed to find MS8607 chip");
    while (1) { delay(10); }
  }
  debug.println("MS8607 Found!");

  Blynk.begin(auth, ssid, pass);
  timer.setInterval(1000L, sendTemperature);
}

void loop() {
  Blynk.run();
  timer.run();
}
No BLE Test yet 

I had planned including a BLE test to control the NeoPixel strip from Blynk in this post but I'm running into a compile error, I'll post when I resolve it. Seems like a simple problem of missing an include file Seeed_erpcUnified.h but I'm having no luck locating it. I'm sure one of the Seeed support people will tell me what I forgot to install.
Blynk observations
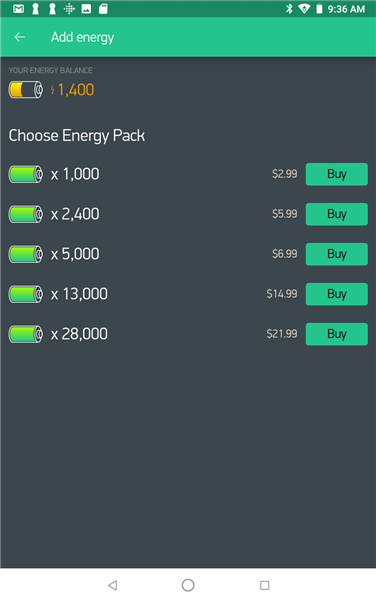
I've used Blynk before but it seems like the app has improved quite a bit (certainly has more widgets and supported boards). It is free if you stay within your "Energy Balance". You'll notice that each widget has a value that shows how much energy is consumed when a widget is used, e.g. each Value Display used 200 units. You get 2000 units for free and need to buy energy beyond that. If you delete projects/widgets you recover the "Energy" used so if you're using Blynk for prototyping it probably isn't an issue. The pricing otherwise is indicated in the app. Very convenient to use. I'm starting to learn Kotlin with Android Studio so I'll probably create my own permanent apps.
Links to related posts